Updated Date: 07/07/2026
Integrating Let's Encrypt with BIG-IQ for Certificate Management
Let’s Encrypt is a certificate authority (CA) for website domains that require HTTPS connections. This global CA can automatically obtain, renew and manage browser-trusted SSL/TLS certificates for Domain Validation. With centralized management, you can provide Let’s Encrypt certificates to several domains using a single CA management profile.
The certificates provided by Let’s Encrypt are valid for 90 days. Following expiration, you must manually provide a key pair that validates the domain’s ownership. BIG-IQ provides CA management profiles, to update and deploy Let’s Encrypt services over the domain’s managing BIG-IP devices. Following initial domain configuration, you can fully, or semi-automate the certificate renewal process to your domains.
- Certificate auto renewal
- Auto renewal invokes certificate renewal, based on the selected number of data prior to certificate expiration. The system automatically retrieves the renewed, valid certificates from Let’s Encrypt.
- Auto deployment over BIG-IP devices
- Auto deployment deploys the updated Let’s Encrypt certificates over the managing BIG-IP devices. The deployment process is invoked following each certificate renewal.
Ensure that you have applied ACME client software to demonstrate control over your website domains, as required by Let’s Encrypt.
Create management profile to for certificate management to your domains that require HTTPS. This process allows you to establish and authenticate a connection between your domain(s), the BIG-IP proxy and the Let’s Encrypt CA provider.
Note: To save your management profile, you must complete the mandatory fields (in yellow), validate the server, select key properties and accept terms and conditions for Let’s Encrypt. Once saved, these fields are locked from editing. The remaining fields and domain configuration can then be completed at a later time.
-
Go to Configuration > LOCAL TRAFFIC > Certificate Management > Third Party CA Management.
The screen lists all third-party CA management profiles.
-
Click Create.
-
From the CA Providers list, select Lets Encrypt.
The screen now provides details specific to Let’s Encrypt.
-
In the Name field enter a unique identifier for the domains requiring the Let’s Encrypt certificate management.
-
Select the user key properties of your domain servers.
-
In the Server field, manually enter the Let’s Encrypt URL, or click Select to select a production or staging option.
-
Click Validate.
The validation process establishes a connection with the Let’s Encrypt servers, to fetch the domain validation resources and the most recent terms and conditions. Once validated, the Terms and Conditions field becomes available.
-
Click the box in the Terms and Conditions.
-
To renew certificates prior to their expiration, enable the Auto Renewal option.
By default, enabling this option automatically renews certificates 7 days before expiration. You can select a longer period of time.
-
To automatically deploy renewed certificates over your BIG-IP devices, enable the Auto Deploy option.
By default, enabling this option automatically deploys renewed certificates at the time 00:00 (midnight) following certificate renewal. You can select a different time of day.
-
Click Save & Close
To immediately connect Let’s Encrypt Web domains click Save and continue.
You have created a new Let’s Encrypt CA management profile.
Connect domains to the new management profile, and add automatic renewal properties to domains in this profile.
You must have a Let’s Encrypt CA management profile configured.
Configure, test, and deploy the domains to your sites that require HTTPS. This process provides the challenge content that validates the connection between the domain’s web server and Let’s Encrypt server.
Note: You need to configure and complete only one challenge to connect Let’s Encrypt and your web domain.
-
Go to Configuration > LOCAL TRAFFIC > Certificate Management > Third Party CA Management, and click the name of your Let’s Encrypt management profile.
-
Establish a connection between your domains and the Let’s Encrypt server:
-
Under the Domain Configuration area, click Create to add a new domain row to the list.
-
Enter the domain name under the Domain Name column.
-
Click Save.
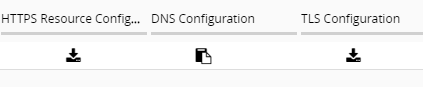
The Let’s Encrypt server returns a challenge authentication set per added domain. These authentication provisioning methods are displayed as icons in each domain row as follows:
-
-
Click the challenge icon, based on your domain configuration.
This generates and downloads/copies the Let’s Encrypt challenge content.
-
Manually enter the challenge content to your domain, based on your domain server’s configuration:
-
HTTP Resource Configuration: Add the downloaded file to your domain web server folder (e.g.
<server root>/.well-known/acme-challenge. -
DNS Configuration: Copies challenge text to your clipboard. Modify the domain’s DNS record to include the copied challenge content.
-
TLS Configuration: Provides a .cert and .key download option. The certificate needs to be installed on the domain servers, which Let’s Encrypt uses to establish a trusted connection. The key is a private key.
For more information about Let’s Encrypt challenge types, go to https://letsencrypt.org/docs/challenge-types/.
Note: One challenge configuration is required per domain. It is not recommended to use multiple challenge types, as Let’s Encrypt will invalidate multiple challenges, such that it will process only one.
Note: For initial configuration, you must manually complete this process, even if you have already configured an API endpoint for automatic renewal.
-
-
In the management profile, select the box for each domain row that you manually configured in step 4.
-
Click Test Connection
If the manual connection between the domain and Let’s Encrypt is successful, the Connection Status column will be marked as valid.
-
If you have developed a domain-specific API endpoint, that can automate the challenge renewal process, you can implement these values per domain row:
This API must be developed and added to the web application such that the custom API can renew the challenge for the specified challenge type.
Note: To view examples of domain-specific API endpoints, see API endpoints for Let’s Encrypt challenge renewal.
-
Enter (or paste) your API under the API End Point column.
-
If your domain requires a user name and password, enter the information in each column.
-
Click Save.
-
Click Deploy & Test
-
-
Click Save.
The configured domains have established a valid connection with the Let’s Encrypt server.
Once the domain connection is complete, configure a certificate signing request (CSR) to retrieve Let’s Encrypt certificates via the domains’ BIG-IP devices.
The following are descriptions and samples of domain-specific API endpoints you can develop and add to your web application for automatic challenge deployment. The API endpoints will allow BIG-IQ to pass the challenge to Let’s Encrypt’s API though the POST body. For more information about connecting Let’s Encrypt to web domains, see Connect Let’s Encrypt to web domains. For more information about Let’s Encrypt challenge types, go to https://letsencrypt.org/docs/challenge-types/.
Note: Configuring an API endpoint for automated deployment of a Let’s Encrypt challenge is optional. You can manually generate and deploy a new challenge file to Let’s Encrypt each time challenge expires.
As BIG-IQ is a proxy used to deploy challenge contents between your web domain and Let’s Encrypt, BIG-IQ will require administrative access to your domain. It is therefore important to select a challenge type that suits your domain. To reduce security risk when using an API for auto deployment, review the POST attributes in the sample API endpoints below.
Select one of the following protocols to automate the Let’s Encrypt challenge using an API endpoint. It is not recommended to use multiple challenge types, as Let’s Encrypt will ultimately use only one, and invalidate an additional challenge types.
Create an API enpoint that automatically accesses the challenge file over the HTTP protocol. This API must be developed and added to the web application such that the custom API can create the challenge. To do so, you must first download the challenge file (see Connect Let’s Encrypt to web domains, step 4a for more information). Once you have the challenge file, place it in the Web application folder: <server root>/.well-known/acme-challenge/”.
Once you have added the file, you can create the API endpoint using the following sample:
    "challenges": [
        {
            "type": "http",
            "content": "<http challenge content>"
            "fileName": "<file name – first part of http content>",
        }
]Create an API endpoint that automatically pulls the challenge text from the domain server DNS configuraiton. You can copy the DNS challenge text to your system’s local clip board (see Connect Let’s Encrypt to web domains, step 4b for more information). Once you have copied the text, you can add it to the domain server’s DNS configuration.
Once you have added the challenge text, you can create the API endpoint using the following sample:
    "challenges": [
        {
            "type": "dns",
            "content": "<DNS text>"
        }
]Create an API endpoint that automatically pulls a password encrypted certificate and private key. When you click the TLS download option, you will be able to download the .cert and .key files. (see Connect Let’s Encrypt to web domains, step 4c for more information). Once you have downloaded the files, you install the .cert file on the domain server. This allows Let’s Encrypt to establish a trusted connection with your domain.
Once you have added the certificate, you can create the API endpoint using the following sample:
    "challenges": [
        {
            "type": "tls",
            "content": "<TLS challenge cert content>"
            "keyContent": "<TLS challenge key content>",
        }
]You must connect the web domain and the Let’s Encrypt server before applying the CSR.
Create a new signed certificate and key to request and import Let’s Encrypt certificates to your managed BIG-IP devices.
Note: To save your CSR, you must complete the mandatory fields (in yellow).
-
On the left, click LOCAL TRAFFIC > Certificate Management > Certificates & Keys.
-
Click the name of the certificate.
-
If the partition used for the managed BIG-IP device is anything other than Common, type it into the Partition field.
-
From the Issuerlist, select the Let’s Encrypt CA.
-
From the Common Name field, select the domain that receives the certificate and key from Let’s Encrypt.
-
From the Key Properties area, ensure Key Type and Key Size fields match the corresponding domain’s CA management details.
-
If your key is password protected, enter a value that corresponds with the listed password policy.
-
Click Save.
BIG-IQ generates the CSR, on behalf of the domain, and sends it to Let’s Encrypt for signed certificates.
Refresh the domain challenge content to renew an expired Let’s Encrypt connection with host domains.
-
Go to Configuration > LOCAL TRAFFIC > Certificate Management > Third Party CA Management, and click the name of your Let’s Encrypt management profile.
-
Under the Domain Configuration area, click Reconfigure.
Domains with expired challenge content are updated and their displayed status is replaced with icons to download/copy the new challenge content. This updates the entire grid, regardless of row selection.
-
Manually enter the new challenge content, based on the domain’s server configuration.
-
In the CA management profile, select the rows that were updated in step 3.
-
Click Test Connection.
The Connection Status column is now marked as valid.
-
Click Save.
Domains with expired challenge content are now up to date and can pair with the Let’s Encrypt Server.