Updated Date: 07/07/2026
Deploying Multiple AS3 Objects of the Same Type
You can complete this task to gain a better understanding of how AS3 objects, classes, and properties interact to deploy multiple objects of the same type (for example monitors or profiles). In this example, we’ve deployed a server and it is running two different services. To insure the health of that server, we need to deploy a monitor for each service.
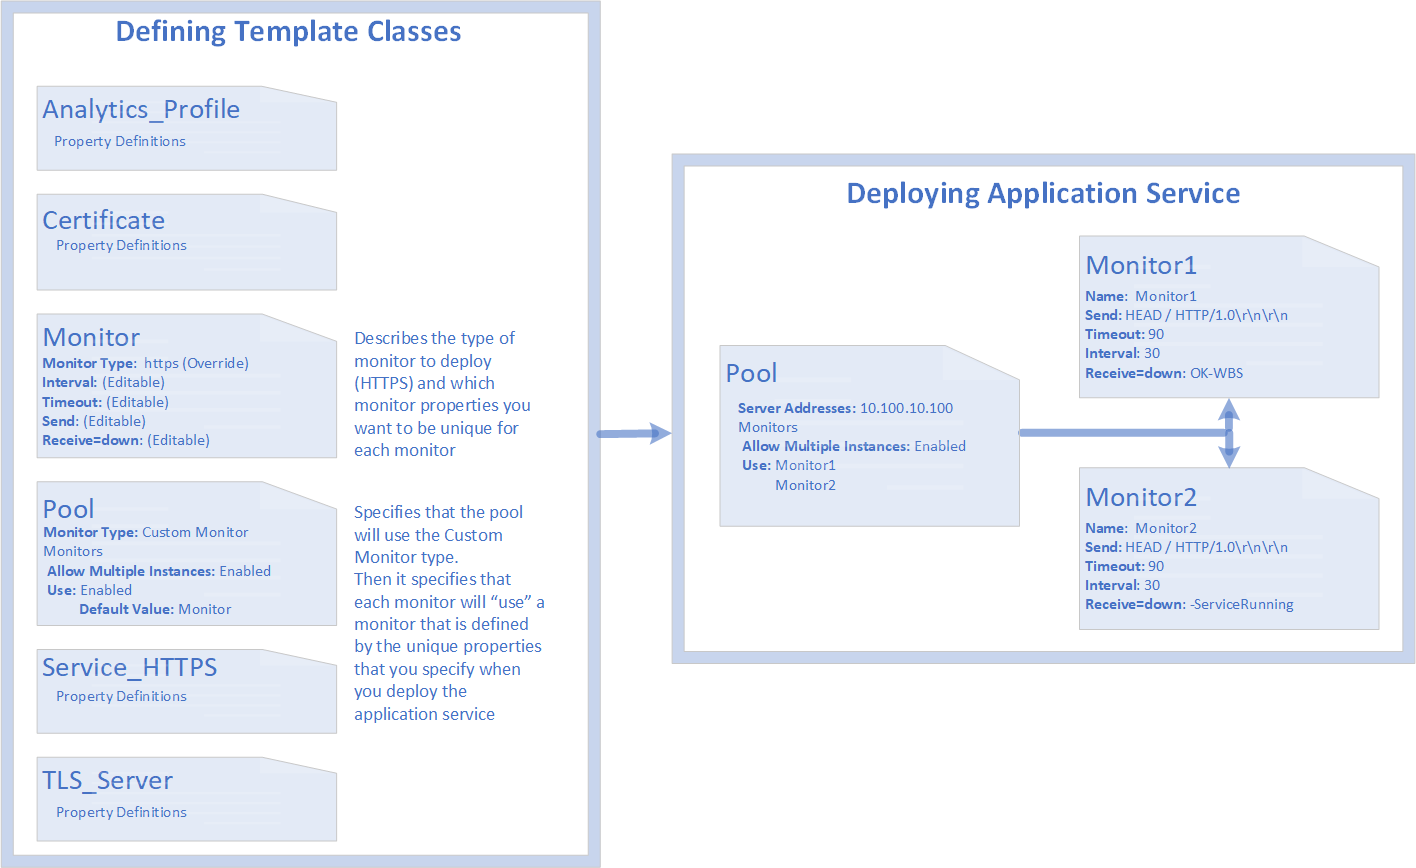
The following illustration describes how BIG-IQ uses the AS3 class property definitions you make in the template to create an application service with multiple monitors. The same concepts apply when you need to deploy multiple instances of other objects (like profiles or.iRules).
You can deploy these monitors in two simple steps.
- Create an AS3 application template that includes multiple instances of the monitor class type. As shown in the illustration, when you define the properties for the monitor and pool classes in the template, you specify that you want multiple monitors and the unique properties that each monitor needs.
- Next you use the template you just created to deploy an application service to your BIG-IP, specifying the values of those unique properties for each monitor.
Before you perform this sample task, you must have user permissions to access the resources (templates, devices, etc.) needed to deploy the application.
In this task, you create an AS3 application template that includes multiple instances of a single class type (monitors).
-
At the top of the screen, click Applications, then, on the left, click APPLICATION TEMPLATES.
The screen lists the AS3 and service catalog templates defined on this BIG-IQ.
-
Select the AS3 template named
AS3-F5-HTTPS-offload-lb-existing-cert-template-big-iq-defaultand then click Clone. -
In the popup screen, type the Name that you want to use for the new template, and then click Clone.
BIG-IQ creates a clone of the AS3 template. Next, we’ll edit it.
-
Click the name of the new AS3 template you just created.
The Properties area lists the classes included in this template.
-
Type a name for the Tenant and clear the Editable check box.
-
Next to Classes click Add/Remove to display the AS3 class types available for this template.
-
In the popup screen, scroll down to Monitors, select its check box, then click Save.
BIG-IQ displays the Properties page for the first class defined in this template (Analytics_Profile). For this example, we need to revise two of these classes.
-
Under Properties, select Monitor.
BIG-IQ displays the Monitor Properties page.
-
Specify the required default property values and the properties BIG-IQ will use when you deploy the application service.
-
For Monitor type, select https.
-
Select the Editable check box for the following properties: Interval, Timeout, Send, and Receive = down.
-
Click Save.
When you use this template to deploy an application, BIG-IQ displays only the properties you selected. Because you specified a value for the type of monitor but did not make the property editable, you won’t need to specify the kind of monitors when you deploy the application.
-
-
Under Properties, select Pool.
BIG-IQ displays the properties page for the Pool class.
-
Under Properties, for Monitor Types, select Custom Monitor.
-
Under Monitors:
-
For Allow Multiple Instances, select Enable
-
For Use, select Editable, and then type in
Monitorfor the default value.
-
-
Click Publish & Close.
That’s all of the changes needed for the template, so now you can use it to create the application service.
Before you can perform this sample task, you must have:
- User permissions to access the resources (templates, devices, etc.) needed to deploy the application.
- IP addresses for the virtual server that processes your external traffic for your application service.
- IP addresses for the nodes or servers that process the data for your application service.
This is the second of two tasks you can complete to gain a better understanding of how AS3 objects, classes, and properties work. In this task, you use your new template to deploy an application that includes both monitors to your BIG-IP. When you deploy the service to your BIG-IP, you specify only the properties that are unique to each monitor.
-
At the top of the screen, click Applications then, on the left, click APPLICATIONS.
The screen lists the applications currently defined on this device.
-
Click Create.
The Create Application Service screen opens.
-
Under Application Properties:
-
For Grouping, select New Application.
-
For Application Name, type a name for the new application.
-
For Application Service Method, select Using Templates.
-
-
For the Template Type, select the AS3 template you created in the previous task.
-
Use the Application Service Name and Description fields to identify the new application service.
-
For Target, identify the BIG-IP device to which you want the application to deploy.
-
Under Pool, identify the server and monitors for the application service.
-
For Server Addresses, type the IP address of the virtual server you want to use.
-
For Monitors, in the Use property, type
Monitor1and then click the + button. -
For the second Use value, type
Monitor2.
-
-
Under Monitor, specify the details for the first monitor.
-
For Name, type
Monitor1. -
For Send, type in the string you want to send for this monitor.
-
For Timeout, type
90. -
For Interval, type
30. -
For Receive = down, type
OK-WBS.
-
-
Specify the details for the second monitor.
-
For Name, click the + button to generate a new set of properties and then type
Monitor2. -
For Send, type in the string you want to send for this monitor.
-
For Timeout, type
90. -
For Interval, type
30. -
For Receive = down, type
ServiceRunning.
-
-
Under Service_HTTPS, for Virtual addresses, type the IP address of the virtual sever that you want the HTTPS service to use.
-
You have configured all of the objects needed for this application, so click Create.
BIG-IQ creates the application and deploys the application service to the target you specified.
Before you can view these newly-deployed objects on the Configuration tab, you must rediscover and re-import services for each service impacted by the deployment. Keep in mind that objects deployed with AS3 are view-only on the Configuration tab. To make changes to these objects, you make changes to the AS3 application.