


Updated Date: 07/07/2026
Central Policy Building
Central Policy Builder can predict how to best fine-tune your web application security policy that is shared over multiple BIG-IP devices. You can use the Central Policy Builder feature to perform traffic learning, by receiving the ASM traffic log messages, for the all the policy’s BIG-IP devices, and consolidating the traffic learning suggestions.
How the Central Policy Builder works:
-
Each BIG-IP device sends learning suggestions for a particular policy to the BIG-IQ data collection devices (DCD).
Note: When enabling policy building, it is recommended to that you have an ASM log profile that logs all requests. This allows you to review the requests that may have triggered a policy suggestion.
-
The policy learning suggestions from all BIG-IP devices are combined so that you can view and manage them on the BIG-IQ Centralized Management system.
-
As suggestions are accepted, and the policy is tuned, you can choose to deploy the policy to one or more of the BIG-IP devices configured to use that policy.
If your system requires added security for transactions between BIG-IP and the Central Policy Builder (CPB), you must enable the secure setting on your Data Collection Devices (DCDs), and replace the default SSL certificate with a certificate issued by a trusted CA (Certificate Authority). If you do not perform these procedures, the system will not provide policy suggestions. For more information about configuring CBP, see Configuring Central Policy Builder.
Important: The default CPB is enabled once Web Application Security is activated on the DCD’s services. Do not perform these tasks if you do not require additional security for your CPB connection.
To replace the default SSL certificate, review the following article: K52425065 on support.f5.com.
Note: When replacing the SSL certificate use the procedure Generating a new CSR and a new SSL private key . Do not apply a new self-signed certificate.
To enable a secure connection for CPB on your DCDs, go to System > BIG-IQ DATA COLLECTION > BIG-IQ Data Collection Devices and select the link in the Service column. Once you are on the selected device’s SERVICES screen, click ENABLE for the Secure Policy Builder field. 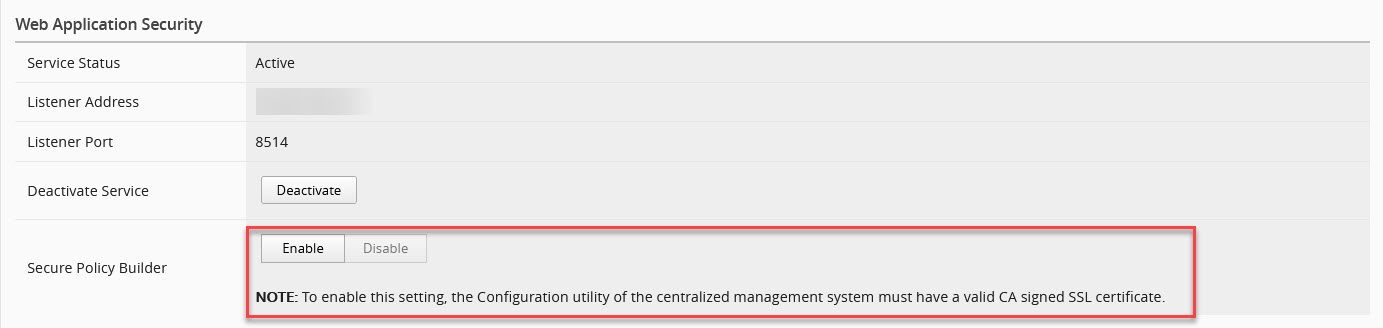
You might see deployments named Auto-Deploy of policies in the list of Web Application Security deployments. Automatic policy deployments occur when you have these policy building settings:
- You have enabled centralized policy building by setting the Policy Building Mode setting to Central.
- You have enabled automatic deployment by setting the Auto-Deploy Policy setting to Real Time or Scheduled.
The BIG-IQ system purges successful automatic deployments from the list of deployments after an hour, and retains failed deployments for a week so that the failure can be resolved if needed. If the deployment task has nothing to deploy, the BIG-IQ system purges it from the list immediately after finishing.
To configure and use central policy building, you need:
-
A BIG-IP version 13.1 or later device with ASM provisioned and licensed.
-
A BIG-IQ Web Application Security service installed and the BIG-IP device discovered and imported.
-
Data collection devices (DCD) configured to your BIG-IQ
Important: Users who managed devices running Web Application Security that require added protection for the connection between BIG-IP and the Central Policy Builder, must enable Secure Policy Builder and replace the default SSL certificate with a certificate issued by a trusted CA (Certificate Authority). If the SSL certificate is not replaced, the system will be unable to provide policy suggestions under Secure Policy Builder. Users who do not enable a secure connection do not need to perform the certificate replacement task.
Replace the default SSL certificate with a new certificate signing request (CSR) and a new SSL private key by a trusted CA (Certificate Authority). For more information about generating and new CSR and a new SSL private key (not self-signed), see: K52425065 on
support.f5.com. -
BIG-IP devices are attached to an Application Security logging profile configured to store all requests. This allows you to review any request that triggered a policy suggestion. To view the status of your logging profile, go to Configuration > SECURITY > Shared Security > Logging Profiles, and select the logging profile configured for application security. Ensure that the Request Type field in the Storage FIlter area is set to All Requests.
Note: *The following is recommended for the learning period before the policy goes into production. Once in production, this process is not recommended, as it is not longer necessary and can consumes a large amount of space.
You use central policy building to combine policy learning suggestions from multiple BIG-IP devices to have more sources for policy suggestions. You configure central policy building by configuring both the data collection devices and the policies that will use central policy building.
-
Configure the data collection devices to be used to collect suggestions from BIG-IP devices.
-
Click System > BIG-IQ DATA COLLECTION > BIG-IQ Data Collection Devices.
-
Click the name of the data collection device you want to use for central policy building.
The data collection device properties screen opens.
-
On the left, click SERVICES, and then on the right, in the Web Application Security area, for the Activate Service setting, click Activate.
Once you activate this service, Central Policy Builder is enabled on the selected DCD.
-
(Optional) To enable a added security for the connection between BIG-IP and Central Policy Builder, select Enable for the Secure Policy Builder setting.
Important: If you enable this option please ensure you have completed the pre-requisites for establishing a secure connection with the DCDs.
-
Save your work.
-
Repeat this process for each data collection device you want to use for central policy building.
-
-
Verify that learning mode is enabled in the Web Application Security policy.
Learning mode must be enabled when using either local or centralized policy building.
-
Click Configuration > SECURITY > Web Application Security > Policies.
-
Click the name of the policy you want to use with central policy building, and then on the left click POLICY PROPERTIES > General Properties.
The general properties screen opens.
-
For the Learning Mode setting, select either Automatic or Manual if one is not already selected.
-
If you made any changes, save your work.
-
-
Enable centralized policy building for the Web Application Security policy.
-
Click Configuration > SECURITY > Web Application Security > Policies.
-
Click the name of the policy you want to use with central policy building, and then on the left click POLICY BUILDING > Settings.
The Settings screen opens.
-
For the Policy Building Mode setting, select Central.
When local policy building is configured, this value is set to Local.
-
Save your work.
-
Repeat this process for each policy that you want to use with central policy building.
-
Central policy building is now enabled for this policy.
You configure the settings of the security policy to specify how the system responds to a request that contains each type of illegal request.
|
Blocking Setting |
Description |
|---|---|
|
Enforcement Mode |
Specify whether blocking is active or inactive for the security policy. - Transparent. Specifies that blocking is disabled for the security policy. This disables blocking for all options on the screen, and the Block check boxes are unavailable.
|
|
Learning Mode |
Specify how learning is, or is not, performed.- Automatic has the system examine traffic, make suggestions, and enforce most suggestions after sufficient traffic over a period of time from various users make it reasonable to add them. A few suggestions must be enforced manually.
|
|
Policy Building Mode |
Specify how policy building is performed. The option you select changes the other settings that are available.- To have policy building occur on the local BIG-IP device, select Local.
|
|
Policy Building Device |
Specify which central policy building device to use. This option is available only when central policy building mode is selected. The policy building device is also a data collection device.- To have the central policy building device chosen automatically, select Auto Select.
|
|
Auto-Deploy Policy |
Specify when learning is automatically applied to the policy, and the policy is automatically deployed.- To have learning applied to the policy and deployed as it occurs, select Real Time.
|
|
Learning Speed |
Select the speed the Policy Builder uses for learning.- To have the Policy Builder learn traffic from a small number of requests, sessions, and IP addresses, select Fast. Using this setting, there is a high chance that the Policy Builder will add false entities to the security policy.
|
|
All Violations |
Select the Learn, Alarm or Block check boxes in this row to have those selections apply to all the violations in this group. You can select or clear these check boxes in the violation rows to change the behavior for individual violations, or groups of violations.- Learn specifies that when a request triggers this violation, the system learns the request.
|
|
Policy General Features |
Expand this setting to see the contained violations. Click the information icon next to each violation for more information about it. Select Learn, Alarm, or Block for each, as appropriate for your policy. |
|
HTTP protocol compliance failed |
Expand this setting to see the sub-violations, and click the information icons for more information.Either select the Enable or Learn check box at the top of the section to select all HTTP protocol compliance failed sub-violations at once, or select the Enable or Learn check box to the left of each sub-violation to specify that the system enforces the sub-violation. When the check box is cleared, the system does not enforce this sub-violation. This category contains the following sub-violations.
|
|
Attack Signatures |
The system examines HTTP messages for known attacks by comparing them against known attack patterns. Click the Edit Settings link to edit the properties of that signature set. |
|
Evasion technique detected |
Expand this setting to see the evasion technique sub-violations and click information icons for more information. Either select the Enable or Learn check box at the top of the section to select all sub-violations at once, or select the Enable or Learn check box to the left of each sub-violation to specify that the system enforces the sub-violation. When the check box is cleared, the system does not enforce this sub-violation. This category contains the following sub-violations.
|
|
File Types |
Expand this setting to see the file type sub-violations, and click information icons for more information. When enabled, the system checks that the requested file type is configured as a valid file type or not configured as an invalid file type. This category contains the following sub-violations. - Illegal query string length. The incoming request contains a query string whose length exceeds the acceptable length specified in the policy.
In the Learn New File Types setting, select under which circumstances the Policy Builder adds, or suggests you add, explicit file types to the security policy. As you select the setting, additional information about the setting is displayed below it. In the Maximum Learned File Types setting, type the maximum number. The default value changes based on the value of the Learn New File Types setting. |
|
URLs |
Expand this area to see the URL sub-violations and click the information icons for more information on each.- In the Learn New HTTP URLs setting, select under which circumstances the Policy Builder adds, or suggests you add, HTTP URLs to the security policy. As you select the setting, additional information about the setting is displayed below it.
|
|
Parameters |
Expand this area to see the parameter sub-violations and click the information icons for more information on each. - In the Learn New Parameters setting, select under which circumstances the Policy Builder adds, or suggests you add, explicit parameters to the security policy. As you select the setting, additional information about the setting is displayed below it.
|
|
Sessions and Logins |
Expand this area to see the session and login sub-violations, and click the information icons for more information on each violation. In the Detect login pages setting, select the Enabled check box to have the Policy Builder detect login pages by examining traffic to the web application. |
|
Cookies |
Expand this area to see the cookie sub-violations and click the information icons for more information on each violation. - In the Learn New Cookies setting, select the circumstances the Policy Builder adds, or suggests you add, explicit cookies to the security policy. As you select the setting, additional information about the setting is displayed below it.
|
|
Content Profiles |
Expand this area to see the content profile sub-violations, and click the information icons for more information on each violation.In the Collapse many common Content Profiles into one wildcard Content profile setting, you specify, when the Enabled check box is selected, that the system collapses many common content profiles into one wildcard content profile. Type in the field how many explicit content profiles the Policy Builder must detect (the number of occurrences) before collapsing them to one wildcard content profile. |
|
Web Services Security Failure |
Expand this area to see the web services security failure sub-violations. At the top of the list of sub-violations, select either the Enable or Learn check box to select all sub-violations at once, or select the Enable or Learn check box to the left of each sub-violation to specify that individual sub-violation.
|
|
CSRF Protection |
Expand this area to see the cross-site request forgery (CSRF) protection sub-violations. Cross-site request forgery (CSRF) is an attack that forces a user to execute unwanted actions on a web application in which the user is currently authenticated. When this setting is enabled, the system protects the web application against CSRF attacks. This category contains the following violations. - CSRF authentication expired. The incoming request may be a Cross-Site Request Forgery (CSRF) attack. The request may come from a clicked link, embedded malicious HTML, or JavaScript in another application, and may involve transmission of unauthorized commands through an authenticated user.
|
|
IP Addresses / Geolocations |
Expand this area to see the IP address and Geolocation sub-violations, and click the information icons for more information on each violation. |
|
Headers |
Expand this area to see the header sub-violations and click the information icons for more information on each violation. In the Learn Host Names setting, Select the Enabled check box to specify that the Policy Builder suggests you add host names that have not yet been added to the policy. |
|
Redirection Protection |
Expand this area to see the redirection protection sub-violations, and click the information icons for more information on each violation. In the Learn New Redirection Domains setting, select under which circumstances the Policy Builder adds, or suggests you add, explicit redirection domains to the policy. As you select the setting, additional information about the setting is displayed below it. In the Maximum Learned Redirection Domains setting, type the largest number of redirection domains that the policy allows. |
|
Bot Detection |
Expand this area to see the WebSocket sub-violations. The Bot Detection category contains the Web scraping detected violation, which detects when the web client, or user agent, does not demonstrate human behavior. |
|
Data Guard |
Expand this area to see the Data Guard sub-violations. The Data Guard category specifies which information the system considers sensitive, including credit card numbers, U.S. Social Security numbers, custom patterns, and file content. This category contains the Data Guard. Information leakage detected violation. |
|
WebSocket protocol compliance |
Expand this area to see the WebSocket protocol compliance sub-violations, and click the information icons for additional information about each violation. |
|
Antivirus Protection |
Expand this area to see the antivirus protection sub-violations, and click the information icons for additional information about each violation. |
You can view and edit the application security policy building settings to specify how the system responds (learn, alarm, or block) to a request that contains each type of illegal request, and to control the policy building process. You edit the blocking settings for each policy object individually.
-
Go to the Blocking Settings screen: click Configuration > SECURITY > Web Application Security > Policies.
-
Click the name of a policy, and from the list on the left select POLICY BUILDING > Settings.
-
Click the arrows to open or close each category and display specific violation types available to configure for that category.
-
Edit the settings to meet your requirements.
-
When you are finished, save your work.
This updates the blocking settings in the application security policy.
You can review or change various overall aspects of policy building using the Policy Building Overview screen.
-
Click Configuration > SECURITY > Web Application Security > Policies.
-
Click the name of the policy you want to edit, and on the left of the new screen, click POLICY BUILDING > Overview.
-
To review the status of the devices being used for central policy building, expand Devices of Central Policy Building.
The screen lists the devices and their status. You can click Refresh to update the device information.
-
To review or change enforcement readiness for various policy entities, expand Enforcement Readiness Summary.
The screen shows a summary list of entities in the security policy that can be enforced, along with their status.
-
For additional information, you can click the links shown in the summary table.
- In the Entity Type column, click the name of the policy entity type to review a list of suggestions for it, if any exist.
- In the Learn New Entities column, you can see the learning status for the policy entity.
- In the Total, Not Enforced, or Not Enforced And Have Suggestions columns, click the number of entities link to be taken to the appropriate policy screen. Entities that are not enforced are in staging, or have wildcard entities configured so that the security policy learns all explicit entities that match them.
- In the Ready to be Enforced column, review the numbers. To enforce these entities, select the check box to the left in the row and click Enforce Selected Entities.
- To update the data shown, click Refresh.
-
To review the suggestions used to reduce false positive alerts, expand Suggestions To Reduce Potential False-Positive Alerts.
In this area, you see three lists: Top Violations, Top Violating Meta Characters, and Top Matched Signatures. You may need to scroll down to see all three. Each list contains suggestions for the entities listed, if there are any.
- To see the suggestions associated with a listed entity, such as one of the top violations, click the name.
- To update the data shown, click Refresh.
-
To review suggestions to add to new entries, expand Suggestions To Add New Entries.
- You can review the new suggestions. These are listed by entity type.
- To update the data shown, click Refresh.
-
Save your work.
Your changes are applied to the security policy.
You can view policy building suggestions and decide how to respond to each suggestion, such as accepting, ignoring, or deleting the suggestion.
-
Click Configuration > SECURITY > Web Application Security > Policies.
-
Click the name of the policy you want to edit, and on the left, click POLICY BUILDING > Suggestions.
-
To accept a suggestion, select it, click Actions, and select one of the accept options.
- To accept a suggestion and have it added to the policy entity, select the Accept action.
- To accept this suggestion and have it added to the policy entity in staged mode, select the Accept and Stage action.
- To accept this suggestion and have it added globally at the policy level, select the Accept Globally action. Not all options are available for all suggestions. Unsupported options for a suggestion are not selectable. For example, the Accept and Stage option is only available for policy entities that support staging, such as signatures and URLs.
-
To delete a suggestion, select the check box to the left of the suggestion and click Delete.
The policy builder can suggest a deleted suggestion again.
-
To ignore a suggestion, select the check box to the left of the suggestion and click Ignore.
Once a suggestion is ignored, the policy builder will not suggest it again.
-
To see additional details about the suggestion, click the name of the suggestion.
The additional details for the suggestion vary, but may include other related suggestions and the list of samples.
-
To add a comment to a suggestion, click the icon in the Comment column for that suggestion, and type your comment in the text box that opens.
-
To list either all suggestions or only a subset of the suggestions, select one of the options in the filtering area in the upper left of the screen, such as Pending Suggestions or Ignored Suggestions.
-
To perform a simple search of the suggestions, type the text to search for in the search area in the upper right of the screen.
You cannot use the simple search when looking for a violation or a refinement. You must use an advanced search filter instead and select the violation or refinement.
-
To perform an advanced search using a filter, click the icon to the left of the search area in the upper right of the screen. The filter dialog box opens.
- To use an existing filter, click the filter name. The filter is applied.
- To create a new filter, click Create. The New Filter dialog box opens.
- In the Filter Name setting, type a name for the filter.
- In the Query Parameter area, specify values for the parameters you want to use to create the search filter. As you select parameters, the system creates the query in the Query Expression area.
- When you are done, click Save & Apply to save your changes and apply the filter.
You can view and edit the building process settings for the application security policy to specify how Web Application Security builds policies.
-
Click Configuration > SECURITY > Web Application Security > Policies.
-
Click the name of a policy, and on the left, click POLICY BUILDING > Settings.
-
Scroll to near the bottom of the settings properties screen, expand the Policy Building Process area, and specify settings as needed.
-
In the Trust IP Addresses setting, you specify IP addresses that the Policy Builder considers safe.
- Select All IP Addresses to indicate that all IP addresses are safe.
- Select Address List to indicate that all IP addresses in the displayed list are safe.
- Click Edit IP Addresses to add IP addresses to the list.
-
For the Loosen Policy setting, you specify the number of sources that the system must detect during a specified time period, in order for the Policy Builder to accept and learn a policy change from traffic.
For example, when the Policy Builder detects the same file type, URL, parameter, or cookie from enough different user sessions and IP addresses over time, it adds the entity to the security policy. You can configure values for both untrusted traffic and for trusted traffic.
-
For the Tighten Policy (stabilize) setting, you specify the number of requests and the amount of time that must pass for the Policy Builder to stabilize the policy element.
Stabilizing the policy element may mean tightening it by deleting wildcard entities, removing entities from staging mode, and enforcing violations that did not occur, depending on the element.
-
For the Minimize false positives (Track Site Changes) setting, you specify whether, after stabilizing the policy, the Policy Builder remains enabled, and if enabled, how it handles trusted and untrusted traffic to minimize false positives.
- Select Enable to specify that after the Policy Builder stabilizes the policy, the Policy Builder remains enabled, and may still make changes to the policy by loosening it, usually as a result of changes to the web application. Specifies, when cleared (disabled), that after the Policy Builder stabilizes the policy, it disables itself and makes no more changes to the policy, even if it detects that changes were made to the web application.
- Select From Trusted and Untrusted Traffic to specify that the Policy Builder loosens the policy based on traffic from trusted and not trusted sources. This setting is available only if Enable is selected.
- Select Only from Trusted Traffic to specify that the Policy Builder loosens the policy based on traffic from trusted sources. Click IP Address Exceptions to define a trusted IP addresses. This setting is available only if Enable is selected. You configure values for trusted and untrusted traffic separately.
-
For the Options setting, you can establish options that determine what type of entities the Policy Builder adds to the policy.
-
When enabled, Learn from responses specifies that the Policy Builder adds elements found in responses to the policy, when either of the following circumstances is true:
- The Policy Builder trusts the request IP address (because the request IP address appears in the Trusted IP Addresses list).
- The Policy Builder does not trust the request IP address (because the request IP address does not appear in the Trusted IP Addresses list), but the request is legal and fully enforced. Legal means that the request does not trigger any violations, suggestions to learn explicit entities, and staging suggestions. Fully enforced means that the system is not currently determining whether URLs and parameters found in the request are to be parsed as JSON or XML and should be assigned to content profiles. If the Policy Builder learns from responses, it uses the trusted traffic thresholds configured on this screen. This does not include learning from violations in responses. In that case, the thresholds are determined by whether the client IP address is trusted or untrusted.
Specifies, when Learn from responses is cleared (disabled), that the Policy Builder never adds elements found in responses to the policy. Violations occurring in responses are learned according to the learn flag of each violation and do not depend on this setting.
Note: This setting applies only to what can be learned from the response content such as occurrences of URLs and parameters. It does not apply to learning from violations that occur in responses, such as Data Guard leakage. Learning from these violations is determined by the Learn flag of the respective violation.
-
When enabled, Suggest to delete policy entity if it was not observed in traffic for more than specifies that a suggestion to delete a policy entity should be made if that entity hasn’t been observed in traffic for the specified number of days.
-
Select Full Policy Inspection to specify that the Policy Builder learns all policy elements. Specifies, when cleared (disabled), that you are limiting the number of entities the Policy Builder learns.
Note: Do not disable this check box unless F5 Support advises it.
-
In the HTTP Response Status Codes used to learn traffic setting, you can specify that the Policy Builder extracts information from traffic based on transactions that return specific HTTP response status codes. In the field type the response code that must be returned in order for the Policy Builder to extract information from that traffic.
Click Add to add the response status code to the response status codes list. You may enter either a specific response code number from 0 to 599, or a generic code, for example,
4xx. The response status codes list displays the response codes allowed by the Policy Builder and in the policy.Click the X to the left of the response code to remove the selected response status code from the response status codes list and to make it disallowed by the Policy Builder.
-
-
When you are finished, save the modifications.
The policy building process settings are updated in the application security policy.
You can add server technologies to your security policy so that your policy can be automatically associated with the correct attack signature sets for the technology. Server technologies can be server-side applications, frameworks, programs, web servers, operating systems, and so on.
-
Click Configuration > SECURITY > Web Application Security > Policies.
-
Click the name of the policy you want to edit, then on the next screen, on the left, click Server Technologies.
-
Select the server technology from the list.
A confirmation dialog box opens listing the changes that will be made to the policy.
-
Confirm that you want to add the server technology by clicking OK in the dialog box.
The technologies are added to the list of selected server technologies.
-
To remove a server technology entry, click the X to the left of that entry.
-
Save your work.
You can view and edit Data Guard settings to specify which information the system considers sensitive, including credit card numbers, U.S. Social Security numbers, custom patterns, and file content.
-
Click Configuration > SECURITY > Web Application Security > Policies.
-
Click a policy name, and on the left click Data Guard.
-
In the Data Guard setting, select Enabled so that you can modify the other settings.
When this setting is disabled, the system sends the response, including the sensitive information, to the user.
-
Modify the settings as needed to specify how the system treats sensitive data:
|
Protect credit card numbers |
Specifies that the system considers credit card numbers as sensitive data. The system returns asterisks to the client instead of the sensitive data. |
|
Protect U.S. security card numbers |
When selected, the system considers U.S. security card numbers as sensitive data. |
|
Mask sensitive data |
When selected, the system masks sensitive data returned by the web server by returning asterisk ( * ) characters to the client instead of the sensitive data. |
|
Custom Patterns |
When selected, specifies that the system recognizes customized patterns as sensitive data. In the field, type a pattern that you want the system to consider as sensitive data, and click Add. Use PCRE regular expression syntax for the pattern, for example, |
|
Exception Patterns |
When selected, the system recognize exception patterns as not being sensitive data.In the field, type a pattern that you want the system to consider as an exception to sensitive data, and click Add. Use PCRE regular expression syntax for the pattern, for example, |
|
File Content Detection |
When this is selected, you specify the possible types of content the system could consider as sensitive data. The system checks responses for the selected file content, and if it finds it, that content is not returned, |
|
Enforcement Mode |
Specify whether the listed URLs should be enforced or ignored by Data Guard.- Select Enforce URLs in List to have Data Guard protect these URLs even if they are not in the policy.
Note: When adding URLs, you can type either explicit ( |
- When you are finished, save your work.
The policy is updated to use the new Data Guard settings.
You can enable and modify CSRF protection properties in your security policy to better protect your applications from a CSRF attack. Cross-site request forgery (CSRF) is an attack method that exploits a pre-existing relationship of trust and forces a user to run unwanted actions on a web application in which the user is currently authenticated.
-
Click Configuration > SECURITY > Web Application Security > Policies.
-
Click the name of a policy, and from the list on the left, select CSRF Protection.
-
For the CSRF Protection setting, select the Enabled check box.
The screen displays the other property settings.
-
For the SSL Only setting, select the Enabled check box.
-
For the Expiration Time setting, select the Enabled check box, then provide the expiration time in seconds in the area provided.
-
Use the CSRF URLs area to add, remove, or modify CSRF URLs to be protected.
Existing URLs are listed in their evaluation order at the bottom of the screen.
For BIG-IP device versions earlier than 13.1, URLs added to the CSRF URLs list must have the following settings:
- Specify the Method setting as Any.
- Specify the Enforcement Action setting as Verify CSRF Token.
- Specify the Required Parameters setting as At Least One.
-
To add a new URL to the list:
-
In the Method setting, select the method type.
-
In the URL setting, type the URL to be protected.
-
In the Enforcement Action setting, select the type of enforcement.
-
In the Required Parameters setting, specify whether there are any required parameters, and if needed, provide them.
-
Click Add.
-
-
To edit existing CSRF URLs:
- To modify a URL, change the required parameters or enforcement action in the list at the bottom of the screen.
- To change the evaluation order of a URL, drag the URL row to a new position in the list.
- To delete a URL from the list, click the X to the left of the URL.
-
Save your work.