


Updated Date: 07/07/2026
Configuring Access Policy Manager for MDM applications
MDM solutions are responsible for managing user devices, where a user enrolls a device (or devices) and sets certain compliance policy which dictates whether a device is compliant or non-compliant. The endpoint management system determines whether the APM recognizes the device before allowing access from the access policy. An endpoint management system also controls the corporate data on mobile devices. Edge Client establishes a VPN connection with APM, and an endpoint management system (Airwatch, MaaS360, or Intune) manages and sends device details to APM.
To reduce the number of queries to the MDM server, the Database Synchronization Manager lists all the compliant devices in the case of Airwatch and MaaS360 & non-compliant devices in the case of Microsoft Intune and stores the information in the local cache. The synchronization interval is configurable to fit your situation and is refreshed after every 4 hours by default to get a new list of devices. When a device tries to connect through the F5 Access client, the local cache is queried for the device ID. When the device ID is not found, the device is verified by the MDM server. When the device is found compliant, the device ID is added to the local cache after the user logs in.
Supported Devices
Only iOS devices and Android devices with VPN access to APM from specific mobile device apps that are being managed by MDM (F5 Access Client Apps) are supported. For example, if you connect to APM WebTop from a browser in a device, then APM will not get a device ID and cannot check for device compliance.
Note: F5 Access for macOS and Windows are currently not supported.
For devices with iOS 12 and later, F5 Access client could not retrieve device ID from iOS due to Apple imposed constraints, and compliance check failed. Microsoft’s Network Access Control (NAC) integration with Intune provides a new temporary NAC ID to identify the device. This ID is pushed to the F5 Access client through the F5 Access profile in Intune. For iOS devices, the device is always verified by the MDM server as the NAC ID is not stored in the local cache.
Note: To use NAC on iOS devices, the Enable network access control (NAC) option must be selected when configuring the VPN profile for F5 Access in Microsoft Intune.
-
Creating an endpoint management system connector with Airwatch
-
Creating an endpoint management system connector with MaaS360
-
Creating an Azure web application with Microsoft Intune for APM
-
Creating an endpoint management system connector with Microsoft Intune
-
Configuring an access policy to include endpoint management integration
You must create a Server SSL profile on a BIG-IP system and have access to an Airwatch system.
An endpoint management system on BIG-IP Access Policy Manager(APM) is an object that stores information about the device management server, such as IP addresses and API credentials. You can configure more than one endpoint management system on the same BIG-IP system. APM polls devices connected to configured endpoint management systems.
-
Log in to the Airwatch console using the administrator user name and password.
-
On the left panel, click Accounts.
The View Role screen displays.
-
For the Categories setting, click API > REST.
-
Enable API access for the administrator.
-
On the left panel on the main screen, click Groups & Settings.
The Settings popup screen opens.
-
Under the System tab, click API > REST API
The System/Advanced/API/REST popup screen opens.
-
On the System/Advanced/API/REST screen, select the General tab.
-
Select the Override setting.
-
Select Enable API Access.
-
Copy the API key displayed next to API key.
-
Click Save.
-
On the BIG-IP system, on the Main tab, click Access Policy > Authentication > Endpoint Management Systems.
The Endpoint Management Systems screen opens.
-
Click Create.
-
In the Name field, type a name for the endpoint management system.
-
In the Type list, select Airwatch for the endpoint management system.
-
In the FQDN field, type a fully qualified domain name.
-
In the Port field, type
443. -
From the Server SSL Profile list, select a previously created Server SSL profile in BIG-IP Local Traffic Manager.
-
In Update Interval (minutes) field, type a number in minutes that represents how often APM updates the device database.
-
In the Username field, type the Airwatch administrator user name.
-
In the Password field, type the Airwatch administrator password.
-
In the API Token field, type or paste the API key copied from the Airwatch screen.
-
Click Finished.
You have created an endpoint management system. APM tests the connection to the device management server, and prints a test status in the Status field. If the status displays OK, APM starts the device database synchronization for the created endpoint management system.
Note: The Airwatch interface might change.
You must create a Server SSL profile on a BIG-IP system and have access to an MaaS360 system.
An endpoint management system on BIG-IP Access Policy Manager(APM) is an object that stores information about the device management server, such as IP addresses and API credentials. You can configure more than one endpoint management system on the same BIG-IP system. APM polls devices connected to configured endpoint management systems.
-
Contact MaaS360 to obtain information needed to access the API.
The information required includes the following data:
- Application ID
- Platform version
- Version number
- Access key
- Service URL
-
Log in to the MaaS360 console using the administrator user name and password.
-
At the bottom of the screen, copy the Account ID.
-
On the BIG-IP system, on the Main tab, click Access > Authentication > Endpoint Management Systems.
The Endpoint Management Systems screen opens.
-
Click Create.
The New endpoint management system screen opens.
-
In the Name field, type a name for the endpoint management system.
-
In the Type list, select MaaS360 for the endpoint management system.
The Network location and API Credentials sections display.
-
In the FQDN field, type the service URL provided by MaaS360.
-
In the Port field, type
443. -
From the Server SSL Profile list, select a previously created Server SSL profile in BIG-IP Local Traffic Manager.
-
In Update Interval (minutes) field, type a number in minutes that represent how often APM updates the device database.
-
In the Username field, type the MaaS360 administrator user name.
-
In the Password field, type the MaaS360 administrator password.
-
In the Billing Id field, type or paste the billing ID copied from the MaaS360 screen.
-
In the Application Id field, type the application ID provided by MaaS360.
-
In the Access Key field, type the access key provided by MaaS360.
-
In the Platform field, type the platform version of the MaaS360 console.
-
In the App Version field, type the current version number of the application that is linked to the account.
-
Click Finished.
You have created an endpoint management system. APM tests the connection to the device management server, and prints a test status in the Status field. If the status displays OK, APM starts the device database synchronization for the created endpoint management system.
Note: The MaaS360 interface might change.
Before you can configure a web application, contact Microsoft to purchase a Microsoft Intune subscription.
BIG-IP APM integrates Microsoft Intune by configuring a Microsoft Azure Client web application on the Microsoft Azure portal. This topic describes how to create a web application to obtain a client ID and a client secret.
-
On Microsoft Azure, on the main tab, click Azure Active Directory.
The Azure Active Directory screen opens.
-
Click App registration.
The App registrations screen opens.
-
Click New registration.
The Register an application screen opens.
-
In the Name field, type a name for the new web application.
-
From the Application type dropdown menu, select Web app / API.
-
In the Sign-on URL field, type a URL.
This can be any URL, such as
https://localhost. -
Click Register.
A newly-created application’s page displays the registration details.
-
Copy the Application ID to your records.
You use this ID as a client id when configuring an EMS object on the BIG-IP system.
-
In the Manage section, click Certificates & secrets.
The Certificates & secrets screen opens.
-
Under Client secrets, click New Client Secret to create a secret key.
-
In the Description field, enter any description for this secret key.
-
In the Expires section, select Never.
-
Click Add.
You should copy the key to the administrator records. You use this key as a client secret when configuring an EMS object on the BIG-IP system.
A new key displays in the Certificates & secrets screen.
-
Click Overview to navigate to the app screen with registration details. In the Manage section, click API permissions.
The API permissions screen opens.
-
Click Add a permission.
The Request API permissions screen opens.
-
Select Intune from the list of Microsoft APIs, and then select Application Permissions.
-
From the Permissions list, select Get device state and compliance information from Microsoft Intune.
-
Click Add a permissions.
A list of added permissions displays.
-
Click Add a Permission again.
-
Select Microsoft Graph from the list of Microsoft APIs, and then select Application Permissions.
-
Select one of the following Microsoft Graph permissions under Application dropdown:
- Application.Read.All (This is required for Microsoft Graph)
- Application.ReadWrite.All
- Application.OwnedBy
- Directory.Read.All Click Add Permissions.
A list of added permissions displays.
-
On the API permissions screen, click Grant admin consent for button. When asked to confirm grant consent for all accounts in the Azure domain, click Yes.
You now have a tenant ID, client ID, and client secret.
Note: Note: In June 2020, Microsoft announced the deprecation of the Azure Active Directory (AD) Graph API. The Microsoft Graph will replace the Azure AD Graph, offering improved security and resilience, starting June 30, 2022. When adding new API permission, the Azure Active Directory Graph option is greyed out and is not available as Microsoft recommends using Microsoft Graph APIs for new permission requests. If you still want to continue adding Azure Active Directory Graph permission, click Add a Permission > APIs my organization users > Search for “Windows Azure Active Directory” and grant legacy permissions as per your requirement.
You must create a Server SSL profile on a BIG-IP system and have access to a Microsoft Intune system.
An endpoint management system on BIG-IP Access Policy Manager(APM) is an object that stores information about the device management server, such as IP addresses and API credentials. You can configure more than one endpoint management system on the same BIG-IP system. APM polls devices connected to configured endpoint management systems.
-
On the BIG-IP system, on the Main tab, click Access > Authentication > Endpoint Management Systems.
The Endpoint Management Systems screen opens.
-
Click Create.
The New endpoint management system screen opens.
-
In the Name field, type a name for the endpoint management system.
-
In the Type list, select Microsoft Intune for the endpoint management system.
The Network location and API Credentials sections display.
-
From the Server SSL Profile list, select a previously created Server SSL profile in BIG-IP Local Traffic Manager.
-
From the DNS Resolver list, select a previously created DNS Resolver in BIG-IP Local Traffic Manager.
Create a DNS Resolver the same way you create a Server SSL profile.
-
In Update Interval (minutes) field, type a number in minutes that represent how often APM updates the device database.
-
In the Tenant Id field, type the tenant ID that comes with a Microsoft Intune subscription.
-
In the Client Id field, type the client ID that becomes available after creating a web application.
-
In the Client Secret field, type the client secret that becomes available after creating a web application.
-
Click Finished.
You have created an endpoint management system. APM tests the connection to the device management server, and prints a test status in the Status field. If the status displays OK, APM starts the device database synchronization for the created endpoint management system.
You can create an endpoint management system on BIG-IP APM with either Airwatch, MaaS360 or Intune.
An endpoint system management system connector object on BIG-IP Access Policy Manager(APM) is an object that stores information about the device management server, such as IP addresses and API credentials. You can configure more than one endpoint management system on the same BIG-IP system. APM polls devices connected to configured endpoint management systems.
-
On the BIG-IP system, on the Main tab, click Access > Authentication > Endpoint Management Systems.
The Endpoint Management Systems screen with a list of endpoint management systems opens.
-
In the Name column, click the name of the endpoint management system you want to edit.
The properties screen for that endpoint management system opens.
-
Edit one or more fields.
The status of the endpoint management system updates during each sync interval. If you edit the Username, FQDN, or Port fields, the Status field displays the same status as the actual configuration status. If you edit other property fields, the Status field might be different than the actual configuration status. The correct status appears when the next sync interval begins
-
Click Update.
You have updated an endpoint management system.
You create an access profile to provide the access policy configuration for a virtual server that establishes a secured session.
-
On the Main tab, click Access > Profiles / Policies.
The Access Profiles (Per-Session Policies) screen opens.
-
Click Create.
The New Profile screen opens.
-
In the Name field, type a name for the access profile.
Note: A access profile name must be unique among all access profile and any per-request policy names.
-
From the Profile Type list, select one these options:
-
LTM-APM: Select for a web access management configuration.
-
SSL-VPN: Select to configure network access, portal access, or application access. (Most access policy items are available for this type.)
-
ALL: Select to support LTM-APM and SSL-VPN access types.
-
SSO: Select to configure matching virtual servers for Single Sign-On (SSO).
Note: No access policy is associated with this type of access profile
-
RDG-RAP: Select to validate connections to hosts behind APM when APM acts as a gateway for RDP clients.
-
SWG - Explicit: Select to configure access using Secure Web Gateway explicit forward proxy.
-
SWG - Transparent: Select to configure access using Secure Web Gateway transparent forward proxy.
-
System Authentication: Select to configure administrator access to the BIG-IP system (when using APM as a pluggable authentication module).
-
Identity Service: Used internally to provide identity service for a supported integration. Only APM creates this type of profile.
Note: You can edit Identity Service profile properties.
Note: Depending on licensing, you might not see all of these profile types.
Additional settings display.
-
-
In the Language Settings area, add and remove accepted languages, and set the default language.
A browser uses the highest priority accepted language. If no browser language matches the accepted languages list, the browser uses the default language.
-
Click Finished.
The access profile displays in the Access Profiles List. Default-log-setting is assigned to the access profile.
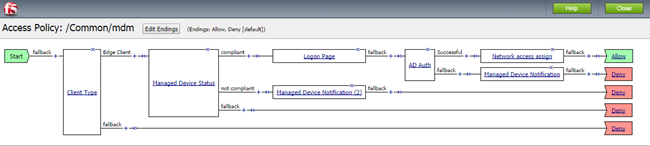
You can configure an access policy to perform compliance checks for connected devices. The Managed Endpoint Status action determines whether APM recognizes a device with a device ID. The Managed Endpoint Notification action sends a push notification message to a device. You can create access policy checks using session variables and device posture information to allow or deny access.
-
On the Main tab, click Access > Profiles / Policies.
The Access Profiles (Per-Session Policies) screen opens.
-
In the Access Policy column, click the Edit link for the endpoint management type access profile you want to configure.
The visual policy editor opens the access policy in a separate screen.
-
Click the (+) icon anywhere in the access policy to add a new item.
Note: Only an applicable subset of access policy items is available for selection in the visual policy editor for any access profile type.
A popup screen opens, listing predefined actions on tabs such as General Purpose, Authentication, and so on.
-
Add a Managed Endpoint Status action:
-
From the Endpoint Security (Server-Side) list, select Managed Endpoint Status and click Add Item.
A popup Properties screen opens.
-
In the Name field, type a name for the access policy action.
-
For the Endpoint Management System, select the endpoint management system that you previously created.
-
Click Save.
The visual policy editor screen displays.
-
-
In both the compliant branch and not compliant branch of the Managed Device Status action, click the (+) icon anywhere in the access policy to add a new action item.
For example, as shown in the Access policy with endpoint management integration image below, the Managed Device Status action performs the compliance checks on the device for allowing network access and sends notification messages to the non-compliant device.
-
To add a Managed Endpoint Notification action, perform the following steps:
-
From the Endpoint Security (Server-Side) list, select Managed Endpoint Notification.
A popup Properties screen opens.
-
In the Name field, type a name for the access policy action.
-
From the endpoint management system list, select the endpoint management system that you previously created.
Note: The Intune endpoint management system does not support Endpoint Notification agent.
-
In the Message field, type a message that displays on a device.
-
Click Save.
The visual policy editor screen displays.
-
You have an access policy that presents endpoint management integration with VPN access.
-
On the Main tab, click Local Traffic > Virtual Servers.
The Virtual Server List screen opens.
-
Click Create.
The New Virtual Server screen opens.
-
In the Name field, type a unique name for the virtual server.
-
From the Configuration list, select Advanced.
-
In the Destination Address field, type the IP address for the Virtual Server.
When you type the IP address for a single host, it is not necessary to append a prefix to the address.
-
In the Service Port field, type the port number.
-
From the SSL Profile (Client) list, select clientssl.
-
From the Source Address Translation list, select Auto Map.
-
Click Finished.
-
From the Access Profile list, select the access profile that you previously created.
-
From the Connectivity Profile list, select the connectivity profile that you previously created.
Your access policy is now associated with the newly created virtual server.