Updated Date: 06/30/2026
Tenant Management
A tenant is a guest system running software on the F5OS platform layer (for example, a BIG-IP system). You can run several tenants on most platforms, although the F5 r2000 Series only supports a single tenant. For more information, see Tenant data.
The administrator can connect to the tenant’s webUI, CLI, or REST API and have the same experience as on their existing F5 platforms. A tenant on the rSeries platform is managed similarly to how a vCMP guest is managed today on the VIPRION platform. The tenant is assigned dedicated vCPU and memory resources and is restricted to specific VLANs for network connectivity.
The admin is responsible for configuring tenant deployments within the appliance. Once a tenant has been deployed, there is a per-tenant administrator role, whose responsibilities include configuring the services that are available on that tenant.
Important: Tenants inherit certain capabilities, such as the license, VLANs, and management interface speed, from the system. Do not try to install a new license or delete the existing license on the tenants. Tenant admins cannot configure global parameters. You configure these at the platform layer, and values are propagated to all tenants in the system.
Note:
- For the F5 r2000/r4000 platforms, you can add same VLAN ID to multiple interfaces. Adding the same VLAN ID to multiple interfaces could result in L2 loops. Special considerations should be made to the network topology to avoid L2 loops.
- Before you can assign multi-interface VLAN to the tenant, change the value of the db variable <vlan.macassignment> to <unique> inside the tenant.
Also see knowledge article Overview of the BIG-IP tenant image types.
This table lists tenant data specifications for rSeries systems.
| Model | Maximum number of tenants | Maximum vCPUs per tenant | Minimum vCPUs per tenant | System memory | Memory reserved for tenants | Minimum memory per tenant |
|---|---|---|---|---|---|---|
| r2600 | 1 | 4 | 4 | 32 GB | 24 GB | 12288 MB |
| r2800 | 1 (v1.7.0 or earlier) 2 (v1.8.0 or later) |
8 | 4 | 32 GB | 24 GB | 12288 MB |
| r4600 | 2 | 12 | 4 | 64 GB | 48 GB | 12288 MB |
| r4800 | 4 | 16 | 4 | 64 GB | 48 GB | 12288 MB |
| r5600 | 8 | 12 | 1 | 128 GB | 108 GB | 4096 MB |
| r5800 | 18 | 18 | 1 | 128 GB | 108 GB | 4096 MB |
| r5900 | 26 | 26 | 1 | 128 GB | 108 GB | 4096 MB |
| r10600 | 24 | 24 | 1 | 256 GB | 224 GB | 4096 MB |
| r10800 | 28 | 28 | 1 | 256 GB | 224 GB | 4096 MB |
| r10900 | 36 | 36 | 1 | 256 GB | 224 GB | 4096 MB |
| r12600 | 44 | 44 | 1 | 512 GB | 462 GB | 4096 MB |
| r12800 | 52 | 52 | 1 | 512 GB | 462 GB | 4096 MB |
| r12900 | 60 | 60 | 1 | 512 GB | 462 GB | 4096 MB |
In this diagram, an rSeries system has eight tenants (red and blue).
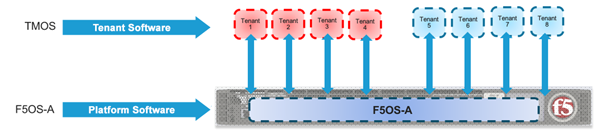
Each tenant has its own IP address, set of users, and software. You can access each tenant via the CLI, web-based user interface, or API.
After you have configured and deployed a tenant, you can use the tenant management IP address to connect to the tenant’s web-based user interface, API, or CLI. A BIG-IP tenant is running standard TMOS and is managed like any other BIG-IP instance.
These BIG-IP tenant images are available to deploy on F5 rSeries systems:
- ALL-F5OS
- T4-F5OS
- T2-F5OS
- T1-F5OS (see note)
Note: T1-F5OS has limitations, so using the other images is recommended. Other images must be downloaded from F5 Downloads.
Each image type has different uses so you need to be sure to use the correct type for your tenant needs. For additional information about BIG-IP tenant image types, see K45191957: Overview of the BIG-IP tenant image types.
- Installation of F5OS tenant images using the tar.bundle format will succeed. This option is only available on: F5OC-C (Chassis) all supported releases
- Installation of F5OS tenant images using the qcow2.zip.bundle format released in October 2025 or later will fail to be verified on the following F5OS host software versions: F5OS-C all supported versions (instead, use the tar.bundle format)
This table lists general use cases for tenant images.
|
Tenant image |
Description of Use |
|---|---|
|
ALL-F5OS |
* The F5 r2000 platform does not support multi-tenancy. See the F5 rSeries data sheet for all currently-supported features. |
|
T4-F5OS |
|
|
T2-F5OS |
|
|
T1-F5OS |
|
Each image has different sizing requirements. You will need to understand the system and the tenant requirements to determine the number and type of tenants you can deploy. The amount of memory and disk space that a tenant actually needs is dependent on the number of modules provisioned and its use.
| Tenant image | Disk size | Minimum memory | Minimum # vCPUs | Max tenants per system |
|---|---|---|---|---|
| T1-F5OS | 22 GB | 4 GB | 1 | 36 |
| T2-F5OS | 45 GB | 8 GB | 2 | 18 |
| ALL-F5OS | 77/82/83 GB | 8 GB | 2 | 11 |
| T4-F5OS | 142 GB | 8 GB | 2 | 6 |
Important: The minimum virtual disk size for the tenant image category “ALL-F5OS” depends on the BIG-IP tenant image version you deploy. The minimum virtual disk size is 77 GB for BIG-IP 15.1.x tenant image, 86 GB for BIG-IP 17.1.x, BIG-IP 17.5.x, BIG-IP 21.0.x tenant image and 88 GB for BIG-IP 21.1.x tenant image. For additional information see K45191957: Overview of the BIG-IP tenant image types.
These are recommended resource considerations for determining the amount of memory (RAM) and disk space to allocate when planning tenant deployments on F5 rSeries systems.
These are recommendations for determining the amount of memory (RAM) to allocate when planning tenant deployments on rSeries systems based on the number of vCPUs assigned.
| Platform | Memory | Default memory allocation formula |
|---|---|---|
| r2000 | 32 GB | min-memory = (3 * 1024 * vcpu-cores-per-node) |
| r4000 | 64 GB | min-memory = (3 * 1024 * vcpu-cores-per-node) |
| r5000 | 128 GB | min-memory = (3.5 * 1024 * vcpu-cores-per-node) + 512 |
| r10000 | 256 GB | min-memory = (3.5 * 1024 * vcpu-cores-per-node) + 512 |
| r12000 | 512 GB | min-memory = (3.5 * 1024 * vcpu-cores-per-node) + 512 |
Note: The formula for finding vcpu-cores-per-node is: multiples of 4 in range of [4, max-cores]. The default value for vcpu-cores-per-node is 4, and the default value for memory is 12288.
There is also an advanced setting through which additional memory can be assigned out of the pool to a tenant. You can specify more than the minimum amount of memory when configuring a tenant, if needed.
These are recommendations for determining the amount of disk space when planning tenant deployments on rSeries systems.
- The amount of disk space that a tenant actually needs is dependent on the number of modules provisioned and its use.
- As the aggregate disk usage within deployed tenants increases, the host disk can start to reach capacity on systems with many large tenants. The administrator will need to monitor disk usage to make sure there is sufficient space for the tenants.
Cloud-init is a tool designed for automating the initial configuration of BIG-IP tenants deployed on the F5OS platforms. When a BIG-IP tenant is deployed, cloud-init schema reads the provided configuration data, commonly referred to as user-data, and processes it to apply the necessary system setup. A cloud-init property in the tenant creation schema allows tenants to reference these objects, which are directly passed to tenants during deployment.
You can define the configuration required for a BIG-IP tenant within the userdata file, specifying parameters such as initial system settings (e.g., hostname and network interfaces), security settings (e.g., SSH keys and user credentials), software installations, service configurations (e.g., Virtual Servers and Pools), and runtime scripts for advanced customization. F5OS encapsulates this userdata into a predefined cloud-Init object, enabling users to reference it seamlessly during tenant creation via the cloud-Init schema. For more information to about supported configuration refer to the BIG-IP 21.1.0 Product Documentation.
- A cloud-init object cannot be edited or deleted if it is referenced by any tenant in the deployed state.
- Editing is allowed only when all referencing tenants are moved to the configured state.
- Any new cloud-init configuration will be applied once the tenants are moved back to the deployed state.
- Sensitive information, such as passwords, must be encrypted before being included in the cloud-init configuration.
You can add or delete tenant images from the webUI. You must use HTTPS image import or export. Note that tenant images are specific to the rSeries system, and the software version must be compatible with it.
-
Log in to the webUI using an account with admin access.
-
On the left, click Tenant Management > Tenant Images.
-
To upload an image, click Upload and browse to the image location.
-
To import an image:
-
Click Import.
Import Tenant Image screen displays.
-
For URL, enter the URL of the remote image server.
F5 recommends that the remote host be an HTTPS server with PUT/POST enabled and have a valid CA-signed certificate. You can opt to select the Ignore Certificate Warnings check box if you want to skip the certificate check.
-
For Username, type the user name for an account on the remote image server, if required.
-
For Password, type the password for the account, if required.
-
Select Ignore Certificate Warnings to skip the certificate check.
-
Click Import Image.
Note:
- Depending on the image file size and network availability, the import might take a few minutes. You can view progress of the file transfer under the Image Transfer Status area. When the import is successful, the software image is listed in the webUI.
- If you want to cancel an in-progress file transfer operation, click Cancel button.
-
-
To delete a tenant image, select the image and click Delete.
After you have added the tenant images that you want to use to the system, you can create and deploy tenants that will use that software image. The tenant image must be one that is listed as compatible with the rSeries system.
You must have imported the tenant images that you want to use for the tenant deployments into the system. You must also have previously created any required VLANs. Before you can create and deploy tenants, you also need to estimate resource requirements so you know how many vCPUs, memory, and other resources to assign to the tenant.
An administrator can deploy tenants from the webUI. You can open a preview pane with tenant details by clicking anywhere in a row. You can resize the preview pane to show more or less information. To close the preview pane, click Close or click again anywhere in the row.
-
Log in to the webUI using an account with admin access.
-
On the left, click Tenant Management > Tenant Deployments.
The Tenant Deployment screen displays showing the existing tenant deployments and associated details.
-
To add a tenant deployment, click Add.
The Add Tenant Deployment screen displays.
-
For Name, enter a name for the tenant deployment (up to 49 characters).
Note: The first character in the name cannot be a number. After that, only lowercase alphanumeric characters and hyphens are allowed.
-
For Type, select the tenant type: BIG-IP.
-
For Image, select the software image that was previously imported onto the system.
Ensure that the image you selected meets your tenant deployment needs.
-
For IP Address, enter the IPv4 address, IPv6 address, or Fully Qualified Domain Name (FQDN) for the tenant.
-
For Prefix Length, enter a number for the length of the prefix.
The maximum prefix length is 32 for IPv4 and 128 for IPv6.
-
For Gateway, enter the IPv4 address or IPv6 address of the gateway.
-
For Management VLAN, select a management VLAN from the dropdown.
-
For VLANs, select one or more VLANs that are available to the tenant.
You can assign VLANs to more than one tenant.
-
For Virtual Wires, select configured virtual wires for the tenant.
Note: The Virtual Wires field is only available for selection when virtual wires have been configured
-
For MAC Data/MAC Block Size, select one of these options:
Option Description One Represents a block with one MAC. This is used when a contiguous block of MAC addresses is needed. This is the default value. Small Represents a block of 8 MACs. When this value is used, the tenant gets a block of 8 contiguous MACs. Medium Represents a block of 16 MACs. When this value is used, the tenant gets a block of 16 contiguous MACs. Large Represents a block of 32 MACs. When this value is used, the tenant gets a block of 32 contiguous MACs. Extra Large Represents a block of 96 MACs. When this value is used, the l2-inline-device is enabled, and the tenant gets a block of 96 contiguous MACs. This option is supported only on the r5k/r10k platforms. -
For DAG IPv6 Prefix Length, enter the prefix length used by disaggregator algorithms.
The range is from 1 to 128, with a default value of 128.
For more information about the prefix length, see Configure DAG IPv6 prefix length from the CLI.
-
For Resource Provisioning, select one of these options:
Option Description Recommended Recommended values for vCPUs and memory for the tenant. Advanced Enables you to configure custom values for vCPUs and memory on the tenant. For example, if you want to configure a single vCPU tenant, or a tenant that uses more than the recommended amount of memory. -
For vCPUs, select the number of vCPUs to provide to the tenant
The minimum recommended number of vCPUs per typical tenant is two (one vCPU is sufficient only for lightweight tenants that cannot be updated). The number of vCPUs needed depends on the amount of traffic the tenant will be handling. More vCPUs provide faster throughput.
-
For Memory, specify the amount of RAM, in MB, to allocate to the tenant.
The amount of memory needed depends on the number of vCPUs assigned. The minimum amount of memory needed is determined by the formula
[(3.5 * 1024 * #ofvCPUs) + 512].Note: If you do not allocate sufficient memory, you may receive a warning message.
-
For Virtual Disk Size, specify the storage quota, in GB, for the tenant virtual disk.
Default size depends on the image type used. The default size for the ALL image is 82GB.
The minimum recommended disk size is 45 GB.
-
For State, select one of these options:
Options
Description
Configured
The tenant configuration exists on the system, but the tenant is not running, and no hardware resources (CPU, memory) are allocated to it. This is the initial state and the default.
Provisioned
Moves the tenant into the Provisioned state, which causes the system to install the software, assign the tenant to nodes, and create virtual disks for the tenant on those nodes. If you choose this option, it takes a few minutes to complete the provisioning. The tenant does not run while in this state.
Deployed
Changes the tenant to the Deployed state. The tenant is set up, resources are allocated to the tenant, the image is moved onto the system, the software is installed, and after those tasks are complete, the tenant is fully deployed and running. If you choose this option, it takes a few minutes to complete the deployment and bring up the system. Note: Once a tenant is Deployed (and is up and running), changing its state back to Configured or Provisioned stops the tenant. You will receive a warning message before this occurs.
-
For Crypto/Compression Acceleration, select Enabled if the tenant requires high-performance crypto processing and compression.
When this option is enabled, the tenant receives dedicated crypto devices proportional to the number of vCPU cores. Crypto processing and compression are off-loaded to the hardware. When the option is disabled, the tenant receives no crypto devices.
-
To restrict usage of the Bash shell for tenant administrators, set Appliance Mode to Enabled (this is Disabled by default.)
-
To attach the cloud-init as a reference, select the cloud-init Reference from the drop down.
Important: You can add the cloud-init as a reference, when the Tenant is not in a deployed state.
-
Click Save.
The tenant is now configured and in the Deployed state. When the status says Running, the tenant administrator can log in to the tenant webUI or CLI using the management IP address (with HTTPS or SSH) and continue configuring the tenant system.
Note: If the Status says Pending instead of Running, this may mean that there are not enough resources (vCPUs, memory, or other resources) for the tenant to be deployed. See the Tenant Details screen in the webUI for more information about the specific tenant.
You can configure a cloud-Init object for a tenant from the webUI.
-
Log in to the webUI using an account with admin access.
-
On the left, click Tenant Management > Tenant Deployments.
The Tenant Deployment screen displays showing the existing tenant deployments and associated details.
-
Expand the section Additional Tenant Settings (cloud-init).
-
Enter the Name for the cloud-Init object user-data
-
Paste the User Data for the cloud-Init schema:
Provide user data in valid YAML format with correct syntax.
-
Click Save.
Depending on the state that the tenant is in, you can change certain tenant settings from the webUI. The settings which cannot be modified will be grayed out.
-
Deployed: Tenants must be active and running to modify the State.
Note: Once a tenant is Deployed (and is up and running), changing its state back to Configured or Provisioned stops the tenant. You will receive a warning message before this occurs.
-
Provisioned: You can change all settings except Image.
-
Configured: You can change all settings except Image.
-
Log in to the webUI using an account with admin access.
-
On the left, click Tenant Management > Tenant Deployments.
The Tenant Deployment screen displays showing the existing tenant deployments and associated details.
-
Click the name of the tenant deployment you want to modify.
The Edit Tenant Deployment drawer displays. Click on the edit icon on the drawer..
-
For Image, select a different software image to use for the tenant, if in Configured state.
-
You can change the IP Address, Prefix Length (1-32), and Gateway for the tenant, if in Configured or Provisioned state. Enter an IPv4 address or IPv6 address.
-
For VLANs, you can select different VLANs for the tenant, if in Configured or Provisioned state.
-
For Virtual Wires, select configured virtual wires for the tenant.
Note:
- This field displays only when virtual wires are configured on the system.
- Virtual Wires configuration is only supported for BIG-IP tenant types.
-
For MAC Data/MAC Block Size, select One, Small, Medium, or Large.
Option Description One Represents a block with one MAC. This is used when l2-inline-device functionality is not needed. This is the default value. Small Represents a block of 8 MACs. When this value is used, the l2-inline-device is enabled, and the tenant gets a block of 8 contiguous MACs. Medium Represents a block of 16 MACs. When this value is used, the l2-inline-device is enabled, and the tenant gets a block of 16 contiguous MACs. Large Represents a block of 32 MACs. When this value is used, the l2-inline-device is enabled, and the tenant gets a block of 32 contiguous MACs. Extra Large Represents a block of 96 MACs. When this value is used, the l2-inline-device is enabled, and the tenant gets a block of 96 contiguous MACs. This option is supported only on the r5k/r10k platforms. -
For Resource Provisioning, if changing resources, select either: Recommended (to use recommended values) or Advanced (to customize values), if in Configured or Provisioned state.
-
For vCPUs, select the number of vCPUs for the tenant, if in Configured or Provisioned state.
The minimum recommended number of vCPUs per typical tenant is two (one vCPU is sufficient only for lightweight tenants that cannot be updated). The number of vCPUs needed depends on the amount of traffic the tenant will be handling. More vCPUs provide faster throughput.
-
For Memory, specify the amount of RAM in MB to allocate to the tenant, if in Configured or Provisioned state.
The amount of memory needed depends on the number of vCPUs assigned. The minimum amount of memory needed is determined by the formula
[(3.5 * 1024 * #ofvCPUs) + 512], so a two vCPU tenant needs a minimum of 7680 MB, and a four vCPU tenant needs a minimum of 14,848MB. -
Change State (with caution!):
Option Description Configured If Deployed, this option stops the tenant from running, but maintains the configuration. Provisioned If Deployed, this option stops the tenant from running, but maintains the configuration. If Configured, causes the system to install the software, assign the tenant to nodes, and create virtual disks for the tenant on those nodes. The tenant does not run, consume resources, or pass traffic. Deployed Directly deploys the tenant. This sets up the tenant, allocates resources, moves the image onto the system, and installs the software. When these tasks are complete, the tenant is fully deployed and running. -
Change Crypto/Compression Acceleration only if the tenant is in either the Configured or Provisioned state.
-
To restrict usage of the Bash shell for tenant administrators, set Appliance Mode to Enabled (this is Disabled by default.)
-
To attach the cloud-init as a reference, select the cloud-init Reference from the drop down.
Important: You can add the cloud-init as a reference, when the Tenant is not in a deployed state.
-
Click Save.
The tenant is reconfigured according to the changes made.
You can monitor data and metrics related to the usage, performance, and behavior of the tenant from the webUI. These statistics are crucial for monitoring, managing, and optimizing the tenant. You can monitor the following tenant details:
- Tenant CPU Usage: Shows the measurement of CPU utilization by the tenant.
- Tenant Memory Usage: Shows the measurement of memory utilization by the tenant.
- Tenant Disk Usage: Shows the measurement of disk utilization by the tenant.
-
Log in to the webUI using an account with admin access.
-
On the left, click Tenant Management > Tenant Details.
-
Select a tenant from the Tenant Name dropdown to see the tenant status and statistics.
You can now see the following statistics and status of the tenant.
- Tenant CPU Usage: Displays the tenant’s vCPU’s current utilization by default. However, if multiple vCPUs are available, you can select a vCPU and change the time series to view the historical data and analyze the vCPU utilization.
- Tenant Memory Usage: Displays the tenant’s current memory utilization by default. However, you can change the time series to view historical data and analyze memory utilization.
- Tenant Disk Usage: Displays the overall tenant disk current utilization by default. However, if you need the utilization stats of a specific disk, select the Disk name, Data Type, and change the time series to view the historical data and analyze the disk utilization.
- Tenant Status: Shows the overall status of the tenant image such as Node, Instance ID, Phase, Pod name, Creation time, Ready time, Status, and Management MAC details.
-
Select the interval from the Auto Refresh dropdown to refresh the data displayed or click the refresh icon to update the tenant data immediately.
Note: The utilization data does not depend on the refresh interval. It will continue to collect utilization statistics for the tenant regardless of the selected reload interval
You can delete the cloud-Init object data using the webUI.
-
Log in to the webUI using an account with admin access.
-
On the left, click Tenant Management > Tenant Deployments.
-
Expand the section Additional Tenant Settings (cloud-init).
Select the cloud-Init you want to delete from the datatable and click on ‘Delete’ button
Note: We can only delete a cloud-Init that is not attached to any tenant.
-
Click OK on the confirmation popup.
Cloud Inits will be deleted and removed from the table.
Note: When a cloud-init attached to tenant is selected, an error pop will be displayed and we can’t delete them. Remove the cloud-Init from the tenants configured and try deleting again.
Before creating a tenant, you can display total and available tenant resources, such as vCPUs, memory, and disk space from the CLI. You can also display storage and tenant volume size from the CLI.
-
Log in to the command line interface (CLI) of the system using an account with admin access.
When you log in to the system, you are in user (operational) mode.
-
Show the total and available tenant resources.
show cluster nodes nodeThis example displays the storage and tenant volume size:
appliance-1# show cluster nodes node cluster nodes node node-1 state name node-1 state enabled true state node-running-state running state platform fpga-state FPGA_RDY state platform dma-agent-state DMA_AGENT_RDY state slot-number 1 state node-info creation-time 2026-06-24T19:53:47Z state node-info cpu 36 state node-info pods 500 state node-info memory 263573312Ki state node-info available-tenant-vcpu 32 state node-info available-tenant-memory 215456MB state node-info available-tenant-disk 313GB state node-info inaccessible-tenant-memory 0MB state ready-info ready true state ready-info last-transition-time 2026-06-24T19:53:47Z state ready-info message "kubelet is posting ready status" state disk-pressure-info disk-pressure false state disk-pressure-info last-transition-time 2026-06-24T19:53:47Z state disk-pressure-info message "kubelet has no disk pressure" state tenant-memory tenant-reserved 243168968704 state tenant-memory tenant-configured 0 state tenant-memory tenant-provisioned 15569256448 state tenant-memory tenant-deployed 0 state tenant-memory tenant-configured-percent 0 state tenant-memory tenant-provisioned-percent 6 state tenant-memory tenant-deployed-percent 0 state rate-limiting enabled state disk-usage used-percent 21 state disk-usage growth-rate 0 state disk-usage status in-range -
Show the storage and tenant volume size.
show components component storageThis example displays the storage and tenant volume size:
appliance-1# show components component storage
components component platform
storage state disks disk nvme0n1
  state model Micron_7300_MTFDHBA480TDF
  state vendor Micron
  state version 954300T0
  state serial-no 213931BC1153
  state size 480.00GB
Before you get started, you might want to upload the tenant image you want to use to a local Linux server that uses HTTPS, so you can more easily import it to the rSeries system.
You can import a tenant image onto the system from the CLI.
-
Log in to the command line interface (CLI) of the system using an account with admin access.
When you log in to the system, you are in user (operational) mode.
-
Import a tenant image to the system.
file import remote-port <*port-number*> username <*user*> password <*password*> remote-host <*ip-address-or-fqdn*> remote-file <*remote-file-path*> remote-url <*full-remote-url*> local-file imagesThis example imports a BIG-IP tenant image from server.company.com:
appliance-1(config)# file import username admin password remote-url
  https://server.company.com/images/BIGIP-1x.x.x-x.x.x.ALL-F5OS.tar.bundle
  local-file images
Before you get started, import the tenant images you want to use for the tenant deployments. You must already have created VLANs on the system. Before you can create and deploy tenants, you also need to estimate resource requirements so you know how many vCPUs, memory, and other resources to assign to the tenant.
You can create and deploy tenants from the CLI.
-
Log in to the command line interface (CLI) of the system using an account with admin access.
When you log in to the system, you are in user (operational) mode.
-
Change to config mode.
configThe CLI prompt changes to include
(config). -
Create and deploy the tenant.
tenants tenant <*name*> config <*options*>For more information about CLI options, see Tenant CLI command syntax.
For more information about DAG IPv6 prefix length, see Configure DAG IPv6 prefix length from the CLI.
-
Commit the configuration changes.
commit -
Return to user (operational) mode.
end -
You can monitor the operational state of the tenant and move the tenant into the provisioned running-state.
tenants tenant <*name*> config running-state provisionedThis causes the system to assign the tenant to nodes and create virtual disks for the tenant on those nodes.
-
Show the current status for the tenant:
show tenants tenant <*name*>When the system is creating the virtual disk and installing the image on a disk, the operational state of the tenant shows this information:
- PHASE – Allocating resources to the tenant is in progress
- status – Provisioning A summary similar to this example displays:
appliance-1# show tenants tenant v17132
tenants tenant v17132
state unit-key-hash    qOsbMbAuy7UBl11GugtqyNwaryNvJtsd2UO2DE5n6nLZ0gN5AHW2nAZvmHKOT9Tvy7urFJvkC2roYSB7TUP9Tg==
state type             BIG-IP
state image            BIGIP-17.1.3.2-0.0.32.ALL-F5OS.tar.bundle
state nodes            [ 5 6 7 8 ]
state mgmt-ip          10.218.197.247
state prefix-length    24
state gateway          10.218.197.254
state dag-ipv6-prefix-length 128
state cryptos          enabled
state tenant-auth-support disabled
state vcpu-cores-per-node 4
state qat-vf-count     6
state memory           14848
state storage size 90
state running-state    provisioned
state appliance-mode disabled
state status           provisioning
state primary-slot     5
state image-version    "BIG-IP 17.1.3.2 0.0.32"
state feature-flags clustering-as-service false
state feature-flags stats-stream-capable false
state tcp-cop disabled
state mgmt-vlan        untagged
state mgmt-vlan-accessible true
state mac-data base-mac 14:a9:d0:71:f4:0b
state mac-data mac-pool-size 1
MAC
-------------------
14:a9:d0:71:f4:0b

                INSTANCE  TENANT                                                CREATION  READY          MGMT
NODE  POD NAME  ID        SLOT    PHASE                                         TIME      TIME   STATUS  MAC
------------------------------------------------------------------------------------------------------------
5     v17132-5  5         5       Allocating resources to tenant is in progress                           -
6     v17132-6  6         6       Allocating resources to tenant is in progress                           -
7     v17132-7  7         7       Allocating resources to tenant is in progress                           -
8     v17132-8  8         8       Allocating resources to tenant is in progress                           -
When the system completes the virtual disk creation, the operational state shows this information:
- PHASE – Ready to deploy
- status – Provisioned A summary similar to this example displays:
appliance-1# show tenants tenant v17132 tenants tenant v17132 state unit-key-hash qOsbMbAuy7UBl11GugtqyNwaryNvJtsd2UO2DE5n6nLZ0gN5AHW2nAZvmHKOT9Tvy7urFJvkC2roYSB7TUP9Tg== state type BIG-IP state image BIGIP-17.1.3.2-0.0.32.ALL-F5OS.tar.bundle state nodes [ 5 6 7 8 ] state mgmt-ip 10.218.197.247 state prefix-length 24 state gateway 10.218.197.254 state dag-ipv6-prefix-length 128 state cryptos enabled state tenant-auth-support disabled state vcpu-cores-per-node 4 state qat-vf-count 6 state memory 14848 state storage size 90 state running-state provisioned state appliance-mode disabled state status Provisioned state primary-slot 5 state image-version "BIG-IP 17.1.3.2 0.0.32" state feature-flags clustering-as-service false state feature-flags stats-stream-capable false state tcp-cop disabled state mgmt-vlan untagged state mgmt-vlan-accessible true state mac-data base-mac 14:a9:d0:71:f4:0b state mac-data mac-pool-size 1 MAC ------------------- 14:a9:d0:71:f4:0b INSTANCE TENANT CREATION READY MGMT NODE POD NAME ID SLOT PHASE TIME TIME STATUS MAC ---------------------------------------------------------------------------------- 5 v17132-5 5 5 Ready to deploy - 6 v17132-6 6 6 Ready to deploy - 7 v17132-7 7 7 Ready to deploy - 8 v17132-8 8 8 Ready to deploy - -
Change to config mode.
configThe CLI prompt changes to include
(config). -
You can then deploy the tenant.
tenants tenant <*name*> config running-state deployedThis example moves the tenant into the deployed state, which causes the system to start and maintain VMs on each node to which the tenant is assigned.
-
Commit the configuration changes.
commit -
Return to user (operational) mode.
end -
You can check the status of the tenant.
show tenants tenant <*name*> state instancesA summary similar to this example displays:
appliance-1# show tenants tenant v17132 state instances

                INSTANCE  TENANT
NODE  POD NAME  ID        SLOT    PHASE    CREATION TIME         READY TIME            STATUS                   MGMT MAC
-----------------------------------------------------------------------------------------------------------------------------------
7     v17515-7  7         7       Running  2026-05-22T05:14:03Z  2026-05-22T05:15:09Z  Started tenant instance  9e:b7:44:45:a2:91
8     v17515-8  8         8       Running  2026-05-22T05:09:05Z  2026-05-22T05:15:03Z  Started tenant instance  8e:02:53:7f:84:86
Once you configure and deploy the tenant, and the Status is updated to Running, then you can use the management IP address to access the tenant system using SSH, the web-based interface, or TMOS Shell (tmsh).
Note: Once a tenant is Deployed (and is up and running), changing its state back to Configured or Provisioned stops the tenant. You will receive a warning message before this occurs.
Note: If the Status is Pending instead of Running, this might mean that there are not enough resources (vCPUs, memory, or other resources) for the tenant to be deployed. See the Tenant Details screen in the webUI for more information about the specific tenant.
You can configure the DAG IPv6 prefix length from the CLI. DAG IPv6 prefix length is a configuration field on each tenant that is used by disaggregator algorithms as a networking mask. The valid configuration value is from 1 to 128. The default value is 128. You can configure the value from either the system or the tenant.
When you configure the value at the system level, it is pushed automatically to the tenant. When you configure the prefix length at the tenant level, future configuration at the system level is disabled and must be re-enabled from the tenant.
-
Log in to the command line interface (CLI) of the system using an account with admin access.
When you log in to the system, you are in user (operational) mode.
-
Change to config mode.
configThe CLI prompt changes to include
(config). -
Configure DAG IPv6 prefix length while creating a tenant.
This propagates the value to the tenant. See Create and deploy tenants from the CLI.
-
Configure DAG IPv6 prefix length from the system after the tenant is created.
This propagates the value to the tenant.
tenants tenant <*tenant-name*> config dag-ipv6-prefix-length <value>This example changes the DAG IPv6 prefix length of a tenant named “rseries-bigip” to 120.
appliance-1(config)# tenants tenant rseries-bigip config dag-ipv6-prefix-length 120 -
Commit the configuration changes.
commit
If you configure the DAG IPv6 prefix length, but the value is not propagated to the tenant, you might have previously configured this value externally (such as from the tenant’s webUI, CLI, or REST APIs). This disables configuration at the system level. On a BIG-IP tenant, run this command sequence to re-enable configuration:
```
tmsh mod sys db dag.userconfigipv6prefixlen value false
```
You can configure a cloud-init object for a tenant from the CLI.
-
Log in to the command line interface (CLI) of the system using an account with admin access.
When you log in to the system, you are in user (operational) mode.
-
Change to config mode.
configThe CLI prompt changes to include
(config). -
Config the user-data for the cloud-init schema:
Provide user data in valid YAML format with correct syntax.
cloud-inits cloud-init <cloud-init-object-name> config user-data
(<User data (plain text accepted; stored securely)>):
[Multiline mode, exit with ctrl-D.]
[ user-data <data> ]
A summary to this example displays:
appliance-1(config)# cloud-inits cloud-init data1 config user-data (<User data (plain text accepted; stored securely)>): [Multiline mode, exit with ctrl-D.] > #cloud-config > chpasswd: > list: | > root:<root username> > admin:<admin username> > expire: False > > # Write custom file > write_files: > - path: /config/<custom-config>.sh > permissions: '0755' > owner: root:root > content: | > #!/bin/bash > echo "This log is generated by cloud-init service!!!" >> /var/tmp/cloud-init-output40 > # Wait for MCPD to be ready before running tmsh commands > source /usr/lib/bigstart/bigip-ready-functions > wait_bigip_ready > > # TMSH Configuration > tmsh modify sys global-settings gui-setup disabled > tmsh modify sys global-settings gui-security-banner-text "Configured using Cloud-Init!" > tmsh create ltm pool my_pool members add { <IP address> } > tmsh create ltm virtual my_vs destination <IP address> pool my_pool > tmsh create net vlan vlan-2000 tag 2000 > tmsh create net vlan vlan-2001 tag 2001 > tmsh save /sys config > > # Run commands at boot > runcmd: > - /config/<custom-config>.sh & > - echo "Text by cloud-init1!!" >> /var/tmp/cloud-init-output6 > > final_message: | > Cloud-init has completed successfully. > Hostname: `hostname` > Timestamp: `date` > -
Commit the configuration changes.
commit
You can reference a cloud-init object for a tenant from the CLI.
-
Log in to the command line interface (CLI) of the system using an account with admin access.
When you log in to the system, you are in user (operational) mode.
-
Change to config mode.
configThe CLI prompt changes to include
(config). -
Apply the cloud-Init Object reference:
tenants tenant <tenant-name> config name <tenant-config-name> image <image-name> cloud-init <cloud-init-object-name> ...A sumary to this example displays:
appliance-1(config)# tenants tenant vm1 config type BIG-IP image BIGIP-tmos-bugs-staging-21.0.0-0.0.9721.ALL-F5OS.tar.bundle nodes 1 vcpu-cores-per-node 4 memory 12288 running-state deployed mgmt-ip 10.238.157.213 gateway 10.238.157.254 prefix-length 24 cloud-init ? Possible completions: data1 appliance-1(config)# tenants tenant vm1 config type BIG-IP image BIGIP-tmos-bugs-staging-21.0.0-0.0.9721.ALL-F5OS.tar.bundle nodes 1 vcpu-cores-per-node 4 memory 12288 running-state deployed mgmt-ip 10.238.157.213 gateway 10.238.157.254 prefix-length 24 cloud-init data1 appliance-1(config-tenant-vm1)# commit Commit complete. -
Commit the configuration changes.
commit
You can display detailed information about configured tenants from the CLI.
-
Log in to the command line interface (CLI) of the system using an account with admin access.
When you log in to the system, you are in user (operational) mode.
-
Show the tenants that are currently configured.
show tenantsThis example displays the operational data for a BIG-IP tenant. It uses one VLAN, no cryptos, two vCPU cores, and appliance mode is not enabled. The Instance table in the output displays the live health of the tenant running on the rSeries system.
OperationalMode ~ ] # show tenants tenant v17132 tenants tenant v17132 state unit-key-hash qOsbMbAuy7UBl11GugtqyNwaryNvJtsd2UO2DE5n6nLZ0gN5AHW2nAZvmHKOT9Tvy7urFJvkC2roYSB7TUP9Tg== state type BIG-IP state image BIGIP-17.1.3.2-0.0.32.ALL-F5OS.tar.bundle state nodes [ 5 6 7 8 ] state mgmt-ip 10.218.197.247 state prefix-length 24 state gateway 10.218.197.254 state dag-ipv6-prefix-length 128 state cryptos enabled state tenant-auth-support disabled state vcpu-cores-per-node 4 state qat-vf-count 6 state memory 14848 state storage size 90 state running-state provisioned state appliance-mode disabled state status provisioning state primary-slot 5 state image-version "BIG-IP 17.1.3.2 0.0.32" state feature-flags clustering-as-service false state feature-flags stats-stream-capable false state tcp-cop disabled state mgmt-vlan untagged state mgmt-vlan-accessible true state mac-data base-mac 14:a9:d0:71:f4:0b state mac-data mac-pool-size 1 MAC ------------------- 14:a9:d0:71:f4:0b INSTANCE TENANT CREATION READY MGMT NODE POD NAME ID SLOT PHASE TIME TIME STATUS MAC ------------------------------------------------------------------------------------------------------------ 5 v17132-5 5 5 Allocating resources to tenant is in progress - 6 v17132-6 6 6 Allocating resources to tenant is in progress - 7 v17132-7 7 7 Allocating resources to tenant is in progress - 8 v17132-8 8 8 Allocating resources to tenant is in progress - -
Show the running configuration of the tenants.
show running-config tenants tenantA summary similar to this example displays:
OperationalMode ~ ] # show tenants tenant v17515
tenants tenant v17515
state unit-key-hash    lfZlBbwa6YJ/rpFiY8e4HQgSELGv2bTzcOyv5htbiU+/bJ2mzV3a80TFhhW/aGdda7Ise3pG0DbxlmPzNzhXZw==
state type             BIG-IP
state image            BIGIP-17.5.1.5-0.0.6.ALL-F5OS.tar.bundle
state cloud-init       testcloud
state nodes            [ 7 8 ]
state mgmt-ip          10.218.197.246
state prefix-length    24
state gateway          10.218.197.254
state dag-ipv6-prefix-length 128
state cryptos          enabled
state tenant-auth-support disabled
state vcpu-cores-per-node 8
state qat-vf-count     12
state memory           29184
state storage size 90
state running-state    deployed
state appliance-mode disabled
state status           Running
state primary-slot     7
state image-version    "BIG-IP 17.5.1.5 0.0.6"
state feature-flags clustering-as-service false
state feature-flags stats-stream-capable true
state tcp-cop disabled
state mgmt-vlan        untagged
state mgmt-vlan-accessible true
state mac-data base-mac 14:a9:d0:71:f4:0a
state mac-data mac-pool-size 1
MAC
-------------------
14:a9:d0:71:f4:0a

NODE  CPUS
-------------------------------
7     [ 17 3 21 7 23 9 4 18 ]
8     [ 23 9 3 17 2 16 5 19 ]

                INSTANCE  TENANT
NODE  POD NAME  ID        SLOT    PHASE    CREATION TIME         READY TIME            STATUS                   MGMT MAC
-----------------------------------------------------------------------------------------------------------------------------------
7     v17515-7  7         7       Running  2026-05-22T05:14:03Z  2026-05-22T05:15:09Z  Started tenant instance  9e:b7:44:45:a2:91
8     v17515-8  8         8       Running  2026-05-22T05:09:05Z  2026-05-22T05:15:03Z  Started tenant instance  8e:02:53:7f:84:86
You can view the cloud-Init Configuration for a tenant from the CLI
-
Log in to the command line interface (CLI) of the system using an account with admin access.
When you log in to the system, you are in user (operational) mode.
-
Display the cloud-Init Configuration:
show cloud-inits cloud-int <cloud-init-object-name>
You can monitor data and metrics related to the usage, performance, and behavior of a tenant from the CLI. These statistics, tenant CPU usage, memory usage, and disk usage, are crucial for monitoring, managing, and optimizing the tenant.
-
Log in to the command line interface (CLI) of the system using an account with admin access.
When you log in to the system, you are in user (operational) mode.
-
Change to config mode.
configThe CLI prompt changes to include
(config). -
Show tenants status and statistics.
tenants tenant <*tenant name*> state <*action*>This example displays the tenant status and statistics for a BIG-IP tenant running on the rSeries system.
-
For CPU stats:
appliance-1(config)# tenants tenant cbip state cpu-thread-stats average 1m-avg averages { unix-seconds 1717588320 cpu-threads { cpu-thread { thread-index 0 busy-percent 1 } cpu-thread { thread-index 1 busy-percent 0 } cpu-thread { thread-index 2 busy-percent 0 } cpu-thread { thread-index 3 busy-percent 4 } cpu-thread { thread-index 4 busy-percent 4 } cpu-thread { thread-index 5 busy-percent 4 } cpu-thread { thread-index 6 busy-percent 4 } cpu-thread { thread-index 7 busy-percent 12 } cpu-thread { thread-index 8 busy-percent 4 } cpu-thread { thread-index 9 busy-percent 1 } cpu-thread { thread-index 10 busy-percent 4 } cpu-thread { thread-index 11 busy-percent 4 } cpu-thread { thread-index 12 busy-percent 4 } appliance-1(config)# -
For disk stats:
appliance-1(config)# tenants tenant cbip state disk-stats average 1m-avg averages { unix-seconds 1717588260 used-percent 88 disk-list { disk { disk-name nvme0n1 total-iops 0 read-iops 0 read-bytes 148 write-iops 154 write-bytes 1691163 } } } appliance-1(config)# -
For interface stats:
appliance-1(config)# tenants tenant cbip state interface-stats average 1m-avg averages { unix-seconds 1717588380 interface-list { interface { interface-name 1.0 ifc-bytes-in 1466 ifc-bytes-out 0 ifc-packets-in 0 ifc-packets-out 0 } interface { interface-name 2.0 ifc-bytes-in 135 ifc-bytes-out 0 ifc-packets-in 0 ifc-packets-out 0 } } } appliance-1(config)# -
For memory stats:
appliance-1(config)# tenants tenant cbip state memory-stats average 1m-avg
averages {
        unix-seconds 1717588440
        available 8493508881
        free 1060426615
        used-percent 93
        platform-total 16107667456
        platform-used 8114811835
    }
appliance-1(config)#
-
You can modify a tenant configuration from the CLI.
The administrator is able to modify only these fields while the tenant is running:
- Running-state
- VLANS
- Nodes
-
Log in to the command line interface (CLI) of the system using an account with admin access.
When you log in to the system, you are in user (operational) mode.
-
Show configuration information for the tenant you want to update.
show tenants tenant <*name*> -
Change to config mode.
configThe CLI prompt changes to include
(config). -
You can modify these options while the tenant is running: vlans, nodes, running-state, or virtual-wires.
tenants tenant <*name*> config [ vlans <*vlan-id*> | nodes { 1 | 2 } | running-state { configured | provisioned | deployed } ] -
To modify any of the other options, first change the running state of the tenant to provisioned.
tenants tenant <*name*> config running-state provisionedMake the desired changes. For more information, see the Tenant CLI command syntax section.
-
Commit the configuration changes.
commit
You can resize the storage quota for a tenant virtual disk from the CLI.
-
Log in to the command line interface (CLI) of the system using an account with admin access.
When you log in to the system, you are in user (operational) mode.
-
Display configuration information for the tenant you want to update.
show tenants tenant <*name*> -
Change to config mode.
configThe CLI prompt changes to include
(config). -
Change the storage quota, in GB, for the virtual disk for a specified tenant.
The default size is 77 GB.
tenants tenant big-ip config storage size 80Note: You cannot modify the size of the virtual disk when the tenant is in the deployed running-state. The tenant must be in a configured or provisioned running-state.
-
Commit the configuration changes.
commit
You can delete the cloud-Init configuration for a tenant from the CLI
-
Log in to the command line interface (CLI) of the system using an account with admin access.
When you log in to the system, you are in user (operational) mode.
-
Change to config mode.
configThe CLI prompt changes to include
(config). -
Delete the cloud-Init configuration:
no tenants tenant <tenant-name> config cloud-init -
Commit the configuration changes.
commit
You can delete the cloud-Init object data using the CLI
-
Log in to the command line interface (CLI) of the system using an account with admin access.
When you log in to the system, you are in user (operational) mode.
-
Change to config mode.
configThe CLI prompt changes to include
(config). -
Delete the cloud-Init Object data:
no cloud-inits cloud-Init <cloud-init-object-name>A summary to this example displays:
appliance-1# show cloud-inits cloud-Init data1 usage % No entries found. appliance-1# show tenants tenant vm1 state cloud-Init % No entries found. appliance-1# Commit the configuration changes. commit -
Commit the configuration changes.
commit
You can delete tenant configurations from the CLI.
-
Log in to the command line interface (CLI) of the system using an account with admin access.
When you log in to the system, you are in user (operational) mode.
-
Show the tenants that are currently configured in the system to check the names of the tenants.
show tenants -
Change to config mode.
configThe CLI prompt changes to include
(config). -
Remove a tenant configuration.
no tenants tenant <*tenant-name*> -
Commit the configuration changes.
commit
The tenant deployment is removed from the system.
Note: When you delete a Big-IP tenant, the K3s server requires an average of 20 to 30 seconds to delete each tenant. For Big-IP Next tenant, it requires an average of 100 to 120 seconds to delete each tenant.
Use the tenants command from the CLI to configure tenants on the system.
The tenant command includes this syntax and these options:
tenants tenant <*options*>|
Option |
Value |
Description |
|---|---|---|
|
appliance-mode |
enabled or disabled (default) |
When enabled, appliance-mode disallows root and Bash access for the tenant. |
|
cryptos |
enabled or disabled (default) |
Specifies the crypto device support for the tenant. When enabled, the tenant receives dedicated crypto devices proportional to the number of vCPU cores. When disabled, the tenant receives no crypto device support. |
|
gateway |
IP address |
Specifies the IPv4/IPv6 address of the default gateway for the management network. This IP address can be changed on the tenant itself. This field is required. |
|
image |
Image name for the tenant |
Specifies which software image to install on newly-created virtual disks for this tenant. This field is required. |
|
mac-data |
Available options are: - one - Represents a block with one MAC.
|
Specifies configuration data for MAC block size per tenant. |
|
memory |
Memory allocated for the tenant |
Specifies the memory in MBs for the tenant. For the commit to succeed, tenant configuration requires the minimum MBs depending on the number of cores specified for the tenant. The administrator must decide what amount of dedicated memory is needed to satisfy the requirements of the modules that will be provisioned within the tenant. For more information on resource allocation, see Tenant resource allocation overview. |
|
mgmt-ip |
IP address |
Specifies the management IP address to the tenant. This address applies to the primary node of the tenant. The address can be changed on the tenant. This field is required. |
|
nodes |
Node numbers in square brackets separated by a space. For example, [1 2] |
Lists the nodes to which the tenant can be assigned. This field is required. |
|
prefix-length |
Decimal value |
Specifies the prefix length of the management network. This field is required. |
|
running-state |
Configured (default), provisioned, or deployed |
Specifies the state of a tenant: configured, provisioned, or deployed. Tenants are in the configured state by default. Configured means the tenant exists but has no hardware resources (CPU or memory) allocated to it and is not running. When the tenant is provisioned, the system assigns the tenant to nodes and creates virtual disks for the tenant on those nodes. In the deployed state, allocated resources are used to launch the tenant VM. Note that specifying deployed causes the actions that occur in the configured and provisioned states. To shut down the tenant VM without removing the virtual disk, change the running-state from deployed to provisioned. Changing the tenant running-state to configured from provisioned or deployed stops the tenant, but maintains the configuration. |
|
storage |
Storage quota in GB for the tenant |
Specifies how much storage quota a tenant is allocated. The default size is 77 GB. You cannot modify the size of the virtual disk when the tenant is in the deployed running-state. You can modify the storage size when the tenant is in configured or provisioned running-states. For information on determining minimum disk size, see Tenant sizing. |
|
tenant-auth-storage | ||
|
trust-mode (F5 r2000/r4000 platforms only) |
false or true (default) |
Specifies whether a tenant is trusted. MAC masquerade (MM) is required for high availability (HA) on F5 r2000/r4000 platforms, and only between trusted tenants. Important: This option is available only on F5 r2000/r4000 platforms. For more information about configuring MM, see K13502: Configuring MAC masquerade (11.x - 17.x). Note: Enabling trust mode might reduce the security profile of the platform. |
|
type |
BIG-IP (default) |
Specifies the supported tenants on the system. The field is not required. |
|
vcpu-cores-per-node |
Decimal number |
Specifies how many cores a tenant is allocated from each node to which it is assigned. Use tab completion to see a list of possible values on the current rSeries system. The default value is 2 |
|
virtual-wires |
Virtual wire name |
Specifies which user-specified virtual-wires to use for the tenant. |
|
vlans |
VLAN ID |
Specifies the VLAN ID to be used for tenant traffic. To process the traffic through the tenant, make sure the VLAN is configured on the system. |
You can configure tenants for high-availability (HA) on an rSeries system similar to how it is done on a BIG-IP system or for vCMP guests. To implement high-availability, you set up device service clustering or DSC. DSC provides synchronization and failover of BIG-IP configuration data and traffic groups on two or more tenants. The tenant administrator sets up DSC on the tenants.
For information on BIG-IP Next tenant configuration, see my.f5.com.
If you plan to set up mirroring, you must use an additional system. Connection mirroring requires that both rSeries systems have identical hardware platforms.
Important: Tenants must have identical resources to ensure seamless HA failover. F5 does not support HA between tenants on disparate platforms.
For more information, see these guides at K000130285: F5 Product Manuals Index:
Before you begin, you must set up two rSeries systems with initial configuration, management IP addresses, gateways, DNS servers, and licensing. For more information, see F5 rSeries Systems: Software Installation and Upgrade and other sections in this guide.
Note:
The F5 r2000/r4000 systems require that MAC masquerade (MM) is configured for high availability (HA). MAC masquerade can only be configured on trusted tenants. Ensure that you have enabled trust-mode for any tenant on which you plan to configure HA see Create and deploy tenants from the CLI. For more information about configuring MM, see K13502: Configuring MAC masquerade (11.x - 16.x).
You can set up high availability for two BIG-IP tenants that reside on two separate rSeries systems.
-
Log in to the system and deploy a BIG-IP tenant.
Note: Make sure that both tenants are running the same BIG-IP software version and that it is compatible with rSeries systems.
-
On the tenants, set up L2 network connectivity between the two tenants including setting up VLANs and self-IPs for ConfigSync, failover, and mirroring.
For example, create the same VLAN on both tenants with management IP addresses that can communicate with each other.
-
Log in to each tenant and set the failover ConfigSync address to the self IP addresses on both sides.
-
Establish device trust: On one of the tenants, go to Device Management > Device Trust, create a device trust, and add the management IP of the other tenant.
-
Create a Sync-Failover device group: On the tenants, go to Device Management > Device Group and create a device group with the Group Type option set to Sync-Failover.
For more information, see the “Working with Device Groups” section in BIG-IP Device Service Clustering: Administration at K000130285: F5 Product Manuals Index.
-
On the tenants, go to Device Management > Devices, select the device and initiate the first ConfigSync manually.
-
For tenants on the F5 r2000/r4000 platforms, configure MAC masquerade.
For more information, see the “Managing Failover” section in BIG-IP Device Service Clustering: Administration at K000130285: F5 Product Manuals Index).
For information about configuring MAC masquerade, see K13502: Configuring MAC masquerade (11.x - 17.x).
After setting up HA for tenants, you can optionally create traffic groups, enable mirroring on the virtual servers, and sync the configurations.
Understand that there are many ways to configure HA, and this summary explains the general work flow for how to approach tenant HA. Your environment might require additional steps.