


Updated Date: 07/07/2026
Chassis Partitions
On the VELOS platform, a chassis partition is a kind of virtual system or subset of the chassis that handles the management and separation of disjoint sets of blades within the chassis. The chassis has eight slots, which can contain up to eight blades. One or more slots are assigned to a chassis partition, which then controls whatever blade is inserted into it (if any).
The chassis can be divided into multiple chassis partitions, and a chassis partition can have multiple tenants. A tenant is a guest system running software (for example, a BIG-IP system).
The chassis, chassis partitions, and tenants in the chassis partitions each have separate sets of users, and they have different functions at the different levels. The chassis administrator manages the whole chassis and creates chassis partitions. The chassis partition administrator manages their chassis partition only.
Within the VELOS system, a chassis administrator can create chassis partitions then allocates one or more slots that work as a separate computing cluster for traffic. A chassis might contain multiple chassis partitions, and a slot might belong to only one chassis partition at a time. For example, an 8-slot chassis could potentially have up to 8 chassis partitions, one slot each.
The VELOS system comes initially preconfigured with one default chassis partition. The slots for all blades are automatically assigned as members of the default chassis partition. The blades in the chassis can be used that way, so they work together as one powerful system to process network traffic, or reconfigured into multiple chassis partitions that are organized into smaller subsets of the chassis.
These are chassis partition attributes:
- A chassis is divided into distinct sets of slots called chassis partitions.
- A slot (and the blade it contains, if any) can be part of only one chassis partition.
- Each chassis partition is an independently managed entity with its own addressable management stack. The system controller is responsible for isolating traffic between chassis partitions.
- Each chassis partition provides REST APIs, a CLI, and a webUI to use to perform management tasks.
- The chassis partition administrator configures L2 networking, deploys tenants, and performs other administrative duties within the chassis partition.
- Each chassis partition can have multiple tenants.
- Tenants can span multiple slots in a chassis partition.
- The VELOS platform supports F5-signed tenants only.
The chassis partition is designed so that all of the chassis partition configuration data is constantly stored in an active location and replicated to a standby location. It is already configured for high availability. The active and standby instances of a single partition are always on different system controllers—one is on system controller 1, and the other is on system controller 2. The active chassis instance, however, might not always reside on the active system controller. The active and standby chassis partition instances swap roles during a failover event.
Configuration data is not shared between chassis partitions. Each chassis partition runs its own software image. Chassis partition configuration data is kept independent from other chassis partitions.
You can view details on how the chassis partitions are configured on your VELOS system from the system contoller webUI.
-
Log in to the VELOS system controller webUI using an account with admin access.
-
On the left, click CHASSIS PARTITIONS.
The Chassis Partitions screen opens.
-
Review the chassis partition data:
- Examine the graphic to see how many slots are in use. Those in use are highlighted.
- Review the chassis partition list to see how many chassis partitions currently exist, which slots are associated with each partition, the management IP address of each, whether the chassis partition is Enabled or Disabled, and the operational status.
-
Perform other tasks as needed regarding chassis partition management:
- From here, you can create, edit, or delete chassis partitions.
- You can Enable or Disable a chassis partition using the Enable/Disable partition list.
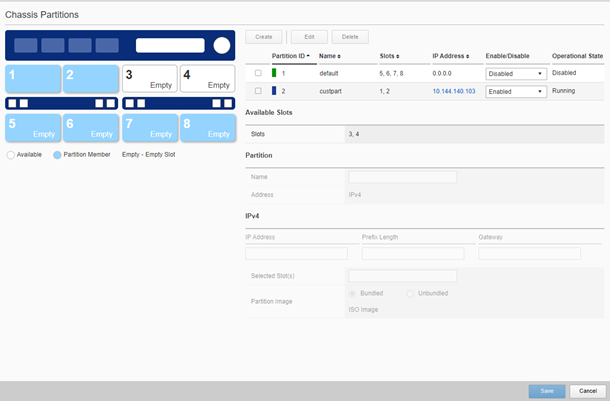
Here is a sample Chassis Partitions screen with two chassis partitions: one named custpart, which uses the two slots that contain blades, and the other, default, which is assigned four empty slots. The custpart partition is Enabled and running.
Before creating a chassis partition, make sure you have chassis partition software images in the Software Management area. You can download the latest versions from the F5 downloads website. When creating a chassis partition, you will need to specify which image to install and run.
Note: The VELOS system initially comes preconfigured with one default chassis partition that you can use instead of having to create custom chassis partitions. The slots for all blades are automatically assigned as members of the default chassis partition. The blades in the chassis can be used that way or reconfigured into multiple chassis partitions that are organized into smaller subsets of the chassis.
You create chassis partitions by dividing the chassis into subsets of blades from the system controller webUI. You assign one or more blades to form the chassis partition. Associating more blades with a chassis partition provides greater computing power to accommodate the workload requirements for tenants deployed on that chassis partition.
-
Log in to the VELOS system controller webUI using an account with admin access.
-
On the left, click CHASSIS PARTITIONS.
The Chassis Partitions screen displays a graphical view of the VELOS chassis, which shows available slots, which slots contain blades, how many chassis partitions currently exist, which slots are associated with the chassis partition, and whether the chassis partitions are enabled or disabled.
-
If all slots are assigned to the default chassis partition, before you can create a new chassis partition, you first need to select one or more slots and remove them from the default chassis partition. (Otherwise, the Create button will be unavailable.)
-
On the chassis graphic, select the slots to associate with the chassis partition you are creating.
Note: Make sure the slots you select are not already in use by other partitions.
The slots you select need not have blades installed when creating a chassis partition. For example, you can set up partitions before additional blades are available and install them later.
-
To create a new partition, click Create.
If using the default partition, select it and click Edit instead.
-
In the list of chassis partitions, for Name, type a name for the chassis partition.
Note: Partition names must consist only of alphanumerics (0-9, a-z, A-Z), must begin with a letter, and are limited to 31 characters.
-
To configure IPv4 addresses, in the IPv4 section:
-
For IP Address, type the IP address of the chassis partition.
-
For Prefix Length, enter a number from 1-32 for the length of the prefix.
-
For Gateway, type the IP address of the gateway.
-
-
To configure IPv6 addresses, in the IPv6 address section:
-
For IP Address, type the IP address of the chassis partition.
-
For Prefix Length, enter a number from 1-32 for the length of the prefix.
-
For Gateway, type the IP address of the gateway.
-
-
Review Selected Slots, which shows the slots you selected in the chassis graphic to be included in the chassis partition.
-
For Partition Image, define the software to use for the chassis partition:
-
Click either Bundled or Unbundled.
Choose Bundled if you are installing the entire operating system for the chassis partition (use the ISO Image). Choose Unbundled if you are installing a service update (specify Base OS Version and Service Versions to use).
-
Select the previously uploaded software image (or images) to run on the chassis partition.
-
-
Click Save.
A new chassis partition is created, enabled, and shown in the chassis partition list.
Note: If the chassis partition does not change automatically to the Enabled state, you can manually select Enabled from the Enabled/Disabled list.
You can now log in to the chassis partition using its management IP address to access the chassis partition webUI and CLI.
You can edit a chassis partition if you need to change its configuration from the system controller webUI.
-
Log in to the VELOS system controller webUI using an account with admin access.
-
On the left, click CHASSIS PARTITIONS.
The Chassis Partitions screen opens.
-
From the chassis partition list, select the chassis partition that you want to edit.
-
Click Edit.
-
Adjust the settings as needed.
For example, you can add available slots to a chassis partition or delete slots from a chassis partition (so they can be added to another partition).
-
Click Save.
You should not need to change chassis partition to something other than the default configuration (Auto), but you can opt to change it or initiate a failover from the active chassis partition to the standby from the chassis partition webUI.
-
Log in to the VELOS chassis partition webUI using an account with admin access.
-
On the left, click SYSTEM SETTINGS > High Availability.
-
For Preferred Node, select the system controller to run the active instance of the chassis partition, or choose Auto to let the system decide.
Note: Using Auto is strongly recommended.
Hardware health conditions of the system controllers always take precedence. If one of the system controllers is not healthy, the chassis partition will ignore the preference and synchronize with the healthy system controller.
If you select a preferred node other than auto, the preference is ignored unless you enable Auto Failback.
-
If you really want to indicate a preference and have selected one of the system controllers (not auto):
-
Set Auto Failback to Enabled.
-
In the Failback Delay field, type the number of seconds to delay before initiating the failback.
-
-
To force a failover to occur immediately, for Force Failover, click Failover.
You would only do this only if you want the current standby system controller to become the active system controller.
The VELOS system includes one preconfigured chassis partition that includes all slots, by default. You can create additional chassis partitions but you need to remove the slots associated with the default chassis partition first.
-
Log in to the command line interface (CLI) of the system controller using an account with admin access.
When you log in to the system, you are in user (operational) mode.
-
Change to config mode.
configThe CLI prompt changes to include
(config). -
Create a chassis partition by naming the chassis partition and specifying the ISO version, management IP address (IPv4), gateway IP address, prefix length (1-32), and then enabling the chassis partition.
Note: Chassis partition names must consist of only alphanumerics (0-9, a-z, A-Z), must begin with a letter, and are limited to 31 characters.
partitions partition <*partition-name*> config iso-version <*iso-version*> mgmt-ip ipv4 address <*address*> gateway <*gateway-ip*> prefix-length <*prefix-length*> ipv6 address <*address*> gateway <*gateway-ip*> prefix-length <*prefix-length*> enabledThis example creates a chassis partition named
customwith an IPv4 IP address of 192.0.2.20, a gateway address of 192.0.2.254, a prefix length of 24, and enables it:partitions partition custom config iso-version 1.0.0-12022 mgmt-ip ipv4 address 192.0.2.20 mgmt-ip ipv4 gateway 192.0.2.254 prefix-length 24 enabled -
Commit the configuration changes.
commit
The system creates the chassis partition. You can now log in to the chassis partition using its management IP address to access the chassis partition webUI, the chassis partition CLI over SSH, or use the REST API.
After you have created a chassis partition, you can enable it and log in to it using the default admin username and password.
-
Use SSH to log in to the chassis partition using the management IP address.
This example shows the admin user logging in to partition 1:
ssh admin@192.0.2.20
admin@192.0.2.20's password:
Last login: Fri, Oct 30 08:02:15 2020 from 192.0.2.20
Welcome to the F5OS Chassis Partition Management CLI
admin connected from 192.0.2.20 using ssh on partition1
partition1#
You can work in the chassis partition to set up networking parameters, configure the interface, VLANS, and LAG. You can also add VELOS system users, if needed, set up logging, and install and deploy a tenant in the chassis partition.
Before you can use a chassis partition, you must add slots to the chassis partition. Slots can be assigned to one partition only.
-
Log in to the command line interface (CLI) of the system controller using an account with admin access.
When you log in to the system, you are in user (operational) mode.
-
Show how chassis partitions and slots are currently configured on the system.
show running-config slotsIn this example, all slots are still assigned to the default chassis partition:
default-1# show running-config slots slots slot 1 partition default ! slots slot 2 partition default ! slots slot 3 partition default ! slots slot 4 partition default ! slots slot 5 partition default ! slots slot 6 partition default ! slots slot 7 partition default ! slots slot 8 partition default ! -
Change to config mode.
configThe CLI prompt changes to include
(config). -
Add the slot to a specified chassis partition.
slots slot [ default | <*slot-number*> | none ] partition <*partition-name*>This example adds slot 1 to a chassis partition named custompartition:
slots slot 1 partition custompartition -
Repeat to add slots to other chassis partitions.
-
Commit the configuration changes.
commit -
Return to user (operational) mode.
end -
Confirm that the chassis partitions and slots are correctly configured on the system.
show running-config slotsA summary similar to this example displays:
default-1# show running-config slots
slots slot 1
 partition custompartition
!
slots slot 2
 partition default
!
slots slot 3
 partition default
!
slots slot 4
 partition default
!
slots slot 5
 partition default
!
slots slot 6
 partition default
!
slots slot 7
 partition default
!
slots slot 8
 partition default
!
After adding slots to chassis partitions, the blade reboots to install the appropriate chassis partition software.
You can remove slots from a chassis partition.
-
Log in to the command line interface (CLI) of the system controller using an account with admin access.
When you log in to the system, you are in user (operational) mode.
-
Show how chassis partitions and slots are currently configured on the system.
show running-config slotsA summary similar to this example displays:
default-1# show running-config slots slots slot 1 partition default ! slots slot 2 partition default ! slots slot 3 partition default ! slots slot 4 partition default ! slots slot 5 partition default ! slots slot 6 partition default ! slots slot 7 partition default ! slots slot 8 partition default ! -
Change to config mode.
configThe CLI prompt changes to include
(config). -
Remove a specified slot from a chassis partition.
slots slot <*slot-number*> partition noneThis example removes slot number 8 from a chassis partition:
slots slot 8 partition none -
Commit the configuration changes.
commit -
Return to user (operational) mode.
end -
Confirm that the chassis partitions and slots are correctly configured on the system.
show running-config slots
You can show the chassis partitions that were created on the system controllers from the system controller CLI.
-
Log in to the command line interface (CLI) of the system controller using an account with admin access.
When you log in to the system, you are in user (operational) mode.
-
Show the chassis partitions that are currently configured on the system.
show partitionsIn this example, the chassis has three chassis partitions: default, partition2, and partition3:
default-1# show partitions PARTITION NAME CONTROLLER ID STATUS ----------------------------------------------- default 1 1 running-standby 2 1 running-active none 1 0 disabled 2 0 disabled part2 1 5 running 2 5 running part3 1 2 running-standby 2 2 running-active part4 1 3 running-standby 2 3 running-active -
Show how the slots are currently configured on the system.
show running-config slotsIn this example, all of the slots are assigned to the default chassis partition:
default-1# show running-config slots
slots slot 1
 partition default
!
slots slot 2
 partition default
!
slots slot 3
 partition default
!
slots slot 4
 partition default
!
slots slot 5
 partition default
!
slots slot 6
 partition default
!
slots slot 7
 partition default
!
slots slot 8
 partition default
!
You can show the status of chassis partition redundancy from the chassis partition CLI.
-
Log in to the command line interface (CLI) of the chassis partition using an account with admin access.
When you log in to the system, you are in user (operational) mode.
-
Show the chassis partition redundancy configuration.
show system redundancyThis example shows a chassis partition with two assigned slots.
default-1# show system redundancy
system redundancy state mode auto
system redundancy state auto-failback disabled
system redundancy state auto-failback failback-delay 30
system redundancy state current-active controller-2
system redundancy state status redundant
SERVICES
NAME          STATUS   FAULT  STARTUP TIME         LAST TRANSITION      OS VERSION   VERSION
--------------------------------------------------------------------------------------------------
blade-1       replica  false  2021-09-13 17:38:22  2021-09-13 17:38:23  1.2.1-10781  1.2.1-10781
blade-2       replica  false  2021-09-13 17:38:31  2021-09-13 17:38:31  1.2.1-10781  1.2.1-10781
controller-1  standby  false  2021-09-13 17:32:48  2021-09-13 17:32:48  1.2.1-10781  1.2.1-10781
controller-2  active   false  2021-09-13 17:31:50  2021-09-13 17:32:18  1.2.1-10781  1.2.1-10781