


Updated Date: 07/07/2026
System Settings
You can access system settings in the system controller webUI and chassis partition webUI, but the settings are different in the two areas.
This table lists the available system settings in the system controller and chassis partition webUIs:
| System controller webUI | Chassis partition webUI |
|---|---|
| Alarms and Events | Alarms and Events |
| Controller Management | Cluster Details |
| System Inventory | High Availability |
| Log Settings | Log Settings |
| File Utilities | File Utilities |
| Time Settings | Device Certificate |
| Device Certificate | System Reports |
| System Reports | Configuration Backup |
| Configuration Backup | General |
| Licensing | |
| Software Install Status | |
| General |
The Alarms & Events screen is available in both the system controller and chassis partition webUIs. This screen lists the alert information for all performance and network indicators that have currently crossed a performance or health threshold. Use this screen to identify the specific object that is affected.
-
Log in to the VELOS system controller webUI or the chassis partition webUI using an account with admin access.
-
On the left, click SYSTEM SETTINGS > Alarm & Events.
-
These actions are available:
- To refresh the alarms or events list, click the Refresh icon on the right of the screen.
- To display events result by time preference, click the down arrow next to Refresh icon, select a value from the list. The default value is one hour. For example, select five minutes to display any event that occurred in the last five minutes.
- To display events by severity, select a value from the Severity list. The default value is WARNING.
Option Description Emergency Emergency system panic messages Alert Serious errors that require administrator intervention Critical Critical errors, including hardware and file system failures Error Non-critical, but possibly important, error messages Warning Warning messages that should be logged and reviewed Notice Messages that contain useful information, but might be ignored Informational Messages that contain useful information, but might be ignored Debug Verbose messages used for troubleshooting
You can configure system controller high availability (HA) from Controller Management screen on the system controller webUI. The system controllers work together as a redundant pair. The default mode for system controller HA is Auto, which automatically selects the system controller that is best suited at the time as the active controller and fails over only as needed.
The High Availability screen on the chassis partition webUI includes options for configuring chassis partition HA. High availability is already implemented for chassis partitions on the VELOS system.
You should not need to change system controller high availability (HA) to something other than the default configuration (Auto), but you can opt to change the configuration or initiate a failover from the active controller to the standby from the system controller webUI.
-
Log in to the VELOS system controller webUI using an account with admin access.
-
On the left, click SYSTEM SETTINGS > Controller Management.
-
For the Preferred Node field, select System Controller 1 or System Controller 2 to act as an active system controller, or choose Auto (recommended).
Note: Changing the Preferred Node configuration creates a failover event and ends the session if you select the system controller that is currently acting as the standby. Wait 30 seconds and then start a new session with either the floating IP address or the active system controller IP address after the change has completed.
Hardware health conditions of the system controllers always take precedence. If one of the system controllers is not healthy, the chassis partition will ignore the preference and synchronize with the healthy system controller.
-
To force a failover to occur immediately, click Failover.
Note: The Failover button is available only when Preferred Node field is set to Auto.
You would do this only if you want the current standby system controller to become the active system controller.
You should not need to change chassis partition to something other than the default configuration (Auto), but you can opt to change it or initiate a failover from the active chassis partition to the standby from the chassis partition webUI.
-
Log in to the VELOS chassis partition webUI using an account with admin access.
-
On the left, click SYSTEM SETTINGS > High Availability.
-
For Preferred Node, select the system controller to run the active instance of the chassis partition, or choose Auto to let the system decide.
Note: Using Auto is strongly recommended.
Hardware health conditions of the system controllers always take precedence. If one of the system controllers is not healthy, the chassis partition will ignore the preference and synchronize with the healthy system controller.
If you select a preferred node other than auto, the preference is ignored unless you enable Auto Failback.
-
If you really want to indicate a preference and have selected one of the system controllers (not auto):
-
Set Auto Failback to Enabled.
-
In the Failback Delay field, type the number of seconds to delay before initiating the failback.
-
-
To force a failover to occur immediately, for Force Failover, click Failover.
You would only do this only if you want the current standby system controller to become the active system controller.
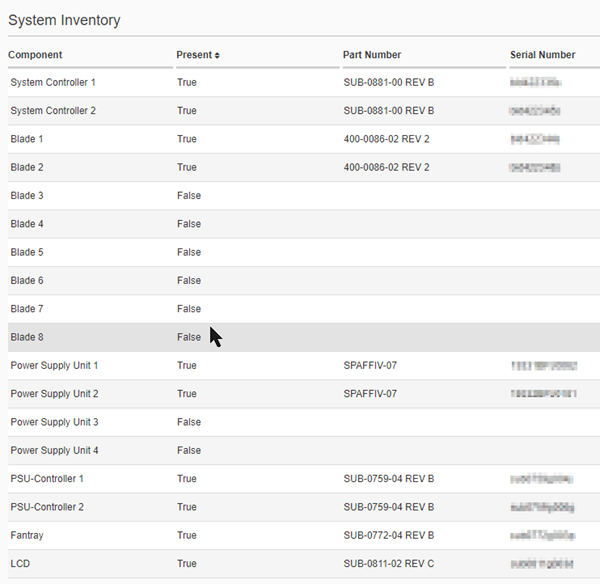
The System Inventory screen on the system controller webUI enables you to see an inventory of all components on the VELOS system, including the system controllers, blades, power supply units (PSU), PSU controller, fan tray, and LCD. The inventory includes the component name, status, part number, and serial number.
You can display an inventory of all of the system components on the VELOS system, including the system controllers, blades, power supply units (PSU), PSU controller, fan tray, and LCD from the system controller webUI. The inventory includes the component name, status, part number, and serial number.
-
Log in to the VELOS system controller webUI using an account with admin access.
-
On the left, click SYSTEM SETTINGS > System Inventory.
The system inventory displays, and you can review the information about the components on the VELOS system. An example is shown here.
The system controller and chassis partition webUIs include options for configuring remote log servers and the log severity level for individual software components and services.
Both webUIs also enable you to generate a system report, or QKView file, to collect configuration and diagnostic information from the VELOS system if you have any concerns about your system operation. The QKView file contains machine-readable (JSON) diagnostic data and combines the data into a single compressed tar.gz format file. You can upload the QKView file to F5 iHealth where you can get help to verify proper operation of the system and get help with troubleshooting and understanding any issues you might be having and ensure that the system is operating at its maximum efficiency.
You can add and display information about configured remote log servers from either the system controller or chassis partition webUIs. You can also change the log severity level for individual software components and services.
-
Log in to the VELOS system controller webUI or the chassis partition webUI using an account with admin access.
-
On the left, click SYSTEM SETTINGS > Log Settings.
-
To add access to a Remote Log Server, click Add.
-
In the Server field, type the IPv4 address, IPv6 address, or Fully Qualified Domain Name (FQDN) of the remote server.
-
In the Port field, type the port number of the remote server.
The default port value is 514.
-
For Protocol, select UDP or TCP to choose between TCP or UDP input.
-
From the Facility list, select LOCAL0.
F5OS supports only the LOCAL0 logging facility. All logs are directed to this facility, and it is the only one that you can use for remote logging.
-
From the Severity list, select the severity level of the messages to log.
Option Description Emergency Emergency system panic messages Alert Serious errors that require administrator intervention Critical Critical errors, including hardware and file system failures Error Non-critical, but possibly important, error messages Warning Warning messages that should be logged and reviewed Notice Messages that contain useful information, but might be ignored Informational Messages that contain useful information, but might be ignored Debug Verbose messages used for troubleshooting -
Click Save & Close.
-
On the Log Settings screen, review the software component log levels for individual software components and adjust them as needed. Click Save if you made changes.
The log levels determine at what level events (and all higher levels) are logged for each service. Informational is the default so all except debug-level events are logged.
-
To delete a remote log server, select the server and click Delete.
If you want to upload the report to the F5 iHealth server, your VELOS system must have DNS configured and have Internet access to these services using the HTTPS/443 remote service/port:
- api.f5.com
- ihealth-api.f5.com
You can generate a system controller QKView from either the system controller or chassis partition webUI. Both reports contain diagnostic information, such as configuration data, log files, and platform information.
-
Log in to the VELOS system controller webUI or the chassis partition webUI using an account with admin access.
-
On the left, click SYSTEM SETTINGS > System Reports.
The System Reports screen displays. A list of QKView reports that were previously generated are shown with any reports that were uploaded to iHealth.
-
To generate a system report, click Generate QKView in the upper right corner of the screen.
The Generate QKView box displays these additional options:
|
Option |
Description |
|---|---|
|
Filename |
Specify a name for the file to which QKView data is written. The default filename is <system-name>.qkview. |
|
Timeout Value |
Specify the time in seconds after which to stop QKView collection. The default value is 0, which indicates no timeout. |
|
Max File Size |
Exclude all files greater than the specified size (in MB). The range is from 2 MB to 1000 MB. The default value is 500 MB. |
|
Max Core Size |
Exclude core files greater than this size (in MB). The range is from 2 MB to 1000 MB. The default value for maximum core size is 25 MB. |
|
Exclude Cores |
Specify whether core files should be excluded from QKView. The default is to include core files. |
**Note:** The system runs many commands to collect the diagnostic information, so generating the report might affect its performance.

It takes a few minutes for the system to finish creating the report and list it on the screen. The QKView Status changes to `File generated successfully` when it is done.
-
To upload the report to the F5 iHealth server, select the check box next to the QKView name and click Upload to iHealth.
The QKView tar file uploads to iHealth, where you can get help to diagnose the health and proper operation of the system.
-
To delete a QKView report, select it and click Delete.
You can import a file from an external server into the system controller or chassis partition from either the webUI or the CLI. HTTPS is the supported protocol. The remote host should be an HTTPS server with PUT/POST enabled and have a valid CA-signed certificate.
Note: If you want to import the contents of a tar file, you need to extract the contents first before you can import them onto the VELOS system.
You can import files onto the system controller into these directories:
- images/staging
- images/import
- diags/shared/
- configs/
You can import files onto the chassis partition into these directories:
- diags/shared
- configs
- images
You can export a file from the system controller or chassis partition to an external server from either the webUI or the CLI. HTTPS is the supported protocol. The remote host should be an HTTPS server with PUT/POST enabled and have a valid CA-signed certificate.
You can export files from the system controller in these directories:
- configs/
- log/confd
- log/controller
- log/host
- diags/core
- diags/crash
- diags/shared
- images/import
- images/staging
You can export files from the chassis partition in these directories:
- configs/
- diags/core
- diags/shared
- images
- log
You can delete files (to which you have file permissions) from specific folders on the VELOS system.
You can delete files on the system controller from the diags/shared directory.
You can delete files on the chassis partition from the diags/shared directory.
File Utilities are available in both the system controller and chassis partition webUIs. You can use File Utilities to import, export, and/or delete files asynchronously depending on which directory you select to work in. All file transfers are done using HTTPS protocol.
-
Log in to the VELOS system controller webUI or the chassis partition webUI using an account with admin access.
-
On the left, click SYSTEM SETTINGS > File Utilities.
-
From the Base Directory list, browse the directories and click subfolders to view their contents and the commands that are available from each one.
From a subfolder, click the left arrow next to the path to navigate back to the main folder.
-
To import a file, click Import.
-
In the popup, type the URL of the file to import.
-
Provide the Username and Password only if required by the remote host.
-
Select Ignore Certificate Warnings if you want to skip warnings when importing files (such as if the remote host does not have a valid CA-signed certificate).
-
Click Import File to begin the import.
-
-
To export a file, select the file and click Export.
-
In the popup, type the Server URL for where to export the file.
-
Provide the Username and Password only if required by the remote host.
-
Select Ignore Certificate Warnings if you want to skip warnings when importing files.
-
Click Export File to begin the export.
-
-
To delete a file, select the file and click Delete.
On the system controller and chassis partition, you can delete files from
diags/shared.
You can view the status of a file transfer operation to view its progress and see if it was successful. If an operation fails, hover over the warning icon to see the error that occurred.
Note: A runtime error displays in the File Transfer status area, if an invalid operation is performed.
You can import files onto your system from either the system controller or chassis partition CLI.
-
Log in to the command line interface (CLI) of the system controller or chassis partition using an account with admin access.
When you log in to the system, you are in user (operational) mode.
-
Import a file.
file import [ remote-port <*port-number*> ] username <*user*> password <*password*> remote-host <*ip-address-or-fqdn*> remote-file <*remote-file-path*> local-file <*local-file-path*> [insecure]Note: The insecure option ignores certificate warnings during the transfer.
This example shows how to import a file to the system controller:
file import username admin password xxxxxxxx remote-host files.company.com remote-file /tmp/BIGIP-bigip14.1.x-miro-14.1.x.xx.x.xxx.ALL-VELOS.qcow2.zip local-file images/stagingThis example shows how to import a file to the chassis partition:
file import username admin password remote-host files.company.com remote-file /tmp/BIGIP-bigip14.1.x-miro-14.1.x.x-x.x.xxx.ALL-VELOS.qcow2.zip local-file images -
Return to user (operational) mode.
end -
Optionally, you can check the file transfer status.
file transfer-status file-name <*local-file-path*>
You can export files from either the system controller or chassis partition CLI.
-
Log in to the command line interface (CLI) of the system controller or chassis partition using an account with admin access.
When you log in to the system, you are in user (operational) mode.
-
Export a file.
file export [ remote-port <*port-number*> ] username <*user*> password <*password*> remote-host <*ip-address-or-fqdn*> remote-file <*remote-file-path*> local-file <*local-file-path*>
You can delete files from either the system controller or chassis partition CLI.
-
Log in to the command line interface (CLI) of the system controller or chassis partition using an account with admin access.
When you log in to the system, you are in user (operational) mode.
-
Delete a file.
file delete file-name <*local-file-path*>
Before VELOS systems can exchange data with one another, they need to exchange device certificates, that is, digital certificates and keys used for secure communication.
If you are using LDAP with transport layer security (TLS) for user authentication, you can choose to require TLS Certificate Validation in the authentication settings. You can add a certificate and key into the system, and when you create a certificate signing request (CSR), it saves the generated key and certificate to these directories:
system/aaa/tls/config/keysystem/aaa/tls/config/certificate
Before you can install device certificates, you must enable LDAP as an authentication method in the system controller or chassis partition in which you are working (USER MANAGEMENT > Auth Settings).
You can view or replace TLS device certificates from either the system controller or chassis partition webUI. The device certificates apply only to the area in which you are working.
-
Log in to the VELOS system controller webUI or the chassis partition webUI using an account with admin access.
-
On the left, click SYSTEM SETTINGS > Certificate Management.
-
To display a TLS Certificate or TLS Key that was previously installed, click Show.
A text area opens and displays the certificate or key.
-
To install a TLS Certificate, paste the text of the local certificate for client TLS authentication.
-
To install a TLS Key, paste the text of the local certificate for client TLS authentication.
-
Click Save.
You can activate a license for the VELOS system from either the system controller CLI or webUI. There is one license per VELOS system, which is used by the chassis partitions and any tenants.
There are two ways to license the system:
- Automatically
- If your system is connected to the Internet, use the Automatic method to prompt the system to contact the F5 license server and activate the license.
- Manually
- If your system is not connected to the Internet, use a management workstation that is connected to the Internet to retrieve an activation key from F5 and then transfer it to the system.
Important:
Adding or reactivating a license on an active VELOS system might impact traffic on tenants running on chassis partitions. Traffic processing will stop briefly on the tenants, and then restart automatically. This occurs when the tenant receives a new or reactivated license causing a configuration reload on the tenants. For more information, see:
- VELOS Systems: Installation and Upgrade at the F5OS Knowledge Center
- K31810358: Activating the license on a VELOS system causes a brief traffic disruption on tenants
- K7752: Licensing the BIG-IP system
You can license the system automatically from the system controller webUI, as long as the system has Internet access.
-
Log in to the VELOS system controller webUI using an account with admin access.
-
On the left, click SYSTEM SETTINGS > Licensing.
-
For the Base Registration Key field, the registration key is auto-populated.
You can choose to overwrite this field with a new registration key.
-
For the Add-On Keys field, the associated add-on keys are auto-populated.
You can click + or x to add or remove additional add-on keys.
Note: To add add-on keys to a licensed system, enter the keys in the Add-On Keys field and click Reactivate.
-
For the Activation Method, select Automatic.
-
Click Activate.
The End User License Agreement (EULA) displays.
-
Click Agree to accept the EULA, .
The system is now licensed. If a base registration key or add-on key fails to activate, try re-activating the license or contact support.f5.com.
You can use the webUI to manually license the VELOS system for systems without access to the Internet.
-
Log in to the VELOS system controller webUI using an account with admin access.
-
On the left, click SYSTEM SETTINGS > Licensing.
-
For the Base Registration Key field, the registration key is auto-populated.
You can choose to overwrite this field with a new registration key.
-
For the Add-On Keys field, the associated add-on keys are auto-populated.
You can click + or x to add or remove additional add-on keys.
Note: To add add-on keys to a licensed system, enter the keys in the Add-On Keys field and click Reactivate.
-
For the Activation Method, select Manual.
-
For the Device Dossier, click Get Dossier.
The VELOS system refreshes and displays the dossier.
-
Copy the dossier text into the Device Dossier field.
-
Click Click here to access F5 Licensing Server.
The Activate F5 Product page displays.
-
Paste the dossier in the Enter Your Dossier field.
-
Click Next.
The license key text displays.
-
Copy the license key text.
Alternatively, you can use the F5 license activation portal at activate.f5.com/license.
-
In the License Text field, paste the license key text.
-
Click Activate.
The End User License Agreement (EULA) displays.
-
Click Agree to accept the EULA.
The system is now licensed. If a base registration key or add-on key fails to activate, try re-activating the license or contact support.f5.com.
For automatic VELOS system licensing, the system needs to be able to connect to the F5 licensing server either through the Internet or another means of networking. You need to have the Base Registration Key (five sets of characters separated by hyphens) provided by F5, and any add-on keys (two sets of 7 characters separated by a hyphen) that you have purchased. The Base Registration Key with associated add-on keys are pre-installed on a new VELOS system.
You can activate the VELOS system license automatically from the system controller CLI.
-
Connect using SSH to the system controller floating management IP address.
-
Log in to the command line interface (CLI) of the system controller using an account with admin access.
When you log in to the system, you are in user (operational) mode.
-
Change to config mode.
configThe CLI prompt changes to include
(config). -
Apply a license to the chassis.
system licensing install registration-key <*key*>The registration key is optional. If it is not included, the system uses the one that is already pre-installed. If no registration key is found, you receive an error.
This example applies a specified base registration license to the system:
syscon-1-active(config)# system licensing install registration-key I1234-12345-12345-12345-1234567 result License installed successfully. -
Apply any add-on keys.
system licensing install add-on-keys <*add-on-keys*>This example enables the additional features associated with the three specified add-on-keys, along with the entitlements of the base registration key:
syscon-1-active(config)# system licensing install
 add-on-keys [1234567-1234567 2345678-2345678 3456789-3456789]
result License installed successfully.
The VELOS system is licensed. The license and any add-on keys apply to all partitions and BIG-IP tenants.
You can activate the VELOS system license manually from the system controller CLI.
-
Connect using SSH to the system controller floating management IP address.
-
Log in to the command line interface (CLI) of the system controller using an account with admin access.
When you log in to the system, you are in user (operational) mode.
-
Change to config mode.
configThe CLI prompt changes to include
(config). -
Get the system dossier.
system licensing get-dossier [registration-key XXXXX-XXXXX-XXXXX-XXXXX-XXXXXXX]The registration key is optional. If it is not included, the system uses the one already pre-installed. If no registration key is found, you receive an error.
The dossier for the system displays.
-
Get the license file using the dossier output you just received by going to the F5 siteactivate.f5.com/license/dossier.jsp.
-
Install the license.
-
Copy the license file text.
-
Run the manual install command and press Enter:
system licensing manual-install license -
Paste the license file content in multiline mode, then press Ctrl+D.
syscon-1-active(config)# system licensing manual-install license Value for 'license' (<string>): [Multiline mode, exit with ctrl-D.] > -
The VELOS system is licensed. The license applies to all of the chassis partitions and BIG-IP tenants.
You can display the license of a VELOS system from the system controller CLI.
-
Connect using SSH to the system controller floating management IP address.
-
Log in to the command line interface (CLI) of the system controller using an account with admin access.
When you log in to the system, you are in user (operational) mode.
-
Display the system license in a simple form.
show system licensingA summary similar to this example displays:
syscon-1-active# show system licensing system licensing license Licensed version 7.4.0 Registration Key Gxxxx-xxxxx-xxxxx-xxxxx-xxxxxxxx Licensed date 2021/01/01 License start 2021/04/16 License end 2022/01/01 Service check date 2021/12/02 Platform ID F101 Appliance SN chs600144s Active Modules Local Traffic Manager, CX410 (Exxxxxx-xxxxxx) Best Bundle, CX410 APM-Lite Carrier Grade NAT (AFM ONLY) Max Compression, CX410 Rate Shaping Max SSL, CX410 Advanced Firewall Manager, CX410 Access Policy Manager, Base, CX410 Anti-Virus Checks Base Endpoint Security Checks Firewall Checks Machine Certificate Checks Network Access Protected Workspace Secure Virtual Keyboard APM, Web Application App Tunnel Remote Desktop Advanced Routing, CX410 Advanced Web Application Firewall, CX410 DNS, Max QPS, CX410 -
Display the raw license file content that was received from the F5 license server.
show running-config system licensing
The VELOS system is licensed. The license applies to all of the chassis partitions and BIG-IP tenants.
You can run the system in appliance mode. Appliance mode adds a layer of security by restricting user access to root and Bash. When enabled, the root user cannot log in to the system by any means, including from the serial console.
You can enable appliance mode at each of these levels:
- System controller
- Chassis partition
- Tenant
Appliance mode is disabled at all levels, by default. You can enable it from the webUI or the CLI. The appliance mode option for system controllers and partitions is available to users with admin access under SYSTEM SETTINGS > General in the respective webUIs. For tenants, it is available in the chassis partition webUI under TENANT MANAGEMENT > Tenant Deployments.
These are the effects of enabling appliance mode at each of the different levels.
System controller appliance mode
- Root or Bash access is disabled on both system controllers.
- The AOM menu on the system controllers is unavailable.
- Users can access the system controllers through the webUI or CLI.
- Console access: Root or Bash access is disabled on both system controller consoles. Users can log in to the system controller CLI from the console using an admin account.
Chassis partition appliance mode
- Root access to the chassis partition is disabled by all means. Bash access is disabled for admin and operator accounts.
- The AOM menu is unavailable on the blades in the chassis partition.
- Users can access the chassis partition through the webUI or the CLI.
- Console access is disabled on all blades in a chassis partition. Users cannot log in to blades (only the root account is generally present on blades. The root account gets disabled on blades).
Tenant appliance mode
- Root access to the tenant is disabled by all means. Bash access is disabled for users (with a terminal shell flag enabled) inside the tenant.
- Users can access the tenant only through the webUI of the CLI.
- Tenant console access: Users can log in to the CLI from the virtual console using an admin account (with a terminal shell flag enabled).
You can enable appliance mode if you want to disable all root and Bash shell access.
Note: For greater security, it is highly recommended that you configure the system controllers and chassis partitions to run in appliance mode.
From the system controller webUI, appliance mode disables root and Bash access to the controllers. From the chassis partition webUI, appliance mode limits access to the specific partition you are logged in to. You can enable or disable the appliance mode for system controllers and partitions from their respective webUIs.
Note: The appliance mode option for tenants is available in the chassis partition webUI under TENANT MANAGEMENT > Tenant Deployments.
-
Log in to the VELOS system controller webUI or the chassis partition webUI using an account with admin access.
-
On the left, click SYSTEM SETTINGS > General.
-
For Appliance Mode, select Enabled to enable it, or Disabled to disable it (the default).
-
Click Save.
The Controller Management screen on the system controller webUI includes options for updating system controller software.
The Software Install Status screen on the system controller webUI enables you to monitor the progress of the updates to system controllers and the chassis partitions software.
Before you begin, consider creating a backup of the system controller configuration before you update the system. Configuration file backups are stored in configs/. To export the configuration file, use File Utilities or the file export command. For more information, see the Back up system configurations from the webUI section.
Before you begin, you must also have imported the updated system controller software image before you can do the update. Go to Software Management > Controller Images to import the software image file.
You can update system controller software while the system is up and running with only a brief interruption from the system controller webUI. The software update is applied automatically to the system controllers one at a time in a rolling update. F5 recommends, however, that you perform the update during a maintenance window.
-
Log in to the VELOS system controller webUI using an account with admin access.
-
On the left, click SYSTEM SETTINGS > Controller Management.
-
In the Update Software section, for Update System Controller Software:
- To install a full F5OS-C version release, select Bundled.
- To install F5OS-C and service version releases independently, select Unbundled.
-
For ISO Image, select the full version release ISO image.
This field is available when Bundled is selected.
-
For Base OS Version, select the F5OS version.
This field is available when Unbundled is selected.
-
For Service Version, select the service version release.
This field is available when Unbundled is selected.
-
Click OK to continue with the update.
When updating from 1.2.x to a greater release: first, the system updates the standby system controller, reboots it, and then the standby becomes the active system controller. You will have to log in again after the failover occurs. The system then updates the other system controller (now in standby), and no other interruptions occur.
Note: F5 recommends updating the system during a maintenance window. Do not perform any configuration operations while the system is being updated.
The system controllers are both updated. Traffic is interrupted briefly during the failover from one system controller to the other. If the update is not successful, the system reverts to the last working software version on both system controllers. You can monitor the update progress on the System Settings > Software Installation Status screen.
You can view the software installation status for the system controllers and the chassis partitions from the system controller webUI.
-
Log in to the VELOS system controller webUI using an account with admin access.
-
On the left, click SYSTEM SETTINGS > Software Install Status.
Software installation status is shown for both system controllers and the chassis partitions. You can see whether a recent installation was successful and view what software version is running.
A cluster on a VELOS system is group of blades or nodes working together as a logical unit. The Cluster Details screen on the chassis partition webUI provides detailed information about clusters that might be useful when a chassis partition is made up of more than one slot/blade.
You can view detailed information about clusters from the chassis partition webUI.
-
Log in to the VELOS chassis partition webUI using an account with admin access.
-
On the left, click SYSTEM SETTINGS > Cluster Details.
-
Set the Auto Refresh interval for refreshing the data displayed or click the refresh icon to update the data immediately.
-
View the cluster detail information.
You can configure general system settings for the VELOS system, such as system date/time settings and system hostname. Depending on which setting you want to configure, you can use either the CLI or the webUI.
The Time Settings screen is available in the system controller webUI. After the VELOS system license is activated, you can configure the Network Time Protocol (NTP) servers and time zone. The NTP server ensures that the VELOS system clock is synchronized with Coordinated Universal Time (UTC). You can specify a list of servers that you want the system to use when updating the time on network systems.
-
Log in to the VELOS system controller webUI using an account with admin access.
-
On the left, click SYSTEM SETTINGS > Time Settings.
-
To synchronize the system clock with an NTP server, for NTP Service, click Enabled.
The NTP Service is set to Disabled, by default.
-
To specify an NTP server, click Add.
-
In the NTP Server field, type the IPv4 address, IPv6 or the Fully Qualified Domain Name (FQDN) of the NTP server.
Note: If specifying an FQDN, you must configure a resolvable DNS server for the system.
-
To set the time zone, select the time zone area from the Locations list.
-
Click Save & Close.
You can manually configure the date and time for your system from the CLI.
-
Connect using SSH to the system controller floating management IP address.
-
Log in to the command line interface (CLI) of the system controller using an account with admin access.
When you log in to the system, you are in user (operational) mode.
-
Change to config mode.
configThe CLI prompt changes to include
(config). -
Change the system date and/or time.
Note: You can opt to change only the time or only the date by including only the relevant option (either time or date).
system set-datetime date <*YYYY-MM-DD*> time <*HH:MM-SS*>In this example, you change the system date to 2021-01-01 and the system time to be 12:01:00:
system set-datetime date 2021-01-01 time 12:01:00
The system date/time is now updated.
You can manually configure the hostname for your system from the CLI. The hostname must be fully qualified domain name (FQDN).
-
Connect using SSH to the system controller floating management IP address.
-
Log in to the command line interface (CLI) of the system controller using an account with admin access.
When you log in to the system, you are in user (operational) mode.
-
Change to config mode.
configThe CLI prompt changes to include
(config). -
Change the hostname.
system config hostname <*hostname*>The minimum length is 1 character, and the maximum length is 253 characters.
In this example, you change the hostname for the system to test.company.com:
system config hostname test.company.com
The system hostname is now updated.
If you are having an issue with a chassis partition (such as unusually high CPU or memory usage or lockup), it is possible that rebooting a blade in the chassis partition might help to resolve the issue.
When there is a problem, the system sends alerts that you would see on the dashboard or on the Alarms & Events screen. A blade status of Not ready for a prolonged time on the General screen can also indicate the need to reboot the blade. You should rarely have to reboot a blade, however, because typically if the VELOS system needs to reboot a blade, it will do so automatically without administrator intervention. F5 recommends working with customer support if you think a blade reboot is necessary.
You can manually reboot a system controller in your VELOS system from the system controller CLI.
-
Connect using SSH to the system controller floating management IP address.
-
Log in to the command line interface (CLI) of the system controller using an account with admin access.
When you log in to the system, you are in user (operational) mode.
-
Change to config mode.
configThe CLI prompt changes to include
(config). -
Reboot a system controller.
system reboot controllers controller [ active | standby ]In this example, you reboot the standby system controller:
syscon-1-active# system reboot controllers controller standby
The specified system controller reboots.
You can manually reboot a blade in your system from the chassis partition CLI.
-
Connect using SSH to the chassis partition management IP address.
-
Log in to the command line interface (CLI) of the chassis partition using an account with admin access.
When you log in to the system, you are in user (operational) mode.
-
Change to config mode.
configThe CLI prompt changes to include
(config). -
Reboot a blade.
cluster nodes node <*blade-number*> rebootIn this example, you reboot blade-1:
default-1#(config) cluster nodes node blade-1 reboot
The specified blade reboots.
You can reboot a blade within a chassis partition from the chassis partition webUI.
-
Log in to the VELOS chassis partition webUI using an account with admin access.
-
On the left, click SYSTEM SETTINGS > General.
-
Review the status of each of the blades in the chassis partition.
The Reboot button will not be available for slots that do not have blades present, or for blades that are currently being rebooted.
-
If you have tenants running on the chassis partition you might want to warn users that their service might be interrupted temporarily.
-
If you decide that a reboot is necessary, click Reboot on the right of the slot containing the blade you want to reboot.
It takes a few minutes for the blade to reboot. The status will show
Reboot in progress, thenNot ready, and when reboot is complete, it saysReady.