Manual Chapter :
Metadata Utilities nsck and sync
Applies To:
Show Versions
ARX
- 6.3.0
The Namespace-Check (nsck) and synchronization (sync) utilities manipulate the metadata in managed volumes. Metadata is high-level information such as physical-file locations on back-end filers, modification-time stamps, and file sizes. The nsck utility can show a volumes metadata to reveal which back-end shares hold its files and directories. If you suspect that the metadata is inconsistent with the back-end files, you can use nsck to re-examine the filers and compare the results with the metadata. Wherever nsck finds metadata inconsistencies, you have the opportunity to correct them.
| nsck report shows the current state of metadata, |
| nsck rebuild rebuilds an entire namespace by re-importing all of its shares, |
| nsck destage removes all metadata for a volume, share, or filer so that you can directly access the filer(s), and |
| nsck migrate moves a volumes metadata from one back-end share to another. |
Before you begin running nsck and sync jobs, it is helpful to know how to monitor their progress. You can monitor the progress of any nsck or sync job with the show nsck command:
bstnA(gbl)# show nsck
bstnA(gbl)# ...
To view only the nsck and/or sync jobs for one namespace, add the namespace clause to the end of the show nsck command:
show nsck namespace namespace
where namespace (1-30 characters) specifies the namespace.
bstnA(gbl)# show nsck namespace wwmed
bstnA(gbl)# ...
Use the Op Id (from the output of the above commands) to focus the show nsck command on a single nsck or sync job:
show nsck job-id
where job-id specifies the ID for the nsck or sync job.
bstnA(gbl)# show nsck 1
bstnA(gbl)# ...
Use show nsck all to see details for all nsck and sync jobs:
bstnA(gbl)# show nsck all
bstnA(gbl)# ...
The show nsck command is focused on job status; if all nsck and sync jobs are cleared from the database (as described below), no jobs appear in show nsck. To see an up-to-date list of nsck or sync reports, use show reports type:
Dstg lists all metadata-inconsistencies reports,
Inc lists all metadata-inconsistencies reports,
MdO lists all metadata-only reports,
MgMd lists all metadata-migration reports,
MdU lists all metadata-upgrade reports, A metadata upgrade may occur in the background after you install a new software release.
Rbld lists all rebuild reports,
Sync lists all sync reports, and
SySh lists all sync-share reports.
bstnA# show reports type Sync
bstnA# ...
Use show reports status to show the one-line status for a particular report:
show reports status report-name
where report-name (1-1024 characters) selects the report.
The output is a single status line for the report; it matches the line from the show reports output.
bstnA# show reports status sync.3._rcrds.rpt
bstnA# ...
You can use the nsck report metadata-only command to show the physical locations of all files and directories in a namespaces managed volumes. A files physical location is its directory path including the IP address of the filer where it resides; for example, 192.168.25.21:/usr/local/bin. You can use this command to see the before-and-after effects of namespace policy on the actual location of your files.
From priv-exec mode, use the nsck report metadata-only command to show physical file locations for a namespace:
namespace (1-30 characters) specifies a namespace on which to report. Use the show namespace command for a list of configured namespaces.
path (optional, 1-256 characters) narrows the scope of the report to a specific virtual path in the namespace (for example, /eng/share). This must be a managed volume or a path within a managed volume.
norecurse (optional) specifies to not recurse into subdirectories during the report.
Note: You can run only one nsck job (report or rebuild) at a time on a given managed volume. Use show nsck to monitor the progress of nsck jobs; see Showing the Progress of nsck and sync Jobs.
The report goes to a file, metadata_only.id.rpt. The id is a unique number for every nsck report. The CLI shows the report name after you invoke the command. Use show reports to see the file listing; use show, tail, or grep to read the file. To save the report off to an external FTP site, use the copy ... ftp command from priv-exec mode.
| a) | Type is a list of file types (shown as keys from the legend above), |
| b) | Share is the filer-share name with the file, and |
| c) | Path is the exact path of the file on the share, relative to the shares root. |
bstnA(gbl)# end
bstnA# nsck wwmed report metadata-only
bstnA# show reports metadata_only.5.rpt
bstnA# ...
You can generate a report that focuses on one managed-volume share. Use the optional share clause to report the metadata for a single share:
share share-name (optional; 1-64 characters) specifies the namespace share.
If the share does not hold any of the files in the path, the report is empty.
bstnA(gbl)# end
bstnA# nsck wwmed report metadata-only share bills
Use the optional outputfile clause to send the nsck results to a file other than the default, metadata_only.n.rpt:
outputfile file-name (optional; 1-256 characters) specifies a prefix for the file name. Use show reports to see the file listing; use show, tail, or grep to read the file. If the file-name already exists, the CLI prompts for confirmation.
bstnA(gbl)# end
bstnA# nsck wwmed report metadata-only share bills outputfile wwmed_bills
This report operation can require a long time and heavy CPU resources if run on a very-large namespace. You can use the cancel nsck report command to cancel a long-running nsck report:
cancel nsck report job-id
where job-id (1-2,147,483,647) identifies the nsck-report job to cancel. This ID appears in the output of show nsck.
bstnA(gbl)# show nsck
bstnA(gbl)# end
bstnA# cancel nsck report 19
You can display a summary of a managed volume's directory structure without having to run an actual metadata report, using the CLI command nsck report dir-structure. This generates a directory structure report that you can view later.
name specifies the namespace for which to run the directory structure report.
path specifies a volume or volume/path on which to report.
norecurse indicates that the report will not explore subdirectories.
summary indicates that the report will not list the details of the individual subdirectories it encounters.
outputfile specifies the name of the file to which the report output is written. The "outputfile" option is a report prefix that has the ".rpt" extension appended to it at a minimum. If no path is specified, the file name is outputfile.volume.rpt.
Use the show reports type ds CLI command to list the directory structure reports that have been generated already.
Directory structure reports can be cancelled by executing the command cancel nsck report id, where id specifies the nsck job to be cancelled. nsck jobs have IDs in the range of 1 to 2,147,483,647.
Whenever a managed-volume client tries to access a file that has been removed by one of the above operations, the client system reports an internal error. For CIFS operations, messages appear in the syslog (labeled UNXFINDNONE, UNXNOPATH, UNXOPENTYPE and/or UNXCRETYPE.), and the namespace software sends an SNMP trap (vcifsNotfound or vcifsTypeMismatch). Use grep to search the syslog for a string. (The syslog is rotated regularly; use show logs for a complete list of all log files, including backups.)
To find the exact scope of metadata inconsistency, use the nsck report inconsistencies command described below.
The nsck report inconsistencies utility detects metadata inconsistencies and produces a report. Metadata inconsistencies occur when a client is connected directly to a back-end share and performs writes or deletes through that direct connection. Without the ARX in the data path, the switch has no knowledge of the changes and cannot update its metadata.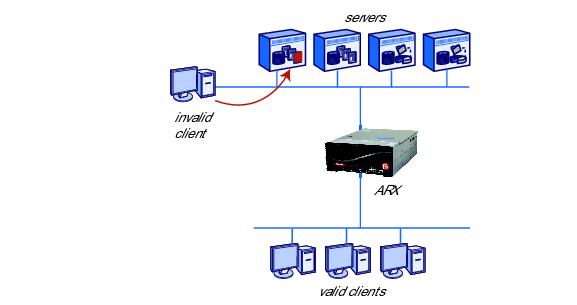
You can use the nsck report inconsistencies to determine whether to run sync files or a full nsck rebuild on a namespace, or to confirm that there are no inconsistencies at all.
From priv-exec mode, use the nsck report inconsistencies command to check the current namespaces managed volumes for metadata inconsistency:
nsck name report inconsistencies [path] [share share-name] [norecurse] [nofilehandles] [outputfile outputfile]
name (1-30 characters) is the namespace on which to report. Use the show namespace command for a list of configured namespaces.
path (optional, 1-256 characters) narrows the scope of the report to a specific virtual path in the namespace (for example, /home/jrandom). This must be a managed volume, or a path within a managed volume.
share share-name (optional, 1-64 characters) narrows the scope further, to a single namespace share. This is the shares name in the namespace, not on the filer.
norecurse (optional) specifies to not recurse into subdirectories during the report.
nofilehandles (optional) specifies to not validate filehandles during a report.
outputfile outputfile (optional, 1-256 characters) specifies a prefix for a customized file name (for example, jrandom_inconsistencies), as opposed to the default. Use the show reports command to display the file in the maintenance directory.
You can run one nsck job at a time on a given volume. Use show nsck to monitor the progress of nsck jobs; see Showing the Progress of nsck and sync Jobs.
The CLI shows the report name after you invoke the command. Use show reports for a full list of nsck reports, and use show, tail, or grep to view one report. The report contains the following information:
| 3. |
| a) | Type - a list of the files inconsistencies (shown as keys from the legend above), |
| b) | Share - the name of the ARX share with the inconsistent file, and |
| c) | Path - the exact path of the file on the share, relative to the shares root. |
bstnA(gbl)# end
bstnA# nsck medarcv report inconsistencies norecurse
bstnA# show reports inconsistencies.15.rpt
bstnA# ...
A volume in a multi-protocol (CIFS and NFS) namespace may have files whose names are inconsistent between CIFS and NFS. Some characters are legal in NFS file names but unsupported in CIFS names, just as CIFS has some naming conventions that NFS cannot always follow. (These issues are discussed extensively in a later chapter about troubleshooting managed volumes.) To create a report that shows all multi-protocol naming issues in a volume, add the multi-protocol flag to the nsck ... report inconsistencies command:
nsck name report inconsistencies [path] [share share-name] [norecurse] [nofilehandles] [multi-protocol] [outputfile outputfile]
multi-protocol (optional) focuses the report on NFS/CIFS naming issues, and
bstnA(gbl)# end
bstnA# nsck insur report inconsistencies multi-protocol outputfile insur_fgns
bstnA# show reports insur_fgns._claims.rpt
bstnA# ...
This report operation can require a long time and heavy CPU resources if run on a very-large namespace. As with a metadata-only report, you can use the cancel nsck report command to cancel a long-running inconsistencies report:
cancel nsck report job-id
where job-id (1-2,147,483,647) identifies the nsck-report job to cancel. This ID appears in the output of show nsck.
bstnA(gbl)# show nsck
bstnA(gbl)# end
bstnA# cancel nsck report 30
An earlier example showed a file, copyRandom.exe, that is recorded in volume metadata but is missing from its back-end filer. You can use the sync utility to re-synchronize the metadata with the actual contents of the filers. You can configure a CIFS volume to automatically sync itself whenever a client encounters a metadata error (see Automatically Synchronizing Metadata (CIFS), on page 9-10 of the ARX® CLI Storage-Management Guide), or you can run the sync operation manually as described here. From priv-exec mode, use the sync files command to synchronize metadata for files:
namespace (1-30 characters) is the namespace to sync. Use the show namespace command for a list of configured namespaces (see Listing All Namespaces, on page 7-4 of the ARX® CLI Storage-Management Guide).
vol-path (1-1024 characters) chooses a specific managed volume in the namespace. Use forward slashes (/) in the path, even for CIFS volumes.
path (1-1024 characters) selects a virtual path in the volume (for example, / or /home/jrandom). You can shorten the time required for the sync with this option; use the metadata-inconsistencies report to find the best path.
| recurse (optional) causes the sync operation to descend into subdirectories. |
| rename-files (optional) allows the sync process to rename any newly-discovered file that has the same name as a previously-imported file. (This command generates a report, described below, that identifies renamed files.) |
As with nsck jobs, every sync operation produces a report as it runs. The CLI shows the report name after you invoke the command. Use show reports for a full list of sync reports, and use show, tail, or grep to view one report. The report is similar to the metadata-inconsistencies report, described above. This report adds some additional Type keys to show which files were synchronized, were renamed, or encountered synchronization issues.
bstnA(gbl)# end
bstnA# sync files medarcv volume /rcrds path / recurse rename-files
bstnA# show reports sync.3._rcrds.rpt
bstnA# ...
Some installations require new directories that cannot be configured through the client interfaces. These directories have features that can only be added through an administrative interface on the back-end filer itself, such as disk quotas. If such a directory is created behind a managed volume, you can use the sync utility to add it to the metadata. This can only function for empty directories, and for directories that are only on a single share behind the managed volume. From priv-exec mode, use the sync directories command to search a managed-volume directory for any new, unrecorded subdirectories:
namespace (1-30 characters) is the namespace to sync. Use the show namespace command for a list of configured namespaces (see Listing All Namespaces, on page 7-4 of the ARX® CLI Storage-Management Guide).
vol-path (1-1024 characters) chooses a specific managed volume in the namespace. Use forward slashes (/) in the path, even for CIFS volumes.
path (1-1024 characters) selects a virtual path in the volume (for example, / or /home/jrandom). The sync utility searches for new directories under this path; it only searches this directory, and does not descend into any known or discovered subdirectories.
bstnA(gbl)# end
bstnA# sync directories medarcv volume /lab_equipment path /
bstnA# show reports sync.5._lab_equipment.rpt
bstnA# ...
share-name (1-64 characters) identifies the share to sync. This is the shares name in the namespace, not on the filer.
bstnA(gbl)# end
bstnA# sync files wwmed volume /acct path /payable share bills recurse rename-files
bstnA# ...
Whenever multiple shares are involved in a synchronization, the sync process scans the shares according to their import priority. This is important for any discovered files that collide with each other; the share with the higher priority wins the file conflict, and the other shares file must be renamed. It is also important for colliding directories; the higher priority share gets the master instance of the directory and the other share gets a stripe. The master instance controls the attributes of the directory (such as permissions and named streams), and gets all newly-created files by default. Tiered volumes use import priority to differentiate their Tier-1 shares from the rest.
Refer to Setting the Shares Priority (for Tiering), on page 9-36 of the ARX® CLI Storage-Management Guide for more information on setting the import priority for a volumes shares.
A sync operation occurs in the background, similar to an nsck run. To see the high-level status of all sync operations, use the show sync command:
bstnA(gbl)# show sync files
bstnA(gbl)# ...
files | directories chooses the type of sync operation,
namespace (1-30 characters) selects a namespace,
vol-path (1-1024 characters) narrows the scope to a specific volume, and.
path (1-1024 characters) narrows the scope further, to a specific virtual path in the volume (for example, /home/jrandom). This is relative to the vol-path.
For example, this command shows all the sync-file operations performed on the medarcv~/rcrds volume:
bstnA(gbl)# show sync files medarcv volume /rcrds
bstnA(gbl)# ...
The show sync command displays a running history of all sync operations. The history goes back indefinitely, so the command can display a very large number of records over time. You can clear all of these records at once, or all records for a particular namespace, volume, or path. From priv-exec mode, use the clear sync command:
files | directories chooses the type of sync record to clear,
namespace (optional, 1-30 characters) identifies one namespace from which to clear sync records. If this option is omitted, the command clears all sync-files or sync-directories records from the history.
vol-path (optional, 1-1024 characters) narrows the scope to one managed volume, and
path (optional, 1-1024 characters) narrows the scope further to a specific virtual path. This is relative to the vol-path.
Before clearing the records, a prompt requests confirmation; enter yes to confirm. After you clear the records, they no longer appear in the show sync output.
bstnA(gbl)# show sync files
bstnA(gbl)# end
bstnA# clear sync files
bstnA# show sync files
bstnA# ...
To cancel an in-progress sync operation, go to priv-exec mode and use the cancel sync command:
files | directories chooses the type of sync operation to cancel,
namespace (1-30 characters) identifies the namespace,
vol-path (1-1024 characters) is the volume, and
path (1-1024 characters) is the specific virtual path that is being synchronized. This is relative to the vol-path.
A prompt requests confirmation before the CLI cancels the sync; enter yes to confirm that you want to cancel the operation.
bstnA(gbl)# end
bstnA# cancel sync files wwmed volume /acct path /
bstnA# ...
A filer subshare is a shared directory that is under another shared directory. A CIFS service and its managed volume can pass clients from a front-end subshare through to the corresponding subshare on a back-end filer. When clients access subshares this way, the filer can enforce the subshares share-level ACL. For example, clients that connect to the Y2005 share (below) use ACL3; by default, when subshares are not supported, the volume connects to the filers top-level share (through ACL1 in this illustration) and descends to the directory from there.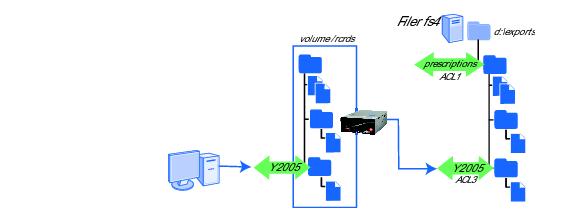
Two sections of the ARX® CLI Storage-Management Guide have instructions for providing this CIFS-subshare support: Supporting Subshares and their ACLs, on page 9-20 explains how to set up managed volumes, and Exporting a Filer Subshare (and Using its ACL), on page 11-16 describes the commands to set up a CIFS service. These instructions explain how to work with subshares that exist on the filers before the managed volume imports them.
The supported method for adding new subshares is to directly access a back-end filer, add the subshare there, then synchronize the metadata with the new subshare.
Ensure the consistency of back-end subshares that correspond to front-end CIFS service exports by using subshare synchronization. Refer to Synchronizing Subshares, on page 9-25 of the ARX® CLI Storage-Management Guide for complete details.
Important: If the volume is backed by any NetApp filers or EMC servers and you plan to support free-space quotas on them (using freespace cifs-quota), prepare the subshares directly on the filer before you synchronize subshares. The subshare-replication process does not create NetApp qtrees or EMC filesystems, and those special directories are required to support free-space quotas. Before you run subshare replication, access the filers directly and create one qtree or filesystem per subshare. Then, synchronize their share-level ACLs and other attributes.
The nsck rebuild utility completely rebuilds all managed volumes in a namespace: it re-imports the back-end shares and rebuilds its metadata databases. This command causes a brief interruption in service, and it forces all NFS clients to unmount and then re-mount their managed volumes; use this only in situations where sync files fails. This has no effect on direct volumes.
Note: By default, this stops all modifications (client writes and file renames on import) in all managed volumes after the rebuild. Essentially, the nsck utility issues a no modify for every managed volume in the namespace.
To guarantee that managed-volume modifications are enabled after the rebuild, run the modify command in each volume and raise the reimport-modify flag before you rebuild the namespace. The reimport-modify flag stops the nsck utility from running no modify.
If you do not do this but the rebuild/import succeeds without any collisions, you can use the modify command on each volume after the rebuild.
For details on the reimport-modify command, see Allowing the Volume to Modify on Re-Import, on page 9-8 of the ARX® CLI Storage-Management Guide.
From priv-exec mode, use the nsck rebuild command to rebuild all managed volumes in a namespace:
nsck namespace rebuild
where namespace (1-30 characters) is the name of the namespace to rebuild. Use the show namespace command to see a list of configured namespaces.
The CLI prompts for confirmation before re-importing all managed volumes in the namespace: enter yes to continue. Enter no to cancel the rebuild.
You can run one nsck job at a time on a given volume. Use show nsck to monitor the progress of nsck jobs; see Showing the Progress of nsck and sync Jobs.
bstnA(gbl)# end
bstnA# nsck wwmed rebuild
A managed volume sometimes duplicates (or stripes) its directories on multiple shares. Each directory has a single master, and may have one or more stripes. The master directory is on the share where it was first found, and each stripe is a copy on another share. If a filer share has the master instance of a directory, the directory tends to grow on that share; by default, a new file goes to the same share as its parents master directory. For example, if a client creates a newfile.doc file in \mydir, and \mydir has its master on the nas20 filer, the volume sends newfile.doc to nas20 by default.
A file-placement rule can change the placement of master directories during import, normal operation, and re-import. The ARX® CLI Storage-Management Guide describes how to use these rules to set master-directory placement: refer to Matching Directories Only, on page 14-7 and Matching and Promoting Directories, on page 14-9. Additionally, you can set the priority of the volumes shares so that the highest-priority shares have mastership from the beginning of the import; see Setting the Shares Priority (for Tiering), on page 9-36 of the same storage manual. If no such rules or priorities are configured for master-directory placement, mastership of directories is not deterministic after the rebuild. After the rebuild is finished, you can correct this by adding a new file-placement rule.
You can narrow the focus of an nsck rebuild to a single volume. To rebuild one volume, add the optional volume clause to the end of the nsck rebuild command:
name (1-30 characters) is the name of the namespace to rebuild. Use the show namespace command to see a list of configured namespaces.
volume volname (optional, 1-256 characters) limits the rebuild to the chosen volume (for example, /home).
The CLI prompts for confirmation before re-importing the volumes shares: enter yes to continue. Enter no to cancel the rebuild.
Note: As mentioned above, this stops all managed-volume modifications (client writes and file renames on import) after the rebuild. Essentially, the nsck utility issues a no modify for the volume.
To guarantee that modifications are enabled after the rebuild, run the modify command and raise the reimport-modify flag before you rebuild the volume. The reimport-modify flag stops the nsck utility from running no modify on the volume.
If you do not do this but the rebuild/import succeeds without any collisions, you can use the modify command after the rebuild.
bstnA(gbl)# end
bstnA# nsck archives rebuild volume /etc
bstnA# show nsck
It is possible for an nsck-rebuild job to freeze in an unfinished state: for example, the job freezes if one of the back-end filers goes down during the re-import. In this situation, you should resolve the problem and then restart the rebuild. To override the unfinished rebuild job and start a new one, add the optional force flag to the nsck rebuild command.
bstnA(gbl)# end
bstnA# nsck archives rebuild force
bstnA# ...
You may want to perform filer recoveries directly on the filer. To directly access the shares behind a namespaces managed volumes, you first release (or de-stage) the shares from the volumes. This removes all metadata from all managed volumes and then disables all of the volumes shares. Once the volumes are de-staged, you can access all of their shares directly (that is, not through a VIP) without any risk of metadata inconsistencies. After you restore all files to the shares, you can re-enable all of the namespaces managed volumes.
As with a rebuild, NFS clients must unmount and remount the volumes after the shares are re-enabled.
From priv-exec mode, use the nsck destage command to release all shares from a namespaces managed volumes.
nsck namespace destage
namespace (1-30 characters) is the name of the namespace to be destaged. Use the show namespace command to see a list of configured namespaces.
destage specifies to destage the namespace metadata and prepare it for reimport.
The CLI prompts for confirmation before releasing the shares: enter yes to continue. Enter no to cancel the destage operation.
Note: As with nsck ... rebuild, this disables all modifications (client writes and file renames on import) in the namespaces managed volumes. That is, no modifications are possible after the managed volumes are later re-enabled. To prevent this, someone must first run the modify command and raise the reimport-modify flag.
You can run one nsck job at a time on a given volume. Use show nsck to monitor the progress of nsck jobs; see Showing the Progress of nsck and sync Jobs.
bstnA(gbl)# end
bstnA# nsck wwmed destage
Some metadata failures require a destage of all volumes in the same volume group. Volume groups are a means of isolating namespaces in the ARXs memory so that the failure of one or more namespaces in one volume group does not affect the performance of namespaces in other volume groups. The ARX® CLI Storage-Management Guide describes volume groups in detail: refer to Assigning The Volume To A Volume Group (optional), on page 9-48.
For example, suppose a volume uses an NFS metadata share, and the mount to that metadata share hangs. The volume (which could support NFS, CIFS, or both for its clients) gradually goes offline. Other volumes in the same volume group will fail eventually, also. The solution for this problem is to restart all of the volumes in the volume group, which results in a re-import of the volumes. You can destage all of them without affecting any volumes in other volume groups. Then, you can use the priv-exec reload command to fail over to the peer ARX and restart all the volumes. Only the volumes in the affected volume group must re-import.
To destage the volumes in one volume group, add the optional volume-group argument to the end of the nsck destage command:
namespace (1-30 characters) is the name of the namespace where the destage occurs. Use the show namespace command to see a list of configured namespaces.
destage specifies to destage the namespace metadata and prepare it for reimport.
volume-group volumegroupid (optional, 1-8) identifies a volume group used by this namespace. You can use the show volume-group command for a full list of the volume groups on this ARX, and to find which volume groups are assigned to this namespace.
The CLI prompts for confirmation before releasing the volumes: enter yes to continue. Enter no to cancel the destage operation. If any of the volumes metadata shares support NFS and are unavailable, the prompt recommends a reload to initiate a failover; this is required to correct a hung NFS mount at a metadata share, as described above.
You can run one nsck job at a time on a given volume. Use show nsck to monitor the progress of nsck jobs; see Showing the Progress of nsck and sync Jobs.
bstnA(gbl)# end
bstnA# nsck wwmed destage volume /it
bstnA# show volume-group
bstnA# nsck medarcv destage volume-group 2
You can narrow the focus of an nsck destage even further, to a single volume. To destage one volume, add the optional volume clause to the end of the nsck destage command:
namespace (1-30 characters) is the name of the namespace where the destage occurs. Use the show namespace command to see a list of configured namespaces.
destage specifies to destage the namespace metadata and prepare it for reimport.
volume volname (optional, 1-256 characters) is the volume to destage (for example, /var).
The CLI prompts for confirmation before releasing the volume: enter yes to continue. Enter no to cancel the destage operation.
You can run one nsck job at a time on a given volume. Use show nsck to monitor the progress of nsck jobs; see Showing the Progress of nsck and sync Jobs.
bstnA(gbl)# end
bstnA# nsck wwmed destage volume /it
bstnA(gbl)# end
bstnA# nsck wwmed destage volume /it force
bstnA# ...
When the shares are ready, re-enable each of them to import them back into the namespace. From gbl-ns-vol mode, you can use enable shares to enable all of the volumes shares at once; see Enabling All Shares in the Volume, on page 9-54 of the ARX® CLI Storage-Management Guide.
Recall that the modify command is disabled by nsck ... destage unless the reimport-modify flag was also raised. If the reimport-modify flag was down during the destage, you have the opportunity to enable modify before enabling shares (see Allowing the Volume to Modify on Import, on page 9-6 of the ARX® CLI Storage-Management Guide).
bstnA# global
bstnA(gbl)# namespace wwmed
bstnA(gbl-ns[wwmed])# volume /it
bstnA(gbl-ns-vol[wwmed~/it])# enable shares
Managed volumes require fast and extremely-reliable back-end shares to store their metadata. A slow metadata share can affect client service as well as import speed. To migrate a volumes metadata from a slow back-end share to one on a faster filer, use the nsck migrate-metadata command:
namespace (1-30 characters) identifies the namespace.
vol-path (1-1024 characters) is the managed volume that requires new metadata storage. Use forward slashes (/) in the path, even for CIFS volumes.
ext-filer (1-64 characters) identifies the target share for the volumes metadata. This is the external-filer name for the filer; use show external-filer for a complete list of configured filers.
nfs3 | nfs3tcp | cifs is a required choice. This is the protocol used to access the metadata share; it can be different from any of the protocols used for the managed volume. The choices are NFSv3 over UDP (nfs3), NFSv3 over TCP (nfs3tcp), or CIFS.
path (1-1024 characters) selects the metadata share and path (for example, / or /usr/acoMD). For a CIFS share, this is the share name (and possibly a path to a subshare); use forward slashes (/), even for CIFS shares.
The CLI prompts for confirmation before it starts the migration; enter yes to proceed. The nsck utility copies all of the metadata to the target share, verifies its integrity at the target share, then switches the managed volume over to the new metadata share. If the migration fails in any way before the last step, the volume comes back online with its metadata still on the original share. You must manually restart the migration after a cancellation or unexpected failure.
As with all nsck jobs, this operation produces a report to show its progress. The CLI shows the report name after you invoke the command. Use show reports for a full list of nsck reports, and use show, tail, or grep to view one report. The report shows the source and target shares, the size of the metadata, and the time required to migrate it.
bstnA(gbl)# end
bstnA# nsck wwmed migrate-metadata volume /acct target nas3 nfs3 /vol/vol2/meta7
bstnA# show reports migrate_metadata.34.rpt
You can cancel a migration any time before it has restarted the volume. The restart occurs after the metadata is successfully copied to the new share. To cancel a metadata migration in an earlier phase, go to priv-exec mode and use the cancel migrate-metadata command:
namespace (1-30 characters) identifies the namespace,
vol-path (1-1024 characters) is the volume, and
bstnA(gbl)# end
bstnA# cancel migrate-metadata medarcv volume /rcrds
bstnA# ...
From priv-exec mode, use the clear nsck command to clear all the nsck jobs that are currently pending, and to clear all finished jobs from the job history in show nsck:
The CLI prompts for confirmation before clearing all jobs; enter yes to clear all nsck jobs. This does not delete the nsck reports; use delete reports nsck-report-name to remove an nsck report, or show reports to see all reports.
bstnA(gbl)# end
bstnA# clear nsck
bstnA# show nsck
Use the nsck-job ID with the clear nsck command to clear one pending (or finished) nsck job:
clear nsck job-id
where job-id (1-2,147,483,647) identifies the nsck job to clear. This ID appears in the name of the nsck report.
bstnA(gbl)# show nsck
bstnA(gbl)# end
bstnA# clear nsck 1
To conserve CPU cycles and/or internal-disk space, you may want to stop a report before it is finished. A oversized, CPU-intensive report could possibly have an effect on namespace performance. You can stop the report without stopping the nsck job. From priv-exec mode, use the truncate-report command to stop all report processing and truncate the report file:
truncate-report report-name
where report-name (1-255 characters) specifies report to truncate.
The CLI prompts for confirmation before truncating the report. Enter yes to continue.
bstnA(gbl)# end
bstnA# truncate report inconsistencies.29.rpt
bstnA# ...


