Manual Chapter :
Forwarding Non-Optimized IP Traffic Through an IPsec Tunnel
Applies To:
Show Versions
BIG-IP AAM
- 11.5.10, 11.5.9, 11.5.8, 11.5.7, 11.5.6, 11.5.5, 11.5.4, 11.5.3, 11.5.2, 11.5.1
Overview: Forwarding Non-Optimized IP traffic through an IPsec tunnel
When you configure an iSession connection using the Quick Start screen, you can specify IPsec encapsulation for outbound iSession traffic. If you select IPsec, the BIG-IP system also encrypts the TCP traffic for the applications you select when you create iApps templates for optimizing applications.
If you also want to send secured and encrypted non-TCP traffic, you can create a forwarding virtual server that uses the iSession routing to send all IP traffic not matched by other virtual servers through the IPsec tunnel. To accelerate the traffic, you can add IP Payload Compression Protocol (IPComp) to the IPsec tunnel. You would choose IPComp when you expect a great deal of compressible non-TCP traffic.
Note: NAT traversal is not supported with iSession routing. For NAT traversal, you
must configure a separate IPsec tunnel, and then route the IP traffic through the tunnel.
Creating a virtual server for all IP iSession traffic
Before you create the virtual server, ensure that you have selected
IPsec for the IP Encapsulation Type
setting on the Quick Start screen or the Symmetric Optimization Local Endpoint screen,
and chosen an IPsec policy. You can use the pre-defined default policy
default-ipsec-policy-isession, or create a custom policy, for
example, to compress all IP traffic that does not match another virtual server.
If you are using IPsec to encrypt iSession traffic, you can
create a forwarding virtual server to send all IP traffic through the IPsec tunnel.
Creating the virtual server avoids the need for any special routing for non-TCP traffic,
such as UDP and ICMP.
The completed screen looks similar to the following example.
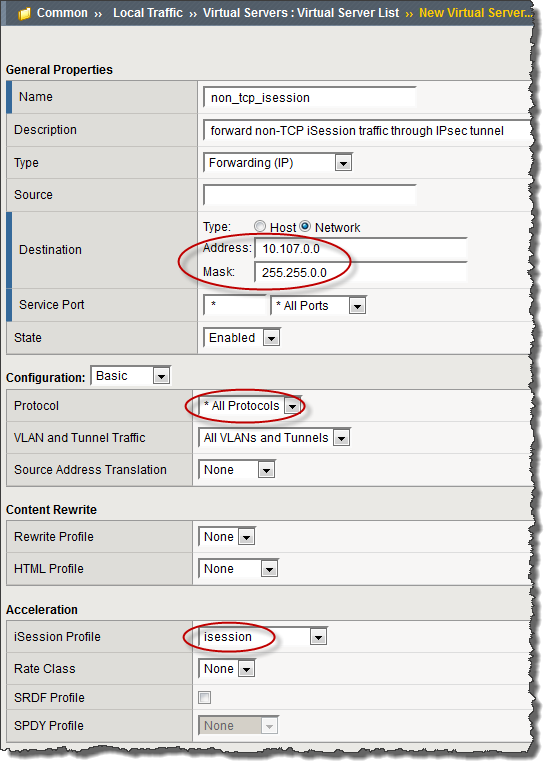 Example of a completed virtual server screen for non-TCP iSession traffic,
with destination subnet specified
Example of a completed virtual server screen for non-TCP iSession traffic,
with destination subnet specified
Example of a completed virtual server screen for non-TCP iSession traffic,
with destination subnet specified
Adding compression to an IPsec policy
You can create an IPsec policy that uses iSession routing to
compress IP traffic through an IPsec tunnel.
For this IPsec policy to take effect, you must associate it with the iSession
routing information, using the IP Encapsulation settings on either the Quick Start
screen or the Symmetric Optimization Local Endpoint screen.


