Manual Chapter : Configuring Global Network Acceleration for Web Application

Applies To:

Show Versions Show Versions

BIG-IP AAM

  • 11.5.10, 11.5.9, 11.5.8, 11.5.7, 11.5.6, 11.5.5, 11.5.4, 11.5.3, 11.5.2, 11.5.1
Manual Chapter

Overview: Configuring Global Network Acceleration for Web Application

Operating symmetrically, the BIG-IP acceleration functionality, using Web Application functionality, caches objects from origin web servers (less than approximately 100MB) and delivers them directly to clients. The BIG-IP device handles both static content and dynamic content, by processing HTTP responses, including objects referenced in the response, and then sending the included objects as a single object to the browser. This form of caching reduces server TCP and application processing, improves web page loading time, and reduces the need to regularly expand the number of web servers required to service an application.

Configuring BIG-IP acceleration across a WAN involves creation of a Sync-Only device group for two or more devices across the WAN, creation of a parent folder for acceleration objects under /Common on each device, configuration of one or more central BIG-IP devices, configuration of one or more remote BIG-IP devices, and synchronization of all devices in the Sync-Only device group.

Deployment of BIG-IP Devices for Acceleration

Global network symmetric deployment with an application configured symmetrically

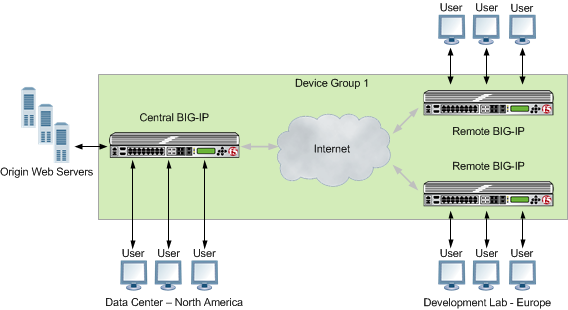
A configuration for a site with multiple BIG-IP devices that are distributed across a large geography comprises a symmetric deployment. A symmetric deployment of multiple BIG-IP devices consists of central and remote BIG-IP devices that have synchronized configurations. With this configuration, users can transparently utilize the functionality of a BIG-IP device on another network across town, or across the world, from both sides of the transaction.

A symmetric deployment A global symmetric deployment with an application configured symmetrically

In a symmetric deployment, the central BIG-IP device is located closest to the application it is accelerating. The central BIG-IP device is accessed by local clients as well as clients from a remote BIG-IP device located in a separate geographic location, which can be around the world or across the country.

For example, a BIG-IP device might be located at a corporate office in North America that is accelerating a web mail server application that employees in a satellite office in Europe use. For this symmetric deployment, the central BIG-IP device is located at the corporate office, closest to the web mail application, and the remote BIG-IP device is located in Europe.

Once the remote BIG-IP device in Europe receives the response from the central BIG-IP device in North America, it caches that response and then sends it to the employee. As long as the content is still valid, the remote BIG-IP device in Europe can then respond to the future requests for the same content from local clients.

Note: To monitor the status of an origin web server in a symmetric deployment, you must do so through the BIG-IP Local Traffic Manager system's http monitor only on the central BIG-IP device.

About symmetric request and response headers

In a global network that includes a symmetric deployment of remote and central BIG-IP devices across a WAN, the remote BIG-IP device receives a request and includes an X-Client-WA header, which distinguishes the request to the central BIG-IP device, enabling the central BIG-IP device to process the request, as necessary. When the central BIG-IP device receives a response for the origin web servers, it includes an X-WA-Surrogate header in the response, which distinguishes the response to the remote BIG-IP device, which processes the response as necessary and removes the X-WA-Surrogate header before sending the response to the client.

Working with Sync-Only device groups

One of the types of device groups that you can create is a Sync-Only device group. A Sync-Only device group contains devices that synchronize configuration data with one another, but their configuration data does not fail over to other members of the device group. A maximum of 32 devices is supported in a Sync-Only device group.

A device in a trust domain can be a member of more than one Sync-Only device group. A device can also be a member of both a Sync-Failover group and a Sync-Only group.

A typical use of a Sync-Only device group is one in which you configure a device to synchronize the contents of a specific folder to a different device group than to the device group to which the other folders are synchronized.

What is device trust?

Before any BIG-IP devices on a local network can synchronize configuration data or fail over to one another, they must establish a trust relationship known as device trust. Device trust between any two BIG-IP devices on the network is based on mutual authentication through the signing and exchange of x509 certificates.

Devices on a local network that trust one another constitute a trust domain. A trust domain is a collection of BIG-IP devices that trust one another and can therefore synchronize and possibly fail over their BIG-IP configuration data, as well as exchange status and failover messages on a regular basis. A local trust domain is a trust domain that includes the local device, that is, the device you are currently logged in to. You can synchronize a device's configuration data with either all of the devices in the local trust domain, or to a subset of devices in the local trust domain.

Note: You can add devices to a local trust domain from a single device on the network. You can also view the identities of all devices in the local trust domain from a single device in the domain. However, to maintain or change the authority of each trust domain member, you must log in locally to each device.

Illustration of Sync-Only device group configuration

You can use a Sync-Only device group to synchronize policy data in a specific folder across a local trust domain.

sync-only device group 
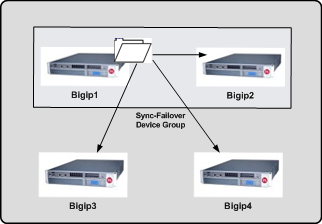
Sync-Only Device Group

Device identity

The devices in a BIG-IP device group use x509 certificates for mutual authentication. Each device in a device group has an x509 certificate installed on it that the device uses to authenticate itself to the other devices in the group.

Device identity is a set of information that uniquely identifies that device in the device group, for the purpose of authentication. Device identity consists of the x509 certificate, plus this information:

  • Device name
  • Host name
  • Platform serial number
  • Platform MAC address
  • Certificate name
  • Subjects
  • Expiration
  • Certificate serial number
  • Signature status
Tip: From the Device Trust: Identity screen in the BIG-IP Configuration utility, you can view the x509 certificate installed on the local device.

Task summary

Perform these tasks to create a Sync-Only device group.

Task list

Defining an NTP server

Network Time Protocol (NTP) synchronizes the clocks on a network by means of a defined NTP server. You can specify a list of IP addresses of the servers that you want the BIG-IP system to use when updating the time on network systems.
  1. On the Main tab, click System > Configuration > Device > NTP. The NTP Device configuration screen opens.
  2. In the Time Server Lookup List area, in the Address field, type the IP address of the NTP that you want to add. Then, click Add.
    Note: If you did not disable DHCP before the first boot of the BIG-IP system, and if the DHCP server provides the information about your NTP server, then this field is automatically populated.
  3. Click Update.

Adding a device to the local trust domain

Verify that each BIG-IP device that is to be part of a local trust domain has a device certificate installed on it.
Follow these steps to log in to any BIG-IP device on the network and add one or more devices to the local system's local trust domain.
Note: Any BIG-IP devices that you intend to add to a device group at a later point must be members of the same local trust domain.
  1. On the Main tab, click Device Management > Device Trust, and then either Peer List or Subordinate List.
  2. In the Peer Authority Devices or the Subordinate Non-Authority Devices area of the screen, click Add.
  3. Type a device IP address, administrator user name, and administrator password for the remote BIG-IP device with which you want to establish trust. The IP address you specify depends on the type of BIG-IP device:
    • If the BIG-IP device is a non-VIPRION device, type the management IP address for the device.
    • If the BIG-IP device is a VIPRION device that is not licensed and provisioned for vCMP, type the primary cluster management IP address for the cluster.
    • If the BIG-IP device is a VIPRION device that is licensed and provisioned for vCMP, type the cluster management IP address for the guest.
    • If the BIG-IP device is an Amazon Web Services EC2 device, type one of the Private IP addresses created for this EC2 instance.
  4. Click Retrieve Device Information.
  5. Verify that the displayed information is correct.
  6. Click Finished.
After you perform this task, the local device and the device that you specified in this procedure have a trust relationship and, therefore, are qualified to join a device group.

Creating a Sync-Only device group

You perform this task to create a Sync-Only type of device group. When you create a Sync-Only device group, the BIG-IP system can then automatically synchronize certain types of data such as security policies and acceleration applications and policies to the other devices in the group, even when some of those devices reside in another network. You can perform this task on any BIG-IP device within the local trust domain.
  1. On the Main tab, click Device Management > Device Groups.
  2. On the Device Groups list screen, click Create. The New Device Group screen opens.
  3. Type a name for the device group, select the device group type Sync-Only, and type a description for the device group.
  4. From the Configuration list, select Advanced.
  5. For the Members setting, select an IP address and host name from the Available list for each BIG-IP device that you want to include in the device group. Use the Move button to move the host name to the Includes list. The list shows any devices that are members of the device's local trust domain.
  6. For the Automatic Sync setting, select or clear the check box:
    • Select the check box when you want the BIG-IP system to automatically sync the BIG-IP configuration data whenever a config sync operation is required. In this case, the BIG-IP system syncs the configuration data whenever the data changes on any device in the device group.
    • Clear the check box when you want to manually initiate each config sync operation. In this case, F5 networks recommends that you perform a config sync operation whenever configuration data changes on one of the devices in the device group.
  7. For the Full Sync setting, select or clear the check box:
    • Select the check box when you want all sync operations to be full syncs. In this case, the BIG-IP system syncs the entire set of BIG-IP configuration data whenever a config sync operation is required.
    • Clear the check box when you want all sync operations to be incremental (the default setting). In this case, the BIG-IP system syncs only the changes that are more recent than those on the target device. When you select this option, the BIG-IP system compares the configuration data on each target device with the configuration data on the source device and then syncs the delta of each target-source pair.
    If you enable incremental synchronization, the BIG-IP system might occasionally perform a full sync for internal reasons. This is a rare occurrence and no user intervention is required.
  8. In the Maximum Incremental Sync Size (KB) field, retain the default value of 1024, or type a different value. This value specifies the total size of configuration changes that can reside in the incremental sync cache. If the total size of the configuration changes in the cache exceeds the specified value, the BIG-IP system performs a full sync whenever the next config sync operation occurs.
  9. Click Finished.
You now have a Sync-Only type of device group containing BIG-IP devices as members.

Syncing the BIG-IP configuration to the device group

Before you sync the configuration, verify that the devices targeted for config sync are members of a device group and that device trust is established.
This task synchronizes the BIG-IP configuration data from the local device to the devices in the device group. This synchronization ensures that devices in the device group operate properly. When synchronizing self IP addresses, the BIG-IP system synchronizes floating self IP addresses only.
Important: You perform this task on either of the two devices, but not both.
  1. On the Main tab, click Device Management > Overview.
  2. In the Device Groups area of the screen, in the Name column, select the name of the relevant device group. The screen expands to show a summary and details of the sync status of the selected device group, as well as a list of the individual devices within the device group.
  3. In the Devices area of the screen, in the Sync Status column, select the device that shows a sync status of Changes Pending.
  4. In the Sync Options area of the screen, select Sync Device to Group.
  5. Click Sync. The BIG-IP system syncs the configuration data of the selected device in the Device area of the screen to the other members of the device group.
Except for non-floating self IP addresses, the entire set of BIG-IP configuration data is replicated on each device in the device group.

Task summary for accelerating HTTP traffic with a Central BIG-IP Device

Perform these tasks to accelerate HTTP traffic with a symmetric BIG-IP device.

Task list

Defining an NTP server

Network Time Protocol (NTP) synchronizes the clocks on a network by means of a defined NTP server. You can specify a list of IP addresses of the servers that you want the BIG-IP system to use when updating the time on network systems.
  1. On the Main tab, click System > Configuration > Device > NTP. The NTP Device configuration screen opens.
  2. In the Time Server Lookup List area, in the Address field, type the IP address of the NTP that you want to add. Then, click Add.
    Note: If you did not disable DHCP before the first boot of the BIG-IP system, and if the DHCP server provides the information about your NTP server, then this field is automatically populated.
  3. Click Update.

Creating a new folder for synchronized acceleration applications

You can organize synchronized acceleration applications in folders.
  1. On the Main tab, click Acceleration > Web Application > Symmetric Folders.
  2. Click Create.
  3. In the Folder Name field, type a name for the folder.
  4. From the Device Group list, select a Sync-Only device group.
  5. Optional: In the Description field, type a description.
  6. Click Save.
A folder for organizing synchronized acceleration applications is available.

Creating a user-defined acceleration policy from a predefined acceleration policy

You can copy a predefined acceleration policy, and modify applicable nodes, matching rules, and acceleration rules, to create a user-defined acceleration policy.
  1. On the Main tab, click Acceleration > Web Application > Policies. The Policies screen displays a list of existing acceleration policies.
  2. In the Tools column, click Copy for the predefined acceleration policy you want to copy.
  3. Name the policy.
  4. Specify a folder, based on your configuration.
    • For a symmetric or farm configuration, from the Sync Folder list, select the name of a symmetric folder.
    • For an asymmetric configuration, from the Sync Folder list, select No Selection.
  5. Click Copy.
  6. Click the name of the new user-defined acceleration policy.
  7. Create, delete, or modify nodes, matching rules, and acceleration rules, as necessary.
  8. Publish the acceleration policy.
    1. Click Publish.
    2. In the Comment field, type a description.
    3. Click Publish Now.
The user-defined acceleration policy appears in the Policy column.

Creating an application profile for a symmetric deployment

An application profile provides the necessary information to appropriately handle requests to your site's web applications.
Important: For symmetric mode, you cannot modify an existing application, because the sync-only folder for a symmetric configuration becomes unavailable. To use an application in a symmetric deployment, you must specify the symmetric mode and symmetric sync-only folder when you create the application.
  1. On the Main tab, click Acceleration > Web Application > Applications. The Applications List screen opens.
  2. Click Create.
  3. From the General Options list, select Advanced.
  4. Name the application.
  5. In the Description field, type a description.
  6. From the Policy list, select a policy.
  7. In the Requested Host field, type each domain name (host name), or IP address, that might appear in HTTP requests for your web application. The specified domain names, or IP addresses, are defined in the host map for the application profile.
  8. Configure the Symmetric Deployment settings.
    1. From the Symmetric Mode list, select Symmetric.
      Note: Selecting Symmetric from the Symmetric Mode list enables the BIG-IP to broadcast invalidations of cached content to all devices within the Sync-Only device group, as well as enable symmetric processing of traffic.
    2. From the Sync Folder list, select a Sync-Only device group.
  9. Click Save.
The application profile appears in the Application column on the Applications List screen.

Enabling acceleration with the Web Acceleration profile

A BIG-IP Acceleration application for a Web Application must be available.
The Web Acceleration profile enables acceleration by using applications that run on a virtual server.
  1. On the Main tab, click Local Traffic > Profiles > Services > Web Acceleration. The Web Acceleration profile list screen opens.
  2. Click the name of a profile.
  3. Select the Custom check box.
  4. For the WA Applications setting, select an application in the Available list and click Enable. The application is listed in the Enabled list.
  5. Click Update.
Acceleration is enabled through the BIG-IP application in the Web Acceleration profile.

Creating a pool on a central BIG-IP device to process synchronized HTTP traffic

You can create a pool of web servers on a central BIG-IP device to process synchronized HTTP requests across a global network.
Note: Skip this task if you forward HTTP traffic to a single server or use a wildcard for the destination.
  1. On the Main tab, click Local Traffic > Pools. The Pool List screen opens.
  2. Click Create. The New Pool screen opens.
  3. In the Name field, type a unique name for the pool.
  4. For the Health Monitors setting, from the Available list, select the http monitor, and click << to move the monitor to the Active list.
  5. From the Load Balancing Method list, select how the system distributes traffic to members of this pool. The default is Round Robin.
  6. For the Priority Group Activation setting, specify how to handle priority groups:
    • Select Disabled to disable priority groups. This is the default option.
    • Select Less than, and in the Available Members field type the minimum number of members that must remain available in each priority group in order for traffic to remain confined to that group.
  7. Using the New Members setting, add each resource that you want to include in the pool:
    1. Type an IP address in the Address field.
    2. Type 80 in the Service Port field, or select HTTP from the list.
    3. (Optional) Type a priority number in the Priority field.
    4. Click Add.
  8. Click Finished.
The new pool appears in the Pools list.

Creating a virtual server to manage HTTP traffic

You can create a virtual server to manage HTTP traffic as either a host virtual server or a network virtual server.
  1. On the Main tab, click Local Traffic > Virtual Servers. The Virtual Server List screen opens.
  2. Click the Create button. The New Virtual Server screen opens.
  3. In the Name field, type a unique name for the virtual server.
  4. For the Destination setting, in the Address field, type the IP address you want to use for the virtual server. The IP address you type must be available and not in the loopback network.
  5. In the Service Port field, type 80, or select HTTP from the list.
  6. From the HTTP Profile list, select http.
  7. From the HTTP Compression Profile list, select one of the following profiles:
    • httpcompression
    • wan-optimized-compression
    • A customized profile
  8. From the Web Acceleration Profile list, select one of the following profiles with an enabled application:
    • optimized-acceleration
    • optimized-caching
    • webacceleration
    • A customized profile
  9. In the Resources area of the screen, from the Default Pool list, select a pool name.
  10. Click Finished.
The HTTP virtual server appears in the list of existing virtual servers on the Virtual Server List screen.

Task summary for accelerating HTTP traffic with a Remote BIG-IP Device

Perform these tasks to accelerate HTTP traffic with a symmetric BIG-IP device.

Task list

Defining an NTP server

Network Time Protocol (NTP) synchronizes the clocks on a network by means of a defined NTP server. You can specify a list of IP addresses of the servers that you want the BIG-IP system to use when updating the time on network systems.
  1. On the Main tab, click System > Configuration > Device > NTP. The NTP Device configuration screen opens.
  2. In the Time Server Lookup List area, in the Address field, type the IP address of the NTP that you want to add. Then, click Add.
    Note: If you did not disable DHCP before the first boot of the BIG-IP system, and if the DHCP server provides the information about your NTP server, then this field is automatically populated.
  3. Click Update.

Enabling acceleration with the Web Acceleration profile

A BIG-IP Acceleration application for a Web Application must be available.
The Web Acceleration profile enables acceleration by using applications that run on a virtual server.
  1. On the Main tab, click Local Traffic > Profiles > Services > Web Acceleration. The Web Acceleration profile list screen opens.
  2. Click the name of a profile.
  3. Select the Custom check box.
  4. For the WA Applications setting, select an application in the Available list and click Enable. The application is listed in the Enabled list.
  5. Click Update.
Acceleration is enabled through the BIG-IP application in the Web Acceleration profile.

Creating a virtual server to manage HTTP traffic

You can create a virtual server to manage HTTP traffic as either a host virtual server or a network virtual server.
  1. On the Main tab, click Local Traffic > Virtual Servers. The Virtual Server List screen opens.
  2. Click the Create button. The New Virtual Server screen opens.
  3. In the Name field, type a unique name for the virtual server.
  4. For the Destination setting, in the Address field, type the IP address you want to use for the virtual server. The IP address you type must be available and not in the loopback network.
  5. In the Service Port field, type 80, or select HTTP from the list.
  6. From the HTTP Profile list, select http.
  7. From the HTTP Compression Profile list, select one of the following profiles:
    • httpcompression
    • wan-optimized-compression
    • A customized profile
  8. From the Web Acceleration Profile list, select one of the following profiles with an enabled application:
    • optimized-acceleration
    • optimized-caching
    • webacceleration
    • A customized profile
  9. In the Resources area of the screen, from the Default Pool list, select a pool name.
  10. Click Finished.
The HTTP virtual server appears in the list of existing virtual servers on the Virtual Server List screen.

Clearing a Remote BIG-IP Device cache

Before you can clear the Acceleration cache on the Remote BIG-IP Device, the BIG-IP device needs to be added to the sync-only device group for the symmetric deployment.
After you configure a Remote BIG-IP Device in a symmetric deployment, you can manually clear the Acceleration cache to ensure that the device is serving valid objects.
  1. Log on to the command line of the system using the root account.
  2. Type this command at the command line. wa_clear_cache
The Remote BIG-IP Device Acceleration cache is clear.

Implementation results

The central and remote BIG-IP devices are configured symmetrically to accelerate HTTP traffic.