Manual Chapter :
Configuring Acceleration with an Asymmetric BIG-IP System
Applies To:
Show Versions
BIG-IP AAM
- 14.1.3, 14.1.2, 14.1.0, 14.0.1, 14.0.0, 13.1.5, 13.1.4, 13.1.3, 13.1.1, 13.1.0, 13.0.1, 13.0.0, 12.1.5, 12.1.4, 12.1.3, 12.1.2, 12.1.1, 12.1.0
Configuring Acceleration with an Asymmetric BIG-IP System
About an asymmetric BIG-IP deployment
A BIG-IP® asymmetric deployment consists of one or more BIG-IP systems installed on one end of a WAN, and in the same location as the origin web servers that are running the applications to which the BIG-IP system is accelerating client access.
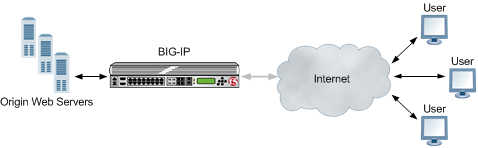
An asymmetric deployment
Task summary for configuring Acceleration with an asymmetric BIG-IP system
Perform these tasks to configure Acceleration with and asymmetric BIG-IP® system.
Task summary
Defining an NTP server
Network Time Protocol (NTP) synchronizes the clocks on a network by means of a
defined NTP server. You can specify a list of IP addresses of the servers that you want
the BIG-IP system to use when updating the time on network systems.
Creating a new folder for synchronized acceleration applications
You can organize synchronized acceleration applications in folders.
- On the Main tab, click .
- Click Create.
- In the Folder Name field, type a name for the folder.
- From the Device Group list, select a Sync-Only device group.
- Optional: In the Description field, type a description.
- Click Save.
A folder for organizing synchronized acceleration applications is
available.
Creating a user-defined acceleration policy from a predefined acceleration policy
You can copy a predefined acceleration policy, and modify applicable nodes,
matching rules, and acceleration rules, to create a user-defined acceleration
policy.
The user-defined acceleration policy appears in the Policy column.
Creating a BIG-IP application profile for an asymmetric acceleration deployment
An application profile provides the key information that the BIG-IP device needs
to appropriately handle requests to your site's web applications.
The application profile appears in the Application column on
the Applications List screen.
Enabling acceleration with the Web Acceleration profile
A BIG-IP®
Acceleration
application for a Web Application must be available.
The Web Acceleration profile enables acceleration by using applications that run on
a virtual server.
Acceleration is enabled through the BIG-IP application in the Web Acceleration
profile.
Creating a pool to process HTTP traffic
You can create a pool of web servers to process HTTP requests.
The new pool appears in the Pools list.
Creating a virtual server to manage HTTP traffic
You can create a virtual server to manage HTTP traffic as either a host virtual
server or a network virtual server.
The HTTP virtual server appears in the list of existing virtual servers on the
Virtual Server List screen.
Clearing cache for a deployment change
Before, or immediately after, you reconfigure a BIG-IP® Device
from a symmetric to a standalone deployment, or a standalone to a symmetric deployment,
you can manually clear the Acceleration cache to ensure that the device is serving valid
objects.
The BIG-IP Device Acceleration cache is clear.
Implementation result
BIG-IP® acceleration is configured asymmetrically to accelerate HTTP traffic.


