Manual Chapter : HTTP Protocol Security

Applies To:

Show Versions Show Versions

BIG-IP AFM

  • 14.0.1, 14.0.0
Manual Chapter

HTTP Protocol Security

Overview: Securing HTTP traffic

You can secure HTTP traffic by using a default configuration or by customizing the configuration. You can adjust the following security checks in an HTTP security profile:

  • HTTP protocol compliance validation
  • Evasion technique detection
  • Length checking to help avoid buffer overflow attacks
  • HTTP method validation
  • Inclusion or exclusion of certain files by type
  • Mandatory header enforcement

You can also specify how you want the system to respond when it encounters a violation. If the system detects a violation and you enabled the Block flag, instead of forwarding the request, the system can either send a blocking response page or redirect the client to a different location.

Creating an HTTP virtual server to use with HTTP protocol security

When you enable protocol security for an HTTP virtual server, the system scans any incoming HTTP traffic for vulnerabilities before the traffic reaches the HTTP servers.
  1. On the Main tab, click Local Traffic > Virtual Servers .
    The Virtual Server List screen opens.
  2. Click the Create button.
    The New Virtual Server screen opens.
  3. In the Name field, type a unique name for the virtual server.
  4. In the Destination Address field, type the IP address in CIDR format.
    The supported format is address/prefix, where the prefix length is in bits. For example, an IPv4 address/prefix is 10.0.0.1 or 10.0.0.0/24, and an IPv6 address/prefix is ffe1::0020/64 or 2001:ed8:77b5:2:10:10:100:42/64. When you use an IPv4 address without specifying a prefix, the BIG-IP system automatically uses a /32 prefix.
    Note: The IP address you type must be available and not in the loopback network.
  5. In the Service Port field, type 80 (for HTTP) or 443 (for HTTPS), or select HTTP or HTTPS from the list.
  6. In the Configuration area, for the HTTP Profile setting, select the default profile, http.
  7. From the Source Address Translation list, select Auto Map.
  8. For the Default Pool setting, either select an existing pool from the list, or click the Create (+) button and create a new pool.
  9. Click Finished.
The HTTP virtual server appears in the Virtual Servers list.

Attaching an HTTP protocol security profile to a virtual server

The easiest method for adding HTTP protocol security to your HTTP virtual server is to use the system default profile. You do this by configuring a virtual server with the HTTP profile http, and then associating the default HTTP protocol security profile http_security with the virtual server.

  1. On the Main tab, click Local Traffic > Virtual Servers .
    The Virtual Server List screen opens.
  2. In the Name column, click the virtual server you previously created.
    The Properties screen for the virtual server opens.
  3. On the menu bar, from the Security menu, choose Policies.
  4. From the Protocol Security list, select Enabled.
  5. From the Profile list, select http_security.
    This configures the virtual server with the default HTTP protocol security profile.
  6. Click Update.
You now have a virtual server configured so that HTTP protocol checks are performed on the traffic that the HTTP virtual server receives.

Reviewing violation statistics for security profiles

You can view statistics and transaction information for each security profile that triggers security violations.
  1. On the Main tab, click Security > Event Logs > Protocol and click HTTP, DNS, or SIP.
    The appropriate statistics screen opens listing all violations for that protocol, with the number of occurrences.
  2. Type a Support ID, if you have one, to filter the violations and view one in particular.
  3. Click a violation's hyperlink to see details about the requests causing the violation.
    On the Statistics screen, in the left column, you can review information regarding the traffic volume for each security profile configured.

Overview: Creating a custom HTTP security profile

This implementation describes how to set up the BIG-IP® system to perform security checks on your HTTP virtual server traffic customized to the needs of your environment. Custom configuration of HTTP security and traffic management requires creating an HTTP security profile, and fine tuning this profile so it protects HTTP traffic the way you want. Once you have all HTTP settings specified, you create a virtual server, attach the custom HTTP security profile, and add a default pool to handle the HTTP traffic.

Task summary

Creating a custom HTTP profile

An HTTP profile defines the way that you want the BIG-IPsystem to manage HTTP traffic.
Note: Other HTTP profile types (HTTP Compression and Web Acceleration) enable you to configure compression and cache settings, as required. Use of these profile types is optional.
  1. On the Main tab, click Local Traffic > Profiles > Services > HTTP .
    The HTTP profile list screen opens.
  2. Click Create.
    The New HTTP Profile screen opens.
  3. In the Name field, type a unique name for the profile.
  4. From the Parent Profile list, select http.
  5. Select the Custom check box.
  6. Modify the settings, as required.
  7. Click Finished.
The custom HTTP profile now appears in the HTTP profile list screen.

Creating a security profile for HTTP traffic

Before performing this procedure, verify that you have installed and provisioned BIG-IP Advanced Firewall Manager (AFM) on the BIG-IP system.
An HTTP security profile specifies security checks that apply to HTTP traffic, and that you want the BIG-IP system to enforce. In the security profile, you can also configure remote logging and trusted XFF headers.
  1. On the Main tab, click Security > Protocol Security > Security Profiles > HTTP .
    The Security Profiles: HTTP screen opens.
  2. Click the Create button.
    The New HTTP Security Profile screen opens.
  3. In the Profile Name field, type a unique name for the profile.
  4. If you want the security profile to be case-sensitive, leave the Profile is case sensitive check box selected. Otherwise, clear the check box.
    Note: You cannot change this setting after you create the security profile.
  5. Modify the blocking policy settings by clicking HTTP Protocol Checks and Request Checks, selecting the appropriate options, and enabling the Block or Alarm options as needed.
    Note: If you do not enable either Alarm or Block for a protocol check, the system does not perform the corresponding security verification.
    • Alarm: The system logs any requests that trigger the security profile violation.
    • Block: The system blocks any requests that trigger the security profile violation.
    • Alarm and Block: The system both logs and blocks any requests that trigger the security profile violation.
  6. If you want to configure the blocking response page, click Blocking Page.
  7. Click Create.
    The screen refreshes, and you see the new security profile in the list.
The BIG-IP system automatically assigns this service profile to HTTP traffic that a designated virtual server receives.

Configuring an HTTP virtual server with an HTTP security profile

You can configure a local traffic virtual server and a default pool for your network's HTTP servers. When the virtual server receives HTTP traffic, an HTTP security profile can scan for security vulnerabilities, and load balance traffic that passes the scan.
  1. On the Main tab, click Local Traffic > Virtual Servers .
    The Virtual Server List screen opens.
  2. Click the Create button.
    The New Virtual Server screen opens.
  3. In the Name field, type a unique name for the virtual server.
  4. In the Destination Address/Mask field, type an address, as appropriate for your network.
    The supported format is address/prefix, where the prefix length is in bits. For example, an IPv4 address/prefix is 10.0.0.1 or 10.0.0.0/24, and an IPv6 address/prefix is ffe1::0020/64 or 2001:ed8:77b5:2:10:10:100:42/64. When you use an IPv4 address without specifying a prefix, the BIG-IP system automatically uses a /32 prefix.
  5. In the Service Port field, type 443 or select HTTPS from the list.
  6. From the HTTP Profile list, select the http profile .
  7. From the Source Address Translation list, select Auto Map.
  8. In the Resources area of the screen, for the Default Pool setting, click the Create (+) button.
    The New Pool screen opens.
  9. In the Name field, type a unique name for the pool.
  10. In the Resources area, for the New Members setting, select the type of new member you are adding, then type the information in the appropriate fields, and click Add to add as many pool members as you need.
  11. Click Finished to create the pool.
    The screen refreshes, and reopens the New Virtual Server screen. The new pool name appears in the Default Pool list.
  12. Click Finished to create the virtual server.
    The screen refreshes, and you see the new virtual server in the list.
  13. In the Name column, click the name of the relevant virtual server.
    This displays the properties of the virtual server.
  14. On the menu bar, from the Security menu, choose Policies.
  15. From the Protocol Security list, select Enabled.
  16. From the Protocol Security Profile list, select your custom HTTP security profile.
  17. Click Update to save the changes.

Reviewing violation statistics for security profiles

You can view statistics and transaction information for each security profile that triggers security violations.
  1. On the Main tab, click Security > Event Logs > Protocol and click HTTP, DNS, or SIP.
    The appropriate statistics screen opens listing all violations for that protocol, with the number of occurrences.
  2. Type a Support ID, if you have one, to filter the violations and view one in particular.
  3. Click a violation's hyperlink to see details about the requests causing the violation.
    On the Statistics screen, in the left column, you can review information regarding the traffic volume for each security profile configured.

Overview: Increasing HTTP traffic security

The HTTP security profile consists of many different security checks for the various components of HTTP traffic. This implementation shows you how to fine-tune your HTTP security profile as required by your environment. The custom checks are described under the assumption that you have already created a custom HTTP security profile but have no other prerequisite or special order. You need configure only the custom checks that you are interested in.

You can achieve a greater level of security when you configure the system to perform the following checks:

  • HTTP Protocol Checks that are related to RFC compliance and actions to take resulting from a violation
  • Request Checks, such as length, allowable HTTP request methods, inclusion or exclusion of file types, and custom headers that must occur in every request
  • Blocking Page configuration which describes the page to display in the event of a blocked request when a violation is encountered

About RFC compliance and validation checks

When the BIG-IP® system receives an HTTP request from a client, the first validation check that the system performs is to ensure that it is RFC protocol compliant. If the request passes the compliance checks, the system applies the security profile to the request. So that your system fully validates RFC compliance, keep the following HTTP Protocol Checks enabled (they are enabled by default):

  • Several Content-Length headers: This security check fails when the incoming request contains more than one content-length header.
  • Null in request: This security check fails when the incoming request contains a null character.
  • Unparsable request content: This security check fails when the Advanced Firewall Manager™ is unable to parse the incoming request.

Modifying HTTP protocol compliance checks

We recommend that you retain the default properties for the HTTP protocol security checks. This task allows you to take additional precautions such as enabling the Block flag for the HTTP Protocol Checks setting, even if you enable only the Alarm flag for the other security checks. When you do this, the system blocks all requests that are not compliant with HTTP protocol standards, and performs additional security checks only on valid HTTP traffic.
  1. On the Main tab, click Security > Protocol Security > Security Profiles > HTTP .
    The Security Profiles: HTTP screen opens.
  2. In the HTTP Security Profiles area, in the Profile Name column, click the name of the security profile that you are modifying.
    The HTTP Profile Properties screen opens.
  3. On the HTTP Protocol Checks tab, for the HTTP Protocol Checks setting, select the check boxes for the protocol checks that you want the system to validate.
  4. Select Alarm or Block to indicate how you want the system to respond to a triggered violation.
    The default setting is Alarm.
    • Alarm: The system logs any requests that trigger the violation.
    • Block: The system blocks any requests that trigger the violation.
    • Alarm and Block: The system both logs and blocks any requests that trigger the violation.
  5. Click Update to retain changes.
The BIG-IP system is now enabled for compliance checks on all valid HTTP traffic.

About evasion techniques checks

Advanced Firewall Manager can examine HTTP requests for methods of application attack that are designed to avoid detection. When found, these coding methods, called evasion techniques, trigger the Evasion technique detected violation. By creating HTTP security profiles, you can detect evasion techniques, such as:

  • Directory traversal, for example, a/b/../c turns into a/c
  • Multiple decoding passes
  • Multiple backslash characters in a URI, for example, \\servername
  • Bare byte decoding (higher than ASCII-127) in a URI
  • Apache whitespace characters (0x09, 0x0b, or 0x0c)
  • Bad unescape

By default, the system logs requests that contain evasion techniques. You can also block requests that include evasion techniques.

Configuring HTTP protocol evasion techniques blocking policy

You can use HTTP security profiles to detect, log, alarm, and block evasion techniques detected in HTTP traffic.
  1. On the Main tab, click Security > Protocol Security > Security Profiles > HTTP .
    The Security Profiles: HTTP screen opens.
  2. In the HTTP Security Profiles area, in the Profile Name column, click the name of the security profile that you are modifying.
    The HTTP Profile Properties screen opens.
  3. On the HTTP Protocol Checks tab, for the Evasion Techniques Checks setting, select or clear the Alarm or Block check boxes, as required.
    Option Description
    Alarm The system logs any requests that trigger the violation. This is the default setting.
    Block The system blocks any requests that trigger the violation.
    Alarm and Block The system both logs and blocks any requests that trigger the violation.
  4. Click Update to retain changes.

About the types of HTTP request checks

By creating HTTP security profiles, you can perform several types of checks on HTTP requests to ensure that the requests are well-formed and protocol-compliant.

Length checks
Specify valid maximum lengths for request components to help prevent buffer overflow attacks.
Method checks
Specify which HTTP methods the system allows in requests.
File type checks
Specify which file types users can or cannot access.
Mandatory headers
Specify custom headers that must occur in every request.
Null in request
This security check fails when the incoming request contains a null character.
Unparsable request content
This security check fails when the system is unable to parse the incoming request.

Configuring length checks for HTTP traffic

Before performing this procedure, verify that you have installed and provisioned BIG-IP Advanced Firewall Manager (AFM) on the BIG-IP system.
You can specify valid maximum lengths for request components in HTTP security profiles to prevent buffer overflow attacks. You can set maximum lengths for URLs, query strings, POST data, and the entire request.
  1. On the Main tab, click Security > Protocol Security > Security Profiles > HTTP .
    The Security Profiles: HTTP screen opens.
  2. In the Profile Name column, click the name of the security profile for which you want to configure length checking.
    The Profile Properties screen opens.
  3. Click the Request Checks tab.
  4. For each option of the Length Checks setting, specify Any to allow any length or click Length and specify the maximum length you want to allow.
  5. Select Alarm or Block, to indicate how you want the system to respond to a triggered violation.
    The default setting is Alarm.
    • Alarm: The system logs any requests that trigger the violation.
    • Block: The system blocks any requests that trigger the violation.
    • Alarm and Block: The system both logs and blocks any requests that trigger the violation.
  6. For the Request Length Exceeds Defined Buffer Size setting, select or clear Alarm and Block, as needed.
    • Alarm: The system logs any requests that are longer than allowed by the long_request_buffer_size internal parameter (the default is 10,000,000 bytes).
    • Block The system blocks any requests that are longer than allowed by the long_request_buffer_size internal parameter (the default is 10,000,000 bytes).
    • Alarm and BlockThe system both logs and blocks any requests that trigger the violation.
  7. Click Update to retain changes.

Specifying which HTTP methods to allow

Before performing this procedure, verify that you have installed and provisioned BIG-IP Advanced Firewall Manager (AFM) on the BIG-IP system.
The HTTP security profile accepts certain HTTP methods by default. The default allowed methods are GET, HEAD, and POST. The system treats any incoming HTTP request that includes an HTTP method other than the allowed methods as a violating request. Later, you can decide how to handle each violation.
  1. On the Main tab, click Security > Protocol Security > Security Profiles > HTTP .
    The Security Profiles: HTTP screen opens.
  2. In the Profile Name column, click the name of the security profile for which you want to modify allowable HTTP methods.
    The Profile Properties screen opens.
  3. Click the Request Checks tab.
  4. For the Methods setting, specify which HTTP methods to allow:
    The default allowed methods are GET, HEAD, and POST.
    • From the Available list, select the methods you want to allow in a request and move them to the Allowed list.
    • To add a new method to the Available list: type the name in the Method field, click Add to add it to the list, and move it to the Allowed list.
  5. Select Alarm or Block, to indicate how you want the system to respond to a triggered violation.
    The default setting is Alarm.
    • Alarm: The system logs any requests that trigger the violation.
    • Block: The system blocks any requests that trigger the violation.
    • Alarm and Block: The system both logs and blocks any requests that trigger the violation.
  6. Click Update to retain changes.

Including or excluding files by type in HTTP security profiles

Before performing this procedure, verify that you have installed and provisioned BIG-IP Advanced Firewall Manager (AFM) on the BIG-IP system.
By default, an HTTP security profile permits all file types in a request. For tighter security, you can create a list that specifies either all file types you want to allow, or a list specifying all the file types you do not want allowed.
  1. On the Main tab, click Security > Protocol Security > Security Profiles > HTTP .
    The Security Profiles: HTTP screen opens.
  2. In the Profile Name column, click the name of the security profile you want to update.
    The Profile Properties screen opens.
  3. Click the Request Checks tab.
  4. For the File Types setting, specify whether you want to create a list of allowed or disallowed file types, and which files you want in the list.
    • To create a list of file types that are permitted in requests, select Define Allowed.
    • To create a list of file types not permitted, select Define Disallowed.
    • Select file types from the Available list, and move them to the Allowed or Disallowed list.
    • To add a new file type, type the name in the File Type field, click Add to add it to the Available list, and then move it to the Allowed or Disallowed list.
    Important: If the profile is case-sensitive, the file types are case-sensitive. For example, jsp and JSP will be treated as separate file types.
  5. Select Alarm or Block, to indicate how you want the system to respond to a triggered violation.
    The default setting is Alarm.
    • Alarm: The system logs any requests that trigger the violation.
    • Block: The system blocks any requests that trigger the violation.
    • Alarm and Block: The system both logs and blocks any requests that trigger the violation.
The page you configure is displayed every time one of the security checks set to Block is violated.

Configuring a mandatory header for an HTTP security profile

Before performing this procedure, verify that you have installed and provisioned BIG-IP Advanced Firewall Manager (AFM) on the BIG-IP system.
When the BIG-IP system is managing an application that uses custom headers that must occur in every request, you can specify mandatory HTTP headers in the security profile. The system verifies that all requests contain those headers. If a request does not contain the mandatory header, the system issues the Mandatory HTTP header is missing violation, and takes the action that you configure: Alarm, Block, or both.
  1. On the Main tab, click Security > Protocol Security > Security Profiles > HTTP .
    The Security Profiles: HTTP screen opens.
  2. In the Profile Name column, click the name of the security profile for which you want to configure a Mandatory Header alarm.
    The Profile Properties screen opens.
  3. Click the Request Checks tab.
  4. For the Mandatory Headers setting, specify the header that must be in the request:
    1. In the Header field, type the name of the mandatory header, and click the Add button to add it to the Available list.
    2. Move the new mandatory header from the Available list to the Mandatory list.
    3. Select or clear the Alarm or Block check boxes as required.
    Option Description
    Alarm The system logs any responses that trigger the Mandatory HTTP header is missing violation. This is the default setting.
    Block The system blocks any requests that trigger the Mandatory HTTP header is missing violation.
    Alarm and Block The system both logs and blocks any requests that trigger the Mandatory HTTP header is missing violation.
  5. Click Update to retain changes.
All HTTP requests are checked for the mandatory headers you have selected.

Configuring the blocking response page for HTTP security profiles

If your HTTP security profile is set up to block requests that violate one or more of the security checks, the system displays a page, called the blocking response page, on the client's screen. The default blocking response page states that the request was rejected, and provides a support ID. You can also configure the system to redirect the client to a specific web site instead of displaying the blocking response page.
  1. On the Main tab, click Security > Protocol Security > Security Profiles > HTTP .
    The Security Profiles: HTTP screen opens.
  2. In the Profile Name column, click the name of the security profile for which you want to configure a blocking page.
    The Profile Properties screen opens.
  3. Click the Blocking Page tab.
  4. For the Response Type setting, select one of the options:
    • Default Response: Specifies that the system returns the system-supplied blocking response page. Though you cannot edit the HTML code on the default blocking page, you can copy it into a custom response and edit it.
    • Custom Response: Specifies that the system returns a response page that you design or upload.
    • Redirect URL: Specifies that the system redirects the client to the specified URL.
    • SOAP Fault: Specifies that the system displays a blocking page in standard SOAP fault message format. Though you cannot edit the SOAP fault code, you can copy it into a custom response and edit it.
    The settings on the screen change depending on the selection that you make for the Response Type setting.
  5. If you selected the Custom Response option, you can either create a new response or upload an HTML file.
    • To create a custom response, make the changes you want to the default responses for the Response Header and Response Body settings using HTTP syntax for the content, and click Upload.
    • To upload an HTML file for the response body, navigate to an existing HTML response page, and click Upload.
  6. If you selected Redirect URL, type the full path of the web page to which the system should redirect the client in the Redirect URL field.
  7. Click Update to retain changes.
The system displays the response page when a violation occurs on any of the security checks set to Block.

Overview: Configuring Local Protocol Security Event Logging

You can configure the BIG-IP® system to log detailed information about protocol security events and store those logs locally.

Important: The BIG-IP Advanced Firewall Manager™ (AFM) must be licensed and provisioned and DNS Services must be licensed before you can configure Protocol Security event logging.

Creating a local Protocol Security Logging profile

Create a custom Logging profile to log BIG-IP system network firewall events locally on the BIG-IP system.
  1. On the Main tab, click Security > Event Logs > Logging Profiles .
    The Logging Profiles list screen opens.
  2. Click Create.
    The Create New Logging Profile screen opens.
  3. In the Profile Name field, type a unique name for the profile.
  4. Select the Protocol Security check box.
  5. In the HTTP, FTP, and SMTP Security area, from the Publisher list, select local-db-publisher.
  6. In the DNS Security area, from the Publisher list, select local-db-publisher.
  7. Select the Log Dropped Requests check box, to enable the BIG-IP system to log dropped DNS requests.
  8. Select the Log Filtered Dropped Requests check box, to enable the BIG-IP system to log DNS requests dropped due to DNS query/header-opcode filtering.
    Note: The system does not log DNS requests that are dropped due to errors in the way the system processes DNS packets.
  9. Select the Log Malformed Requests check box to enable the BIG-IP system to log malformed DNS requests.
  10. Select the Log Rejected Requests check box to enable the BIG-IP system to log rejected DNS requests.
  11. Select the Log Malicious Requests check box to enable the BIG-IP system to log malicious DNS requests.
  12. Click Finished.
Assign this custom protocol security Logging profile to a virtual server.

Configuring a virtual server for Protocol Security event logging

Ensure that at least one Log Publisher exists on the BIG-IP system.
Assign a custom Protocol Security Logging profile to a virtual server when you want the BIG-IP system to log Protocol Security events on the traffic the virtual server processes.
Note: This task applies only to systems provisioned at a minimum level (or higher) for Local Traffic (LTM). You can check the provisioning level on the System > Resource Provisioning screen.
  1. On the Main tab, click Local Traffic > Virtual Servers .
    The Virtual Server List screen opens.
  2. Click the name of the virtual server you want to modify.
  3. On the menu bar, click Security > Policies .
    The screen displays policy settings for the virtual server.
  4. In the Log Profile setting, select Enabled. Then, select one or more profiles, and move them from the Available list to the Selected list.
  5. Click Update to save the changes.

Viewing Protocol Security event logs locally on the BIG-IP system

Ensure that the BIG-IP system is configured to log the types of events you want to view, and to store the log messages locally on the BIG-IP system.
When the BIG-IP system is configured to log events locally, you can view those events using the Configuration utility.
  1. On the Main tab, click Security > Event Logs > Protocol > DNS .
    The Protocol Security event log displays.
  2. To search for specific events, click Custom Search. Drag the event data that you want to search for from the Event Log table into the Custom Search table, and then click Search.

Disabling logging

Disable event logging when you need to suspend logging for a period of time or you no longer want the BIG-IP system to log specific events.
Note: Logging is enabled by adding log settings to the access profile.
  1. To clear log settings from access profiles, on the Main tab, click Access > Profiles / Policies .
  2. Click the name of the access profile.
    Access profile properties display.
  3. On the menu bar, click Logs.
  4. Move log settings from the Selected list to the Available list.
  5. Click Update.
Logging is disabled for the access profile.

Implementation result

You now have an implementation in which the BIG-IP® system logs specific Protocol Security events locally.

Overview: Logging remote protocol security events

You can configure the BIG-IP® system to log information about Protocol Security events and send the log messages to remote high-speed log servers.

Important: The Advanced Firewall Manager™ (AFM™) must be licensed and provisioned before you can configure Protocol Security event logging.

This illustration shows the association of the configuration objects for remote high-speed logging.

Associations between remote high-speed logging configuration objects

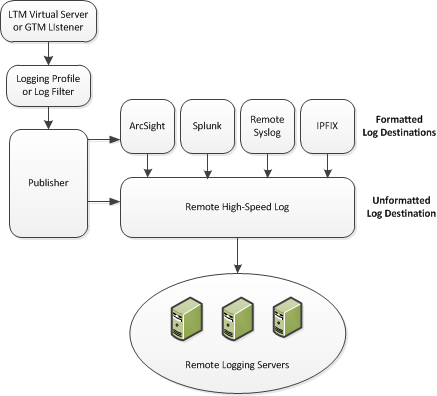
Association of remote high-speed logging configuration objects

Task summary

Perform these tasks to configure Protocol Security event logging on the BIG-IP® system.
Note: Enabling remote high-speed logging impacts BIG-IP system performance.

About the configuration objects of remote protocol security event logging

When configuring remote high-speed logging of Protocol Security events, it is helpful to understand the objects you need to create and why, as described here:

Object Reason Applies to
Pool of remote log servers Create a pool of remote log servers to which the BIG-IP system can send log messages. Creating a pool of remote logging servers.
Destination (unformatted) Create a log destination of Remote High-Speed Log type that specifies a pool of remote log servers. Creating a remote high-speed log destination.
Destination (formatted) If your remote log servers are the ArcSight, Splunk, IPFIX, or Remote Syslog type, create an additional log destination to format the logs in the required format and forward the logs to a remote high-speed log destination. Creating a formatted remote high-speed log destination.
Publisher Create a log publisher to send logs to a set of specified log destinations. Creating a publisher.
DNS Logging profile Create a custom DNS Logging profile to define the data you want the BIG-IP system to include in the DNS logs and associate a log publisher with the profile. Creating a custom Protocol Security logging profile.
Protected object (virtual server) Associate a custom DNS profile with a protected object to define how the BIG-IP system logs the DNS traffic that the protected object processes. Configuring a protected object for Protocol Security event logging.

Creating a pool of remote logging servers

Before creating a pool of log servers, gather the IP addresses of the servers that you want to include in the pool. Ensure that the remote log servers are configured to listen to and receive log messages from the BIG-IP system.
Create a pool of remote log servers to which the BIG-IP system can send log messages.
  1. On the Main tab, click Local Traffic > Pools .
    The Pool List screen opens.
  2. Click Create.
    The New Pool screen opens.
  3. In the Name field, type a unique name for the pool.
  4. Using the New Members setting, add the IP address for each remote logging server that you want to include in the pool:
    1. Type an IP address in the Address field, or select a node address from the Node List.
    2. Type a service number in the Service Port field, or select a service name from the list.
      Note: Typical remote logging servers require port 514.
    3. Click Add.
  5. Click Finished.

Creating a remote high-speed log destination

Before creating a remote high-speed log destination, ensure that at least one pool of remote log servers exists on the BIG-IP system.

Create a log destination of the Remote High-Speed Log type to specify that log messages are sent to a pool of remote log servers.

  1. On the Main tab, click System > Logs > Configuration > Log Destinations .
    The Log Destinations screen opens.
  2. Click Create.
  3. In the Name field, type a unique, identifiable name for this destination.
  4. From the Type list, select Remote High-Speed Log.
    Important: If you use log servers such as Remote Syslog, Splunk, or ArcSight, which require data be sent to the servers in a specific format, you must create an additional log destination of the required type, and associate it with a log destination of the Remote High-Speed Log type. With this configuration, the BIG-IP system can send data to the servers in the required format.
    The BIG-IP system is configured to send an unformatted string of text to the log servers.
  5. From the Pool Name list, select the pool of remote log servers to which you want the BIG-IP system to send log messages.
  6. From the Protocol list, select the protocol used by the high-speed logging pool members.
  7. Click Finished.

Creating a formatted remote high-speed log destination

Ensure that at least one remote high-speed log destination exists on the BIG-IP system.

Create a formatted logging destination to specify that log messages are sent to a pool of remote log servers, such as Remote Syslog, Splunk, or IPFIX servers.

  1. On the Main tab, click System > Logs > Configuration > Log Destinations .
    The Log Destinations screen opens.
  2. Click Create.
  3. In the Name field, type a unique, identifiable name for this destination.
  4. From the Type list, select a formatted logging destination, such as Remote Syslog, Splunk, or IPFIX.
    The Splunk format is a predefined format of key value pairs.
    The BIG-IP system is configured to send a formatted string of text to the log servers.
  5. If you selected Remote Syslog, then from the Syslog Format list select a format for the logs, and then from the High-Speed Log Destination list, select the destination that points to a pool of remote Syslog servers to which you want the BIG-IP system to send log messages.
    Important: For logs coming from Access Policy Manager (APM), only the BSD Syslog format is supported.
  6. If you selected Splunk or IPFIX, then from the Forward To list, select the destination that points to a pool of high-speed log servers to which you want the BIG-IP system to send log messages.
  7. Click Finished.

Creating a publisher

Ensure that at least one destination associated with a pool of remote log servers exists on the BIG-IP system.
Create a publisher to specify where the BIG-IP system sends log messages for specific resources.
  1. On the Main tab, click System > Logs > Configuration > Log Publishers .
    The Log Publishers screen opens.
  2. Click Create.
  3. In the Name field, type a unique, identifiable name for this publisher.
  4. For the Destinations setting, select a destination from the Available list, and click << to move the destination to the Selected list.
    Note: If you are using a formatted destination, select the destination that matches your log servers, such as Remote Syslog, Splunk, or ArcSight.
  5. Click Finished.

Creating a custom Protocol Security logging profile

Create a logging profile to log Protocol Security events for the traffic handled by the protected object to which the profile is assigned.
Note: You can configure logging profiles for HTTP and DNS security events on Advanced Firewall Manager, and FTP and SMTP security events on Application Security Manager.
  1. On the Main tab, click Security > Event Logs > Logging Profiles .
    The Logging Profiles list screen opens.
  2. Click Create.
    The Create New Logging Profile screen opens.
  3. Select the Protocol Security check box.
  4. In the HTTP, FTP, and SMTP Security area, from the Publisher list, select the publisher that the BIG-IP system uses to log HTTP, FTP, and SMTP Security events.
  5. In the DNS Security area, from the Publisher list, select the publisher that the BIG-IP system uses to log DNS Security events.
  6. Select the Log Dropped Requests check box, to enable the BIG-IP system to log dropped DNS requests.
  7. Select the Log Filtered Dropped Requests check box, to enable the BIG-IP system to log DNS requests dropped due to DNS query/header-opcode filtering.
    Note: The system does not log DNS requests that are dropped due to errors in the way the system processes DNS packets.
  8. Select the Log Malformed Requests check box to enable the BIG-IP system to log malformed DNS requests.
  9. Select the Log Rejected Requests check box to enable the BIG-IP system to log rejected DNS requests.
  10. Select the Log Malicious Requests check box to enable the BIG-IP system to log malicious DNS requests.
  11. From the Storage Format list, select how the BIG-IP system formats the log.
    Option Description
    None Specifies the default format type in which the BIG-IP system logs messages to a remote Syslog server, for example: "management_ip_address","bigip_hostname","context_type","context_name","src_ip","dest_ip","src_port","dest_port","vlan","protocol","route_domain","acl_rule_name","action","drop_reason
    Field-List Allows you to:
    • Select, from a list, the fields to be included in the log.
    • Specify the order the fields display in the log.
    • Specify the delimiter that separates the content in the log. The default delimiter is the comma character.
    User-Defined Allows you to:
    • Select, from a list, the fields to be included in the log.
    • Cut and paste, in a string of text, the order the fields display in the log.
  12. Click Finished.
Assign this custom Protocol Security Logging profile to a protected object.

Logging DoS events for a protected object

Ensure that at least one log publisher exists on the BIG-IP system.
Assign a custom logging profile to a protected object when you want the system to log DoS events for the traffic the protected object processes.
  1. On the Main tab, click Security > DoS Protection > Protected Objects .
  2. Click the name of the protected object for which you want to log DoS events.
    The Properties pane opens on the right.
  3. In the Network & General area, for Logging Profiles, move the logging profile to assign from the Available list into the Selected list.
    This assigns the logging profile to the protected object.
  4. Click Save.
The system logs DoS events for the protected object.
You can review DoS event logs at Security > Event Logs > DoS and select the type of DoS event log to view.