Applies To:
Show Versions
BIG-IP AFM
- 13.1.5, 13.1.4, 13.1.3, 13.1.1, 13.1.0
About firewall rules
The BIG-IP® Network Firewall uses rules to specify traffic handling actions. Rules are collected in policies, which are applied at the global context, to a route domain, to a virtual server, or to a self IP address. Rules for the management port do not require a policy, but are defined directly in the management port context.
A rule includes:
- Context
- The category of object to which the rule applies. Rules can be global and apply to all addresses on the BIG-IP system that match the rule, or they can be specific, applying only to a specific virtual server, self IP address, route domain, or the management port.
- Rule or Rule List
- Specifies whether the configuration applies to this specific rule, or to a group of rules.
- Source Address
- One or more addresses, geographic locations, or address lists to which the rule applies. The source address refers to the packet's source.
- Source Port
- The ports or lists of ports on the system to which the rule applies. The source port refers to the packet's source.
- VLAN
- Specifies VLANs to which the rule applies. The VLAN source refers to the packet's source.
- Destination Address
- One or more addresses, geographic locations, or address lists to which the rule applies. The destination address refers to the packet's destination.
- Destination Port
- The ports or lists of ports to which the rule applies. The destination port refers to the packet's destination.
- iRule
- Specifies an iRule that is applied to the rule. An iRule can be started when the firewall rule matches traffic.
- iRule sampling
- When you select an iRule to trigger in a firewall rule, you can select the how frequently the iRule is triggered, for sampling purposes. The value you configure is one out of n times the iRule is triggered. For example, set this field to 5 to trigger the iRule one out of every five times the rule matches a flow.
- Protocol
- The protocol to which the rule applies. The firewall configuration allows you to select one specific protocol from a list of more than 250 protocols. The list is separated into a set of common protocols, and a longer set of other protocols. To apply a rule to more than one protocol, select Any.
- Schedule
- Specifies a schedule for the firewall rule. You configure schedules to define days and times when the firewall rule is made active.
- Action
- Specifies the action (accept, accept decisively, drop, or reject) for the firewall rule.
- Logging
- Specifies whether logging is enabled or disabled for the firewall rule.
Task list
Firewall actions
These listed actions are available in a firewall rule.
Firewall actions are processed within a context. If traffic matches a firewall rule within a given context, that action is applied to the traffic, and the traffic is processed again at the next context.
| Firewall action | Description |
|---|---|
| Accept | Allows packets with the specified source, destination, and protocol to pass through the current firewall context. Packets that match the rule, and are accepted, traverse the system as if the firewall is not present. |
| Drop | Drops packets with the specified source, destination, and protocol. Dropping a packet is a silent action with no notification to the source or destination systems. Dropping the packet causes the connection to be retried until the retry threshold is reached. |
| Reject | Rejects packets with the specified source, destination, and protocol. Rejecting a packet is a more graceful way to deny a packet, as it sends a destination unreachable message to the sender. For example, if the protocol is TCP, a TCP RST message is sent. One benefit of using Reject is that the sending application is notified, after only one attempt, that the connection cannot be established. |
| Accept Decisively | Allows packets with the specified source, destination, and protocol to pass through the firewall. Packets that match the rule, and are accepted decisively, traverse the system as if the firewall is not present, and are not processed by rules in any further context after the accept decisively action applies. If you want a packet to be accepted in one context, and not to be processed in any remaining context or by the default firewall rules, specify the accept decisively action. For example, if you want to allow all packets from Network A to reach every server behind your firewall, you can specify a rule that accepts decisively at the global context, from that Network A, to any port and address. Then, you can specify that all traffic is blocked at a specific virtual server, using the virtual server context. Because traffic from Network A is accepted decisively at the global context, that traffic still traverses the virtual server. |
About Network Firewall contexts
With the BIG-IP® Network Firewall, you use a context to configure the level of specificity of a firewall policy. For example, you might make a global context rule to block ICMP ping messages, and you might make a virtual server context rule to allow only a specific network to access an application.
Context is processed in this order:
- Global
- Route domain
- Virtual server/self IP
- Global drop or reject
The firewall processes policies and rules in order, progressing from the global context, to the route domain context, and then to either the virtual server or self IP context. Management port rules are processed separately, and are not processed after previous rules. Rules can be viewed in one list, and viewed and reorganized separately within each context. You can enforce a firewall policy on any context except the management port. You can also stage a firewall policy in any context except management. Management port rules are configured as inline rules specific to the management port.
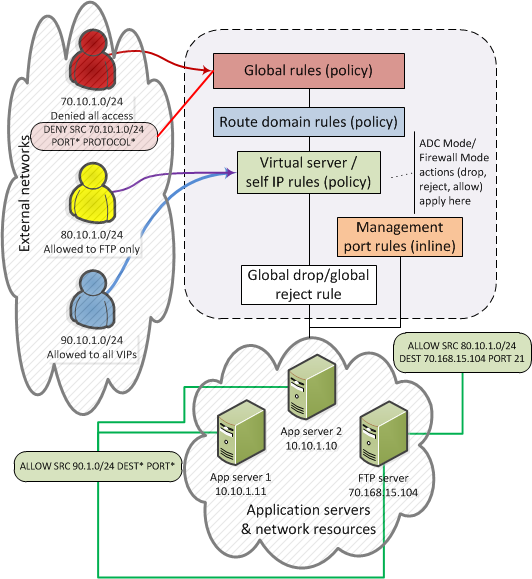
Firewall context processing hierarchy example
Firewall context descriptions
When you create a firewall rule, you can select one of these listed contexts. Each context forms a list of rules. Contexts are processed in heirarchical order, and within each context, rules are processed in numerical order..
| Firewall context | Description |
|---|---|
| Global | Global policy rules are collected in this firewall context. Global rules apply to all traffic that traverses the firewall, and global rules are checked first. |
| Route Domain | Route domain policy rules are collected in this context. Route domain rules apply to a specific route domain defined on the server. Route domain policy rules are checked after global rules. If you have not configured a route domain, you can apply route domain rules to Route Domain 0, which is effectively the same as the global rule context; however, if you configure another route domain after this, Route Domain 0 is no longer usable as a global context. |
| Virtual Server | Virtual server policy rules are collected in this context. Virtual server policy rules apply to the selected existing virtual server only. Virtual server rules are checked after route domain rules. |
| Self IP | Self IP policy rules apply to a specified self IP address on the device. Self IP policy rules are checked after route domain rules. |
| Management Port | The management port context collects firewall rules that apply to the management port on the BIG-IP® device. Management port rules are checked independently of other rules and are not processed in relation to other contexts. |
| Global Reject | The Global Reject rule rejects all traffic that does not match any rule in a previous context, excluding Management Port traffic, which is processed independently. |
Creating a network firewall management port rule
About redundant and conflicting rules
When you create rules on the network firewall, it is possible that a rule can either overlap or conflict with an existing rule.
- Redundant rule
- A rule which has address, user, region, or port information that completely overlaps with another rule, with the same action. In the case of a redundant rule, the rule can be removed with no net change in packet processing because of the overlap with a previous rule or rules.
- Conflicting rule
- A conflicting rule is a special case of a redundant rule, in which address, user, region or port
information overlaps with another rule, but the rules have different actions, and thus conflict. Tip: A rule might be called conflicting even if the result of each rule is the same. For example, a rule that applies to a specific IP address is considered in conflict with another rule that applies to the same IP address, if one has an Accept action and the other has an action of Accept Decisively, even though the two rules accept packets.
On a rule list page, redundant or conflicting rules are indicated in the State column with either (Redundant) or (Conflicting).
Viewing and removing redundant and conflicting rules
About stale rules
On the rule list page, you can determine whether a rule is stale, infrequently used, or never used. A stale rule is one that has not been hit in a long time. In addition, a rule might never be hit, or might be hit infrequently.
On the active rules page, or the page of rules for a policy, the Count column displays the number of times a rule has been hit. A count of 0 might indicate a rule that will never be hit, and can be removed without changing packet processing. A rule with a low count, when other rules have a high count, might indicate a rule that is stale, and no longer needed.
Use the Latest Match column to confirm rule status. A status of Never indicates the rule has never been matched, and might be irrelevant. A very long time since the last match indicates a rule that is likely no longer needed.
You can view stale rules from the stale rules reporting page. Go to .
Viewing and removing unused or infrequently used rules
About firewall rule lists
The BIG-IP® Network Firewall uses rule lists to collect multiple rules. Rule lists function differently depending on how you create them with Advanced Firewall Manager™ (AFM™).
- If you create a rule list with :
- This type of rule list is defined with a name and optional description. Once you create a rule list of this type, you can create and add one or more individual firewall rules to it. You can only add firewall rules by creating them from within the rule list. This type of rule list cannot be used on its own, but must be selected in an Active Rules list, or in a Policy Rules list.
- If you create a rule list with and select the Type as Rule List:
- This type of rule list is defined with a name and optional description. You can specify a context (Global, Route Domain, Virtual Server, or Self IP). However, you cannot add individual rules to this rule list. Instead, you select a single rule list you have already created, or one of the predefined rule lists. This type of rule list is used to activate a rule list in the configuration.
- If you create a rule list with and select the Type as Rule List:
- This type of rule list is defined with a name and optional description. You cannot specify a context as the context is determined by the policy. You cannot add individual rules to this rule list. Instead, you select a single rule list you have already created, or one of the predefined rule lists. This type of rule list is used to activate a rule list in a policy.


