Manual Chapter : IP Address Intelligence in the Network Firewall

Applies To:

Show Versions Show Versions

BIG-IP AFM

  • 13.1.5, 13.1.4, 13.1.3, 13.1.1, 13.1.0
Manual Chapter
 

About IP intelligence policies in the Network Firewall

In the BIG-IP® Network Firewall, you can configure policies to validate traffic against an IP intelligence database. Such traffic can be handled automatically if it originates from known-bad or questionable IP addresses. To use existing lists of known bad IPs, you can configure policies to automatically query feed lists that specify blacklist and whitelist IP address entries, and assign default classes and blacklist or whitelist behaviors to those feed lists. In addition, you can manually add an IP address to a blacklist category, or remove an IP address from a blacklist category.

You can control the actions for each blacklist category by specifying those actions in a policy, and you can configure default action and default logging for each policy. Furthermore, you can configure logging and actions per category. You can apply IP Intelligence policies at the global context, to a virtual server, or on a route domain.

IP intelligence policy objects

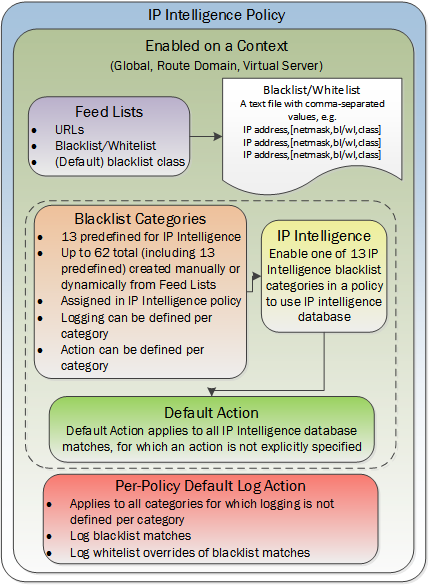
IP Intelligence Policy container and included elements

Downloading the IP intelligence database

The requirements for using IP Intelligence are:
  • The system must have an IP Intelligence license.
  • The system must have an Internet connection either directly or through an HTTP proxy server.
  • The system must have DNS configured (go to System > Configuration > Device > DNS ).
Important: IP Intelligence is enabled by default if you have a license for it. You only need to enable it if it was previously disabled.
To enable IP Intelligence on the BIG-IP® system, you enable auto-update to download the IP intelligence database to the system.
  1. Log in to the command line for the BIG-IP® system.
  2. To determine whether IP intelligence auto-update is enabled, type the following command: tmsh list sys db iprep.autoupdate
    If the value of the iprep.autoupdate variable is disable, IP intelligence is not enabled. If it is enable, your task is complete. No further steps are necessary.
  3. If disabled, at the prompt, type tmsh modify sys db iprep.autoupdate value enable
    The system downloads the IP intelligence database and stores it in the binary file, /var/IpRep/F5IpRep.dat. It is updated every 5 minutes.
  4. If the BIG-IP system is behind a firewall, make sure that the BIG-IP system has external access to vector.brightcloud.com using port 443.
    That is the IP Intelligence server from which the system gets IP Intelligence information.
  5. Optional: If the BIG-IP system connects to the Internet using a forward proxy server, set these system database variables.
    1. Type tmsh modify sys db proxy.host value hostname to specify the host name of the proxy server.
    2. Type tmsh modify sys db proxy.port value port_number to specify the port number of the proxy server.
    3. Type tmsh modify sys db proxy.username value username to specify the user name to log in to the proxy server.
    4. Type tmsh modify sys db proxy.password value password to specify the password to log in to the proxy server.
The IP Intelligence feature remains enabled unless you disable it with the command tmsh modify sys db iprep.autoupdate value disable.
You can configure IP intelligence for Advanced Firewall Manager by assigning IP intelligence policies to the global, route domain, or virtual server context.

About IP intelligence blacklist categories

Blacklist categories are categories you can use to differentiate between types of blacklisted URLs. You can specify up to 62 blacklist categories, including 16 that are predefined on the system. A blacklist category definition consists only of a name and description. You can specify actions and logging options for each blacklist category you create, and for predefined categories, in an IP Intelligence policy. The 16 predefined blacklist categories are automatically available for selection in an IP Intelligence policy.

Blacklist categories

Along with the IP address, the IP intelligence database stores the category that explains the reason that the IP address is considered untrustworthy.

Category Name Description
additional IP addresses that are added from additional categories not more explicitly defined.
appiq_badactors IP addresses gathered from AppIQ central management.
application_denial_of_service IP addresses involved in application DoS Attacks, or anomalous traffic detection.
attacked_ips Destination IP addresses under attack.
botnets IP addresses of computers that are infected with malicious software (Botnet Command and Control channels, and infected zombie machines) and are controlled as a group by a Bot master, and are now part of a botnet. Hackers can exploit botnets to send spam messages, launch various attacks, or cause target systems to behave in other unpredictable ways.
cloud_provider_networks IP addresses and networks that are used by cloud providers.
denial_of_service IP addresses that have launched denial-of-service (DoS) attacks, distributed denial-of-service (DDoS) attacks, anomalous SYN flood attacks, or anomalous traffic detection. These attacks are usually requests for legitimate services, but occur at such a fast rate that targeted systems cannot respond quickly enough and become bogged down or unable to service legitimate clients.
infected_sources Active IP addresses that issue HTTP requests with a low reputation index score, or that are known malicious web sites offering or distributing malware, shell code, rootkits, worms, or viruses.
mobile_threats IP addresses of malicious and unwanted mobile applications.
phishing IP addresses that host phishing sites, and other kinds of fraud activities, such as ad click fraud or gaming fraud.
proxy IP addresses that are associated with web proxies that shield the originator's IP address (such as proxy and anonymization services).
scanners IP addresses that are involved in reconnaissance, such as probes, host scan, domain scan, and password brute force, typically to identify vulnerabilities for later exploits.
spam_sources IP addresses tunneling spam messages through proxy, anomalous SMTP activities and forum spam activities.
tor_proxy IP addresses acting as exit nodes for the Tor Network. Exit nodes are the last point along the proxy chain and make a direct connection to the originator’s intended destination.
web_attacks IP addresses involved in cross site scripting, iFrame injection, SQL injection, cross domain injection, or domain password brute force.
windows_exploits Active IP addresses that have exercised various exploits against Windows resources by offering or distributing malware, shell code, rootkits, worms, or viruses using browsers, programs, downloaded files, scripts, or operating system vulnerabilities.

Creating a blacklist category

You can create a blacklist category to configure policy-based responses to specific types of addresses. Then you can specify an address as belonging to a blacklist category so you can see the types of categories that are triggered in the logs, and so you can provide unique responses on a per-category basis.
  1. On the Main tab, click Security > Network Firewall > IP Intelligence > Blacklist Categories .
    The Blacklist Categories screen opens.
  2. Click Create to create a new IP Intelligence blacklist category.
  3. In the Name field, type a name for the blacklist category.
  4. In the Description field, type a description for the blacklist category.
  5. Select the Match Type for the IP intelligence category.
    By default, IP intelligence blacklist categories match Source only, but you can configure categories to match Source and Destination or Destination only.
  6. Click Finished.
    The list screen and the new items are displayed.

Blacklisting an individual IP address

You can easily blacklist a single IP address manually. You do this by adding the IP address directly to a blacklist category. The settings for the blacklist category, as defined in an IP intelligence policy, are then applied to the IP address.
  1. On the Main tab, click Security > Network Firewall > IP Intelligence > Blacklist Categories .
    The Blacklist Categories screen opens.
  2. Select the check box next to a blacklist category.
    You can select more than one blacklist category.
  3. Click the Add to Category button.
    The Add Entry popup screen appears.
  4. In the Insert (IP Address) field, type an IP address to add to the blacklist category or categories.
  5. In the Seconds field, specify the duration for which the address should be added to the blacklist category.
  6. To allow the IP address to be advertised to edge routers so they will null route the traffic, select Allow Advertisements.
  7. Click the Add Address button.
    The IP address is added to the blacklist category or categories.

Removing an individual IP address from a blacklist

You can easily remove single IP address from a blacklist manually. You do this by selecting the blacklist category, and removing the IP address.
  1. On the Main tab, click Security > Network Firewall > IP Intelligence > Blacklist Categories .
    The Blacklist Categories screen opens.
  2. Select the check box next to a blacklist category.
    You can select more than one blacklist category.
  3. Click the Delete from Category button.
    The Delete Entry popup screen appears.
  4. In the Delete (IP Address) field, type an IP address to remove from the selected blacklist category or categories.
    The Delete Entry popup screen appears.
  5. In the Insert (IP Address) field, type an IP address to add to the blacklist category or categories.
  6. Click the Delete Address button.
    The IP address is removed from the blacklist category or categories.

About IP intelligence feed lists

A feed list retrieves blacklists and whitelists from specified URLs. You can use a feed list to dynamically update blacklists and whitelists.

A feed list can retrieve multiple feeds from FTP, HTTP, or HTTPS addresses. You can specify whether a feed is a blacklist or whitelist, and the default category for the feed list. You can also configure a polling interval.

After a blacklist or whitelist is defined in a feed list, you add the feed list to an IP Intelligence policy. The list is then used by the policy to retrieve feeds and dynamically adjust the blacklist and whitelist policy.

Feed list settings

Feed lists dynamically define IP addresses that have been blacklisted or whitelisted. The IP Intelligence policy uses feed lists to dynamically filter traffic.

A feed list defines the feeds that dynamically update the IP address intelligence database for your system.

Feed list setting Description
URL Select FTP, HTTP, or HTTPS, then specify the URL for the feed. Feeds are typically text files. An example for a local file might be http://172.10.1.23/feed.txt .
List Type Whitelist or Blacklist. Specifies the default classification for all URLs in the feed for which a category is not specified.
Blacklist Category Specifies a default category for the list. This is the default blacklist category for all blacklist URLs in the feed for which a category is not specified. On the BIG-IP® system, you can specify a total of 62 categories; however, 9 categories are used by the IP Intelligence database.
Poll Interval Specifies how often the feed URL is polled for new feeds.
Username The user name to access the feed list file, if required.
Password The password to access the feed list file, if required.
Feed URLs In this area, you can add, replace, or delete feed URLs from the feed list.

A feed is a simple comma-separated value (CSV) file. The file contains four comma-separated values per line.

Position Value Definition
1 IP Address The IP address to be blacklisted or whitelisted. This is the only field that is required in each entry in the file. All other entries are optional.
Important: If you append a route domain with a percentage sign and the route domain number, the route domain is not used.
2 Network Mask (Optional) The network mask for the IP address as a CIDR (such as, 24 for 255.255.255.0). This field is optional.
Note: When IP 0.0.0.0 is mentioned in feed list without netmask, it is considered as a wild card IP and traffic from all the sources is blocked. If traffic from source IP 0.0.0.0 must be blocked, then add network mask of 32 as part of the blacklist entry.
3 Whitelist/Blacklist (Optional) Identifies whether the IP address is a whitelist or blacklist address. You can type wl, bl, whitelist, or blacklist, with any capitalization. Leave this field blank to retain the default specified for the feed.
4 Category (Optional) Type the category name for the entry. Leave this field blank to retain the default specified for the feed.

In this feed list file example, only the first entry specifies a value for every field. The third and fourth entries, 10.10.0.12 and 10.0.0.12, will be set to blacklist or whitelist entries depending on the setting for the feed. 10.10.0.12 is specified with a category of botnets; however, if the default setting for the feed is a whitelist, this is ignored. When an IP address has both a blacklist and a whitelist entry from the configuration, the whitelist entry takes precedence. The more specific entry takes precedence, so if an entry in the feed list file specifies a setting, that setting overrules the default setting for the feed list or category.

10.0.0.2,32,bl,spam_sources 10.0.0.3,,wl, 10.10.0.12,,botnets 10.0.0.12,,, 10.0.0.13,,bl,

Creating a feed list

You can add whitelist and blacklist IP addresses to your configuration automatically by setting up feeds and capturing them with a feed list.
  1. On the Main tab, click Security > Network Firewall > IP Intelligence > Feed Lists .
    The Feed Lists screen opens.
  2. Click Create to create a new IP Intelligence feed list.
  3. In the Name field, type a name for the feed list.
  4. Configure Feed URLs with an HTTP, HTTPS, or FTP URL, the list type, the blacklist category, and the polling interval. Specify a user name and password, if required to access the feed list.
    A feed URL includes the actual URL to the text file, and information about the defaults for that file. Within the feed file, however, any URL can be configured to be a whitelist or blacklist entry, and assigned to a blacklist category.
  5. Click the Add button to add a feed URL to the feed list.
  6. Click Finished.
    The list screen and the new items are displayed.

Configuring and assigning IP intelligence policies

An IP intelligence policy combines combines feed lists, default actions, logging settings, and actions for blacklist categories into a container that you can apply to a virtual server or route domain.

Configuring a policy to check addresses against IP intelligence

You can verify IP addresses against the preconfigured IP Intelligence database, and against IPs from your own feed lists, by creating an IP Intelligence policy.
  1. On the Main tab, click Security > Network Firewall > IP Intelligence > Policies .
    The IP Intelligence Policies screen opens.
  2. Click Create to create a new IP Intelligence policy.
  3. In the Name field, type a name for the IP intelligence policy.
  4. To add feed lists to the policy, click the name of an Available feed list, and then add it to the Selected list.
  5. Set the Default Action for the policy to Accept or Drop.
    • Select Accept to allow packets from categorized addresses that have no action applied on the feed list.
    • Select Drop to drop packets from categorized addresses that have no action applied on the feed list.
    The default action applies to addresses that are not assigned a blacklist category in the feed list. The IP Intelligence feature uses the action specified in a feed list entry, when available.
  6. Set the Default Log Actions.
    • Log Whitelist Overrides specifies the default log action (Yes or No) for whitelist matches that override blacklist matches.
    • Log Blacklist Category Matches specifies the default log action for blacklist matches, when the category does not have a specified log action in the blacklist matching policy. Yes affords visibility into blacklist matches and logs all packets, but provides no hardware acceleration. Limited logs statistics every 256 packets and includes hardware acceleration. No does not log blacklist matches but provides the highest performance with hardware acceleration.
    • Select both Log Black List Category Matches and Log White List Overrides to log all black list matches, and all whitelist matches that override blacklist matches.
    Note: Whitelist matches always override blacklist matches.
  7. To configure matching actions and logging for custom blacklist categories, select the Blacklist Category in the Blacklist Matching Policy area. Select a category from the list of predefined and user-defined blacklist categories, and set the default action and default logging action for the category, then click Add to add the blacklist category to the policy.
  8. In the Blacklist Matching Policy area, select default actions for the selected blacklist category.
    1. For Blacklist Category, select the category for which to configure the settings.
    2. For Action, select Use Policy Default to use the default policy action for this category. Select Drop or Accept to override the default action.
    3. For Log Blacklist Category Matches, specify the action for blacklist matches for this category. Select Use Policy Default to use the default log action for blacklist matches. Yes affords visibility into blacklist matches and logs all packets, but provides no hardware acceleration. Limited logs statistics every 256 packets and includes hardware acceleration. No does not log blacklist matches but provides the highest performance with hardware acceleration.
    4. For Match Override, select the matching criteria that overrides a blacklist match. You can require a source match, a destination match, or both a source and destination match to override a blacklist match with a whitelist.
    5. Click Add to add the customized blacklist matching policy to the IP intelligence policy.
      The matching policy for the blacklist category is added to the list.
    6. To replace a blacklist category matching policy, select the entry and click Replace.
    When you define a blacklist category and add it to the IP intelligence policy, matches for that category use the default actions specified for the category, and override the policy defaults.
  9. To remove a customized category from the policy, select the category in the Blacklist Matching Policy area and click Delete.
  10. Click Finished.
    The list screen and the new items are displayed.

Assigning a global IP Intelligence policy

You can assign an IP Intelligence policy globally, to apply blacklist and whitelist matching actions and logging to all traffic.
  1. On the Main tab, click Security > Network Firewall > IP Intelligence > Policies .
    The IP Intelligence Policies screen opens.
  2. From the Global Policy list, select the IP Intelligence policy to apply to all traffic on the BIG-IP system.
  3. Click Update.
    The list screen and the updated item are displayed.
The specified IP Intelligence policy is applied to all traffic.

Assigning an IP Intelligence policy to a virtual server

You can assign an IP Intelligence policy to a virtual server, to apply blacklist and whitelist matching actions and logging to traffic on that virtual server only.
  1. On the Main tab, click Local Traffic > Virtual Servers .
    The Virtual Server List screen opens.
  2. Click the name of the virtual server you want to modify.
  3. On the menu bar, from the Security menu, choose Policies.
  4. Next to IP Intelligence, select Enabled, then select the IP intelligence policy to apply to traffic on the virtual server.
  5. Click Update.
    The list screen and the updated item are displayed.
The specified IP Intelligence policy is applied to traffic on the selected virtual server.

Assigning an IP Intelligence policy to a route domain

You can assign an IP Intelligence policy to a route domain, to apply blacklist and whitelist matching actions and logging to route domain traffic.
  1. On the Main tab, click Network > Route Domains .
    The Route Domain List screen opens.
  2. In the Name column, click the name of the relevant route domain.
  3. From the IP Intelligence Policy list, select an IP Intelligence policy to enforce on this route domain.
  4. Click Update.
    The system displays the list of route domains on the BIG-IP system.
The specified IP Intelligence policy is applied to traffic on the route domain.