You can use bandwidth controllers with Policy Enforcement Manager™ to
restrict bandwidth usage per subscriber, group of subscribers, per application, and so on. This
implementation uses PEM for global application control to limit overall bandwidth for all P2P (or
other application) traffic. For example:
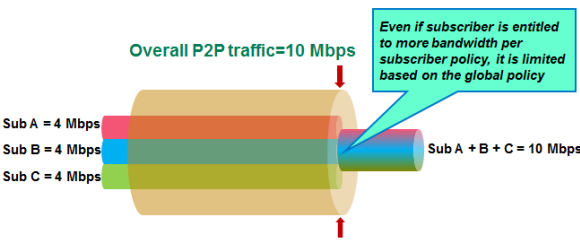
Diagram of bandwidth usage per subscriber
In the figure, three subscribers have individual policies that allow P2P bandwidths of up to 4
Mbps each. The maximum bandwidth for all P2P traffic is limited to 10 Mbps (specified as the
maximum rate in a static bandwidth controller). If all were sending P2P traffic, they would all
get less bandwidth if you apply a global enforcement policy that enforces bandwidth control.
For this implementation, you create the bandwidth controller and the enforcement policy on the
BIG-IP® system. In the enforcement policy, a rule applies bandwidth control
to P2P traffic. From the listener, you apply the policy globally to all traffic.
Task Summary
Creating VLANs
VLANs represent a collection of hosts that can share network
resources, regardless of their physical location on the network. For Policy Enforcement Manager™, you typically create VLANs for the subscriber
traffic coming in to the BIG-IP® system, for traffic going out to
the network, and if using w-steering with service chains, you need two VLANs for each
value added service to be fully transparent.
-
On the Main tab, click .
The VLAN List screen opens.
-
Click Create.
The New VLAN screen opens.
-
In the Name field, type a unique name for the
VLAN.
-
In the Tag field, type a numeric tag, between 1-4094,
for the VLAN, or leave the field blank if you want the BIG-IP system to
automatically assign a VLAN tag.
The VLAN tag identifies the traffic from hosts in the associated VLAN.
-
For the Interfaces setting:
-
From the Interface list, select an interface
number or trunk name.
-
From the Tagging list, select
Tagged or
Untagged.
Select Tagged when you want traffic for that
interface to be tagged with a VLAN ID.
-
If you specified a numeric value for the Customer
Tag setting and from the Tagging
list you selected Tagged, then from the
Tag Mode list, select a value.
-
Click Add.
-
Repeat these steps for each interface or trunk that you want to assign
to the VLAN.
-
From the Configuration list, select
Advanced.
-
If you want the system to verify that the return route to an initial packet is
the same VLAN from which the packet originated, select the Source
Check check box.
-
In the MTU field, retain the default number of bytes
(1500).
-
If you want to base redundant-system failover on VLAN-related events, select
the Fail-safe box.
-
From the CMP Hash list, select the appropriate value
depending on the location of the VLAN in the system:
- On the VLAN coming in to the BIG-IP system (often called
internal), select Source
Address.
- On VLANs going out (often called external), leave
the value set to Default.
- For traffic returning to the BIG-IP from the Internet, select
Destination Address.
- If using w-steering for value-added services, on the VLAN coming back to
the BIG-IP system, select Source Address.
-
Click Finished.
The screen refreshes, and displays the new VLAN in the
list.
Create as many VLANs as needed for your configuration.
Creating a rule for bandwidth control
If you want to use rate control, you need to have already created a bandwidth
controller.
You can create a rule that provides bandwidth control. For example, the bandwidth
controller might limit the total amount of bandwidth that can be used by application
traffic, such as P2P.
-
On the Main tab, click .
The Policies screen opens.
-
Click the name of the enforcement policy you want to add rules to.
The properties screen for the policy opens.
-
In the Policy Rules area, click Add.
The New Rule screen opens.
-
In the Name field, type a name for the rule.
-
In the Precedence field, type an integer that indicates the
precedence for the rule in relation to the other rules. Number 1 has the highest
precedence. Rules with higher precedence are evaluated before other rules with lower
precedence.
Tip: All rules in a policy are run concurrently. Precedence takes effect when
there are conflicting rules. The conflict occurs when the traffic matches two rules and
the policy actions from these rules differ. For example, if you have rule 1 with
precedence 10 and Gate Status disabled for a search engine, and
you have rule 2 with precedence 11 and Gate Status enabled, then
rule 1 is processed first because it has higher precedence. Rules conflict if they have
identical or overlapping classification criteria (for the traffic that matches more than
one rule). In some cases, different policy actions are not conflicting, and hence,
applied in parallel.
-
In the Classification setting, filter the application traffic to
which you want to apply bandwidth control.
-
For Match Criteria, select
Match.
-
For Category, select P2P (or other
application traffic you want to limit on the network).
-
Click Add.
-
In the Forwarding area, ensure that Gate Status is set to
Enabled.
-
In the Rate Control setting, for Bandwidth
Controller, select the name of the bandwidth controller that you created
to limit P2P (or other application) traffic.
-
Click Finished.
You have created a rule to restrict the total bandwidth usage for all P2P traffic to the
Maximum Rate specified in the static bandwidth control policy.
The enforcement policy needs to be associated with the virtual servers required for PEM. You
can do this by creating a listener (recommended), or you can edit the virtual servers to specify
the enforcement policy as a global policy, and enable classification.
Creating a listener: example
You create a listener to complete the preliminary setup on the BIG-IP®
system; in this case, to apply bandwidth management as a global enforcement policy.
-
On the Main tab, click .
The Listeners screen opens.
-
Click Add.
The New Virtual Group screen opens.
-
In the Name field, type a unique name for the listener.
-
For the Source setting, type the IP address or network from
which the virtual server will accept traffic.
-
In the Destination Address field, type the IP address of the
virtual server. For example, 10.0.0.1 or
10.0.0.0/24.
Note: When you use an IPv4 address without specifying a prefix, the BIG-IP® system automatically uses a /32
prefix.
Tip: You can use a catch-all virtual server (0.0.0.0)
to specify all traffic that is delivered to the BIG-IP® system.
Configure the source and destination setting, during forwarding mode only. In the relay
mode, the client does not have an IP address and the DHCP provides the client with an IP
address.
The system will create a virtual server using the address or network you
specify.
-
For the Service Port setting, type or select the service port
for the virtual server.
-
Subscriber provisioning using RADIUS is enabled by default. If your system is using
RADIUS for snooping subscriber identity, you need to specify VLANs and tunnels. If you are
not using RADIUS, you need to disable it.
- For the VLANs and Tunnels setting, move the VLANs and
tunnels that you want to monitor for RADIUS traffic from the
Available list to the Selected
list.
- If you do not want to use RADIUS, from the Subscriber Identity
Collection list, select Disabled.
-
In the Policy Provisioning area, for Global Policy, move the
enforcement policy you created for bandwidth control to High
Precedence.
The system applies the policy with bandwidth control to all traffic.
-
Click Finished.
The Policy Enforcement Manager creates a listener.
When you create a listener, the Policy Enforcement Manager™ also
creates virtual servers for each type of traffic (TCP, UDP, or both), and a virtual
server for HTTP traffic. The system sets up classification and assigns the appropriate
policy enforcement profile to the virtual servers. If you are connecting to a RADIUS
authentication server, a virtual server for RADIUS is also added.
Now you can send traffic through the network. All traffic classified as P2P traffic is
limited to the Maximum Rate specified in the static bandwidth control
policy. Once the maximum rate is reached, no additional P2P traffic is allowed on the
network.


