Manual Chapter :
Creating Access Profiles and Access Policies
Applies To:
Show Versions
BIG-IP APM
- 11.4.1, 11.4.0
In the BIG-IP® Access Policy Manager® an access profile is the profile that you select in a virtual server definition to establish a secured connection to a resource. You can also configure an access profile to provide access control and security features to a local traffic virtual server hosting web applications.
| Customization settings for the access profile To customize these settings, see the BIG-IP® Access Policy Manager® Customization Guide. |
On the Access Profile Properties screen, you use the Settings section to configure timeout and session settings. You must select the Custom check box to configure settings for this section.
| Inactivity Timeout - Specifies the inactivity timeout for the connection, in minutes. If there is no activity between the client and server within the specified threshold time, the system closes the current session. By default, the threshold is 0, which specifies that as long as a connection is established, the inactivity timeout is disabled. However, if an inactivity timeout value is set, when server traffic exceeds the specified threshold, the inactivity timeout is reset. In addition, for portal access, you can customize the timing for the warning message to appear for the user prior to session timeout by using the Session Timeout Guard Time setting in the webtop customization settings. The user can click a link inside the message window to reset inactivity timeout. |
| Access Policy Timeout - This is designed to keep malicious users from creating a DOS attack on your Secure Access Manager. The timeout requires that a user, who has followed through on a redirect, must reach the webtop before the timeout expires. The default value is 300 seconds. |
| Maximum Session Timeout - Specifies the maximum lifetime of one session, in minutes. The maximum lifetime is between the time a session is created, to when the session terminates. By default, it is set to 0, which means no limit. When you configure this setting, there is no way to extend the session lifetime, and the user must logout and then log back in to the server, when needed. |
| Max Concurrent Users - Specifies the number of sessions per access profile. The default value is 0, which represents unlimited sessions. Please note that this field is read-only for application editors. All other administrative roles can modify this field. |
| Max Sessions Per User - Specifies the number of sessions per user. The default value is 0, which represents unlimited sessions. Please note that this field is read-only for application editors. All other administrative roles can modify this field. |
On the Access Profile Properties screen, you use the Configurations section to configure a logout URI and timeout.
| Logout URI Include - Specifies a list of logoff URIs that the access profile searches for in order to terminate the APM session. This feature is used with http applications. |
| Logout URI Timeout - Specifies the timeout used to delay logout for the customized logout URIs defined in the logout URI Include list. |
On the Access Profile Properties screen, you use the Single-Sign On settings to configure Single Sign-On and cookie behavior, with the following settings:
| Domain Mode - Two domain modes are available: Single Domain or Multiple Domains. |
| Single Domain - Select this if you want to apply your SSO configuration for only a single domain. |
| Multiple Domains - Select this if you want to apply your SSO configuration across multiple domains. This is useful in cases where you want to allow your users a single APM login session and apply it across multiple Local Traffic Manager or Access Policy Manager virtual servers front-ending different domains. |
| Primary Authentication URI - Specifies the address of your primary authentication URI. This is a required field if you select to use SSO configuration across Multiple Domains. An example would be https://logon.yourcompany.com. This is where the user session is created. As long as you provide the URI, your user is able to access multiple backend applications from multiple domains and hosts without requiring them to re-enter their credentials because the user session is stored on the primary domain. |
| Cookie Options - This setting applies to Single Domain or the primary authentication domain. The following options are available: |
| Secure - Enable this setting to add the secure keyword to the session cookie. If you are configuring an application access control scenario where you are using an HTTPS virtual server to authenticate the user, and then sending the user to an existing HTTP virtual server to use applications, clear this check box. |
| Persistent - Enable this setting to set cookies if the session does not have a webtop. When the session is first established, session cookies are not marked as persistent, but when the first response is sent to the client after the access policy completes successfully, the cookies are marked persistent. Persistent cookies are updated for the expiration timeout every 60 seconds. The timeout is equal to session inactivity timeout. If the session inactivity timeout is overwritten in the access policy, the overwritten value will be used to set the persistent cookie expiration. |
| SSO Configuration - To add an SSO configuration for Single Sign-On, select the configuration from the list. |
| Domain Cookie - Applies to single domain mode only. Specifies a domain cookie to use with a web access management connection. If you specify a domain cookie, then the line domain=specified_domain is added to the MRHsession cookie. By default, the Secure Cookie option is enabled. This adds the secure keyword to the session cookie. If you are configuring a web access management scenario with an HTTPS virtual server for authentication, and using an HTTP local traffic virtual server for applications, clear this check box. |
| Configure Authentication Domains - The following options apply only if you select to use Multiple Domains. |
| Domain/Host list - Type in the domain or host that you want to apply the SSO configuration. Click Add to specify additional domains or hosts. |
| Secure Cookie - Enable this setting if you want your domain or host to add the secure keyword to the session cookie. If you are configuring an application access control scenario where you are using an HTTPS virtual server to authenticate the user, and then sending the user to an existing HTTP virtual server to use applications, clear this check box. |
| Persistent Cookie - Enable this setting if you want your domain or host to retain the cookie for the user session, even when the user session is terminated. Although this is an unsecure method, this setting is useful, and required, in cases where you have a third-party application, such as Microsoft SharePoint, and need to store the cookie in a local database so that any attempt to access backend server applications through Access Policy Manager succeeds. |
| SSO Config - For each domain or host that you add, you can apply different SSO authentication methods. Select an existing SSO configuration from the list. Access Policy Manager supports different SSO mechanisms for different applications protected by a single access policy. |
| 1. | On the Main tab of the navigation pane, expand Access Policy, then click Access Profiles. The Access Profiles List screen opens. |
| 2. |
| 3. |
| 4. | To change settings for Inactivity Timeout, Access Policy Timeout, Maximum Session Timeout, and Max Concurrent Users, select the Custom check box, then type numbers for the settings you want to change. |
| 5. | To select a Single Sign On (SSO) configuration for the access policy, specify settings in the Single-Sign On section. |
| 6. | (Optional) In the Domain Cookie box, type the domain cookie. |
| 7. | Select the Secure check box in the Cookie Options section to add the secure keyword to the domain cookie. If the access policy is configured for an HTTP virtual server, clear this check box. |
| 8. | Configure the language settings for the access profile. See Customizing access profile languages, following, for more information. |
| 9. | Click Finished when the configuration is complete. |
After you create or change an access policy, the link Apply Access Policy appears in yellow at the top left of the BIG-IP® Configuration Utility screen. You must click this link to activate the access policy for use in your configuration.
| 1. | Click the Apply Access Policy link. The Apply Access Policy screen appears, showing a list of access policies that have been changed. |
| 2. | Select the check boxes for one or more access policies to apply, and click the Apply Access Policy button. By default, all access policies that are new or changed are selected. After you apply the access policy, the Access Profiles list screen is displayed. |
Typically, the clients web browser has language preferences configured, which lists display languages in order of preference. Access Policy Manager® detects this order, compares it with the languages configured in the access profile, and presents customized pages and messages in the user-specified language, if that language exists in the access profile. If the user-specified language does not exist in the access profile, the user sees pages in the access profile default language.
In the access profile, you can configure the list of accepted languages in which the Access Policy Manager provides messages and customized elements. You can also select a default language for the access profile. The default language is used to provide messages and customized elements to users whose browsers are not identified with a language that is on the list of accepted languages.
Several languages have predefined messages in Access Policy Manager. Those languages appear in the Factory Builtin Languages list.
Languages that are available, but not yet customized for use with Access Policy Manager appear in the Additional Languages list.
There are several other places in Access Policy Manager where you can customize settings for different languages. To configure these language settings, see the following tasks and pages:
Note: If you customize messages, you must customize the same messages separately for each accepted language. Otherwise, default messages will appear for any accepted language for which you have not customized messages. It is recommended that if you customize messages for a specific accepted language, you remove all other languages from the accepted language list.
| 1. | On the Main tab of the navigation pane, expand Access Policy, then click Access Profiles. The Access Profiles List screen appears. |
| To add a language string from the list of installed languages, in the Language Settings area, in the Factory Builtin Languages box, select the language, and click the ( << ) button to move the language to the Accepted Languages list. |
| To add a language that is not yet installed and customized, from the Additional Languages list, select the language and click Add. |
| 4. | Click Update to update the language settings. |
In an access policy, you define the criteria for granting access to various servers, applications, and other resources on your network.
You create an access policy by creating an access profile, which automatically creates a blank access policy. Every access profile has an access policy associated with it. You configure that access policy through the access profile.
To view and edit the access policy associated with an access profile, you use the visual policy editor, a browser-based editor for access policies.
| 1. | On the Main tab of the navigation pane, expand Access Policy and click Access Profiles. The Access Profiles List screen opens. |
| 2. | In the Access Policy column click Edit for the access policy you want to edit. The visual policy editor opens in a new window or new tab, depending on your browser settings. You can right-click and select to open in a new tab or new window, if you want to choose the destination. If this is a new access policy, an unconfigured policy appears. |
You can also open an access policy from the Access Profiles List screen by clicking the access profile name, then clicking the Access Policy tab, then clicking the Edit link.
In the visual policy editor, policy branch rules follow each policy action. Typically, an action is followed by both a successful branch rule and a fallback branch rule. Some actions, like the Logon action, are followed by only one branch rule. Some actions are followed by multiple branch rules. In actions where there is only one result branch rule, that result is labeled Fallback. In actions where there is a failed result and a successful result, the visual policy editor labels the successful branch rule Successful and the failed branch rule Fallback. Some actions have multiple result branch rules, and no successful branch.
For example, the Client OS action in Figure 5.1 has multiple branch rules, and each branch rule is named for the operating system to which the branch rule corresponds, with a fallback branch for any client operating system that does not match a specific branch rule. This allows you to assign actions to any branch rule, and separate endings to any branch rule.
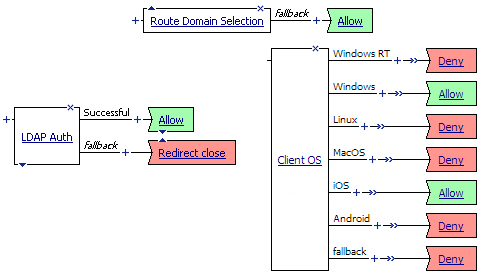
Note: The Windows® RT branch shown in figure 5.1 is available only when you have the appropriate Access Policy Manager® 11.4.x hotfix installed. To determine hotfix requirements, refer to the BIG-IP® APM Client Compatibility Matrix for APM 11.4.0 or APM 11.4.1 on the AskF5 web site at http://support.f5.com.
Click the plus sign on the branch rule where you want to add the action. When you place your cursor over the plus sign, it turns blue and appears between parentheses [ ] to indicate that you can click it.
 | Add authentication. For more information, see BIG-IP® Access Policy Manager®: Authentication Configuration Guide on http://support.f5.com. |
| | Assign resources. For more information, see Assigning resources. Note that you must assign a resource group that contains a network access resource, or the access policy will not function. |
When you create an access profile, the system automatically creates an associated, blank access policy.
| 1. | On the Main tab of the navigation pane, expand Access Policy and select Access Profiles. The Access Profiles List screen opens. |
| 2. | Click Edit in the Access Policy column of the access policy you want to edit. The visual policy editor opens, displaying the access policy. |
Figure 5.2 A new, unconfigured access policy
When you first open a new access policy in the visual policy editor, the configuration includes only a start point, a fallback branch rule, and a default ending.
| 1. | On the Main tab of the navigation pane, expand Access Policy and click Access Profiles. The Access Profiles List screen opens. |
| 2. | In the profile list, find the access policy you want to edit, then click Edit in the Access Policy column. The visual policy editor opens in a new window or new tab, depending on your browser settings. |
| 3. | On a branch rule of the access policy, click the plus sign ( The Add Item popup screen opens. |
| 4. | If the tab for the category of action that you want to add is not open, click another tab. |
| 5. | Select an action to add to the access policy. See the full list of action categories and actions at Understanding available actions. |
| 6. | Click Add Item to add the action to the access policy. The action popup screen opens. To configure the action, see the action description at Understanding available actions. |
Access policy endings are the end result of a branch rule in an access policy. With access policy endings, you can give users access to the network access connection, deny access to users, or redirect users to another URL.
| Allow Starts the SSL VPN session and loads the sources and webtop for the user. |
| Deny Disallows the SSL VPN session and shows the user a Logon Denied web page. |
| Redirect Transfers the user to the URL specified in the ending configuration. |
In the visual policy editor, you can create and delete access policy endings, change any ending in the access policy to another ending, customize endings, and set a default ending.
| 1. | On the Main tab of the navigation pane, expand Access Policy, then click Access Profiles. The Access Profiles List screen opens. |
| 2. | In the profile list, find the access policy you want to edit, then click Edit in the Access Policy column. The visual policy editor opens in a new window or new tab, depending on your browser settings. |
| 3. | Near the top of the visual policy editor, click the Edit Endings button. The Edit popup screen opens. |
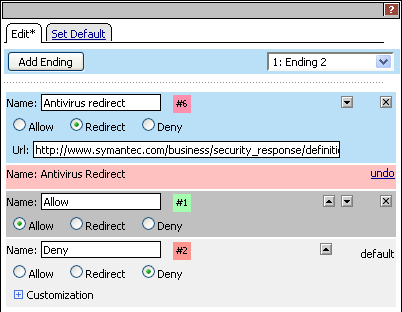
| 4. | At the upper left, click the Add Ending button. The new ending appears, highlighted in blue. See Figure 5.4. |
| 5. | In the Name box, type a name for the new ending. |
| Allow Specifies that the user has access to the VPN connection, as defined in the access profile and access policy. |
| Redirect Specifies a URL to which the access policy redirects the user. Type the redirect URL in the box provided. Note that in a Redirect ending, you can specify session variables for the URI. For example, you can specify that the redirect use the session logon protocol (http or https), the session start URI (for example, www.siterequest.com) and the session start path (for example, /owa). |
| Deny Specifies the user is not allowed access to the network access resource, and presents a Denied page. To customize the Denied page, see Customizing the Deny access policy ending. |
| 7. | To change the color of the ending for better visual clarity in your access policies, click the color square |
| 8. | Click Save. |
| 1. | On the Main tab of the navigation pane, expand Access Policy, then click Access Profiles. The Access Profiles List screen opens. |
| 2. | In the profile list, find the access policy you want to edit, then click Edit in the Access Policy column. The visual policy editor opens in a new window or new tab, depending on your browser settings. |
| 3. | Click an access policy ending. The Select Ending popup screen opens. |
| 5. | Click Save. |
| 1. | On the Main tab of the navigation pane, expand Access Policy, then click Access Profiles. The Access Profiles List screen opens. |
| 2. | In the profile list, find the access policy you want to edit, then click Edit in the Access Policy column. The visual policy editor opens in a new window or new tab, depending on your browser settings. |
| 3. |
The Deny access policy ending provides several customized messages that you can configure for the access policy. These include text messages for the logout screen. You can also configure these messages for different languages that you have defined for the access policy.
| 1. | On the Main tab of the navigation pane, expand Access Policy, then click Access Profiles. The Access Profiles List screen opens. |
| 2. | In the profile list, find the access policy you want to edit, then click Edit in the corresponding Access Policy column. The visual policy editor opens in a new window or new tab, depending on your browser settings. |
| 3. |
| 4. | On the Deny ending you want to customize, click the plus sign ( The popup screen displays additional setting options. |
| 5. | Customize the text for the logon denied settings by typing the text in the corresponding boxes. |
| Specifies the language for which you are configuring Deny messages. | |
| Thank You Message | Specifies a thank you message displayed for network access users after logout. |
| Specifies the text that indicates that the session could not start. | |
| Specifies a more specific error message that follows the error title, which indicates that a problem may have occurred during access policy evaluation. | |
| Specifies the text that precedes the link a user clicks to start a new session. | |
| Specifies the text label for the hypertext link to start a new session, such as click here. This link immediately follows the New Session Text. | |
| Specifies the text that precedes the session number when an error occurs. | |
| ACL denied page title | Specifies the title text for a page that appears when access is denied by an ACL. |
| ACL Denied Page Reject Message | Specifies the text that appears when access to a page or site is denied due to an ACL restriction. |
| ACL Denied Page Return Link Message | Specifies the link text that the user can click to return to the previous page. This is displayed when a user reaches the ACL denied page. |
| 6. | Click Save. |
To complete the configuration of any access policy, and make the access policy active on the server, click the Apply Access Policy link at the top of the screen.
A macro is a group of reusable checks. Using the visual policy editor, you configure macros in the same way that you configure access policies. The difference is that you do not configure access policy endings, but instead you configure terminals for a macro.
| 1. | On the Main tab of the navigation pane, expand Access Policy, then click Access Profiles. The Access Profiles List screen opens. |
| 2. | In the profile list, find the access policy you want to edit, then click Edit in the Access Policy column. The visual policy editor opens in a new window or new tab, depending on your browser settings. |
| 3. |
| 4. | Select the macro template. The macro templates are described in the Using predefined macro templates. |
| 5. | In the Name box, type a name for the macro. This is the name by which the macro appears in the Add Action popup screen. |
| 6. | Click Save. |
| 8. | To edit an action, click the action name. Edits you make to the actions in a macro are applied to the actions in an access policy, after you add the macrocall to the access policy. |
| 9. | Add and remove actions from the macro in the same way you add and remove actions from access policies. |
| 1. | In the visual policy editor, click the plus sign ( |
| 2. |
| 3. | To add a terminal, click Add Terminal. |
| 5. | To change the color of the ending for better visual clarity in your access policies, click the Dropper |
| 6. | If you want to set a default terminal, click the Set Default tab, and select the default terminal. |
| 7. | If you want to delete a terminal, click the (x) next to the terminal name. |
| 1. | On the Main tab of the navigation pane, expand Access Policy, then click Access Profiles. The Access Profiles List screen opens. |
| 2. | In the profile list, find the access policy you want to edit, then click Edit in the Access Policy column. The visual policy editor opens in a new window or new tab, depending on your browser settings. |
| 3. | On a branch rule of the access policy, click the plus sign ( The Add Action popup screen opens. |
| 4. |
| 5. | Select a macro you defined previously and click Add Item. The macrocall is added to the access policy. You can edit the macro items in the macro definition as required. |
| 1. | From the visual policy editor, click the plus sign ( The macro is displayed along with buttons and a list of terminals. |
| 2. |
| 3. | From Maximum Macro Loop Count, select a number greater than 1 and click Save. The popup screen closes and Loop displays on the list of terminals for the macro. |
| 4. | In the macro, click the terminal on the branch that contains the actions that you want to repeat. |
| 5. |
| 6. | After you are done configuring the macro, add the macrocall to the access policy that you are editing. A Loop branch follows the macrocall. The access policy takes the Loop branch when a macro exits on the Loop terminal. |
A user-defined macro, Messaging, contains an authentication action and a message action. See Figure 5.5 for the macro definition and to see the macrocall in an access policy.
Figure 5.5 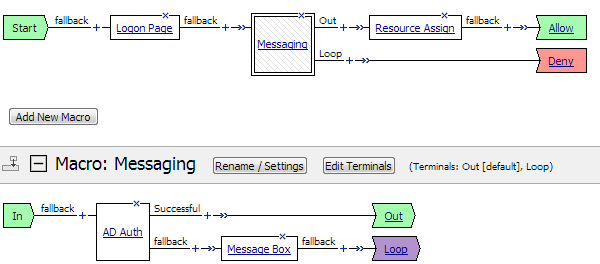 Example macro loop
Example macro loopWhen the macro runs and the authentication action passes, the macro exits on the Out terminal to an Out branch in the access policy. When the authentication action fails, the message action runs and the macro loops back to the authentication action again. If the macro count exceeds the maximum, the macro exits on the Loop terminal to a Loop branch.
Click the (x) button at the right of the screen next to the macro name. You can delete a macro only if it is not in use.
You can use predefined macro templates to create macros for use in your policies. The following sections describe a few of the available macro templates and are offered as examples.
Tip: If you open these macro definitions to view them, you can better understand how the macros are configured. Each macro definition includes instructions on how to add and open the macro template.
You can use the empty macro template to add an unconfigured macro template that includes only a start point and an end point to the access policy. Use this as a starting point to configure a new macro for an access policy.
The AD auth and resources macro template is a preconfigured macro template that adds Active Directory authentication to your access policy.
In this macro template, you must configure both the Active Directory action and the resource assign action. You can optionally customize the logon page action with custom messages, and localized messages for different languages.
| 1. |
| 2. | Select the macro template AD Auth and resources. |
| 3. |
| 5. | To edit an action, click the action name. In the macro display, the action popup screen opens. |
| To customize the Active Directory action, see the BIG-IP® Access Policy Manager® Authentication Configuration Guide. |
The SecurID and resources macro template is a preconfigured macro template that adds SecurID authentication to your access policy.
In this macro template, you must configure both the SecurID action and the resource assign action. You can optionally customize the logon page action with custom messages, and localized messages for different languages.
| 1. |
| 2. | Select the macro template SecurID and resources. |
| 3. |
| 5. | To edit an action, click the action name. In the macro display, the action popup screen opens. |
| To customize the SecurID action, see the BIG-IP® Access Policy Manager® Authentication Configuration Guide. |
You can export any access profile, and later restore that access profile, or import it to another Access Policy Manager®. Exported profiles are saved as files with the extension conf.
When you import a profile, you select a conf file. You also specify a name for the new profile, and whether to reuse existing objects, like resources.
| 1. | On the Main tab of the navigation pane, expand Access Policy, then click Access Profiles. The Access Profiles List screen opens. |
| 2. | Locate the access profile you want to export. In the Export column, click the Export link. You are prompted to open or save a conf file. |
| 1. | On the Main tab of the navigation pane, expand Access Policy, then click Access Profiles. The Access Profiles List screen opens. |
| 2. |
| 3. | In the New Profile Name box, type the name for the new policy. |
| 4. |
| 5. |
| 6. | Select the Reuse Existing Objects check box to reuse objects that exist on the server. This option reuses objects that exist on the server, such as server definitions or resources, instead of recreating them for use with this policy. |
| 7. |


