Manual Chapter : Protecting Internal Resources Per-Request

Applies To:

Show Versions Show Versions

BIG-IP APM

  • 13.1.5, 13.1.4, 13.1.3, 13.1.1, 13.1.0
Manual Chapter
 

Overview: Protecting internal resources on a per-request basis

You can use a per-request policy to protect your internal resources and to be more selective about who accesses them and when. After a user starts a session, a per-request policy makes it possible to apply additional criteria for access any time the user makes a request. These steps are for use in a reverse proxy configuration; that is, with APM® and LTM® set up for web access management.

Note: You cannot use subroutines in macros within per-request policies.

Task summary

Creating a per-request policy

You must create a per-request policy before you can configure it in the visual policy editor.
  1. On the Main tab, click Access > Profiles / Policies > Per-Request Policies .
    The Per-Request Policies screen opens.
  2. Click Create.
    The General Properties screen opens.
  3. In the Name field, type a name for the policy and click Finished.
    A per-request policy name must be unique among all per-request policy and access profile names.
    The policy name appears on the Per-Request Policies screen.

Configuring policies to branch by local database user group

If you plan to look up local database groups from the per-request policy, you must configure local database-related items in the access policy and the per-request policy to use the same session variable.
  1. On the Main tab, click Access > Profiles / Policies .
    The Access Profiles (Per-Session Policies) screen opens.
  2. In the Per-Session Policy column, click the Edit link for the access profile you want to configure.
    The visual policy editor opens the access policy in a separate screen.
  3. On a policy branch, click the (+) icon to add an item to the policy.
    A popup screen displays actions on tabs, such as General Purpose and Authentication, and provides a search field.
  4. In the search field, type local, select Local Database, and click Add Item.
    A popup properties screen opens.
  5. Configure properties for the Local Database action:
    1. From the LocalDB Instance list, select a local user database.
    2. Click Add new entry
      A new line is added to the list of entries with the Action set to Read and other default settings.
    3. In the Destination column in the Session Variable field, type the name of the variable in which to store the user groups retrieved from the local database.
      In the per-request policy, the default value that the LocalDB Group Lookup item uses is session.localdb.groups. If you enter a differentvalue, note it. You will need it to update the advanced expression in the LocalDB Group Lookup item in the per-request policy.
    4. In the Source column from the DB Property list, select groups.
    5. Click Save.
      The properties screen closes. The policy displays.
    This is not a complete access policy, but you can return to it and complete it later. You can close the visual policy editor or leave it open.
    The access policy includes a Local Database action that can read groups into a session variable.
  6. On the Main tab, click Access > Profiles / Policies > Per-Request Policies .
    The Per-Request Policies screen opens.
  7. In the Name field, locate the policy that you want to update, then in the Per-Request Policy field, click the Edit link.
    The visual policy editor opens in another tab.
  8. Click the (+) icon anywhere in the per-request policy to add a new item.
  9. In the search field, type local, select LocalDB Group Lookup, and click Add Item.
    A popup properties screen opens.
  10. Click the Branch Rules tab.
  11. Click the change link in the entry for the default expression.
    A popup screen opens.
  12. If the session variable you typed in the access policy Local Database action was session.localdb.groups, perform these substeps.
    1. In the User is a member of field, remove MY_GROUP and type the name of a group.
    2. Click Finished.
      The popup screen closes.
    3. Click Save.
      The properties screen closes and the policy displays.
  13. If you typed a session variable other than session.localdb.groups in the access policy Local Database action, perform these substeps.
    1. Click the Advanced tab.
      In the field, this expression displays. expression is expr { [mcget {session.localdb.groups}] contains "MY_GROUP" }
    1. In the expression, replace session.localdb.groups with the name of the session variable you typed into the Local Database action.
    2. In the expression, replace MY_GROUP with the name of a group that should match a local database group.
    3. Click Finished.
      The popup screen closes.
    4. Click Save.
      The properties screen closes and the policy displays.
    This is not a complete per-request access policy, but you can return to it and complete it later.
The access and per-request policies are configured to use the same session variable. The access policy is configured to support the use of LocalDB Group Lookup in the per-request policy.
Complete the configuration of the access and per-request policies.

Categorizing URLs using custom categories in a per-request policy

Important: These steps apply to a BIG-IP® system on which URL categories are available only by creating them in Access Policy Manager® (APM®).
If you haven't configured URL categories and URL filters yet in APM, configure them before you start this task.
Look up the category for a URL request and use it in a policy branch rule, or to assign a URL filter, and so on.
Note: These steps provide guidance for adding items to control traffic based on the URL category; they do not specify a complete per-request policy.
  1. On the Main tab, click Access > Profiles / Policies > Per-Request Policies .
    The Per-Request Policies screen opens.
  2. In the Name field, locate the policy that you want to update, then in the Per-Request Policy field, click the Edit link.
    The visual policy editor opens in another tab.
  3. Add a Category Lookup item and set its properties:
    Important: A Category Lookup item triggers event logging for URL requests and provides categories for a URL Filter Assign item.
    1. From the Categorization Input list, select an entry based on the type of traffic to be processed. .
      • For HTTP traffic, select Use HTTP URI (cannot be used for SSL Bypass decisions).
      • For SSL-encrypted traffic, select Use SNI in Client Hello (if SNI is not available, use Subject.CN).
      • Use Subject.CN in Server Cert is not supported for reverse proxy.
    2. For Category Lookup Type, you can only retain the default setting Process custom categories only.
    1. Click Save.
      The properties screen closes. The policy displays.
  4. To add a URL Filter Assign item, do so anywhere on a branch after a Category Lookup item.
    A URL filter applies to the categories that a Category Lookup item returns. If the filter specifies the Block action for any URL category, URL Filter Assign blocks the request.
    Note: If URL Filter Assign does not block the request and the filter specifies the confirm action for any URL category, URL Filter Assign takes the Confirm per-request policy branch and the policy exits on the ending for it.
    1. From the URL Filter list, select a URL filter.
    2. To simplify the display in the visual policy editor if the URL filter does not specify confirm actions, select Branch Rules, and click x on the Confirm entry.
    3. Click Save.
      The properties screen closes and the policy displays.
Now the per-request policy includes an item that looks up the URL category. You can add other items to the policy to control access according to your requirements.
Note: SSL bypass and SSL intercept are not supported when you are protecting internal resources from incoming requests. They are supported in a forward proxy configuration.
A per-request policy goes into effect when you add it to a virtual server.

Configuring a per-request policy to control access to applications

Access Policy Manager® (APM®) supports a preset group of application families and applications. You can configure your own application filters or use one of the filters that APM provides: block-all, allow-all, and default.
Configure a per-request policy to specify the logic that determines whether to allow access to the applications or application families.
Note: This task provides the steps for adding items to control requests based on the application name or application family or based on an application filter. It does not specify a complete per-request policy.
  1. On the Main tab, click Access > Profiles / Policies > Per-Request Policies .
    The Per-Request Policies screen opens.
  2. In the Name field, locate the policy that you want to update, then in the Per-Request Policy field, click the Edit link.
    The visual policy editor opens in another tab.
  3. Add an Application Lookup item to the policy.
    1. Click the (+) icon anywhere in the per-request policy to add a new item.
      A popup screen opens, listing predefined actions on tabs such as General Purpose, Authentication, and so on.
    2. From the General Purpose tab, select Application Lookup, and click Add Item.
      A Properties popup screen opens.
    3. Click Save.
      The Properties screen closes. The visual policy editor displays. A single branch, fallback, follows the Application Lookup item.
  4. To branch by application family or application name, add branch rules to the Application Lookup item.
    1. Click the name of the application lookup item.
      A Properties popup screen displays.
    2. Click the Branch Rules tab.
    3. Click Add Branch Rule.
      A new entry with Name and Expression settings displays.
    4. Click the change link in the new entry.
      A popup screen opens.
    5. Click the Add Expression button.
      Settings are displayed.
    6. For Agent Sel, select Application Lookup.
    7. For Condition select Application Family or Application Name.
    1. From the list, Application Family is or Application Name is, select a family or name.
    1. Click Add Expression.
      The expression displays.
    2. Continue adding branches and when you are done, click Finished.
      The popup screen closes. The Branch Rules popup screen displays.
    3. Click Save.
      The visual policy editor displays.
    Newly created branches follow the Application Lookup item.
  5. To apply an application filter to the request, add an Application Filter Assign item on a branch somewhere after the Application Lookup item.
    A Properties popup screen displays.
  6. From the Application Filter list, select an application filter and click Save.
    The popup screen closes.
To put the per-request policy into effect, add it to the virtual server.
Important: To support application filtering, classification must be enabled on the virtual server.

Configuring a per-request policy to branch by group or class

Add a group or class lookup to a per-request policy when you want to branch by user group or class.
Note: The access policy must be configured to populate session variables for a group or class lookup to succeed. This task provides the steps for adding items to branch by group or class. It does not specify a complete per-request policy.
  1. On the Main tab, click Access > Profiles / Policies > Per-Request Policies .
    The Per-Request Policies screen opens.
  2. In the Name field, locate the policy that you want to update, then in the Per-Request Policy field, click the Edit link.
    The visual policy editor opens in another tab.
  3. On a policy branch, click the (+) icon to add an item to the policy.
    A small set of actions are provided for building a per-request policy.
    A popup screen displays actions on tabs, such as General Purpose and Authentication, and provides a search field.
  4. On the Authentication tab, select an option: AD Group Lookup, LDAP Group Lookup, or RADIUS Class Lookup to the per-request policy.
  5. Click Add Item.
    A properties popup screen opens.
  6. Click the Branch Rules tab.
  7. To edit an expression, click the change link.
    An additional popup screen opens, displaying the Simple tab.
  8. Edit the default simple expression to specify a group or class that is used in your environment.
    In an LDAP Group Lookup item, the default simple expression is User is a member of CN=MY_GROUP, CN=USERS, CN=MY_DOMAIN. You can use the simple expression editor to replace the default values.
  9. Click Finished.
    The popup screen closes.
  10. Click Save.
    The popup screen closes. The visual policy editor displays.
A per-request policy goes into effect when you add it to a virtual server.

Adding a per-request policy to the virtual server

To add per-request processing to a configuration, associate the per-request policy with the virtual server.

  1. On the Main tab, click Local Traffic > Virtual Servers .
    The Virtual Server List screen opens.
  2. Click the name of the virtual server.
  3. In the Access Policy area, from the Per-Request Policy list, select the policy that you configured earlier.
  4. Click Update.
The per-request policy is now associated with the virtual server.

Example policy: URL filter per user group

Each URL Filter Assign item in this per-request policy example should specify a filter that is applicable to the user group.

Group lookup followed by branches for specific groups and a URL filter assignment for each.

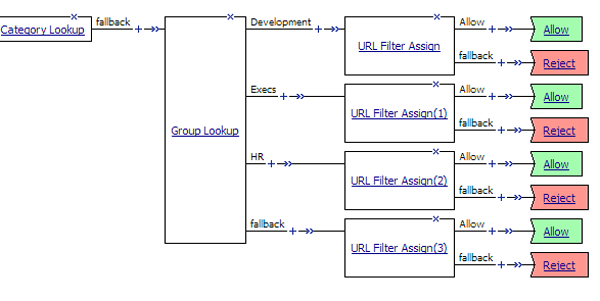
URL filter based on group membership


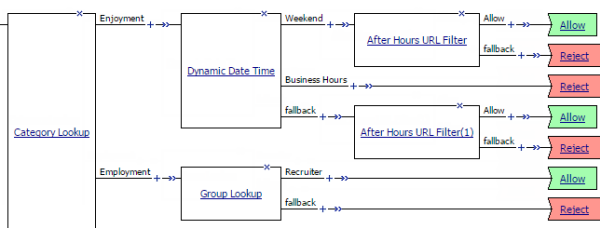
Example policy: Access control by date, time, and user group

This per-request policy example applies specific URL filters for weekends and weeknights, and restricts access during work hours based on user group.

Policy that restricts access except for weekends, after hours, and sales group

Deny or allow access based on date and time and group membership


Example policy: User-defined category-specific access control

In this per-request policy example, only recruiters are allowed to access URLs in the user-defined category Employment. The policy also restricts access to entertaining videos during business hours.

Category-specific access restrictions (using user-defined categories)


Example policy: Application lookup and filter

Application lookup and application filter assign in a per-request policy

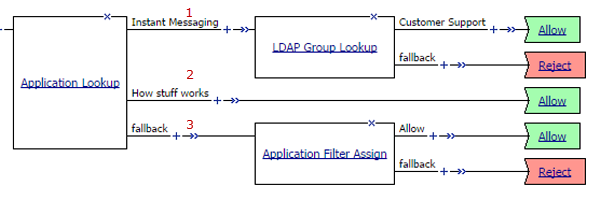
Application access control by application family, application name, and application filter

1 A user-defined branch for the instant messaging application family.
2 A user-defined branch for a specific application.
3 The default fallback branch, on which an application filter is applied. Application Filter Assign needs the information provided by Application Lookup.