Manual Chapter : Transparent Forward Proxy Configurations

Applies To:

Show Versions Show Versions

BIG-IP APM

  • 13.1.5, 13.1.4, 13.1.3, 13.1.1, 13.1.0
Manual Chapter

Overview: Configuring transparent forward proxy

In transparent forward proxy, you configure your internal network to forward web traffic to the BIG-IP® system with Access Policy Manager® (APM®) configured to act as a forward proxy. Use this configuration when your topology includes a router on which you can configure policy-based routing or Web Cache Communication Protocol (WCCP) to send any traffic for ports 80 and 443 to the BIG-IP system.

This implementation describes only the configuration required on the BIG-IP system.

swg

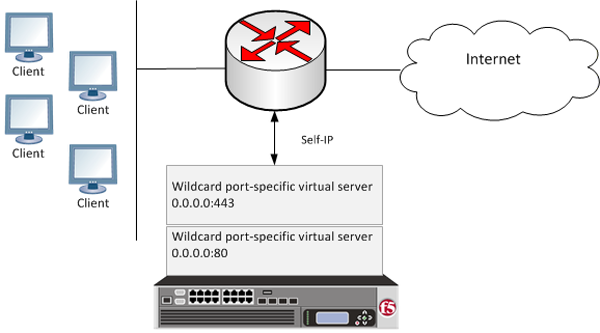
APM transparent forward proxy deployment

The router sends traffic to the self-ip address of a VLAN configured on the BIG-IP system. Virtual servers listen on the VLAN and process the traffic that most closely matches the virtual server address. APM identifies users without using session management cookies. A per-request policy, configured to use action items that determine the URL category and apply a URL filter, controls access.

Note: Transparent forward proxy provides the option to use a captive portal. To use this option, you need an additional virtual server, not shown in the figure, for the captive portal primary authentication server.

Task summary

Use these procedures to configure the virtual servers, SSL profiles, access profile, and VLAN that you need to support transparent forward proxy. When you are done, you must add an access policy and a per-request policy to this configuration to process traffic as you want.

Task list

About the iApp for Secure Web Gateway configuration

When deployed as an application service, the Secure Web Gateway (SWG) iApps® template can set up either an explicit or a transparent forward proxy configuration. The template is designed for use on a system provisioned and licensed with SWG. To download a zipped file of iApp templates from the F5 Downloads site at (downloads.f5.com), you must register for an F5 support account. In the zipped file, a README and template for F5 Secure Web Gateway are located in the RELEASE_CANDIDATE folder.

About user identification with a logon page

User identification by IP address is a method that is available for these access profile types: SWG-Explicit, SWG-Transparent, and LTM-APM.

Note: Identify users by IP address only when IP addresses are unique and can be trusted.

To support this option, a logon page must be added to the access policy to explicitly identify users. The logon page requests user credentials and validates them to identify the users. For explicit forward proxy, a 407 response page is the appropriate logon page action. For transparent forward proxy, a 401 response page is the appropriate logon page action. For LTM-APM, the Logon Page action is appropriate.

F5® BIG-IP® Access Policy Manager® (APM®) maintains an internal mapping of IP addresses to user names.

About user identification with an SWG F5 agent

Transparent user identification makes a best effort to identify users without requesting credentials. It is not authentication. It should be used only when you are comfortable accepting a best effort at user identification.

Transparent user identification is supported in Secure Web Gateway (SWG) configurations for either explicit or transparent forward proxy. An agent obtains data and stores a mapping of IP addresses to user names in an IF-MAP server. An F5® DC Agent queries domain controllers. An F5 Logon Agent runs a script when a client logs in and can be configured to run a script when the client logs out.

Note: Agents are available only on a BIG-IP® system with an SWG subscription.

In an access policy, a Transparent Identity Import item obtains the IP-address-to-username-mapping from the IF-MAP server. This item can be used alone for determining whether to grant access or be paired with another query to look up the user or validate user information.

To support this option, either the Secure Web Gateway F5 DC Agent or F5 Logon Agent must be downloaded, installed, and configured.

Creating a VLAN for transparent forward proxy

You need a VLAN on which the forward proxy can listen. For increased security, the VLAN should directly face your clients.
  1. On the Main tab, click Network > VLANs .
    The VLAN List screen opens.
  2. Click Create.
    The New VLAN screen opens.
  3. In the Name field, type a unique name for the VLAN.
  4. For the Interfaces setting,
    1. From the Interface list, select an interface number.
    2. From the Tagging list, select Untagged.
    3. Click Add.
  5. Click Finished.
    The screen refreshes, and displays the new VLAN in the list.
The new VLAN appears in the VLAN list.

Assigning a self IP address to a VLAN

Assign a self IP address to a VLAN on which the forward proxy listens.
  1. On the Main tab, click Network > Self IPs .
  2. Click Create.
    The New Self IP screen opens.
  3. In the Name field, type a unique name for the self IP address.
  4. In the IP Address field, type the IP address of the VLAN.
    The system accepts IPv4 and IPv6 addresses.
  5. In the Netmask field, type the network mask for the specified IP address.

    For example, you can type 255.255.255.0.

  6. From the VLAN/Tunnel list, select the VLAN.
  7. Click Finished.
    The screen refreshes, and displays the new self IP address.

Creating an access profile for transparent forward proxy

You create an access profile to provide the access policy configuration for a virtual server that establishes a secured session.
  1. On the Main tab, click Access > Profiles / Policies .
    The Access Profiles (Per-Session Policies) screen opens.
  2. Click Create.
    The New Profile screen opens.
  3. In the Name field, type a name for the access profile.
    Note: An access profile name must be unique among all per-session profile and per-request policy names.
  4. From the Profile Type list, select SWG-Transparent.
    Note: After you complete this step, the User Identification Method is set to IP Address and cannot be changed.
    Additional settings display.
  5. To use NTLM authentication before a session starts, from the NTLM Auth Configuration list select a configuration.
    Important: For NTLM authentication to work, you must also enable the Captive Portals setting and specify an IP address in the Primary Authentication URI field for the virtual server that you configure for the captive portal.
    In the case of a shared machine, an IP address might already be associated with a user or a session. Using NTLM authentication ensures that the system can associate the IP address with the correct session (new or existing) or with a new user each time a user logs on to the shared machine.
  6. To direct users to a captive portal, for Captive Portal select Enabled and, in the Primary Authentication URI field, type the URI.
    You might specify the URI of your primary authentication server if you use single sign-on across multiple domains. Users can then access multiple back-end applications from multiple domains and hosts without needing to re-enter their credentials, because the user session is stored on the primary domain.
    For example, you might type https://logon.siterequest.com in the field.
  7. In the Language Settings area, add and remove accepted languages, and set the default language.
    A browser uses the highest priority accepted language. If no browser language matches the accepted languages list, the browser uses the default language.
  8. Click Finished.
    The Access Profiles list screen displays.
The access profile displays in the Access Profiles List. Default-log-setting is assigned to the access profile.

Creating a custom Client SSL forward proxy profile

Creating a Client SSL forward proxy profile makes it possible for client and server authentication, while still allowing the BIG-IP® system to perform data optimization, such as decryption and encryption. This profile applies to client-side SSL forward proxy traffic only.

  1. On the Main tab, click Local Traffic > Profiles > SSL > Client .
    The Client SSL profile list screen opens.
  2. Click Create.
    The New Client SSL Profile screen opens.
  3. In the Name field, type a unique name for the profile.
  4. From the Parent Profile list, select clientssl.
  5. To avoid issues with privacy concerns, you might need to enable SSL forward proxy bypass for URLs that expose personal user information, such as those for financial or government sites.
    1. Scroll down to the SSL Forward Proxy list, and select Advanced.
    2. Select the Custom check box for the SSL Forward Proxy area.
    3. From the SSL Forward Proxy list, select Enabled.
      You can update this setting later but only while the profile is not assigned to a virtual server.
    4. From the CA Certificate list, select a certificate.
    5. From the CA Key list, select a key.
    6. In the CA Passphrase field, type a passphrase.
    7. In the Confirm CA Passphrase field, type the passphrase again.
    8. In the Certificate Lifespan field, type a lifespan for the SSL forward proxy certificate in days.
    9. Optional: From the Certificate Extensions list, select Extensions List.
    10. Optional: For the Certificate Extensions List setting, select the extensions that you want in the Available extensions field, and move them to the Enabled Extensions field using the Enable button.
    11. From the SSL Forward Proxy Bypass list, select Enabled.
      You can update this setting later but only while the profile is not assigned to a virtual server.
      Additional settings display.
    12. For Default Bypass Action, retain the default value Intercept.
      You can override the value of this action on a case-by-case basis in the per-request policy for the virtual server.
      Note: Bypass and intercept lists do not work with per-request policies. Retain the setting None for the remainder of the fields.
  6. Click Finished.
The custom Client SSL forward proxy profile now appears in the Client SSL profile list screen.

Creating a custom Server SSL profile

Create a custom server SSL profile to support SSL forward proxy.
  1. On the Main tab, click Local Traffic > Profiles > SSL > Server .
    The Server SSL profile list screen opens.
  2. Click Create.
    The New Server SSL Profile screen opens.
  3. In the Name field, type a unique name for the profile.
  4. For Parent Profile, retain the default selection, serverssl.
  5. From the Configuration list, select Advanced.
  6. Select the Custom check box.
    The settings become available for change.
  7. From the SSL Forward Proxy list, select Enabled.
    You can update this setting later, but only while the profile is not assigned to a virtual server.
  8. From the SSL Forward Proxy Bypass list, select Enabled (or retain the default value Disabled).
    The values of the SSL Forward Proxy Bypass settings in the server SSL and the client SSL profiles specified in a virtual server must match. You can update this setting later but only while the profile is not assigned to a virtual server.
  9. Scroll down to the Secure Renegotiation list and select Request.
  10. Click Finished.
The custom Server SSL profile is now listed in the SSL Server profile list.

Creating a virtual server for forward proxy SSL traffic

You configure a virtual server to process the SSL web traffic in a transparent forward proxy configuration.
  1. On the Main tab, click Local Traffic > Virtual Servers .
    The Virtual Server List screen opens.
  2. Click the Create button.
    The New Virtual Server screen opens.
  3. In the Name field, type a unique name for the virtual server.
  4. In the Destination Address field, type 0.0.0.0/0 to accept any IPv4 traffic.
  5. In the Service Port field, type 443 or select HTTPS from the list.
  6. From the Configuration list, select Advanced.
  7. From the HTTP Profile list, select http.
  8. If you plan to use this virtual server for proxy chaining from APM, from the HTTP Proxy Connect Profile list, select a profile that you configured previously or select http-proxy-connect.
  9. For the SSL Profile (Client) setting, from the Available list, select the name of the Client SSL forward proxy profile you previously created, and using the Move button, move the name to the Selected list.
    Important: To enable SSL forward proxy functionality, you can either:
    • Disassociate existing Client SSL and Server SSL profiles from a virtual server and configure the SSL Forward Proxy settings.
    • Create new Client SSL and Server SSL profiles and configure the SSL Forward Proxy settings.
    Then with either option, select the Client SSL and Server SSL profiles on a virtual server. You cannot modify existing Client SSL and Server SSL profiles while they are selected on a virtual server to enable SSL forward proxy functionality.
  10. For the SSL Profile (Server) setting, from the Available list, select the name of the Server SSL forward proxy profile you previously created, and using the Move button, move the name to the Selected list.
    Important: To enable SSL forward proxy functionality, you can either:
    • Disassociate existing Client SSL and Server SSL profiles from a virtual server and configure the SSL Forward Proxy settings.
    • Create new Client SSL and Server SSL profiles and configure the SSL Forward Proxy settings.
    Then with either option, select the Client SSL and Server SSL profiles on a virtual server. You cannot modify existing Client SSL and Server SSL profiles while they are selected on a virtual server to enable SSL forward proxy functionality.
  11. For the VLAN and Tunnel Traffic setting, retain the default value All VLANs and Tunnels list.
  12. From the Source Address Translation list, select Auto Map.
  13. For the Address Translation setting, clear the Enabled check box.
  14. Click Finished.
The virtual server now appears in the Virtual Server List screen.
After you configure an access policy and a per-request policy, specify them in the Access Profile settings area of this virtual server.

Creating a virtual server for forward proxy traffic

You configure a virtual server to process web traffic going to port 80 in a transparent forward proxy configuration.
  1. On the Main tab, click Local Traffic > Virtual Servers .
    The Virtual Server List screen opens.
  2. Click the Create button.
    The New Virtual Server screen opens.
  3. In the Name field, type a unique name for the virtual server.
  4. In the Destination Address field, type 0.0.0.0/0 to accept any IPv4 traffic.
  5. In the Service Port field, type 80, or select HTTP from the list.
  6. From the Configuration list, select Advanced.
  7. From the HTTP Profile list, select http.
  8. For the HTTP Connect Profile setting, be sure to retain the default value None.
  9. For the VLAN and Tunnel Traffic setting, retain the default value All VLANs and Tunnels list.
  10. From the Source Address Translation list, select Auto Map.
  11. For the Address Translation setting, clear the Enabled check box.
  12. Click Finished.
The virtual server now appears in the Virtual Server List screen.
After you configure an access policy and a per-request policy, specify them in the Access Profile settings area of this virtual server.

Creating a Client SSL profile for a captive portal

You create a Client SSL profile when you want the BIG-IP® system to authenticate and decrypt/encrypt client-side application traffic. You create this profile if you enabled Captive Portals in the access profile and if you want to use client-side SSL.

  1. On the Main tab, click Local Traffic > Profiles > SSL > Client .
    The Client SSL profile list screen opens.
  2. Click Create.
    The New Client SSL Profile screen opens.
  3. In the Name field, type a unique name for the profile.
  4. For the Parent Profile list, retain the default value, clientssl.
  5. Select the Custom check box.
  6. In the Certificate Key Chain area, select a certificate and key combination to use for SSL encryption for the captive portal.
    This certificate should match the FQDN configured in the access profile SWG-Transparent type to avoid security warnings, and should be generated by a certificate authority that your browser clients trust.
    Note: If the key is encrypted, type a passphrase. Otherwise, leave the Passphrase field blank.
  7. Click Finished.
After creating the Client SSL profile and assigning the profile to a virtual server, the BIG-IP system can apply SSL security to the type of application traffic for which the virtual server is configured to listen.

Creating a virtual server for a captive portal

You configure a virtual server to use as a captive portal if you enabled the Captive Portals setting in the access profile.
  1. On the Main tab, click Local Traffic > Virtual Servers .
    The Virtual Server List screen opens.
  2. Click the Create button.
    The New Virtual Server screen opens.
  3. In the Name field, type a unique name for the virtual server.
  4. In the Destination Address field, type the IP address for a host virtual server.
    This field accepts an address in CIDR format (IP address/prefix). However, when you type the complete IP address for a host, you do not need to type a prefix after the address.
    Type a destination address in this format: 162.160.15.20.
  5. Specify a port in the Service Port field.
    If you plan to use client-side SSL, type 443 or select HTTPS from the list.
  6. From the HTTP Profile list, be sure to retain the default value http.
  7. For the HTTP Connect Profile setting, be sure to retain the default value None.
    Whether or not you plan to use client-side SSL, for a captive portal the value for this setting should be None.
  8. If you plan to use client-side SSL, for the SSL Profile (Client) setting, move the profile you configured previously from the Available list to the Selected list.
  9. Click Finished.
The virtual server appears in the Virtual Server List screen.
After you configure an access policy, specify it in the Access Profile settings area of this virtual server.

Implementation result

You now have the profiles, virtual servers, and other configuration objects that you need for transparent forward proxy.

Important: Before you send traffic to this configuration, you need to configure an access policy and a per-request policy and specify them in the virtual servers.

Access policy and per-request policy configuration depends on what you are trying to do. To locate examples, look for configurations that categorize and filter traffic, intercept or bypass SSL traffic, forward traffic to a third party proxy server, and so on.

About redirects after access denied by captive portal

A tool that captures HTTP traffic can reveal what appears to be an extra redirect after a user attempts to gain access using a captive portal but fails. Instead of immediately redirecting the user to the logout page, the user is first redirected to the landing URI, and then a request to the landing URI is redirected to the logout page.

This sample output shows both redirects: the 302 to the landing page http://berkeley.edu/index.html and the 302 to the logout page http://berkeley.edu/vdesk/hangup.php3.

POST  https://bigip-master.com/my.policy?ORIG_URI=http://berkeley.edu/index.html
302   http://berkeley.edu/index.html

GET   http://berkeley.edu/index.html
302   http://berkeley.edu/vdesk/hangup.php3
                  

Although the 302 to the landing page might seem to be an extra redirect, it is not. When a request is made, a subordinate virtual server transfers the request to the dominant virtual server to complete the access policy. When the dominant virtual server completes the access policy, it transfers the user back to the subordinate virtual server, on the same original request. The subordinate virtual server then enforces the result of the access policy.

Overview: Configuring transparent forward proxy in inline mode

In a configuration where Access Policy Manager® (APM®) acts as a transparent forward proxy, you configure your internal network to forward web traffic to the BIG-IP® system. This implementation describes an inline deployment. You place the BIG-IP system directly in the path of traffic, or inline, as the next hop after the gateway.

swg

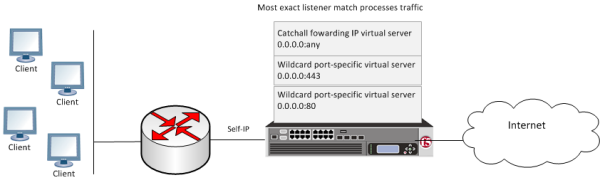
Transparent forward proxy inline deployment

The gateway sends traffic to the self IP address of a VLAN configured on the BIG-IP system. Wildcard virtual servers listen on the VLAN and process the traffic that most closely matches the virtual server address. A wildcard virtual server is a special type of network virtual server designed to manage network traffic that is targeted to transparent network devices.

Note: Transparent forward proxy provides the option to use a captive portal. To use this option, you need an additional virtual server, not shown in the figure, for the captive portal primary authentication server.

Task summary

Use these procedures to configure the virtual servers, SSL profiles, access profile, VLAN, and self-IP that you need to support inline transparent forward proxy. When you are done, you must add an access policy and a per-request policy to this configuration to process traffic as you want.

Task list

About the iApp for Secure Web Gateway configuration

When deployed as an application service, the Secure Web Gateway (SWG) iApps® template can set up either an explicit or a transparent forward proxy configuration. The template is designed for use on a system provisioned and licensed with SWG. To download a zipped file of iApp templates from the F5 Downloads site at (downloads.f5.com), you must register for an F5 support account. In the zipped file, a README and template for F5 Secure Web Gateway are located in the RELEASE_CANDIDATE folder.

Creating a VLAN for transparent forward proxy

You need a VLAN on which the forward proxy can listen. For increased security, the VLAN should directly face your clients.
  1. On the Main tab, click Network > VLANs .
    The VLAN List screen opens.
  2. Click Create.
    The New VLAN screen opens.
  3. In the Name field, type a unique name for the VLAN.
  4. For the Interfaces setting,
    1. From the Interface list, select an interface number.
    2. From the Tagging list, select Untagged.
    3. Click Add.
  5. Click Finished.
    The screen refreshes, and displays the new VLAN in the list.
The new VLAN appears in the VLAN list.

Assigning a self IP address to a VLAN

Assign a self IP address to a VLAN on which the forward proxy listens.
  1. On the Main tab, click Network > Self IPs .
  2. Click Create.
    The New Self IP screen opens.
  3. In the Name field, type a unique name for the self IP address.
  4. In the IP Address field, type the IP address of the VLAN.
    The system accepts IPv4 and IPv6 addresses.
  5. In the Netmask field, type the network mask for the specified IP address.

    For example, you can type 255.255.255.0.

  6. From the VLAN/Tunnel list, select the VLAN.
  7. Click Finished.
    The screen refreshes, and displays the new self IP address.

Creating an access profile for transparent forward proxy

You create an access profile to provide the access policy configuration for a virtual server that establishes a secured session.
  1. On the Main tab, click Access > Profiles / Policies .
    The Access Profiles (Per-Session Policies) screen opens.
  2. Click Create.
    The New Profile screen opens.
  3. In the Name field, type a name for the access profile.
    Note: An access profile name must be unique among all per-session profile and per-request policy names.
  4. From the Profile Type list, select SWG-Transparent.
    Note: After you complete this step, the User Identification Method is set to IP Address and cannot be changed.
    Additional settings display.
  5. To use NTLM authentication before a session starts, from the NTLM Auth Configuration list select a configuration.
    Important: For NTLM authentication to work, you must also enable the Captive Portals setting and specify an IP address in the Primary Authentication URI field for the virtual server that you configure for the captive portal.
    In the case of a shared machine, an IP address might already be associated with a user or a session. Using NTLM authentication ensures that the system can associate the IP address with the correct session (new or existing) or with a new user each time a user logs on to the shared machine.
  6. To direct users to a captive portal, for Captive Portal select Enabled and, in the Primary Authentication URI field, type the URI.
    You might specify the URI of your primary authentication server if you use single sign-on across multiple domains. Users can then access multiple back-end applications from multiple domains and hosts without needing to re-enter their credentials, because the user session is stored on the primary domain.
    For example, you might type https://logon.siterequest.com in the field.
  7. In the Language Settings area, add and remove accepted languages, and set the default language.
    A browser uses the highest priority accepted language. If no browser language matches the accepted languages list, the browser uses the default language.
  8. Click Finished.
    The Access Profiles list screen displays.
The access profile displays in the Access Profiles List. Default-log-setting is assigned to the access profile.

Creating a custom Client SSL forward proxy profile

Creating a Client SSL forward proxy profile makes it possible for client and server authentication, while still allowing the BIG-IP® system to perform data optimization, such as decryption and encryption. This profile applies to client-side SSL forward proxy traffic only.

  1. On the Main tab, click Local Traffic > Profiles > SSL > Client .
    The Client SSL profile list screen opens.
  2. Click Create.
    The New Client SSL Profile screen opens.
  3. In the Name field, type a unique name for the profile.
  4. From the Parent Profile list, select clientssl.
  5. To avoid issues with privacy concerns, you might need to enable SSL forward proxy bypass for URLs that expose personal user information, such as those for financial or government sites.
    1. Scroll down to the SSL Forward Proxy list, and select Advanced.
    2. Select the Custom check box for the SSL Forward Proxy area.
    3. From the SSL Forward Proxy list, select Enabled.
      You can update this setting later but only while the profile is not assigned to a virtual server.
    4. From the CA Certificate list, select a certificate.
    5. From the CA Key list, select a key.
    6. In the CA Passphrase field, type a passphrase.
    7. In the Confirm CA Passphrase field, type the passphrase again.
    8. In the Certificate Lifespan field, type a lifespan for the SSL forward proxy certificate in days.
    9. Optional: From the Certificate Extensions list, select Extensions List.
    10. Optional: For the Certificate Extensions List setting, select the extensions that you want in the Available extensions field, and move them to the Enabled Extensions field using the Enable button.
    11. From the SSL Forward Proxy Bypass list, select Enabled.
      You can update this setting later but only while the profile is not assigned to a virtual server.
      Additional settings display.
    12. For Default Bypass Action, retain the default value Intercept.
      You can override the value of this action on a case-by-case basis in the per-request policy for the virtual server.
      Note: Bypass and intercept lists do not work with per-request policies. Retain the setting None for the remainder of the fields.
  6. Click Finished.
The custom Client SSL forward proxy profile now appears in the Client SSL profile list screen.

Creating a custom Server SSL profile

Create a custom server SSL profile to support SSL forward proxy.
  1. On the Main tab, click Local Traffic > Profiles > SSL > Server .
    The Server SSL profile list screen opens.
  2. Click Create.
    The New Server SSL Profile screen opens.
  3. In the Name field, type a unique name for the profile.
  4. For Parent Profile, retain the default selection, serverssl.
  5. From the Configuration list, select Advanced.
  6. Select the Custom check box.
    The settings become available for change.
  7. From the SSL Forward Proxy list, select Enabled.
    You can update this setting later, but only while the profile is not assigned to a virtual server.
  8. From the SSL Forward Proxy Bypass list, select Enabled (or retain the default value Disabled).
    The values of the SSL Forward Proxy Bypass settings in the server SSL and the client SSL profiles specified in a virtual server must match. You can update this setting later but only while the profile is not assigned to a virtual server.
  9. Scroll down to the Secure Renegotiation list and select Request.
  10. Click Finished.
The custom Server SSL profile is now listed in the SSL Server profile list.

Creating a virtual server for forward proxy SSL traffic

You configure a virtual server to process the SSL web traffic in a transparent forward proxy configuration.
  1. On the Main tab, click Local Traffic > Virtual Servers .
    The Virtual Server List screen opens.
  2. Click the Create button.
    The New Virtual Server screen opens.
  3. In the Name field, type a unique name for the virtual server.
  4. In the Destination Address field, type 0.0.0.0/0 to accept any IPv4 traffic.
  5. In the Service Port field, type 443 or select HTTPS from the list.
  6. From the Configuration list, select Advanced.
  7. From the HTTP Profile list, select http.
  8. If you plan to use this virtual server for proxy chaining from APM, from the HTTP Proxy Connect Profile list, select a profile that you configured previously or select http-proxy-connect.
  9. For the SSL Profile (Client) setting, from the Available list, select the name of the Client SSL forward proxy profile you previously created, and using the Move button, move the name to the Selected list.
    Important: To enable SSL forward proxy functionality, you can either:
    • Disassociate existing Client SSL and Server SSL profiles from a virtual server and configure the SSL Forward Proxy settings.
    • Create new Client SSL and Server SSL profiles and configure the SSL Forward Proxy settings.
    Then with either option, select the Client SSL and Server SSL profiles on a virtual server. You cannot modify existing Client SSL and Server SSL profiles while they are selected on a virtual server to enable SSL forward proxy functionality.
  10. For the SSL Profile (Server) setting, from the Available list, select the name of the Server SSL forward proxy profile you previously created, and using the Move button, move the name to the Selected list.
    Important: To enable SSL forward proxy functionality, you can either:
    • Disassociate existing Client SSL and Server SSL profiles from a virtual server and configure the SSL Forward Proxy settings.
    • Create new Client SSL and Server SSL profiles and configure the SSL Forward Proxy settings.
    Then with either option, select the Client SSL and Server SSL profiles on a virtual server. You cannot modify existing Client SSL and Server SSL profiles while they are selected on a virtual server to enable SSL forward proxy functionality.
  11. For the VLAN and Tunnel Traffic setting, retain the default value All VLANs and Tunnels list.
  12. From the Source Address Translation list, select Auto Map.
  13. For the Address Translation setting, clear the Enabled check box.
  14. Click Finished.
The virtual server now appears in the Virtual Server List screen.
After you configure an access policy and a per-request policy, specify them in the Access Profile settings area of this virtual server.

Creating a virtual server for forward proxy traffic

You configure a virtual server to process web traffic going to port 80 in a transparent forward proxy configuration.
  1. On the Main tab, click Local Traffic > Virtual Servers .
    The Virtual Server List screen opens.
  2. Click the Create button.
    The New Virtual Server screen opens.
  3. In the Name field, type a unique name for the virtual server.
  4. In the Destination Address field, type 0.0.0.0/0 to accept any IPv4 traffic.
  5. In the Service Port field, type 80, or select HTTP from the list.
  6. From the Configuration list, select Advanced.
  7. From the HTTP Profile list, select http.
  8. For the HTTP Connect Profile setting, be sure to retain the default value None.
  9. For the VLAN and Tunnel Traffic setting, retain the default value All VLANs and Tunnels list.
  10. From the Source Address Translation list, select Auto Map.
  11. For the Address Translation setting, clear the Enabled check box.
  12. Click Finished.
The virtual server now appears in the Virtual Server List screen.
After you configure an access policy and a per-request policy, specify them in the Access Profile settings area of this virtual server.

Creating a forwarding virtual server

For Secure Web Gateway transparent forward proxy in inline mode, you create a forwarding virtual server to intercept IP traffic that is not going to ports 80 or 443.
  1. On the Main tab, click Local Traffic > Virtual Servers .
    The Virtual Server List screen opens.
  2. Click the Create button.
    The New Virtual Server screen opens.
  3. In the Name field, type a unique name for the virtual server.
  4. From the Type list, select Forwarding (IP).
  5. In the Source Address field, type 0.0.0.0/0.
  6. In the Destination Address field, type 0.0.0.0/0 to accept any IPv4 traffic.
  7. In the Service Port field, type * or select * All Ports from the list.
  8. From the Protocol list, select * All Protocols.
  9. From the VLAN and Tunnel Traffic list, retain the default selection, All VLANs and Tunnels.
  10. From the Source Address Translation list, select Auto Map.
  11. Click Finished.

Creating a Client SSL profile for a captive portal

You create a Client SSL profile when you want the BIG-IP® system to authenticate and decrypt/encrypt client-side application traffic. You create this profile if you enabled Captive Portals in the access profile and if you want to use client-side SSL.

  1. On the Main tab, click Local Traffic > Profiles > SSL > Client .
    The Client SSL profile list screen opens.
  2. Click Create.
    The New Client SSL Profile screen opens.
  3. In the Name field, type a unique name for the profile.
  4. For the Parent Profile list, retain the default value, clientssl.
  5. Select the Custom check box.
  6. In the Certificate Key Chain area, select a certificate and key combination to use for SSL encryption for the captive portal.
    This certificate should match the FQDN configured in the access profile SWG-Transparent type to avoid security warnings, and should be generated by a certificate authority that your browser clients trust.
    Note: If the key is encrypted, type a passphrase. Otherwise, leave the Passphrase field blank.
  7. Click Finished.
After creating the Client SSL profile and assigning the profile to a virtual server, the BIG-IP system can apply SSL security to the type of application traffic for which the virtual server is configured to listen.

Creating a virtual server for a captive portal

You configure a virtual server to use as a captive portal if you enabled the Captive Portals setting in the access profile.
  1. On the Main tab, click Local Traffic > Virtual Servers .
    The Virtual Server List screen opens.
  2. Click the Create button.
    The New Virtual Server screen opens.
  3. In the Name field, type a unique name for the virtual server.
  4. In the Destination Address field, type the IP address for a host virtual server.
    This field accepts an address in CIDR format (IP address/prefix). However, when you type the complete IP address for a host, you do not need to type a prefix after the address.
    Type a destination address in this format: 162.160.15.20.
  5. Specify a port in the Service Port field.
    If you plan to use client-side SSL, type 443 or select HTTPS from the list.
  6. From the HTTP Profile list, be sure to retain the default value http.
  7. For the HTTP Connect Profile setting, be sure to retain the default value None.
    Whether or not you plan to use client-side SSL, for a captive portal the value for this setting should be None.
  8. If you plan to use client-side SSL, for the SSL Profile (Client) setting, move the profile you configured previously from the Available list to the Selected list.
  9. Click Finished.
The virtual server appears in the Virtual Server List screen.
After you configure an access policy, specify it in the Access Profile settings area of this virtual server.

Implementation result

You now have the profiles, virtual servers, and other configuration objects that you need for transparent forward proxy.

Important: Before you send traffic to this configuration, you need to configure an access policy and a per-request policy and specify them in the virtual servers.

Access policy and per-request policy configuration depends on what you are trying to do. To locate examples, look for configurations that categorize and filter traffic, intercept or bypass SSL traffic, forward traffic to a third party proxy server, and so on.