Manual Chapter : Access policy changes for F5 Access

Applies To:

Show Versions Show Versions

BIG-IP APM

  • 15.0.1, 15.0.0, 14.1.3, 14.1.2, 14.1.0, 14.0.1, 14.0.0, 13.1.5, 13.1.4, 13.1.3, 13.1.1, 13.1.0, 13.0.1, 13.0.0, 12.1.6, 12.1.5, 12.1.3, 11.6.5, 11.6.4, 11.6.3, 11.5.10, 11.5.7
Manual Chapter

Access policy changes for F5 Access

About access policy changes for F5 Access

Client certificate authentication changes

F5 Access 3.x supports authentication with a client certificate in Web Logon mode on iOS 12 devices. This feature is supported on iOS 12 devices, but not on iOS 11 devices. However, in native logon mode, client certificate authentication is supported on both iOS 11 and iOS 12 devices.

To solve this, use native mode if possible in your deployment.

Restriction: For F5 Access 3.x, native mode can be enforced in the Connectivity Profile on the BIG-IP. Please refer to the guide BIG-IP APM and F5 Access for iOS for details. This setting is available on BIG-IP 12.1.3, 13.1.0, and 14.0.0. This setting is note available on 11.5.1, 11.5.7, or 11.6.3.

If you cannot use native mode, create different branches for iOS 12 and iOS 11 devices and use certificate authentication only on the iOS 12 branch. You can create a custom version check, as shown in the following example. Use the custom expression expr {[mcget{session.client.platform.version}] >="12.0"} to detect iOS 12 or later.

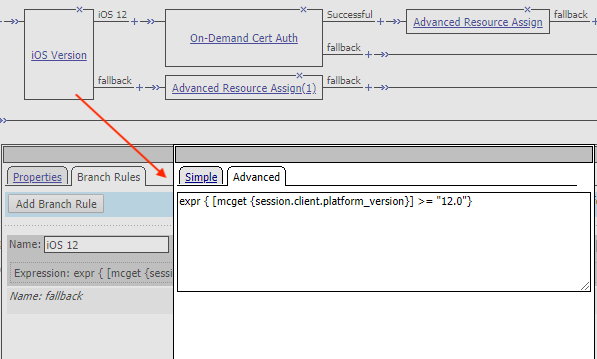
Version check for iOS 12

Changes with external logon pages

If you use an external logon page, that page must meet the Apple Transport Security (ATS) requirements, as detailed previously.

Client Proxy Autoconfig file changes

If you use a Client Proxy Autoconfig (PAC) script in your Network Acess, configuration, the file must be hosted on an HTTPS resource that meets Apple Transport Security (ATS) requirements, as detailed previously.

Device-wide On-Demand connections

If you use device-wide On-Demand connections, such connections now support runtime prompts and Web Logon connections with F5 Access 3.x. In the scenario where you have device-wide connections (but not per-app VPN connections), both manual connections and On-Demand connections can use the same Access Policy. Prompts that appear during authentication are supported, including password prompts, device authentication prompts, and Web Logon connections.

About Per-App VPN changes for F5 Access

Per-App VPN changes

Per-App VPN is a layer-3 tunnel in F5 Access 3.x. For the connection to work, a Network Access resource and a Webtop resource must be assigned to the Access Policy.

Per-app VPN connections do not fully support runtime prompts (password prompts, device authentication prompts) or Web Logon connections. We recommend that you configure the Access Policy so clients are not required to do interactive authentication in a Per-App VPN scenario.

You can use the session variable session.client.vpn_scope to identify device-wide and Per-App VPN connections.

Restriction: This session variable can be used on BIG-IP versions 12.1.3, 13.1.0, and 14.0.0. This can not be used on 11.5.1, 11.5.7, or 11.6.3, as the session variable does not exist on those versions.
  • For the device-wide VPN branch, use expr { [mcget {session.client.vpn_scope}] == "device" }
  • For the Per-App VPN branch, use expr { [mcget {session.client.vpn_scope}] == "per-app" }
See the following example.
Per-App VPN example version check

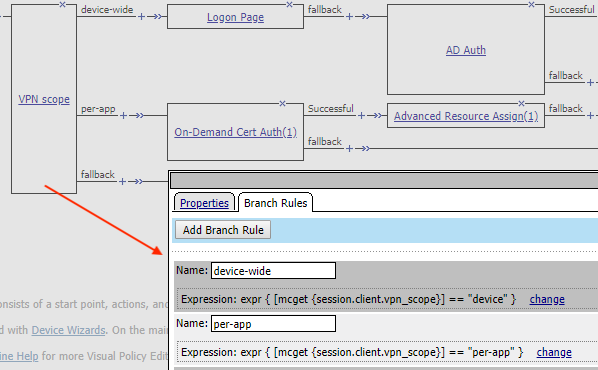
Per-App VPN access policy check

Adding a version check to the access policy

A version check allows you to distinguish between F5 Access for iOS 3.0.x and earlier versions. You can use this information to assign the required full network access resource to the 3.0.x branch, for example, in a Per-App VPN scenario.
Restriction: This version check can be used on BIG-IP versions 12.1.3, 13.1.0, and 14.0.0. This can not be used on versions 11.5.1, 11.5.7, or 11.6.3, as the session variable does not exist on those versions.
  1. On the Main tab, click Access > Profiles / Policies .
    The Access Profiles (Per-Session Policies) screen opens.
  2. In the Per-Session Policy column, click the Edit link for the access profile you want to configure.
    The visual policy editor opens the access policy in a separate screen.
  3. Click the (+) sign anywhere in the access policy to add a new action item.
    An Add Item screen opens, listing predefined actions on tabs such as General Purpose, Authentication, and so on.
  4. Click Add Item.
    The screen is not active while the visual policy editor creates the action. The screen closes and a Properties screen displays.
  5. Click the Endpoint Security (Server-Side) tab.
  6. Select the Client Type item, and click Add Item.
  7. Click Save.
  8. On the Edge Client branch, click the (+) sign to add a new action item.
  9. Click the Endpoint Security (Server-Side) tab.
  10. Select the Client OS item, and click Add Item.
  11. Click Save.
  12. On the iOS branch, click the (+) sign to add a new action item.
  13. Click the General Purpose tab.
  14. Select the Empty item, and click Add Item.
  15. On the Properties screen in the Name field, type F5 Access Version.
  16. Click the Branch Rules tab.
  17. Click Add Branch Rule.
  18. In the Name field, type Version 3.
  19. Click the change link in the Expression area.
    A popup screen opens.
  20. Click the Advanced tab.
    Use this tab to enter Tcl expressions.
    A text input field displays.
  21. In the text field, type expr { [mcget {session.client.app_version}] >= "3.0" }, and click Finished.
  22. On the fallback branch following the F5 Access version item, change the Deny ending to Allow.
    iOS 2.x clients will take the fallback branch.
  23. Click Save.
  24. Add a Network Access resource to the Version 3 branch. On the Version 3 branch, click the (+) sign to add a new action item.
  25. Click the Assignment tab.
  26. Select the Advanced Resource Assign item, and click Add Item.
  27. Under Resource Assignment, click Add new entry.
  28. Under Expression, click Add/Delete.
  29. Click the Network Access tab, and select a Network Access resource to assign.
  30. Click the Webtop tab, and select a webtop to assign.
  31. Click Update.
  32. Click Save.
  33. On the fallback branch following the Advanced Resource Assign item, click the Deny ending.
  34. Change the Deny ending to Allow, and click Save.
  35. Click Apply Access Policy to save your configuration.
The access profile appears in the Access Profiles List.
Configure the virtual server to include this access policy, and make sure the Client SSL profile is enabled on the server.

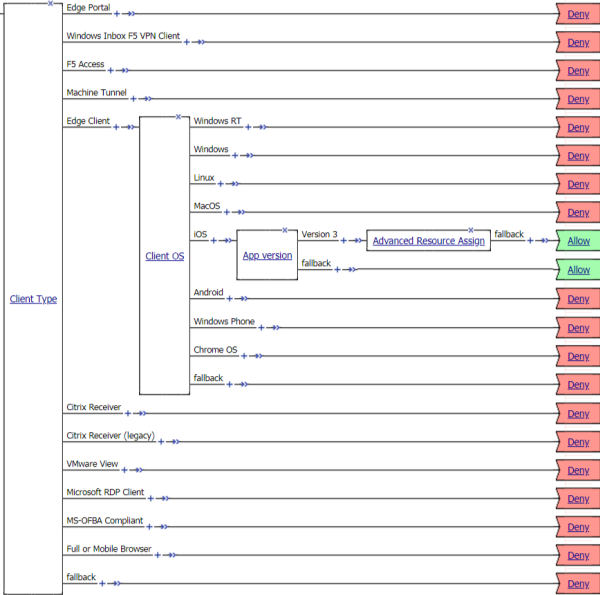
Example of access policy for F5 Access 3.x and 2.1.x

You can configure an access policy branch to direct F5 Access 3.x and 2.1.x device users on iOS to different branches.

This example displays such an access policy.