Manual Chapter : Creating a Security Policy Automatically

Applies To:

Show Versions Show Versions

BIG-IP ASM

  • 12.1.6, 12.1.5, 12.1.4, 12.1.3, 12.1.2, 12.1.1, 12.1.0
Manual Chapter

Creating a Security Policy Automatically

Deployment scenarios when creating security policies

The Deployment wizard provides several different scenarios for creating and deploying security policies. Before you start creating a security policy, review the descriptions of each deployment scenario to help you decide which one is most appropriate for your organization.

Deployment scenario Description
Create a security policy automatically (recommended) Develops a security policy for a web application by examining traffic. In this scenario, the Real Traffic Policy Builder® automatically creates the security policy based on statistical analysis of the traffic and the intended behavior of the application. The system stabilizes and enforces the security policy when it processes sufficient traffic over a period of time. You have the option of modifying the policy manually, as well, to speed up policy creation.
Create a security policy manually or use templates (advanced) Uses rapid deployment or an application-ready security policy (pre-configured template) to develop a security policy, or lets you develop a policy manually. The system creates a basic security policy that you can review and fine-tune. When the security policy includes all the protections that you need, and does not produce any false positives, you can enforce the security policy.
Create a security policy for XML and web services manually Develops a security policy to protect web services or XML applications, such as those that use a WSDL or XML schema document. The system creates the security policy based on your configurations, and provides additional learning suggestions that you can review and fine-tune. When the security policy includes all the protections that you need, and does not produce any false positives, you can enforce the security policy.
Create a security policy using third party vulnerability assessment tool output Creates a security policy based on integrating the output from a vulnerability assessment tool, such as WhiteHat Sentinel, IBM® AppScan®, Trustwave® App Scanner (Cenzic), Qualys®, Quotium Seeker®, HP WebInspect, or a generic scanner if using another tool. Based on the results from an imported vulnerability report, Application Security Manager™ creates a policy that automatically mitigates the vulnerabilities on your web site. You can also review and fine-tune the policy. When the security policy includes all the protections that you need and does not produce any false positives, you can enforce the security policy.

Overview: Automatic policy building

You can use the Application Security Manager™ to help you build a security policy that is tailored to your environment. The automatic policy building tool is called the Real Traffic Policy Builder®. The Real Traffic Policy Builder (referred to simply as the Policy Builder) adds suggestions for creating a security policy based on settings that you configure using the Deployment wizard, and the characteristics of the traffic going to and from the web application that the system is protecting. If using automatic learning, the system implements the learning suggestions and automatically builds the policy when sufficient traffic and time has passed. If using manual learning, you can review the suggestions and develop the policy adding the policy elements and features you want.

Task summary

Creating a security policy automatically

Before you can create a security policy, you must perform the minimal system configuration tasks including defining a VLAN, a self IP address, and other tasks required according to the needs of your networking environment.
Application Security Manager™ can automatically create a security policy that is tailored to secure your web application.
  1. On the Main tab, click Security > Application Security > Security Policies .
    The Active Policies screen opens.
  2. Click the Create button.
    The Deployment wizard opens to the Select Local Traffic Deployment Scenario screen.
  3. For the Local Traffic Deployment Scenario setting, specify a virtual server to use for the security policy.
    • To secure an existing virtual server that has no security policy associated with it, select Existing Virtual Server and click Next.
    • To create a new virtual server and pool with basic configuration settings, select New Virtual Server and click Next.
    • To create an active but unused security policy, select Do not associate with Virtual Server and click Next. No traffic will go through this security policy until you associate it with a virtual server. The Policy Builder cannot begin automatically creating a policy until traffic is going to ASM through the virtual server.
    The virtual server represents the web application you want to protect.
    The Configure Local Traffic Settings screen opens if you are adding a virtual server. Otherwise, the Select Deployment Scenario screen opens.
  4. If you are adding a virtual server, configure the new or existing virtual server, and click Next.
    • If creating a new virtual server, specify the protocol, virtual server name, virtual server destination address and port, pool member IP address and port, and the logging profile.
    • If using an existing virtual server, it must have an HTTP profile and cannot be associated with a local traffic policy. Specify the protocol and virtual server.
    • If you selected Do not associate with Virtual Server, you will have to manually associate the security policy with a virtual server at a later time. On the policy properties screen, you need to specify a name for the security policy.
    The Select Deployment Scenario screen opens.
  5. For Deployment Scenario, select Create a security policy automatically and click Next.
    The Configure Security Policy Properties screen opens.
  6. In the Security Policy Name field, type a name for the policy.
  7. From the Application Language list, select the language encoding of the application, or use Auto detect and let the system detect the language.
    Important: You cannot change this setting after you have created the security policy.
  8. If the application is not case-sensitive, clear the Security Policy is case sensitive check box. Otherwise, leave it selected.
    Important: You cannot change this setting after you have created the security policy.
  9. If you do not want the security policy to distinguish between HTTP/WebSocket and HTTPS/WebSocket Secure URLs, clear the Differentiate between HTTP/WS and HTTPS/WSS URLs check box. Otherwise, leave it selected.
  10. Click Next.
    The Configure Attack Signatures screen opens.
  11. To configure attack signatures, move the systems used by your web application from the Available Systems list into the Assigned Systems list.
    The system adds the attack signatures needed to protect the selected systems.
  12. For the Signature Staging setting, verify that the default option Enabled is selected.
    Note: Because ASM begins building the security policy in Blocking mode, you can keep signature staging enabled so you can check whether legitimate traffic is being stopped to reduce the chance of false positives.
    New and updated attack signatures remain in staging for 7 days, and are recorded but not enforced (according to the learn, alarm, and block flags in the attack signatures configuration) during that time.
  13. Click Next.
    The Configure Automatic Policy Building screen opens.
  14. For Policy Type, select an option to determine the security features to include in the policy.
    Bulleted lists on the screen describe the exact security features that are included in each type.
    Option Description
    Fundamental Creates a robust security policy that is appropriate for most applications.
    Enhanced Creates a more specific security policy with additional customization such as learning URLs, cookies, and content profiles; includes tracking of user login sessions and brute force protection.
    Comprehensive

    Creates the most secure policy providing the greatest amount of customization, including all the Enhanced features and more traffic classification at the parameter and URL levels, dynamic parameters, and CSRF URLs.

  15. For the Policy Builder Learning Speed setting, select how fast to generate suggestions for the policy.
    Option Description
    Fast Use if your application supports a small number of requests from a small number of sessions; for example, useful for web sites with less traffic. Policy Builder requires fewer unique traffic samples to make decisions in Automatic Learning Mode, or to reach a high learning score. However, choosing this option may present a greater chance of adding false entities to the security policy.
    Medium Use if your application supports a medium number of requests, or if you are not sure about the amount of traffic on the application web site. This is the default setting.
    Slow Use if your application supports a large number of requests from many sessions; for example, useful for web sites with lots of traffic. Policy Builder requires a large amount of unique traffic samples to make decisions in Automatic Learning Mode, or to reach a high learning score. This option creates the most accurate security policy, but it takes Policy Builder longer to collect the statistics.
    Based on the option you select, the system sets greater or lesser values for the number of different user sessions, different IP addresses, and length of time before it adds suggestions to the security policy and if you are using automatic learning, enforces the elements.
  16. For Trusted IP Addresses, select which IP addresses to consider safe:
    Option Description
    All Specifies that the policy trusts all IP addresses. This option is recommended for traffic in a corporate lab or preproduction environment where all of the traffic is trusted. The policy is created faster when you select this option.
    Address List Specifies networks to consider safe. Fill in the IP Address and Netmask fields, then click Add. This option is typically used in a production environment where traffic could come from untrusted sources. The IP Address can be either an IPv4 or an IPv6 address.
    If you leave the trusted IP address list empty, the system treats all traffic as untrusted. In general, it takes more untrusted traffic, from different IP addresses, over a longer period of time to build a security policy.
  17. If you want to display a response page when an AJAX request does not adhere to the security policy, select the AJAX blocking response behavior check box.
  18. Click Next.
    The Security Policy Configuration Summary opens where you can review the settings to be sure they are correct.
  19. Click Finish to create the security policy.
    The Policy Properties screen opens.
ASM™ creates the virtual server with an HTTP profile (or associates an existing one), and on the Security tab, Application Security Policy is enabled and associated with the security policy you created. A local traffic policy is also created and by default sends all traffic for the virtual server to ASM. The Policy Builder automatically begins examining the traffic to the web application and making suggestions for building the security policy (unless you did not associate a virtual server). The system sets the enforcement mode of the security policy to Blocking, but it does not block requests until the Policy Builder processes sufficient traffic, adds elements to the security policy, and enforces the elements.
Tip: This is a good point at which to test that you can access the application being protected by the security policy and check that traffic is being processed correctly by the BIG-IP® system.

How the security policy is built

When you finish running the Deployment wizard, you have created a basic security policy to protect your web application. The Real Traffic Policy Builder® starts examining the application traffic, and fine-tunes the security policy using the guidelines you configured.

The Policy Builder builds the security policy as follows:

  • Adds policy elements and updates their attributes when ASM sees enough traffic from various users
  • Examines application content and creates XML or JSON profiles as needed (if the policy includes JSON/XML payload detection)
  • Configures attack signatures in the security policy
  • Stabilizes the security policy when sufficient sessions over a period of time include the same elements
  • Includes new elements if the site changes

The Policy Builder automatically discovers and populates the security policy with the policy elements (such as file types, URLs, parameters, and cookies). On the Policy Building screens, you can monitor general policy building progress, review learning suggestions and deal with those you must handle manually, and see the number of elements that have been included in the policy.

Automatic policy building characteristics

If you create a security policy with the Learning Mode set to Automatic, the Real Traffic Policy Builder® does automatic policy building. This is how it works:

  • The security policy starts out loose, allowing traffic, then the Policy Builder adds policy elements based on evaluating the traffic.
  • By examining the traffic, the Policy Builder makes learning suggestions that you can review on the Traffic Learning screen to see the suggested additions to the security policy. You can select and examine each suggestion if you want to learn more about it. If using automatic policy building, you can still change the policy manually, or leave it up to the system to make the changes.
  • The system sets the enforcement mode of the security policy to Blocking, but it does not block requests until the Policy Builder sees sufficient traffic, adds elements to the security policy, and enforces the elements.
  • The system holds attack signatures in staging for 7 days (by default, you can adjust the length of staging): the system checks, but does not block traffic during the staging period. If a request causes an attack signature violation, the system disables the attack signature for the particular element (parameter, JSON or XML profile, or security policy). After the staging period is over, the Policy Builder can remove all attack signatures from staging if enough traffic from different sessions and different IP addresses was processed. The security policy enforces the enabled signatures and blocks traffic that causes a signature violation.
  • The system enforces elements in the security policy when it has processed sufficient traffic and sessions over enough time, from different IP addresses, to determine the legitimacy of the file types, URLs, parameters, cookies, methods, and so on.
  • The security policy stabilizes.
  • If the web site for the application changes, the Policy Builder initially loosens the security policy then adds policy elements to the security policy, updates the attributes of policy elements, puts the added elements in staging, and enforces the new elements when traffic and time thresholds are met.

This is the process describing what happens during the automatic policy building process. You can always control the way the security policy works by making changes manually and configuring additional layers of security based on the unique needs of your environment.

Reviewing learning suggestions

After you create a security policy, the system provides learning suggestions concerning additions to the security policy based on the traffic that is accessing the application. For example, you can have users or testers browse the web application. By analyzing the traffic to and from the application, Application Security Manager™ generates learning suggestions or ways to fine-tune the security policy to better suit the traffic and secure the application.

Note: This task is primarily for building a security policy manually. If you are using the automatic learning mode, this task applies to resolving suggestions that require manual intervention, or for speeding up the enforcement of policy elements.
  1. On the Main tab, click Security > Application Security > Policy Building > Traffic Learning .
    The Traffic Learning screen opens, and lists suggestions based on traffic patterns and violations that the system has detected.
  2. If you want to change the order in which the suggestions are listed, or refine what is included in the list, use the filters at the top of the column.
    You can also list the suggestions by average violation rating of all matching requests, first occurrence, last occurrence, matched entity name, or use the search filter to display specific types of suggestions that you are interested in.
    By default, the suggestions that have the highest learning score (those closest to being ready to be enforced) are listed first. Suggestions have higher learning scores if that traffic has met the conditions in the policy, if it originates from many sources, if it is unlikely to be a violation, or if the traffic comes from a trusted IP address. They may also be suggestions to add an entity the system learns, for example, a new file type, URL, or parameter.
  3. On the Traffic Learning screen, review each learning suggestion.
    1. Select a learning suggestion.
      Information is displayed about the action the system will take if you accept the suggestion, and what caused the suggestion.
    2. You can learn more about the suggestion by looking at the action, the number of samples it is based on, the violations caused and their violation ratings, and if needed, by examining samples of the requests that caused the suggestion.
    3. With a request selected on the left, you can view data about the request on the right, including any violations it generated, the contents of the request itself, and the response (if any). Note that some requests may contain violations related to different suggestions.
      By examining the requests that caused a suggestion, you can determine whether it should be accepted.
    4. To add comments about the suggestion and the cause, click the Add Comment icon and type the comments.
  4. Decide how to respond to the suggestion. You can start with the suggestions with the highest learning scores, or those which you know to be valid for the application. These are the options.
    Option What happens
    Accept Suggestion The system modifies the policy by taking the suggested action, such as adding an entity that is legitimate. If the entity that triggered the suggestion can be placed in staging (file types, URLs, parameters, cookies, or redirection domains), clicking Accept Suggestion displays a second option, Accept suggestion and enable staging on Matched <<entity>>. Click this option to accept the suggestion and place the matched entity in staging.
    Delete Suggestion The system removes the learning suggestion, but the suggestion reoccurs if new requests cause it. The learning score of the suggestion starts over from zero in that case.
    Ignore Suggestion The system does not change the policy and stops showing this suggestion on the Traffic Learning screen now and in the future. You can view ignored suggestions by filtering by status ignored.
    Leave the suggestion You can read the suggestions and wait to handle them until more traffic has passed through, or until you get more information. The suggestion remains in the list and no changes are made to the policy.
    Note: If you are working in automatic learning mode, when the learning score reaches 100%, the system accepts most of the suggestions, or you can accept suggestions manually at any time. If you are using manual learning, when the learning score reaches 100% (or before that if you know the suggestions are valid), you need to accept the suggestions manually.

    If you know that a suggestion is valid, you can accept it at any time even before the learning score reaches 100%. The ones that reach 100% have met all the conditions so that they are probably legitimate entities.

  5. To put the security policy changes into effect immediately, click Apply Policy.
By default, a security policy is put into an enforcement readiness period for seven days. During that time, you can examine learning suggestions and adjust the security policy without blocking traffic. The security policy then includes elements unique to your web application.
It is a good idea to periodically review the learning suggestions on the Traffic Learning screen to determine whether the violations are legitimate and caused by an attack, or if they are false positives that indicate a need to update the security policy. Typically, a wide recurrence of violations at some place in the policy (with a low violation rating and a high learning score) indicates that they might be false positives, and hence the policy should be changed so that they will not be triggered anymore. If the violations seem to indicate true attacks (for example, they have a high violation rating), the policy should stay as is, and you can review the violations that it triggered.

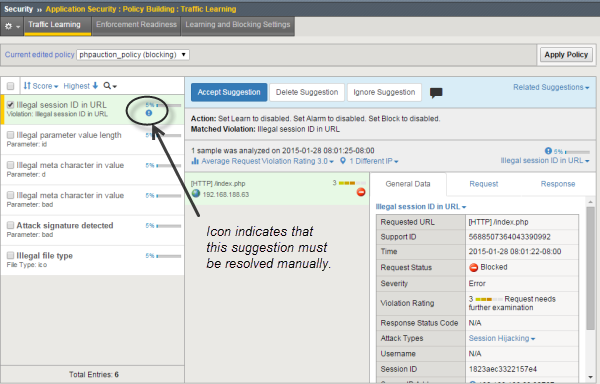
Learning suggestions you must handle manually

Some learning suggestions must be resolved manually even if you are using the Automatic Learning Mode to create a security policy. Suggestions typically require manual intervention if they involve changing an attribute that was manually and deliberately set in the policy, such as a disallowed geolocation or a session ID in a URL. The system does not change the policy unless you accept the suggestion manually.

You can easily see the suggestions that you need to resolve manually because they are marked with an icon on the Traffic Learning screen as shown in the figure. You can also use the advanced filter to view the suggestions the have Learning Mode set to Manual, and this would list the suggestions you need to resolve.

Manually resolvable suggestions

Suggestions that must be resolved manually

If you are using the Manual Learning Mode, you must resolve all of the suggestions manually.

Reviewing outstanding security policy tasks

You can display a security policy summary including a list of action items. To simplify your work, the system reminds you of required or recommended actions, such as, outstanding configuration and maintenance tasks, and provides links to setup and reporting screens.
  1. On the Main tab, click Security > Overview > Application > Action Items .
    The Action Items screen opens.
  2. Examine the Action Items screen for information about recommended tasks that you need to complete.
    • Review the Suggested Action Items area, which lists system tasks and security policy tasks that should be completed.
    • Click the links to go to the screen where you can perform the recommended action items.
    • Click any security policy task link to open the Summary screen, where you can view and resolve the tasks for that security policy.
  3. In the Quick Links area, click Policies Summary.
    The Policies Summary opens and shows a summary of all the active security policies on the system.
  4. In the Policy Details area, click the links to display details about a security policy.
    • Click the Policy Name to view or edit policy properties.
    • Click a security policy row (not on the policy name) to view Suggested Action Items, Quick Links, and how Policy Builder is operating for that security policy (whether automatically, manually, or disabled).
    • Click a number in the File Types, URLs, Parameters, Cookies, or Redirection Domains column of a security policy to see details about these policy elements.
    • Click the Real Traffic Policy Builder® column to view the learning suggestions for the policy.
If you keep an eye on the summary screens, the system lists the tasks that you should complete to ensure that the security policy is configured completely.

About additional application security protections

The Application Security Manager™ provides additional security protections that you can manually configure for a security policy.

Feature Description and Location
DoS attack prevention Prevents Denial of Service (DoS) attacks based on latency and/or transaction rates (also using behavioral analysis, geolocation, CAPTCHA challenge, heavy URL detection, proactive web scraping detection, and blacklisting). Click Security > DoS Protection . You create a DoS profile with Application Security enabled to configure Layer 7 DoS protection.
Brute force prevention Stops attempts to break in to secured areas of a web application by trying exhaustive, systematic, login combinations. Click Security > Application Security > Anomaly Detection > Brute Force Attack Prevention .
IP Address Intelligence Logs and blocks attacks from IP addresses that are in the IP Address Intelligence Database and are considered to have a bad reputation. Click Security > Application Security > IP Addresses > IP Address Intelligence .
Web scraping detection Mitigates web scraping (web data extraction) on web sites by attempting to determine whether a web client source is human. Click Security > Application Security > Anomaly Detection > Web Scraping .
CSRF protection Prevents cross-site request forgery (CSRF) where a user is forced to perform unwanted actions on a web application where the user is currently authenticated. Click Security > Application Security > CSRF Protection .
Sensitive data masking Protects sensitive data in responses such as a credit card number, U.S. Social Security number, or custom pattern. Click Security > Application Security > Data Guard . Create sensitive parameters if needed (they are also masked); click Security > Application Security > Parameters > Sensitive Parameters . As an additional protection, set the Mask Credit Card Numbers in Request Log option in the policy properties.
Anti-virus protection Configures the system as an Internet Content Adaptation Protocol (ICAP) client so that an external ICAP server can inspect HTTP file uploads for viruses before releasing the content to the web server. To set up the ICAP server, click Security > Options > Application Security > Integrated Services > Anti-Virus Protection .