Manual Chapter : Using Vulnerability Assessment Tools with a Security Policy

Applies To:

Show Versions Show Versions

BIG-IP ASM

  • 14.0.1, 14.0.0, 13.1.5, 13.1.4, 13.1.3, 13.1.1, 13.1.0
Manual Chapter

Overview: Vulnerability assessment policy building

Application Security Manager™ (ASM) integrates with current versions of services that perform vulnerability assessments of web applications, such as:
  • HP WebInspect
  • IBM®AppScan®
  • Qualys®
  • Quotium Seeker®
  • Trustwave ® App Scanner
  • WhiteHat Sentinel
ASM™ also provides a generic scanner so you can use other vulnerability assessment tools not explicitly supported. Vulnerability assessment services identify, classify, and report potential security holes or weaknesses in the code of your web site.

You can use the vulnerability assessment policy template to create a baseline security policy and integrate it with a vulnerability assessment tool. By using vulnerability assessment tool output, the system suggests updates to the security policy that can protect against the vulnerabilities that the tool found. You can choose which of the vulnerabilities you want the security policy to handle, retest to be sure that the security policy protects against the vulnerabilities, then enforce the security policy when you are ready.

If you have an existing security policy that was previously created, you can also incorporate use of a vulnerability assessment tool with that policy.

Task summary

About using Policy Builder with scanner policies

When you develop a security policy using third party vulnerability assessment tool or scanner output, you can set the Learning Mode to automatic or manual, which enables the Real Traffic Policy Builder®. In this case, the Policy Builder makes suggestions for what to add to the policy based on what it learns from your web application traffic, and uses logic to prevent false positives. The suggestions are either automatically learned by the system or they must be manually learned by an administrator depending on the learning mode you selected.

In addition, you select an external scanning tool such as WhiteHat Sentinel, Qualys Web Application Scanning, IBM AppScan, Trustwave App Scanner (Cenzic), Quotium Seeker, or others to build your policy to protect against the vulnerabilities they have found. You import the vulnerabilities detected by the scanner, and choose whether or not to update the security policy for each problem found.

It is possible that in some cases Policy Builder decisions might conflict with and override the scanner results. Here are some examples:

  • The Policy Builder might remove a URL that the scanner added to the list of CSRF-protected URLs.
  • The Policy Builder might allow file upload of executable files on a parameter after the scanner disallowed it.
  • The Policy Builder might add an allowed method after the scanner disallowed it.
  • The Policy Builder might disable attack signatures on parameters, cookies, and at the policy level after the scanner enabled them.

You can also select disabled for the Learning Mode, which disables the Policy Builder so that it does not make learning suggestions. In this case, you can manually build the security policy or just use scanner output to build it. You can adjust the Learning Mode after creating the policy on the Policy Building Learning and Blocking Settings screen.

About exporting results from scanners

Application Security Manager™ (ASM) integrates with the current version of many vulnerability assessment tools (also called scanners). ASM uses the exported results from the scanners to address potential vulnerabilities or security risks concerning your application web site. Using a scanner external to ASM, you perform a vulnerability assessment of the web site, then export the results in standard XML format. Then later, using ASM, you import the results into the security policy being developed to protect the application.

Here are brief instructions on how to export the scan results from several of the vulnerability assessment tools.

Tool To export scan results from the tool
Trustwave App Scanner Right click Assessment Run > Export Assessment Run To > Standard XML .
HP WebInspect Click File > Export > Scan Details . Export the Full details in XML format.
IBM AppScan Click File > Export > Scan results as XML .
Qualys Click Web Applications > View Report > Download > XML .
Quotium Seeker Click Project > Export Results , select F5 BIG-IP ASM format. In ASM, use Generic Scanner to configure.
WhiteHat Sentinel Retrieves reports by connecting directly to ASM using a web service.

You can use additional vulnerability assessment tools as long as you have the results in standard XML output.

Creating a security policy using the vulnerability assessment template

In order to integrate vulnerability assessment tool output with Application Security Manager™ (ASM), you need recent scanner output for the web application you want to protect in the form of an XML file (except if using WhiteHat or Trustwave tools which allow you to download output directly).

Before you can create a security policy using ASM™, you need to complete the basic BIG-IP® system configuration tasks according to the needs of your networking environment.

You can create a baseline security policy that can be used to protect against the potential problems that a vulnerability assessment tool scan finds.
  1. On the Main tab, click Security > Application Security > Security Policies > Policies List .
    The Policies List screen opens.
  2. Click Create New Policy.
    You only see this button when no policy is selected.
  3. In the Policy Name field, type a name for the policy.
  4. Leave Policy Type, set to Security.
  5. For Policy Template, select Vulnerability Assessment Baseline.
  6. For Virtual Server, click Configure new virtual server to specify where to direct application requests.
    1. For What type of protocol does your application use?, select HTTP, HTTPS, or both.
    2. In the Virtual Server Name field, type a unique name.
    3. In the HTTP Virtual Server Destination field, type the address in IPv4 (10.0.0.1) or IPv6 (2001:ed8:77b5:2:10:10:100:42/64) format, and specify the service port.
      Tip: If you want multiple IP addresses to be directed here, use the Network setting.
    4. In the HTTP Pool Member setting, specify the addresses of the back-end application servers.
    5. From the Logging Profile list, select a profile such as Log illegal requests to determine which events are logged on the system.
  7. Click Create Policy to create the security policy.
The system creates a baseline security policy for your web application with the enforcement mode set to blocking, and the learning mode set to manual. The policy already protects against malformed HTTP protocol, evasion techniques, and CSRF attacks. But it does not yet protect against the vulnerabilities found by the scanner.
Next, you need to associate the scanner, then import, review, and resolve vulnerabilities so that the security policy protects against them.

Associating a vulnerability assessment tool with an existing security policy

After creating a security policy using the vulnerability assessment template, you can associate a vulnerability assessment tool with that security policy.
  1. On the Main tab, click Security > Application Security > Vulnerability Assessments > Settings .
    The Vulnerabilities Assessments: Settings screen opens.
  2. In the Current edited security policy list near the top of the screen, verify that the security policy shown is the one you want to work on.
  3. From the Vulnerability Assessment Tool list, select the vulnerability assessment tool that you use to scan your web application for problems, or select Generic Scanner if your tool is not listed.
    Important: After you import vulnerabilities, you cannot change the vulnerability assessment tool you are using for a security policy.
    A popup screen informs you that the Policy Type will be changed to Vulnerability Assessment and asks if you want to continue.
  4. For WhiteHat Sentinel only, complete these options:
    1. To share information about the web site structure with WhiteHat Sentinel, select the Share Site Map with Vulnerability Assessment Tool check box, and from the Scheduled Synchronization list, select how often to send the information.
    2. For WhiteHat Web API Key, type the key generated and supplied by WhiteHat Sentinel for your web application.
      Note: If you do not have a web API key, click the Get a free website security assessment from WhiteHat link. A popup screen opens where you can fill in a form to request a free website security assessment. A WhiteHat representative verifies eligibility, then initiates the scan. ASM automatically downloads the results into the security policy, where you can mitigate the vulnerabilities. In this case, you do not have to complete the rest of the steps in this procedure.
    3. Click Refresh WhiteHat Site Names List to populate the WhiteHat Site Name list with the names of web applications configured under the WhiteHat Web API key. If this BIG-IP system cannot communicate with the WhiteHat service, type the application site name (defined in your WhiteHat account) in the Custom box.
    4. Click Site Mapping Settings to indicate what traffic information to send to the scanner based on response codes, trusted IP addresses, and rules defining what traffic should be considered legitimate.
  5. If using the Generic Scanner, click Download Generic Schema to download the generic_scanner.xsd file.
  6. To associate the selected vulnerability assessment tool with the security policy, click Save.
  7. In the editing context area, click Apply Policy to immediately put the changes into effect.
The system associates the vulnerability assessment tool with the security policy.
Next, you need to import, review, and resolve vulnerabilities on the Vulnerabilities screen so that the security policy protects against them.

Creating a WhiteHat vulnerability file

Before you can develop a vulnerability scan file using WhiteHat Sentinel, you need the following:
  • Up-to-date WhiteHat Sentinel subscription and valid login credentials (sentinel.whitehatsec.com)
  • WhiteHat Sentinel Web API key for your account
  • Site name (as defined in your WhiteHat account)
  • Computer with Internet access
This procedure explains how to create a WhiteHat vulnerability file if the BIG-IP® system does not have Internet access. You can use WhiteHat Sentinel to run a vulnerability scan on a system that does have access, then save the results of the scan as an XML file. You can then upload the vulnerability file onto Application Security Manager™. If the BIG-IP system does have Internet access, you do not need to follow this procedure.
  1. On a computer with Internet access, open a browser and run the WhiteHat Sentinel vulnerability scan by typing the following command:
    https://sentinel.whitehatsec.com/api/vuln/?display_attack_vectors=1&key=<WhiteHat_web_API_key >&display_param=1&query_site=<website_name>
    Note: Replace <WhiteHat_web_API_key> with the WhiteHat Web API Key, and replace <website_name> with the name of the web site you want WhiteHat Sentinel to scan for vulnerabilities.
    The results of the vulnerability scan appear in the web browser in XML format.
  2. Save the results as an XML file.
You have created a WhiteHat vulnerability scan file that you can import into a security policy. Place it in a location where you can access it from Application Security Manager, and upload it when creating a security policy integrated with WhiteHat Sentinel.

Importing vulnerability assessment tool output

In order to import vulnerability assessment tool output into a security policy, you need to have configured the policy to use a vulnerability assessment tool. You also need recent scanner output for the web application you want to protect in the form of a standard XML file.
You can import vulnerability assessment tool output into a security policy.
  1. On the Main tab, click Security > Application Security > Vulnerability Assessments > Vulnerabilities .
    The Vulnerabilities screen opens.
  2. In the Current edited security policy list near the top of the screen, verify that the security policy shown is the one you want to work on.
  3. To import the recent scanner output from the vulnerabilities tool, click Import.
  4. In the import popup screen, for the Import previously saved vulnerabilities file field, specify the XML file output from the vulnerabilities assessment tool that you associated with the security policy, then click Import.
    Some vulnerability assessment tools (such as WhiteHat) provide additional settings allow you to connect to an existing account, create a trial account, and request a new scan. Refer to the details on the screen.
    The system verifies the file and if vulnerabilities for more than one domain are discovered, on the popup screen you can select the domain names for which to include the vulnerabilities.
The system imports the vulnerabilities that the vulnerabilities assessment tool found on your web application.
Next, you need to review and resolve vulnerabilities on the Vulnerabilities screen so that the security policy protects against them.

Resolving vulnerabilities

Before you can resolve vulnerabilities for a security policy, the security policy must be associated with a vulnerability assessment tool, and have the vulnerabilities file imported to it.
When you resolve vulnerabilities discovered by a scanner, the security policy protects against them. Application Security Manager™ (ASM) can resolve some vulnerabilities automatically. Others require some manual intervention on your part, and ASM™ provides guidance on what to do.
  1. On the Main tab, click Security > Application Security > Vulnerability Assessments > Vulnerabilities .
    The Vulnerabilities screen opens.
  2. In the Vulnerabilities Found and Verified area, you can filter the vulnerabilities that are displayed using the View and Vulnerabilities with lists.
    View option What it displays
    All All vulnerabilities found by the scanner.
    Resolvable All vulnerabilities that are resolvable either automatically or manually.
    Resolvable (Automatically) Vulnerabilities that ASM can resolve.
    Resolvable (Manually) Vulnerabilities that can be resolved with some manual intervention.
    Not Resolvable Vulnerabilities that are not resolvable in any straightforward way.
    Vulnerabilities with option What it displays
    Any Vulnerabilities in any state.
    Ignored Vulnerabilities that you decided to ignore by selecting and clicking Ignore.
    Mitigated Vulnerabilities that ASM has mitigated, or those which have been fixed and marked as mitigated.
    Pending Vulnerabilities that need to be dealt with.
    Mitigated (In Staging) Vulnerabilities that were resolved by adding a parameter or cookie (in staging) to the security policy.
  3. Review the vulnerabilities that the assessment tool has detected and verified.
    1. Click a row in the table to display details about the vulnerability.
      Below the Vulnerabilities Found table, a list of the specific vulnerabilities is displayed.
    2. To add notes about the vulnerability, click the pencil icon in the ASM Status column.
      The Vulnerability Notes popup opens where you can add notes.
  4. For the vulnerabilities that are shown as Resolvable (Automatically), select the vulnerabilities you want the system to resolve (or ignore), and click the appropriate button.
    Option What it does
    Resolve and Stage Updates the security policy to protect against the vulnerability, and puts parameters in staging. Entities in staging do not cause violations, and this allows you to fine-tune their settings without causing false positives.
    Resolve Updates the security policy to protect against the vulnerability.
    Ignore Changes the ASM Status of the selected vulnerability from Pending to Ignore. If later you decide to protect against this vulnerability, you can select it and click Cancel Ignore.
    ASM reviews the prerequisites and then displays a list of the changes it will make to fix the vulnerability.
  5. If you agree with the changes, click Resolve.
    ASM modifies the security policy to protect against the vulnerabilities for which you clicked Resolve and ignores the rest. In the Vulnerabilities list, the ASM Status column for the vulnerability changes to Mitigated or Mitigated (In Staging), if appropriate.
  6. For the vulnerabilities that are shown as Resolvable (Manually), select the vulnerability you want to work on, and click the appropriate button.
    Option What it does
    Show Resolution Opens a popup that describes the vulnerability and its possible impact, shows the steps required to manually fix the vulnerability, and describes any risks that might result from making the changes.
    Change ASM Status to Mitigated Changes the status of the vulnerability to say Mitigated. Recommended after you manually fix vulnerabilities.
    Ignore Changes the ASM Status of the selected vulnerability from Pending to Ignore. If later you decide to protect against this vulnerability, you can select it and click Cancel Ignore.
  7. Click Apply Policy to save the changes to the security policy.
    The system updates the security policy to prevent the handled vulnerabilities from reoccurring.
The security policy for your web application protects against the vulnerabilities that the vulnerability assessment tool discovered and which you resolved manually or automatically. The ASM Status of vulnerabilities that have been dealt with is set to Mitigated.
You can periodically rescan your system to check for additional vulnerabilities that need to be resolved.

Reviewing learning suggestions

Before you can see learning suggestions on the system, it needs to have had some traffic sent to it.

After you create a security policy and begin sending traffic to the application, the system provides learning suggestions concerning additions to the security policy based on the traffic it sees. For example, you can have users or testers browse the web application. By analyzing the traffic to and from the application, Application Security Manager™ generates learning suggestions or ways to fine-tune the security policy to better suit the traffic and secure the application.

Note: This task is primarily for building a security policy manually. If you are using the automatic learning mode, this task applies to resolving suggestions that require manual intervention, or for speeding up the enforcement of policy elements.
  1. On the Main tab, click Security > Application Security > Policy Building > Traffic Learning .
    The Traffic Learning screen opens, and lists suggestions based on traffic patterns and violations that the system has detected.
  2. Take a look at the Traffic Learning screen to get familiar with it.
    With no suggestions selected, the right pane displays sections that facilitate the reviewer decision-making process. These include graphical charts that summarize policy activity, a summary of top violations in Reduce Potential False-positive Alerts, an enforcement readiness summary and a summary of suggestions to add new entity or delete an obsolete entity.
  3. To change the order in which the suggestions are listed, or refine what is included in the list, use the filters at the top of the column. Click the search icon to see basic and advanced filters.
  4. Review the learning suggestions as follows.
    1. Select a learning suggestion.
      Information is displayed about the action the system will take if you accept the suggestion, and what caused the suggestion.
    2. Select a suggestion to learn more about what caused it by looking at the action, the number of samples it is based on, the violations caused and their violation ratings, and if available, by examining samples of the requests that caused the suggestion.
    3. Select a request to view data about the request on the right, including any violations it generated, the contents of the request itself, and the response (if any).
      By examining the requests that caused a suggestion, you can determine whether it should be accepted.
    4. To add comments about the suggestion and the cause, click the Add Comment icon Add Comment icon to the right of the suggestion commands, and type the comments.
  5. Decide how to respond to the suggestion. You can start with the suggestions that have the highest learning scores, or those which you know to be valid for the application. These are the options.
    Option What happens
    Accept Suggestion The system modifies the policy by taking the suggested action, such as adding an entity that is legitimate. If the entity that triggered the suggestion can be placed in staging (file types, URLs, parameters, cookies, or redirection domains), clicking Accept Suggestion displays a second option, Accept suggestion and enable staging on Matched <<entity>>. Click this option to accept the suggestion and place the matched entity in staging.
    Delete Suggestion The system removes the learning suggestion, but the suggestion reoccurs if new requests cause it. The learning score of the suggestion starts over from zero in that case.
    Ignore Suggestion The system does not change the policy and stops showing this suggestion on the Traffic Learning screen now and in the future. You can view ignored suggestions by filtering by status ignored.
    Note: If you are working in automatic learning mode, when the learning score reaches 100%, the system can accept most of the suggestions if you selected the Learning Mode Auto-apply Policy, or you can accept suggestions manually at any time. If you are using manual learning, when the learning score reaches 100% (or before that if you know the suggestions are valid), you need to accept the suggestions manually.

    If you know that a suggestion is valid, you can accept it at any time even before the learning score reaches 100%. The ones that reach 100% have met all the conditions so that they are probably legitimate entities.

  6. To put the security policy changes into effect immediately, click Apply Policy.
By default, a security policy is put into an enforcement readiness period for seven days. During that time, you can examine learning suggestions and adjust the security policy making sure that users can access the application. The security policy then includes elements unique to your web application.
It is a good idea to periodically review the learning suggestions on the Traffic Learning screen to determine whether the violations are legitimate and caused by an attack, or if they are false positives that indicate a need to update the security policy. Typically, a wide recurrence of violations at some place in the policy (with a low violation rating and a high learning score) indicates that they might be false positives, and hence the policy should be changed so that they will not be triggered anymore. If the violations seem to indicate true attacks (for example, they have a high violation rating), the policy should stay as is, and you can review the violations that it triggered.

Learning suggestions you must handle manually

Some learning suggestions must be resolved manually even if you are using the Automatic Learning Mode to create a security policy. Suggestions typically require manual intervention if they may have a large impact on the policy or involve changing an attribute that was manually and deliberately set in the policy, such as a disallowed geolocation or a session ID in a URL. In these cases, the system does not change the policy unless you accept the suggestion manually.

You can easily see the suggestions that you need to resolve manually because they are marked with an icon on the Traffic Learning screen as shown in the figure. You can also use the advanced filter to view the suggestions the have Learning Mode set to Manual, and this would list the suggestions you need to resolve.

Manually resolvable suggestions

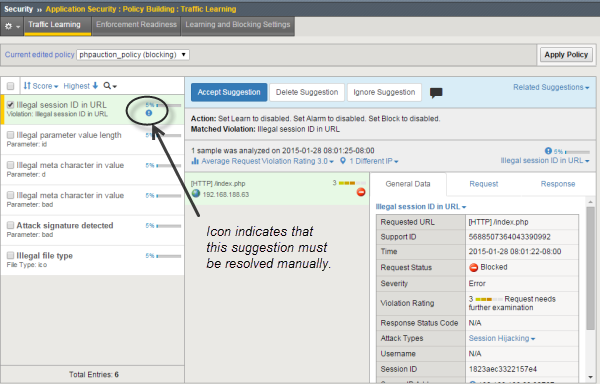
Suggestions that must be resolved manually

If you are using the Manual Learning Mode, you must resolve all of the suggestions manually.

Enforcing a security policy

You only need to enforce a security policy if it was created manually (not using automatic learning), and if it is operating in transparent mode. Traffic should be moving through Application Security Manager™, allowing users to access the web application for which you set up the security policy.
When you enforce a security policy, the system blocks requests that cause violations that are set to block.
  1. On the Main tab, click Security > Application Security > Policy Building > Learning and Blocking Settings .
    The Learning and Blocking Settings screen opens.
  2. In the Current edited security policy list near the top of the screen, verify that the security policy shown is the one you want to work on.
  3. For the Enforcement Mode setting, select Blocking.
  4. To see the Policy Building Settings, in the upper right corner, click Advanced.
  5. Review each of the Policy Building Settings so you understand how the security policy handles requests that cause the associated violations, and adjust if necessary. You need to expand most of the settings to see the violations.
    Tip: To the right of Policy Building Settings, click Blocking Settings to see and adjust all of the violations at once.
    Option What happens when selected
    Learn The system generates learning suggestions for requests that trigger the violation (except learning suggestions are not generated for requests that return HTTP responses with 400 or 404 status codes).
    Alarm When selected, the system marks requests that trigger the violation as illegal. The system also records illegal requests in the Charts screen, the system log (/var/log/asm), and possibly in local or remote logs (depending on the settings of the logging profile).
    Block The system blocks requests that trigger the violation when (1) the security policy is in the blocking enforcement mode, (2) a violation occurs, and (3) the entity is enforced. The system sends the blocking response page (containing a Support ID to identify the request) to the client.
  6. Click Save to save your settings.
  7. To put the security policy changes into effect immediately, click Apply Policy.
When the enforcement mode is set to blocking, the security policy no longer allows requests that cause violations set to block to reach the back-end resources. Instead, the security policy blocks the request, and sends the blocking response page to the client.