You can deploy Application Security Manager™ (ASM) with database security
products, such as IBM®
InfoSphere®
Guardium® to increase security visibility, receive alerts about suspicious
activity, and prevent attacks. When integrated with database security, ASM™
provides information about each HTTP request and database query to the database security
product's logging and reporting system. This allows the database security system to correlate the
web transaction with the database query to make a security assessment of the transaction.
Before you can integrate ASM with a database security product, the database security server
itself must have been configured, and be accessible from ASM. On the BIG-IP
®system, you specify the host name or IP address of the database security server. Then, you
enable database security integration for one or more security policies that are set up to protect
web application resources.
When using database security, Application Security Manager monitors web application traffic and
sends information about the users, the requests, and the reporting events to the database
security server. The following figure shows an example of how ASM can integrate with the IBM
InfoSphere Guardium Database Activity Monitoring Appliance.
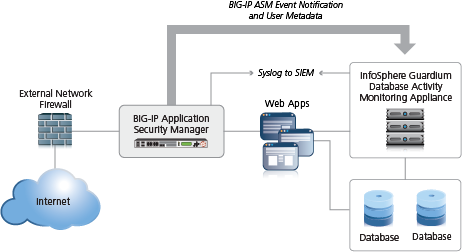
Integrating ASM with external database security example
The security policy can get user names from requests using login pages configured from within
ASM, or the policy can retrieve the user names from Access Policy
Manager® (APM). This implementation describes how to integrate with an
external database security server using login pages.
When using login pages for the application, you define the URLs, parameters, and validation
criteria required for users to log in to the application. User and session information is
included in the system logs so you can track a particular session or user. The system can log
activity, or block a user or session if either generates too many violations.
Task Summary
Creating a security policy automatically
Before you can create a security policy, you must perform the minimal system
configuration tasks including defining a VLAN, a self IP address, and other tasks required according to the needs of your
networking environment.
Application Security Manager™ can automatically create a security
policy that is tailored to secure your web application.
-
On the Main tab, click .
The Active Policies screen opens.
-
Click the Create button.
The Deployment wizard opens to the Select Local Traffic Deployment
Scenario screen.
-
For the Local Traffic Deployment Scenario setting,
specify a virtual server to use for the security policy.
- To secure an existing virtual server that has no security policy
associated with it, select Existing Virtual Server
and click Next.
- To create a new virtual server and pool with basic configuration
settings, select New Virtual Server and click
Next.
- To create an active but unused security policy, select Do not
associate with Virtual Server and click
Next. No traffic will go through this security
policy until you associate it with a virtual server. The Policy Builder
cannot begin automatically creating a policy until traffic is going to ASM
through the virtual server.
The virtual server represents the web application you want to protect.
The Configure Local Traffic Settings screen opens if you are adding a
virtual server. Otherwise, the Select Deployment Scenario screen
opens.
-
If you are adding a virtual server, configure the new or existing virtual
server, and click Next.
- If creating a new virtual server, specify the protocol, virtual server
name, virtual server destination address and port, pool member IP address
and port, and the logging profile.
- If using an existing virtual server, it must have an HTTP profile and
cannot be associated with a local traffic policy. Specify the protocol and
virtual server.
- If you selected Do not associate with Virtual
Server, you will have to manually associate the security
policy with a virtual server at a later time. On the policy properties
screen, you need to specify a name for the security policy.
The Select Deployment Scenario screen opens.
-
For Deployment Scenario, select Create a
security policy automatically and click
Next.
The Configure Security Policy Properties screen opens.
-
In the Security Policy Name field, type a name for the
policy.
-
From the Application Language list, select the language
encoding of the application, or use Auto detect and let
the system detect the language.
Important: You cannot change this setting after you have created the
security policy.
-
If the application is not case-sensitive, clear the Security Policy
is case sensitive check box. Otherwise, leave it selected.
Important: You cannot change this setting after you have created the
security policy.
-
If you do not want the security policy to distinguish between HTTP/WebSocket
and HTTPS/WebSocket Secure URLs, clear the Differentiate between
HTTP/WS and HTTPS/WSS URLs check box. Otherwise, leave it
selected.
-
Click Next.
The Configure Attack Signatures screen opens.
-
To configure attack signatures, move the systems used by your web application
from the Available Systems list into the
Assigned Systems list.
The system adds the attack signatures needed to protect the selected
systems.
-
For the Signature Staging setting, verify that the
default option Enabled is selected.
Note: Because ASM begins building the security policy in Blocking
mode, you can keep signature staging enabled so you can check whether
legitimate traffic is being stopped to reduce the chance of false
positives.
New and updated attack signatures remain in staging for 7 days, and are
recorded but not enforced (according to the learn, alarm, and block flags in the
attack signatures configuration) during that time.
-
Click Next.
The Configure Automatic Policy Building screen opens.
-
For Policy Type, select an option to determine the
security features to include in the policy.
Bulleted lists on the screen describe the exact security features that are
included in each type.
| Option |
Description |
|
Fundamental
|
Creates a robust security policy that is appropriate for most
applications. |
|
Enhanced
|
Creates a more specific security policy with additional
customization such as learning URLs, cookies, and content profiles;
includes tracking of user login sessions and brute force
protection. |
|
Comprehensive
|
Creates the most secure policy providing the greatest amount of
customization, including all the Enhanced features and more traffic
classification at the parameter and URL levels, dynamic parameters,
and CSRF URLs.
|
-
For the Policy Builder Learning Speed setting, select
how fast to generate suggestions for the policy.
| Option |
Description |
|
Fast
|
Use if your application supports a small number of requests from a
small number of sessions; for example, useful for web sites with less
traffic. Policy Builder requires fewer unique traffic samples to make
decisions in Automatic Learning Mode, or to reach a high learning score.
However, choosing this option may present a greater chance of adding
false entities to the security policy. |
|
Medium
|
Use if your application supports a medium number of requests, or if
you are not sure about the amount of traffic on the application web
site. This is the default setting. |
|
Slow
|
Use if your application supports a large number of requests from
many sessions; for example, useful for web sites with lots of traffic.
Policy Builder requires a large amount of unique traffic samples to make
decisions in Automatic Learning Mode, or to reach a high learning score.
This option creates the most accurate security policy, but it takes
Policy Builder longer to collect the statistics. |
Based on the option you select, the system sets greater or lesser values
for the number of different user sessions, different IP addresses, and length of
time before it adds suggestions to the security policy and if you are using
automatic learning, enforces the elements.
-
For Trusted IP Addresses, select which IP addresses to
consider safe:
| Option |
Description |
|
All
|
Specifies that the policy trusts all IP addresses. This option is
recommended for traffic in a corporate lab or preproduction environment
where all of the traffic is trusted. The policy is created faster when
you select this option. |
|
Address List
|
Specifies networks to consider safe. Fill in the IP
Address and Netmask fields, then
click Add. This option is typically used in a
production environment where traffic could come from untrusted sources.
The IP Address can be either an IPv4 or an IPv6 address. |
If you leave the trusted IP address list empty, the system treats all traffic
as untrusted. In general, it takes more untrusted traffic, from different IP
addresses, over a longer period of time to build a security policy.
-
If you want to display a response page when an AJAX request does not adhere to
the security policy, select the AJAX blocking response
behavior check box.
-
Click Next.
The Security Policy Configuration Summary opens where you can review the
settings to be sure they are correct.
-
Click Finish to create the security policy.
The Policy Properties screen opens.
ASM™ creates the virtual server with an HTTP profile (or
associates an existing one), and on the Security tab, Application Security
Policy is enabled and associated with the security policy you created. A
local traffic policy is also created and by default sends all traffic for the virtual
server to ASM. The Policy Builder automatically begins examining the traffic to the web
application and making suggestions for building the security policy (unless you did not
associate a virtual server). The system sets the enforcement mode of the security policy
to Blocking, but it does not block requests until the Policy Builder processes
sufficient traffic, adds elements to the security policy, and enforces the elements.
Tip: This is a good point at which to test that you can access the
application being protected by the security policy and check that traffic is being
processed correctly by the BIG-IP® system.


