Manual Chapter : Using Shun with Layer 7 DoS

Applies To:

Show Versions Show Versions

BIG-IP ASM

  • 12.1.6, 12.1.5, 12.1.4, 12.1.3, 12.1.2, 12.1.1, 12.1.0
Manual Chapter

Using Shun with Layer 7 DoS

Overview: Using Shun with Layer 7 DoS

Layer 7 DoS in Application Security Manager™ (ASM) is set up to automatically add IP addresses to a shun list (also called auto-blacklisting). The BIG-IP® system stops traffic that is thought to be causing a DoS attack, by adding it to a shun list for a limited time. L7 DoS maintains the shun list and auto-blacklisting works at Layer 7 when you configure an L7 DoS profile and attach it to a virtual server.

Furthermore, by integrating L7 DoS shun with an IP intelligence policy, the auto-blacklisting stops traffic at Layer 3 saving system resources. The auto-blacklisting works at Layer 3 when:
  • You configure an L7 DoS profile and an IP intelligence policy, and then associate both with a virtual server, and
  • You are using mitigations other than device ID or URL in the DoS profile.

The DoS profile you create should include all of the DoS mitigations you want to use for the application. For example, you could enable these protections:

  • Proactive Bot Defense with CAPTCHA challenge
  • Stress-based Detection with Request Blocking and Rate Limiting
  • Heavy URL Protection set to automatic detection

Source IP addresses that are thought to be causing a DoS attack based on the mitigations you configured fall into the category of application denial of service blacklist, for which the IP intelligence policy is configured to drop. Together, and using fewer resources, the DoS profile and IP intelligence policy protect the web application from DoS attacks.

Task Summary

About the DoS shun list

A shun list is a temporary list of IP addresses that have been sending lots of traffic that is failing 90%, or more, of the time. The failures occur as a result of any of the mitigation methods in use, including CAPTCHA, request blocking, client-side integrity defense, bot defense, and so on. The system creates a shun list of clients that repeatedly fail to respond to DoS JavaScript challenges, undergo high block ratios in rate limiting, or have been repeatedly handled by any of the other DoS mitigations. While these clients are on the shun list, all traffic they send is blocked.

Shun list features are set up using system variables. By default, the shun list is enabled, and clients remain on the list and are blocked for 120 seconds. The default value for the minimum ratio of successful responses to JavaScript challenges is 10% (to keep clients off the shun list). The minimum requests per second from a Clients being considered for the shun list must be sending a minimum of 10 requests per second. Advanced users can change the default values, if necessary, by adjusting the system variables from the command line.

Shun List system variables

The shun list is set up using system variables from the command line. These system variables are automatically set to reasonable values by default. Do not change these variables unless you are an advanced BIG-IP® system user.

Variable Default Value What It Specifies
dosl7d.shun_list enable Whether to use the shun list to block IP addresses.
dosl7d.min_challenge_success_ratio 10% The minimum percentage of good transactions per IP address (or else the system adds it to the shun list).
dosl7d.min_challenge_rps 10 The minimum requests per second before the system can apply shun mitigation.
dosl7d.shun_prevention_time 120 The time in seconds (from 1-1000) to keep the IP address on the shun list.
For example, to disable the shun list, type the command:
 (tmos)# modify sys db dosl7d.shun_list value disable

Configuring DoS protection for applications

You can configure Application Security Manager™ to protect against and mitigate DoS attacks, and increase system security.
  1. On the Main tab, click Security > DoS Protection > DoS Profiles .
    The DoS Profiles list screen opens.
  2. Click Create.
    The Create New DoS Profile screen opens.
  3. Under Profile Information, click General Settings, and in the Profile Name field, type the name for the profile.
  4. Under Application Security, click General Settings, then for Application Security, click Edit , and select the Enabled check box.
  5. To omit checking for DoS attacks on certain trusted addresses, edit the IP Address Whitelist setting:
    1. Click Edit.
    2. One at a time, type IP addresses or subnets that do not need to be examined for DoS attacks, and click Add.
    3. When you are done, click Close.
    Note: You can add up to 20 IP addresses.
  6. To set up DoS protection based on the country where a request originates, edit the Geolocations setting, selecting countries to allow or disallow.
    1. Click Edit.
    2. Move the countries for which you want the system to block traffic during a DoS attack into the Geolocation Blacklist.
    3. Move the countries that you want the system to allow (unless the requests have other problems) into the Geolocation Whitelist.
    4. Use the Stress-based or TPS-based Detection settings to select appropriate mitigations by geolocation in the How to detect attackers and which mitigation to use settings.
    5. When done, click Close.
  7. If you have written an iRule to specify how the system handles a DoS attack and recovers afterwards, enable the Trigger iRule setting.
  8. Click Finished to save the DoS profile.
You have created a DoS profile that provides basic DoS protection including TPS-based detection and heavy URL detection.
Next, consider configuring additional levels of DoS protection such as stress-based protection, proactive bot defense, and behavioral DoS. Look at the other options available under Application Security and adjust as needed. For example, if using geolocation, use the stress-based or TPS-based detection settings to select appropriate mitigations by geolocation in the How to detect attackers and which mitigation to use settings. Also, the DoS profile needs to be associated with a virtual server before it protects against DoS attacks.

Using an IP Intelligence policy with L7 DoS

You can create an IP intelligence policy that blocks traffic from IP addresses that are on the shun list because they are in a specific blacklist category. For IP addresses that were blocked originally as a result of DoS Layer 7 protections, this IP intelligence policy causes traffic from those IP addresses to be dropped temporarily.
  1. On the Main tab, click Security > Network Firewall > IP Intelligence > Policies .
    The IP Intelligence Policies screen opens.
  2. Click Create to create a new IP Intelligence policy.
  3. In the Name field, type a name for the IP intelligence profile, such as ip-intell-l7.
  4. Leave the Default Action list set to Drop.
  5. For Blacklist Matching Policy, specify the action for the application DoS category.
    1. For Blacklist Category, select application_denial_of_service.
    2. For Action, select Drop.
    3. For Log Blacklist Category Matches, select Yes.
    4. Click Add.
  6. Click Finished.
The IP intelligence policy now connects using the shun list at the IP level to problems discovered originally at the application level. This allows the system to slow down DoS attacks using fewer system resources.
The IP intelligence policy needs to be associated with a virtual server, or you can assign a global IP intelligence policy to all virtual servers.

Associating a DoS profile and IP intelligence policy with a virtual server

Before you can accomplish this task, you must first create a DoS profile in Application Security Manager™ (ASM) to protect your application. You also need an IP intelligence policy that tells the shun list to temporarily drop traffic from IP addresses that have been sending suspicious traffic.
You can add DoS protection and an IP intelligence policy to a virtual server to provide enhanced protection from DoS attacks, and use the shun list to recognize attackers.
  1. On the Main tab, click Local Traffic > Virtual Servers .
    The Virtual Server List screen opens.
  2. Click the virtual server that you want to have DoS protection and use the shun list.
  3. On the menu bar, from the Security menu, choose Policies.
  4. To specify the shun list action for Layer 7 DoS, from the IP Intelligence list, select Enabled, and then, from the Policy list, select the IP intelligence policy (for example, ip-intell-l7) to associate with the virtual server.
    You can also apply one IP intelligence policy at the global level that applies to all virtual servers on the system ( Security > Network Firewall > IP Intelligence ).
  5. To enable denial-of-service protection, from the DoS Protection Profile list, select Enabled, and then, from the Profile list, select the DoS profile to associate with the virtual server.
  6. Click Update to save the changes.
The application represented by the virtual server now has DoS protection, and uses the shun list. If ASM discovers lots of malicious traffic coming from one IP address, that IP address is added to the shun list. Traffic from that IP address is blocked immediately for two minutes (using the default value). After that, traffic from the IP address is allowed through to ASM and, if necessary, is handled by other DoS mitigations specified in the DoS profile. If problems still exist, the IP address is added back onto the shun list.

Viewing DoS transaction outcomes

Before you can look at DoS transaction outcomes, you need to have created a DoS profile so that the system is capturing the analytics on the BIG-IP® system. You must associate the DoS profile with one or more virtual servers.
You can display graphic charts that show transaction outcomes for DoS attacks on web applications that were detected on your system. The charts provide visibility into what caused the attack, IP addresses of the attackers, which applications are being attacked, and how the attacks are being mitigated.
  1. On the Main tab, click Security > Reporting > DoS > Application > Transaction Outcomes .
    The Transaction Outcomes screen opens and displays a graphical chart showing cumulative statistics about DoS attacks detected by the system.
  2. If you want to change the time frame for information shown in the chart, adjust the Display .. during settings.
    You can focus in on requests or responses only, and for the period of time you are interested in.
  3. To see the statistics for a specific time, point anywhere on the chart.
    Information about the transactions at that time pops up on the screen.
  4. If you want to view additional information, under the chart, from Drilldown to select the option for the details you want to see.
    For example, select Client IP Addresses to see the list of IP addresses involved in the attack, the number of transactions initiated by each one, and those which were valid, mitigated, and blocked.
  5. To view a report showing live traffic, click Open Real-Time Charts.
    A popup screen shows DoS statistics in real-time, and it is updated every 10 seconds.
By reviewing DoS Application Statistics, you can investigate the details of an attack. You can become more familiar with what caused the attacks, what applications are most vulnerable, and you see the mitigation methods that are in place. As a result of your investigation, you have more information to help you decide whether you need to tune the DoS configuration and add more protections, or change the thresholds in the DoS profile.
To get additional information if you are recording traffic during attacks, you can view the TCP dumps related to the DoS attacks in /shared/dosl7/tcpdumps.

Sample DoS shun block report

This figure shows a sample Transaction Outcomes report for a system on which there have been DoS attacks. Most of the attacks have been blocked because the IP addresses are on the shun list. This chart shows aggregated data and is updated every 5 minutes.

Sample DoS report with shun blocked traffic

To view current DoS statistics that are updated every 30 seconds, click Open Real-Time Charts.

Sample DoS report with shun blocked traffic

This figure shows a real-time chart with current DoS statistics that is updated every 30 seconds. Traffic that does not constitute a DoS attack is described as Passthrough. Some DoS attacks being mitigated using rate limiting and request blocking and are shown as DoS Blocked, others are on the shun list (requests from that IP address fail over 90% of the time), or did not respond to a JavaScript challenge (CS Integrity Mitigation).

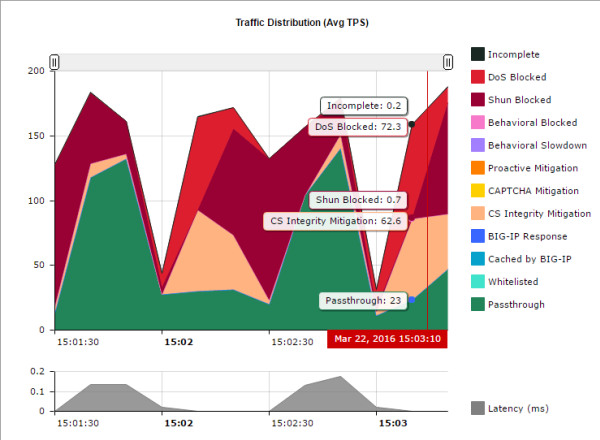
Sample real-time DoS report

Result of using shun list with Layer 7 DoS

Now you have associated both a DoS profile and an IP intelligence policy with the virtual server representing the application. Here's a general idea of what happens next:

  • A client is sending lots of traffic from one IP address to the web application.
  • Layer 7 DoS first inspects the traffic even before it gets to Application Security Manager™.
  • If the client is blocked more than 90% of the time and it is sending at least 10 requests per second, the client IP address is put on the shun list.
  • Traffic from the IP address on the shun list is blocked at the IP level (Layer 3) for two minutes.
  • After that, the IP address is removed from the shun list.
  • Traffic from the IP address is allowed through to L7 DoS where it is inspected according to the protections in the DoS profile.
  • If the traffic is successful more than 10% of the time, it is allowed and handled by L7 DoS. Otherwise, that IP address is added back onto the shun list.

If DoS mitigation is performed by URL or device ID, the IP addresses are not shunned at the IP level, but are shunned at Layer 7.