Applies To:
Show Versions
BIG-IP ASM
- 12.1.6, 12.1.5, 12.1.4, 12.1.3, 12.1.2, 12.1.1, 12.1.0
Detecting and Preventing Web Scraping
Overview: Detecting and preventing web scraping
Web scraping is a technique for extracting information from web sites that often uses automated programs, or bots (short for web robots), opening many sessions, or initiating many transactions. You can configure Application Security Manager™ (ASM) to detect and prevent various web scraping activities on the web sites that it is protecting.
ASM™ provides the following methods to address web scraping attacks. These methods can work independently of each other, or they can work together to detect and prevent web scraping attacks.
- Bot detection investigates whether a web client source is human by detecting human interaction events such as mouse movements and keyboard strokes, by detecting irregular sequences of those events, and by detecting rapid surfing.
- Session opening detects an anomaly when either too many sessions are opened from an IP address or when the number of sessions exceeds a threshold from an IP address. Also, session opening can detect an attack when the number of inconsistencies or session resets exceeds the configured threshold within the defined time period. This method also identifies as an attack an open session that sends requests that do not include an ASM cookie.
- Session transactions anomaly captures sessions that request too much traffic, compared to the average amount observed in the web application. This is based on counting the transactions per session and comparing that to the average amount observed in the web application.
- Fingerprinting captures information about browser attributes in order to identify a client. It is used when the system fails to detect web scraping anomalies by examining IP addresses, ASM cookies, or persistent device identification.
- Suspicious clients used together with fingerprinting, specifies how the system identifies and protects against potentially malicious clients; for example, by detecting scraper extensions installed in a browser.
- Persistent client identification prevents attackers from circumventing web scraping protection by resetting sessions and sending requests.
Task Summary
Prerequisites for configuring web scraping
For web scraping detection to work properly, you should understand the following prerequisites:
- The web scraping mitigation feature requires that the DNS server is on the DNS lookup server list so the system can verify the IP addresses of legitimate bots. Go to to see if the DNS lookup server is on the list. If not, add it and restart the system.
- Client browsers need to have JavaScript enabled, and support cookies for anomaly detection to work.
- Consider disabling response caching. If response caching is enabled, the system does not protect cached content against web scraping.
- The Application Security Manager™ does not perform web scraping detection on legitimate search engine traffic. If your web application has its own search engine, we recommend that you add it to the system. Go to , and add it to the list.
Adding allowed search engines
Allowed search engines
By default, Application Security Manager™ (ASM) allows requests from these well-known search engines and legitimate web robots:
- Ask (.ask.com)
- Baidu (.baidu.com, .baidu.jp)
- Bing (.msn.com)
- Google (.googlebot.com)
- Yahoo (.yahoo.net)
- Yandex (.yandex.com .yandex.net, .yandex.ru,)
You can add other search engines to the allowed search engine list; for example, if your web application uses an additional search engine. The list applies globally to all security policies on the system. ASM does not perform web scraping detection on traffic from any search engine listed.
Detecting web scraping based on bot detection
Detecting web scraping based on session opening
Detecting web scraping based on session transactions
Using fingerprinting to detect web scraping
Displaying web scraping event logs
Web scraping attack examples
This figure shows a Web Scraping Statistics event log on an Application Security Manager™ (ASM) system where several web scraping attacks, with different attack types, have occurred.
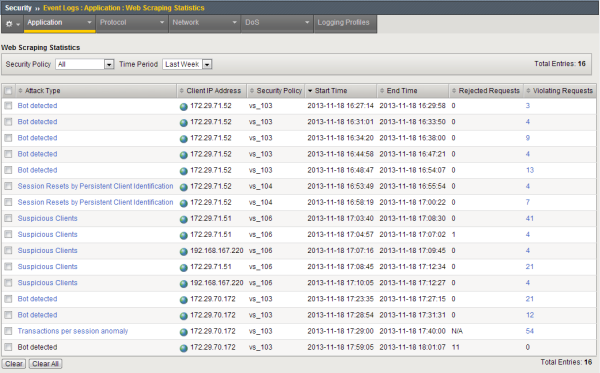
Web scraping statistics event log
The next figure shows details on a web scraping attack started on November 17 at 7:14PM. The attack type was Session Resets by Persistent Client Identification, and it occurred when the number of cookie deletions detected through the use of fingerprinting exceeded the configured threshold.

Example cookie deletion attack (fingerprinting)
The next figure shows details on a web scraping attack started on November 17 at 7:20PM. The attack type was Session Resets by Persistent Client Identification. It occurred when the number of cookie deletions detected through the use of persistent client identification exceeded the configured threshold (more than 2 in 4 seconds).
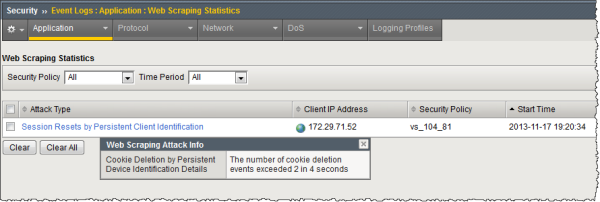
Example cookie deletion attack (persistent client ID)
The next figure shows details on a web scraping attack started on November 17 at 7:24PM. The attack type was Session Resets by Persistent Client Identification. It occurred when the number of integrity fault events detected through the use of persistent client identification exceeded the configured threshold (more than 3 in 25 seconds).

Example device ID integrity attack
The next figure shows details on a suspicious clients attack that occurred when a client installed the disallowed Scraper browser plug-in.

Example disallowed plug-in attack
Web scraping attack types
Web scraping statistics specify the attack type so you have more information about why the attack occurred. This shows the web scraping attack types that can display in the web scraping event log.
| Attack Type | Description |
|---|---|
| Bot activity detected | Indicates that there are more JavaScript injections than JavaScript replies.
Click the attack type link to display the detected injection ratio and the injection
ratio threshold.
Note: You cannot configure the Bot activity detected
ratio values. This attack type can occur only when the security policy is in
Transparent mode.
|
| Bot Detected | Indicates that the system suspects that the web scraping attack was caused by a web robot. |
| Session Opening Anomaly by IP | Indicates that the web scraping attack was caused by too many sessions being opened from one IP address. Click the attack type link to display the number of sessions opened per second from the IP address, the number of legitimate sessions, and the attack prevention state. |
| Session Resets by Persistent Client Identification | Indicates that the web scraping attack was caused by too many session resets or inconsistencies occurring within a specified time. Click the attack type link to display the number of resets or inconsistencies that occurred within a number of seconds. |
| Suspicious Clients | Indicates that the web scraping attack was caused by web scraping extensions on the browser. Click the attack type link to display the scraping extensions found in the browser. |
| Transactions per session anomaly | Indicates that the web scraping attack was caused by too many transactions being opened during one session. Click the attack type link to display the number of transactions detected on the session. |
Viewing web scraping statistics
Web scraping statistics chart
This figure shows a Web Scraping Statistics chart on an Application Security Manager™ (ASM) test system where many web scraping attacks occurred during a short period of time.
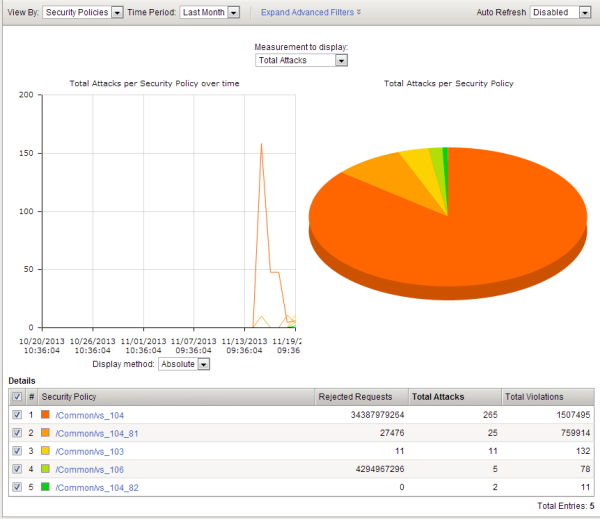
Web scraping statistics chart
You can use this chart to see the number of rejected requests, web scraping attacks, and total violations that occurred on the web applications protected using the five security policies listed at the bottom.
Implementation Result
When you have completed the steps in this implementation, you have configured the Application Security Manager™ to protect against web scraping. The system examines mouse and keyboard activity for non-human actions. Depending on your configuration, the system detects web scraping attacks based on bot detection, session opening violations, session transaction violations, and fingerprinting.
After traffic is flowing to the system, you can check whether web scraping attacks are being logged or prevented, and investigate them by viewing web scraping event logs and statistics.
If fingerprinting is enabled, the system uses browser attributes to help with detecting web scraping. If using fingerprinting with suspicious clients set to alarm and block, the system collects browser attributes and blocks suspicious requests using information obtained by fingerprinting. If you enabled event sequencing, the system looks for irregular event sequences to detect bots.
If you chose alarm and block for the web scraping configuration and the security policy is in the blocking operation mode, the system drops requests that cause the Web scraping detected violation. If you chose alarm only (or the policy is in the transparent mode), web scraping attacks are logged only but not blocked.


