Applies To:
Show Versions
BIG-IP APM
- 15.0.1, 15.0.0, 14.1.2, 14.1.0, 14.0.1, 14.0.0
BIG-IP Link Controller
- 15.0.1, 15.0.0, 14.1.2, 14.1.0, 14.0.1, 14.0.0
BIG-IP LTM
- 15.0.1, 15.0.0, 14.1.2, 14.1.0, 14.0.1, 14.0.0
BIG-IP DNS
- 15.0.1, 15.0.0, 14.1.2, 14.1.0, 14.0.1, 14.0.0
BIG-IP ASM
- 15.0.1, 15.0.0, 14.1.2, 14.1.0, 14.0.1, 14.0.0
Migration of Devices Running the Same Software Version
About migrating devices running the same software version
What is device migration?
Device migration enables you to replace the devices in a BIG-IP® device group running software version 12.1.3, or later, with newer devices running the same software version. It enables you to take an existing configuration on a device group's source device and easily replicate it on a target device.
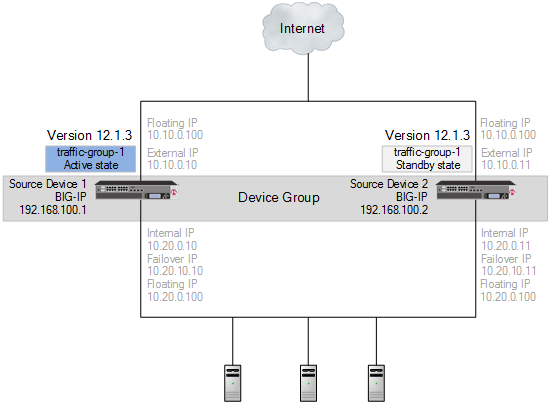
Source devices in a device group
Supported platforms
Supported source and target platforms include appliances, VIPRION® platforms, virtual edition (VE) devices, and vCMP® guests.
Configuration Dependencies
- Interfaces
- Interface bundles
- Management IP address
- Management route
Migration of a device group running the same software version
- For a device group, migration functionality reestablishes the device group with the target devices when you load an archive onto the second target device.
- During migration, do not make any additional configuration changes. Reconfiguration during migration can cause unexpected behavior.
- Devices run different software versions during migration, preventing normal config sync functionality until migration completes.
Step 1. Migrate source device 1 to target device 1.
- Prepare each source device in the device group.
- Create and save an archive for each device.
- Download an archive file for each device.
- Force source device 1 offline, and observe that source device 2 becomes active.
- Shut down source device 1.
- Install target device 1.
- Prepare target device 1.
- Upload the source device 1 archive, and load the archive onto the target device 1.
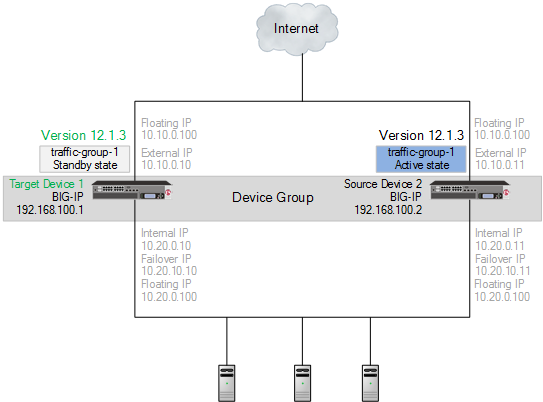
Migrated target device 1 in a device group
Step 2. Migrate source device 2 to target device 2.
- Force source device 2 offline, and observe that target device 1 becomes active.
- Shut down source device 2.
- Install target device 2.
- Prepare target device 2.
- Upload the source device 2 archive, and load the archive onto the target device 2, reestablishing the device group.
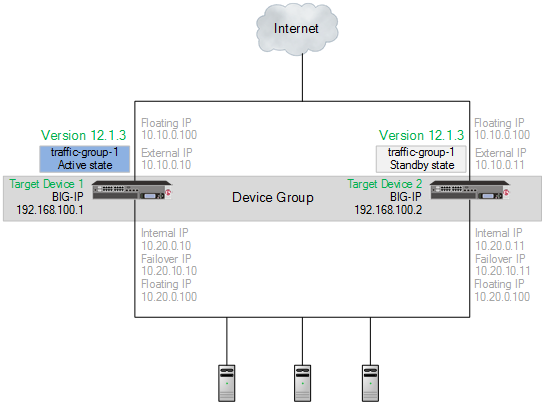
Migrated target device 1 and target device 2 in a device group
About migrating to a target device
You can easily take an existing configuration on a source device (appliance, VIPRION®, VE, or vCMP® guest) and replicate it on a target device (appliance, VIPRION, VE, or vCMP guest). The migration process includes the following steps:
- Prepare the source device
- Archive and download the UCS file
- Shut down the source device
- Set up the target device
- Upload the archived UCS file
- Load the archived UCS file onto the target device
For a device group, the migration functionality reestablishes the device group with the target devices when you load an archive onto the second target device.
Task Summary
Preparing a source device
Creating and saving an archive using the Configuration utility
Downloading a copy of an archive to a management workstation
Shutting down a source device
- For BIG-IP software version 11.x.x, type halt. When a message appears indicating that the device is halted, turn off the power.
- For BIG-IP software version 12.0.0, and later, type shutdown.
Installing a target device
Preparing a target device for migration
Uploading an archive from a management workstation
Loading an archive using tmsh
- Interfaces
- Interface bundles
- Management IP address
- Management route


