Manual Chapter : Configuring Cloud Interconnection for AWS

Applies To:

Show Versions Show Versions

BIG-IP AAM

  • 14.1.5, 14.1.2, 14.1.0, 14.0.1, 14.0.0, 13.1.5, 13.1.4, 13.1.3, 13.1.1, 13.1.0, 13.0.1, 13.0.0, 12.1.5, 12.1.4, 12.1.3, 12.1.2, 12.1.1, 12.1.0

BIG-IP APM

  • 14.1.5, 14.1.4, 14.1.3, 14.1.2, 14.1.0, 14.0.1, 14.0.0, 13.1.5, 13.1.4, 13.1.3, 13.1.1, 13.1.0, 13.0.1, 13.0.0, 12.1.6, 12.1.5, 12.1.4, 12.1.3, 12.1.2, 12.1.1, 12.1.0

BIG-IP LTM

  • 14.1.5, 14.1.4, 14.1.3, 14.1.2, 14.1.0, 14.0.1, 14.0.0, 13.1.5, 13.1.4, 13.1.3, 13.1.1, 13.1.0, 13.0.1, 13.0.0, 12.1.6, 12.1.5, 12.1.4, 12.1.3, 12.1.2, 12.1.1, 12.1.0

BIG-IP AFM

  • 14.1.5, 14.1.4, 14.1.3, 14.1.2, 14.1.0, 14.0.1, 14.0.0, 13.1.5, 13.1.4, 13.1.3, 13.1.1, 13.1.0, 13.0.1, 13.0.0, 12.1.6, 12.1.5, 12.1.4, 12.1.3, 12.1.2, 12.1.1, 12.1.0

BIG-IP DNS

  • 14.1.5, 14.1.4, 14.1.3, 14.1.2, 14.1.0, 14.0.1, 14.0.0, 13.1.5, 13.1.4, 13.1.3, 13.1.1, 13.1.0, 13.0.1, 13.0.0, 12.1.6, 12.1.5, 12.1.4, 12.1.3, 12.1.2, 12.1.1, 12.1.0

BIG-IP ASM

  • 14.1.5, 14.1.4, 14.1.3, 14.1.2, 14.1.0, 14.0.1, 14.0.0, 13.1.5, 13.1.4, 13.1.3, 13.1.1, 13.1.0, 13.0.1, 13.0.0, 12.1.6, 12.1.5, 12.1.4, 12.1.3, 12.1.2, 12.1.1, 12.1.0
Manual Chapter

Create connections for AWS in the Equinix portal

You must create virtual circuits over the dedicated links that are directly connected to the BIG-IP® systems.
  1. In the Equinix Cloud Exchange Portal, on the top toolbar, click Create Connection.
  2. Complete the fields.
    Option Description
    Metro The colo location where the BIG-IP systems will physically be located.
    Service AWS Direct Connect
    Virtual Circuit Name A name, for example aws_pri for the primary BIG-IP system in AWS.
    Buyer-side Port The primary BIG-IP system port.
    Buyer-side VLAN ID A tag you will use in a BIG-IP system. In this example, it is 3010.
    AWS Account ID In the AWS Management console, at the top right, click Support > Support Center . The account number displays at the top right.
  3. Click Create Virtual Circuit.
  4. Open the AWS Management Console and from the Services menu at the top of the screen, under Networking & Content Delivery, click Direct Connect.
  5. In the left pane, click Connections.
    Within a few minutes, the connection you created in Equinix should appear.
  6. Expand the connection to view details, and select the check box to accept the connection.
  7. Now return to the Equinix portal. From the menu at the top of the page, click Connections and expand your connection again.
  8. Click Accept Hosted Connection and enter your access key and secret key.
The state of the connection in AWS changes to available.
Now complete these steps for the secondary BIG-IP system.

Create a virtual interface in the AWS Management Console

AWS requires you to configure endpoints that the Direct Connections will terminate on. In AWS terminology, these are called virtual interfaces.
  1. Log in to the AWS Management Console (https://console.aws.amazon.com).
  2. On the home page, in the Networking & Content Delivery section, click Direct Connect.
  3. On the left pane, click Connections.
  4. In the Connections list, click the row to view the connection details.
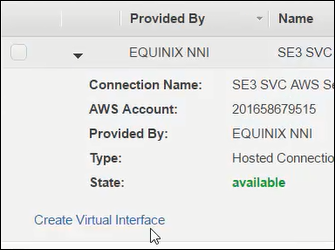
  5. Click the Create Virtual Interface link.
  6. Complete the settings. When an option is not listed here, you can accept the default setting.
    Option Description
    Connection The primary connection name and ID.
    Virtual Interface Name A name, for example aws_pri_vi.
    Auto-generate peer IPs
    Important: Clear this check box.
    Your router peer IP The AWS router address, for example, 172.16.1.9/30.
    Amazon router peer IP BIG-IP system's router address, for example, 172.16.1.10/30.
    BGP ASN You can use any valid BGP ASN number, for example, 22317.
  7. Click Continue.
    The screen displays the interfaces. After a few minutes, the state changes from pending to down.
  8. In the list of virtual interfaces, click the row to view the interface details.
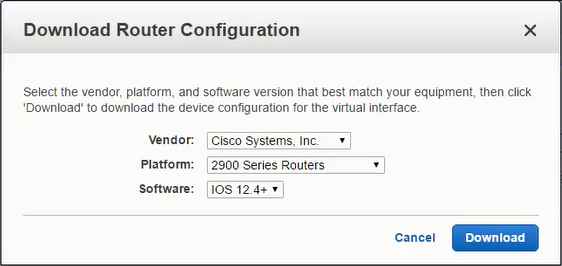
  9. Click the Download Router Configuration link.
  10. Accept the defaults and click Download.
    The file, for example, uswest2-<>-cgate_vi_secondary.txt, is downloaded.
  11. Open the file with a text editor and note the IP address and neighbor information. You will need this later for your BGP routing configuration.