Applies To:
Show Versions
BIG-IP LTM
- 13.0.1, 13.0.0
BIG-IP DNS
- 13.0.1, 13.0.0
Introducing DNSSEC
About DNSSEC
Domain Name System Security Extensions (DNSSEC) is an industry-standard protocol that functions as an extension to the Domain Name System (DNS) protocol. BIG-IP® DNS uses DNSSEC to guarantee the authenticity of DNS responses, including zone transfers, and to return Denial of Existence responses thus protecting your network against DNS protocol and DNS server attacks.
About DNSSEC keys
BIG-IP® DNS, formerly Global Traffic Manager™ (GTM™), uses two types of DNSSEC keys to return DNSSEC-compliant responses: a zone-signing key to sign all of the records in a DNSSEC resource record set, and a key-signing key to sign only the DNSKEY record (that is the zone-signing key) of a DNSSEC record set.
About enhancing DNSSEC key security
To enhance DNSSEC key security, when automatic key management is configured, BIG-IP® DNS uses an automatic key rollover process that uses overlapping generations of a key to ensure that BIG-IP DNS can always respond to queries with DNSSEC-compliant responses. BIG-IP DNS dynamically creates new generations of each key based on the values of the Rollover Period and Expiration Period of the key.
The first generation of a key has an ID of 0 (zero). Each time BIG-IP DNS dynamically creates a new generation of a key, the ID increments by one. Over time, each generation of a key overlaps the previous generation of the key ensuring that BIG-IP DNS can respond to a DNSSEC query even if one generation of a key becomes unavailable. When a generation of a key expires, BIG-IP DNS automatically removes that generation of the key from the configuration. The value of the TTL (time-to-live) of a key specifies how long a client resolver can cache the key.
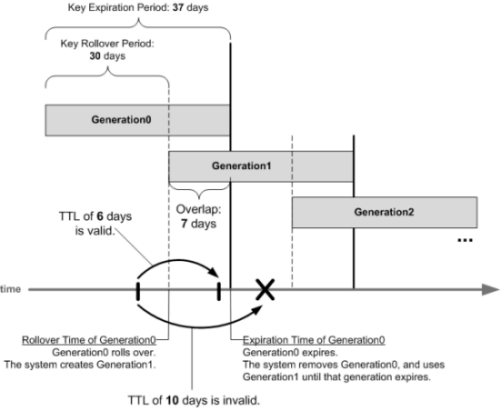
Overlapping generations of a key
How do I prepare for a manual rollover of a DNSSEC key?
When you create DNSSEC key-signing keys and DNSSEC zone-signing keys, it is important to create a disabled standby version of each key that has a similar name. When you associate both pairs of keys with the same zone, you can easily perform a manual rollover of the keys, should an enabled key become compromised.
About SEP records and DNSSEC
Each DNSSEC zone has a list of read-only Security Entry Point (SEP) records. The BIG-IP® DNS creates these records automatically when you create a zone. These SEP records consist of Delegation Signer (DS) and DNSKEY records.
Obtaining a trust or DLV anchor
About configuring DNSSEC
You can use BIG-IP® DNS to ensure that all responses to DNS-related traffic comply with the DNSSEC security protocol. To configure DNSSEC compliance, you create DNSSEC key-signing and zone-signing keys and a DNSSEC zone. Then you assign at least one enabled key-signing key and one enabled zone-signing key to the zone.
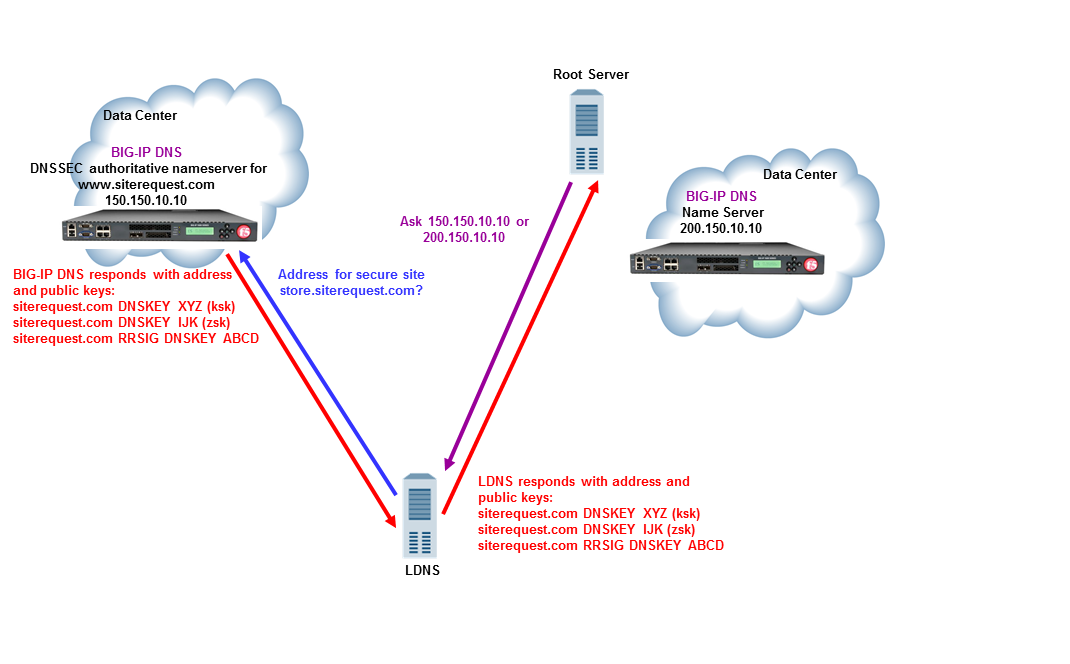
Traffic flow when BIG-IP DNS is the DNSSEC authoritative nameserver
About configuring basic DNSSEC
You can secure the DNS traffic handled by BIG-IP® DNS using the DNSSEC protocol.
Task summary
Perform these tasks to configure DNSSEC on BIG-IP DNS.Creating listeners to identify DNS traffic
Creating automatically managed DNSSEC zone-signing keys
Ensure that the time setting on BIG-IP® DNS is synchronized with the NTP servers on your network. This ensures that each BIG-IP DNS in a synchronization group is referencing the same time when generating keys.
Determine the values you want to configure for the rollover period, expiration period, and TTL of the keys, using the following criteria:
- The amount of time required to send the DS records for the zone to which this key is associated to the organization that manages the parent zone.
- The value of the rollover period must be greater than half the value of the expiration period, as well as less than the value of the expiration period.
- The difference between the values of the rollover and expiration periods must be more than the value of the TTL.
Creating manually managed DNSSEC zone-signing keys
Ensure that the time setting on BIG-IP® DNS is synchronized with the NTP servers on your network. This ensures that each BIG-IP DNS in a synchronization group is referencing the same time when generating keys.
When you plan to manually create keys, install the certificate and key pairs on the BIG-IP system, before you attempt to create DNSSEC keys.
Creating automatically managed DNSSEC key-signing keys
Ensure that the time setting on BIG-IP® DNS is synchronized with the NTP servers on your network. This ensures that each BIG-IP DNS in a synchronization group is referencing the same time when generating keys.
Determine the values you want to configure for the rollover period, expiration period, and TTL of the keys, using the following criteria:
- The amount of time required to send the DS records for the zone to which this key is associated to the organization that manages the parent zone.
- The value of the rollover period must be greater than half the value of the expiration period, as well as less than the value of the expiration period.
- The difference between the values of the rollover and expiration periods must be more than the value of the TTL.
Creating manually managed DNSSEC key-signing keys
Ensure that the time setting on BIG-IP® DNS is synchronized with the NTP servers on your network. This ensures that each BIG-IP DNS in a synchronization group is referencing the same time when generating keys.
When you plan to manually create keys, install the certificate and key pairs on the BIG-IP system, before you attempt to create DNSSEC keys.
Creating a DNSSEC zone
Confirming that BIG-IP DNS is signing DNSSEC records
About configuring DNSSEC with an external HSM
You can configure BIG-IP® DNS to use the DNSSEC protocol to secure the DNS traffic handled by BIG-IP DNS in conjunction with an external HSM system.
Task summary
Perform these tasks to configure DNSSEC on BIG-IP DNS.Creating listeners to identify DNS traffic
Creating automatically managed DNSSEC zone-signing keys for use with an external HSM
Ensure that the time setting on BIG-IP® DNS is synchronized with the NTP servers on your network. This ensures that each BIG-IP DNS in a synchronization group is referencing the same time when generating keys.
Determine the values you want to configure for the rollover period, expiration period, and TTL of the keys, using the following criteria:
- The amount of time required to send the DS records for the zone to which this key is associated to the organization that manages the parent zone.
- The value of the rollover period must be greater than half the value of the expiration period, as well as less than the value of the expiration period.
- The difference between the values of the rollover and expiration periods must be more than the value of the TTL.
Creating manually managed DNSSEC zone-signing keys for use with an external HSM
Ensure that the time setting on BIG-IP® DNS is synchronized with the NTP servers on your network. This ensures that each BIG-IP DNS in a synchronization group is referencing the same time when generating keys.
When you plan to manually create keys, install the certificate and key pairs on the BIG-IP system, before you attempt to create DNSSEC keys.
Creating automatically managed DNSSEC key-signing keys for use with an external HSM
Ensure that the time setting on BIG-IP® DNS is synchronized with the NTP servers on your network. This ensures that each BIG-IP DNS in a synchronization group is referencing the same time when generating keys.
Determine the values you want to configure for the rollover period, expiration period, and TTL of the keys, using the following criteria:
- The amount of time required to send the DS records for the zone to which this key is associated to the organization that manages the parent zone.
- The value of the rollover period must be greater than half the value of the expiration period, as well as less than the value of the expiration period.
- The difference between the values of the rollover and expiration periods must be more than the value of the TTL.
Creating manually managed DNSSEC key-signing keys for use with an external HSM
Ensure that the time setting on BIG-IP® DNS is synchronized with the NTP servers on your network. This ensures that each BIG-IP DNS in a synchronization group is referencing the same time when generating keys.
When you plan to manually create keys, install the certificate and key pairs on the BIG-IP system, before you attempt to create DNSSEC keys.
Creating a DNSSEC zone
Confirming that BIG-IP DNS is signing DNSSEC records
Configuring DNSSEC with an internal HSM
You can configure BIG-IP® DNS to use the DNSSEC protocol to secure the DNS traffic handled by BIG-IP DNS in conjunction with an internal HSM system.
Task summary
Perform these tasks to configure DNSSEC on BIG-IP DNS.Creating listeners to identify DNS traffic
Creating automatically managed DNSSEC zone-signing keys for use with an internal HSM
Ensure that the time setting on BIG-IP® DNS is synchronized with the NTP servers on your network. This ensures that each BIG-IP DNS in a synchronization group is referencing the same time when generating keys.
Determine the values you want to configure for the rollover period, expiration period, and TTL of the keys, using the following criteria:
- The amount of time required to send the DS records for the zone to which this key is associated to the organization that manages the parent zone.
- The value of the rollover period must be greater than half the value of the expiration period, as well as less than the value of the expiration period.
- The difference between the values of the rollover and expiration periods must be more than the value of the TTL.
Creating automatically managed DNSSEC key-signing keys for use with an internal HSM
Ensure that the time setting on BIG-IP® DNS is synchronized with the NTP servers on your network. This ensures that each BIG-IP DNS in a synchronization group is referencing the same time when generating keys.
Determine the values you want to configure for the rollover period, expiration period, and TTL of the keys, using the following criteria:
- The amount of time required to send the DS records for the zone to which this key is associated to the organization that manages the parent zone.
- The value of the rollover period must be greater than half the value of the expiration period, as well as less than the value of the expiration period.
- The difference between the values of the rollover and expiration periods must be more than the value of the TTL.
Creating a DNSSEC zone
Confirming that BIG-IP DNS is signing DNSSEC records
About DNSSEC signing of zone transfers
You can configure the BIG-IP® system to sign zone transfers using DNSSEC keys. With this configuration, the DNS nameservers (clients) requesting zone transfers can serve DNSSEC-signed responses to DNS queries.
The BIG-IP system manages the DNSSEC keys and signs the zone transfers even when external HSMs or FIPS cards are used in the configuration. With this configuration, the BIG-IP system must contain a DNSSEC zone with DNSSEC keys and a DNS zone with a list of DNS nameservers (clients) that can request zone transfers for the zone.
Example of DNS Express signing zone transfers with DNSSEC keys
In this figure, a zone is hosted on an authoritative DNS server, that is not secured with DNSSEC keys. An administrator at Site Request creates a DNS zone with a DNS Express™ server and a DNSSEC zone with DNSSEC keys. The name of both zones on the BIG-IP system match the name of the zone on the authoritative DNS server. The creation of the DNS zone initiates an unsigned zone transfer request from DNS Express to the authoritative DNS server that hosts the zone. The server responds with an unsigned zone transfer and the zone is loaded into DNS Express as an unsigned zone.
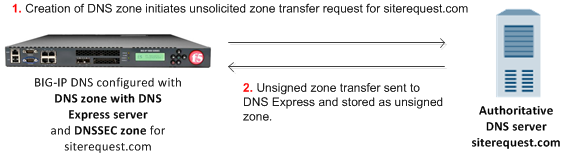
Unsigned DNS zone transfer to DNS Express
- Creation of DNS zone with DNS Express server initiates unsolicited zone transfer request from DNS Express to authoritative DNS server.
- DNS server responds with unsigned zone transfer to DNS Express, which loads the zone, and stores it as an unsigned zone.
In this figure, when the zone is updated, the zone transfer from the server to DNS Express is unsigned. The zone is stored in DNS Express as an unsigned zone. However, when the BIG-IP system receives a zone transfer request, the system signs the zone transfer using DNSSEC keys and sends the signed zone transfer to a DNS nameserver (client).
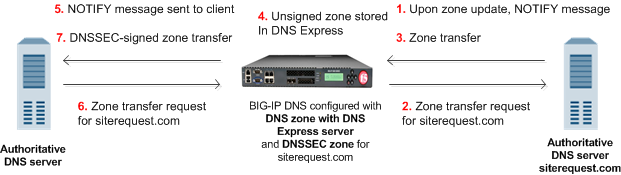
BIG-IP responds to zone transfer request with DNSSEC-signed response
- When a zone update occurs, DNS server sends NOTIFY message to DNS Express.
- DNS Express sends zone transfer request to DNS server.
- DNS server responds with zone transfer to DNS Express
- DNS Express stores unsigned zone.
- DNS Express sends NOTIFY to DNS nameserver client.
- Client sends zone transfer request to DNS Express.
- DNS Express responds with DNSSEC-signed zone transfer.
Example of DNS zone proxy with DNSSEC
In this figure, a zone is hosted on an authoritative DNS server, that is not secured with DNSSEC. The BIG-IP® system is configured with both a DNS zone and a DNSSEC zone that match the zone name on the server. The system can forward zone transfer requests to the DNS server, and then sign the response with DNSSEC keys, before sending the response to the client (authoritative DNS nameservers (clients) and cloud providers). This allows the clients and cloud providers to serve DNSSEC-signed DNS queries and responses.
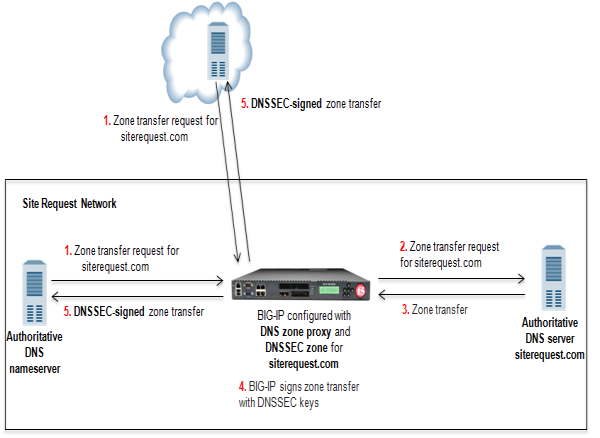
The BIG-IP system configured with DNS zone proxy and DNSSEC zone
- DNS nameserver (client) sends zone transfer request for a DNS zone.
- The BIG-IP system forwards the request to the authoritative DNS server.
- DNS server answers with zone transfer.
- The BIG-IP system signs the zone transfer with DNSSEC keys.
- The BIG-IP system sends the DNSSEC-signed zone transfer to the client that made the request.
Example of BIG-IP load balancing zone transfer request to pool of DNS servers and returning DNSSEC-signed zone transfer
In this figure, a zone is hosted on a pool of authoritative DNS servers. The servers are not secured with DNSSEC. The BIG-IP® system is configured with both a DNS zone and a DNSSEC zone that match the zone name on the servers. The BIG-IP system can forward zone transfer requests to a pool member, and then sign the response with DNSSEC keys, before sending the DNSSEC-signed zone transfer to the client (authoritative DNS nameserver or cloud provider). This allows the clients and cloud providers to serve DNSSEC-signed DNS queries and responses.
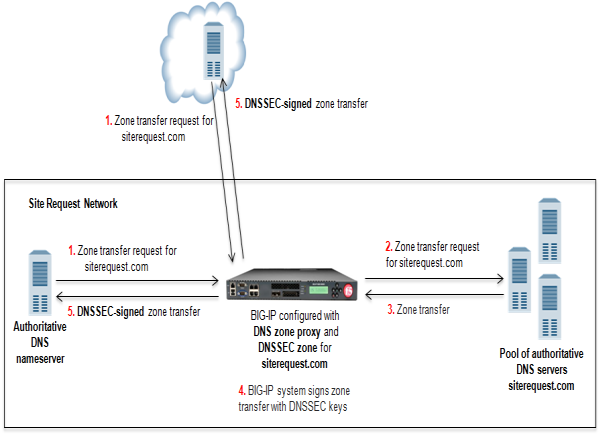
BIG-IP load balancing zone transfer request to pool member and returning DNSSEC-signed zone transfer
- DNS nameserver (client) or cloud provider sends zone transfer request for a DNS zone.
- BIG-IP forwards the request to a member of the pool of authoritative DNS servers that host the zone.
- The pool member responds with a zone transfer.
- BIG-IP signs the zone transfer with DNSSEC keys.
- BIG-IP sends the DNSSEC-signed zone transfer to the client that made the request.
Task summary
To configure the BIG-IP® system to sign zone transfers using DNSSEC keys, perform these tasks:
Enabling BIG-IP to respond to zone transfer requests
Enabling a DNS listener to process DNSSEC traffic
Creating automatically managed DNSSEC zone-signing keys
Ensure that the time setting on BIG-IP® DNS is synchronized with the NTP servers on your network. This ensures that each BIG-IP DNS in a synchronization group is referencing the same time when generating keys.
Determine the values you want to configure for the rollover period, expiration period, and TTL of the keys, using the following criteria:
- The amount of time required to send the DS records for the zone to which this key is associated to the organization that manages the parent zone.
- The value of the rollover period must be greater than half the value of the expiration period, as well as less than the value of the expiration period.
- The difference between the values of the rollover and expiration periods must be more than the value of the TTL.
Creating manually managed DNSSEC zone-signing keys
Ensure that the time setting on BIG-IP® DNS is synchronized with the NTP servers on your network. This ensures that each BIG-IP DNS in a synchronization group is referencing the same time when generating keys.
When you plan to manually create keys, install the certificate and key pairs on the BIG-IP system, before you attempt to create DNSSEC keys.
Creating automatically managed DNSSEC key-signing keys
Ensure that the time setting on BIG-IP® DNS is synchronized with the NTP servers on your network. This ensures that each BIG-IP DNS in a synchronization group is referencing the same time when generating keys.
Determine the values you want to configure for the rollover period, expiration period, and TTL of the keys, using the following criteria:
- The amount of time required to send the DS records for the zone to which this key is associated to the organization that manages the parent zone.
- The value of the rollover period must be greater than half the value of the expiration period, as well as less than the value of the expiration period.
- The difference between the values of the rollover and expiration periods must be more than the value of the TTL.
Creating manually managed DNSSEC key-signing keys
Ensure that the time setting on BIG-IP® DNS is synchronized with the NTP servers on your network. This ensures that each BIG-IP DNS in a synchronization group is referencing the same time when generating keys.
When you plan to manually create keys, install the certificate and key pairs on the BIG-IP system, before you attempt to create DNSSEC keys.
Creating a DNSSEC zone
Adding nameserver objects that represent DNS servers
Adding nameserver objects that represent DNS nameservers (clients)
Configuring a DNS zone to answer zone transfer requests
Viewing DNSSEC zone statistics
You can view information about the zones that are protected by DNS Express™.
Troubleshooting DNSSEC on the BIG-IP system
On BIG-IP® DNS, you can view DNSSEC records in ZoneRunner™, access and view DNSSEC SEP Records, and modify generations of a DNSSEC key.


