Applies To:
Show Versions
BIG-IP LTM
- 13.1.5, 13.1.4, 13.1.3, 13.1.1, 13.1.0
BIG-IP DNS
- 13.1.5, 13.1.4, 13.1.3, 13.1.1, 13.1.0
Overview: Using caching to improve DNS performance
You can configure a DNS cache on the BIG-IP® system to allow the system to more quickly respond to repeated DNS queries. You can configure a simple DNS cache or a DNS cache with more advanced resolving and validation functions. There are three types of DNS cache configurations available on the BIG-IP system: a transparent cache, a resolver cache, and a validating resolver cache.
Typically, you configure a resolver cache where the BIG-IP system either acts as the LDNS for clients or is in the LDNS resolver path for clients. By caching DNS responses and answering queries from the cache, the BIG-IP system is able to immediately respond to subsequent client requests for the same resource. This enhances DNS performance in two significant ways. First, answering a DNS query from the cache is faster and has a very short latency, because the sooner a client gets a DNS response, the faster the client can access the Internet resource. Secondly, caching DNS responses reduces the number of queries that have to be resolved. The BIG-IP system uses the cache to resolve the same query from multiple clients handling many more queries per second than a typical DNS resolver.
About the transparent DNS cache
You can configure a transparent cache on the BIG-IP® system to use external DNS resolvers to resolve queries, and then cache the responses from the resolvers. The next time the system receives a query for a response that exists in the cache, the system immediately returns the response from the cache. The transparent cache contains messages and resource records.
A transparent cache in the BIG-IP system consolidates content that would otherwise be cached across multiple external resolvers. When a consolidated cache is in front of external resolvers (each with their own cache), it can produce a much higher cache hit percentage.
F5 Networks recommends that you configure the BIG-IP system to forward queries, which cannot be answered from the cache, to a pool of local DNS servers rather than the local BIND instance because BIND performance is slower than using multiple external resolvers.
About the resolver DNS cache
You can configure a resolver cache on the BIG-IP® system to resolve DNS queries and cache the responses. The next time the system receives a query for a response that exists in the cache, the system returns the response from the cache. The resolver cache contains messages, resource records, and the nameservers the system queries to resolve DNS queries.
It is important for network architects to note that it is possible to configure the local BIND instance on the BIG-IP® system to act as an external DNS resolver. However, F5 Networks does not recommend this approach, because the performance of BIND is slower than using a resolver cache.
About the validating resolver DNS cache
You can configure a validating resolver cache on the BIG-IP® system to recursively query public DNS servers, validate the identity of the DNS server sending the responses, and then cache the responses. The next time the system receives a query for a response that exists in the cache, the system returns the DNSSEC-compliant response from the cache. The validating resolver cache contains messages, resource records, the nameservers the system queries to resolve DNS queries, and DNSSEC keys.
Using the validating resolver cache, the BIG-IP system mitigates cache poisoning by validating DNS responses using DNSSEC validation. This is important, because attackers can attempt to populate a DNS cache with erroneous data that redirects clients to fake web sites, or downloads malware and viruses to client computers. When an authoritative server signs a DNS response, the validating resolver verifies the data before entering the data into the cache. Additionally, the validating resolver cache includes a built-in filter and detection mechanism that rejects unsolicited DNS responses.
About information stored in DNS caches
The transparent, resolver, and validating resolver DNS caches contain a message cache and a resource record cache. The resolver and validating resolver DNS caches also contain a nameserver cache. Additionally, the validating resolver cache contains a key cache.
- Message cache
- The message cache contains the entire contents of a particular DNS response including the supporting records.
- Resource Record cache
- The resource record cache contains the individual record elements in the DNS response, which may include an SOA record, DNSSEC key records, glue records, and other supporting records.
- Nameserver cache
- The nameserver cache contains information about the public DNS nameservers the resolver has used to fill the cache. Often there is more than one nameserver that is listed as an authority for a zone; therefore, the cache entries track metrics for the nameservers so that the system can send new queries to the best nameserver. The cache entries include metrics, such as time to live (TTL), round trip times (RRT), and properties, such as EDNS support and zone lameness.
- Key cache
- The key cache contains the DNSKEY resource records and tracks the DNSSEC keys for use in DNSSEC validation. This cache also contains information about the validity of the DNSSEC keys.
Configuring DNS cache global settings
Overview: Caching responses from external resolvers
You can configure a transparent cache on the BIG-IP® system to use external DNS resolvers to resolve queries, and then cache the responses from the resolvers. The next time the BIG-IP system receives a query for a response that exists in the cache, the system immediately returns the response from the cache. The transparent cache contains messages and resource records.
A transparent cache in the BIG-IP system consolidates content that would otherwise be cached across multiple external resolvers. When a consolidated cache is in front of external resolvers (each with their own cache), it can produce a much higher cache hit percentage.
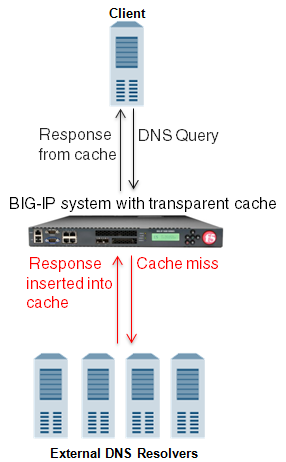
BIG-IP system using transparent cache
Task summary
Creating a transparent DNS cache
Enabling transparent DNS caching
Creating a custom DNS monitor
Creating a pool of local DNS servers
Determining DNS cache performance
Viewing records in a DNS cache
Viewing DNS cache statistics
Viewing DNS cache statistics using tmsh
Managing transparent cache size
Clearing a DNS cache
Clearing groups of records from a DNS cache
Clearing specific records from a DNS cache using tmsh
Overview: Resolving queries and caching responses
You can configure the BIG-IP® system to resolve DNS queries and cache the responses by creating a resolver DNS cache. The next time the BIG-IP system receives a query for a response that exists in the cache, the system returns the response from the cache. The resolver cache contains messages, resource records, and the nameservers the system queries to resolve DNS queries.
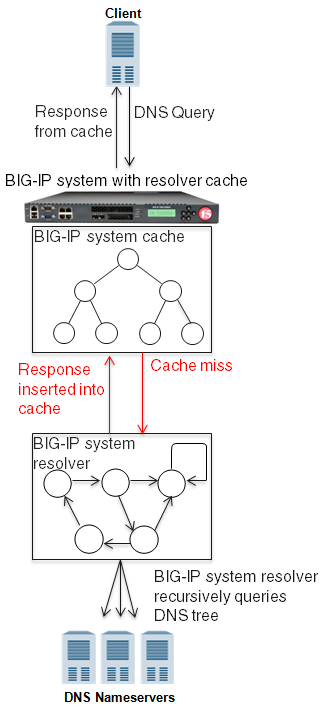
BIG-IP system using resolver cache
Task summary
Creating a resolver DNS cache
Enabling resolving and caching
Determining DNS cache performance
Viewing records in a DNS cache
Viewing DNS cache statistics
Viewing DNS cache statistics using tmsh
Managing cache size
Clearing a DNS cache
Clearing groups of records from a DNS cache
Clearing specific records from a DNS cache using tmsh
Overview: Resolving queries and caching validated responses
You can configure the BIG-IP® system to recursively query public DNS servers, validate the identity of the DNS server sending the responses, and then cache the responses. You do this by configuring a validating resolver cache on the system. The next time the BIG-IP system receives a query for a response that exists in the cache, the system returns the DNSSEC-compliant response from the cache. The validating resolver cache contains messages, resource records, the nameservers the system queries to resolve DNS queries, and DNSSEC keys.
Using the validating resolver cache, the BIG-IP system mitigates cache poisoning by validating DNS responses using DNSSEC validation. This is important, because attackers can attempt to populate a DNS cache with erroneous data that redirects clients to fake web sites, or downloads malware and viruses to client computers. When an authoritative server signs a DNS response, the validating resolver verifies the data before entering the data into the cache. Additionally, the validating resolver cache includes a built-in filter and detection mechanism that rejects unsolicited DNS responses.
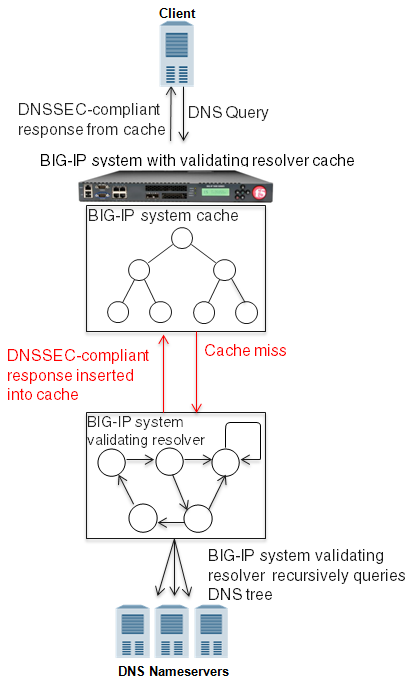
BIG-IP system using validating resolver cache
Task summary
Creating a validating resolver DNS cache
About SEP records and DNSSEC
Each DNSSEC zone has a list of read-only Security Entry Point (SEP) records. The BIG-IP® DNS creates these records automatically when you create a zone. These SEP records consist of Delegation Signer (DS) and DNSKEY records.
Obtaining a trust or DLV anchor
Adding a trust anchor to a validating resolver DNS cache
Adding a DLV anchor to a validating resolver DNS cache
Enabling validating resolver DNS caching
Determining DNS cache performance
Viewing records in a DNS cache
Viewing DNS cache statistics
Viewing DNS cache statistics using tmsh
Managing cache size
Clearing a DNS cache
Clearing groups of records from a DNS cache
Clearing specific records from a DNS cache using tmsh
Overview: Resolving queries for local zones with authoritative responses
You can configure a transparent, resolver, or validating resolver DNS cache with local zones. Use this configuration when you want the BIG-IP® system to resolve queries for small local zones with authoritative responses.
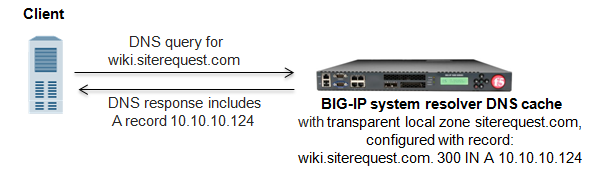
Successful DNS query resolution from transparent local zone
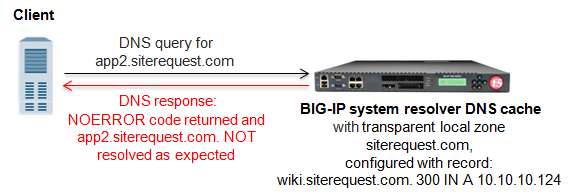
Failed DNS query resolution from transparent local zone
About local zones
A local zone contains resource records that a DNS cache uses to resolve matching DNS queries with authoritative DNS responses. The Type attribute of the local zone determines how the cache handles a DNS query that does not match the local zone.
Adding local zones to a DNS cache
Determine which local zones and associated resource records you want the BIG-IP system to respond to with authoritative DNS responses.
Overview: Forwarding specific DNS queries to specific nameservers
You can configure a resolver or validating resolver DNS cache with forward zones. Do this configuration when you want the BIG-IP® system to forward DNS queries that match the forward zones to specific nameservers, which resolve the query when the cache does not contain a response.
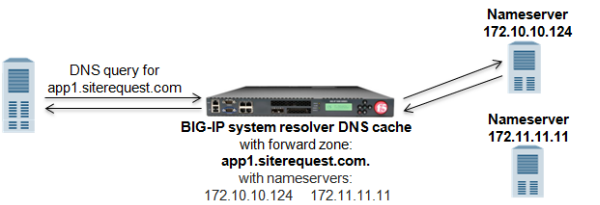
Successful DNS query resolution from forward zone
About forward zones
A DNS cache forward zone resolves matching DNS queries by obtaining answers from one of the recursive nameservers associated with the forward zone. When the BIG-IP® system receives a query that cannot be resolved from the cache, the system forwards the query to a nameserver associated with the matching forward zone. When the nameserver returns a response, the BIG-IP system caches the response, and returns the response to the resolver making the query.
Longest match
The BIG-IP system matches a DNS query with a forward zone based on longest match. For example, the network administrator for Site Request, configures two forward zones. download.siterequest.com. is configured with two nameservers with the IP addresses 172.27.5.1 and 172.27.7.247. app1.siterequest.com. is configured with two nameservers with the IP addresses 10.10.5.5 and 11.11.5.7. A query for product.download.siterequest.com. matches the forward zone download.siterequest.com and a query for ftp.appl1.siterequest.com. matches the forward zone app1.siterequest.com.
Selecting a nameserver
When a forward zone is configured with more than one nameserver, the BIG-IP system forwards the first query to a randomly selected nameserver, and records the round trip time (RTT) of a successful response. If the first nameserver does not return a response, the BIG-IP system forwards the query to a different nameserver and records the RTT of a successful response. After that, the system always sends a query to the nameserver with the fastest RTT. If none of the nameservers return a response, or the RTT exceeds 120 seconds, the BIG-IP system returns a SERVFAIL response to the resolver making the query.
Task summary
Perform these tasks to configure the BIG-IP® system to forward DNS queries to specific DNS servers.
Adding forward zones to a DNS cache
Gather the IP addresses of the nameservers that you want to associate with a forward zone.
Deleting forward zones from a DNS cache
Changing the nameservers associated with a forward zone
Viewing statistics about DNS cache forward zones
Overview: Forwarding specific DNS queries to a pool of DNS servers
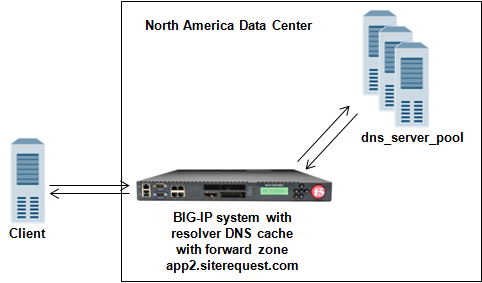
Successful DNS query resolution from pool of DNS servers associated with a forward zone
Task summary
Creating a custom DNS monitor
Creating a pool of local DNS servers
Creating a resolver DNS cache
Enabling resolving and caching
Creating listeners that alert BIG-IP DNS to DNS queries for a pool of DNS servers
Configuring a forward zone with a listener that load balances DNS queries
Overview: Customizing a DNS cache
You can customize a DNS cache on the BIG-IP® system to meet specific network needs by changing the default values on the DNS cache settings.


