Manual Chapter : Configuring Remote High-Speed Logging of CGNAT Processes

Applies To:

Show Versions Show Versions

BIG-IP AAM

  • 13.1.5, 13.1.4, 13.1.3, 13.1.1, 13.1.0

BIG-IP APM

  • 13.1.5, 13.1.4, 13.1.3, 13.1.1, 13.1.0

BIG-IP Link Controller

  • 13.1.5, 13.1.4, 13.1.3, 13.1.1, 13.1.0

BIG-IP Analytics

  • 13.1.5, 13.1.4, 13.1.3, 13.1.1, 13.1.0

BIG-IP LTM

  • 13.1.5, 13.1.4, 13.1.3, 13.1.1, 13.1.0

BIG-IP AFM

  • 13.1.5, 13.1.4, 13.1.3, 13.1.1, 13.1.0

BIG-IP PEM

  • 13.1.5, 13.1.4, 13.1.3, 13.1.1, 13.1.0

BIG-IP DNS

  • 13.1.5, 13.1.4, 13.1.3, 13.1.1, 13.1.0

BIG-IP ASM

  • 13.1.5, 13.1.4, 13.1.3, 13.1.1, 13.1.0
Manual Chapter

Overview: Configuring remote high-speed logging for CGNAT

You can configure the BIG-IP® system to log information about carrier-grade network address translation (CGNAT) processes and send the log messages to remote high-speed log servers.

This illustration shows the association of the configuration objects for remote high-speed logging of CGNAT processes.

Associations between CGNAT remote high-speed logging configuration objects

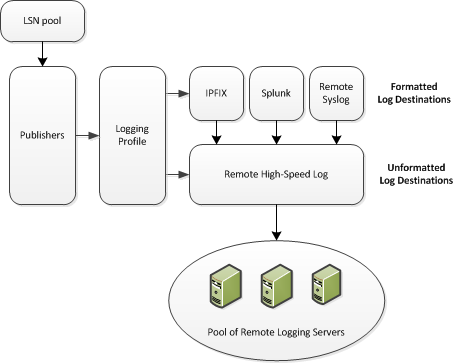
Association of remote high-speed logging configuration objects

Task summary

Perform these tasks to configure remote high-speed logging of CGNAT processes on the BIG-IP system.
Note: Enabling remote high-speed logging impacts BIG-IP system performance.

About the configuration objects of high-speed logging

When configuring remote high-speed logging (HSL) of CGNAT processes, it is helpful to understand the objects you need to create and why, as described here:

Object Reason Applies to
Pool of remote log servers Create a pool of remote log servers to which the BIG-IP® system can send log messages. Creating a pool of remote logging servers.
Destination (formatted) Create log destination to format the logs in the required format and forward the logs to a remote high-speed log destination. Creating a formatted remote high-speed log destination.
Publisher Create a log publisher to send logs to a set of specified log destinations. Creating a publisher.
Logging Profile (optional) Create a logging profile to configure logging options for various large scale NAT (LSN) events. The options apply to all HSL destinations. Creating a LSN logging profile.
LSN pool Associate an LSN pool with a logging profile and log publisher in order to log messages about the traffic that uses the pool. Configuring an LSN pool.

Creating a pool of remote logging servers

Before creating a pool of log servers, gather the IP addresses of the servers that you want to include in the pool. Ensure that the remote log servers are configured to listen to and receive log messages from the BIG-IP® system.
Create a pool of remote log servers to which the BIG-IP system can send log messages.
  1. On the Main tab, click the applicable path.
    • DNS > Delivery > Load Balancing > Pools
    • Local Traffic > Pools
    The Pool List screen opens.
  2. Click Create.
    The New Pool screen opens.
  3. In the Name field, type a unique name for the pool.
  4. Using the New Members setting, add the IP address for each remote logging server that you want to include in the pool:
    1. Type an IP address in the Address field, or select a node address from the Node List.
    2. Type a service number in the Service Port field, or select a service name from the list.
      Note: Typical remote logging servers require port 514.
    3. Click Add.
  5. Click Finished.

Creating a remote high-speed log destination

Before creating a remote high-speed log destination, ensure that at least one pool of remote log servers exists on the BIG-IP® system.

Create a log destination of the Remote High-Speed Log type to specify that log messages are sent to a pool of remote log servers.

  1. On the Main tab, click System > Logs > Configuration > Log Destinations .
    The Log Destinations screen opens.
  2. Click Create.
  3. In the Name field, type a unique, identifiable name for this destination.
  4. From the Type list, select Remote High-Speed Log.
    Important: If you use log servers such as Remote Syslog, Splunk, or IPFIX, which require data be sent to the servers in a specific format, you must create an additional log destination of the required type, and associate it with a log destination of the Remote High-Speed Log type. This allows the BIG-IP system to send data to the servers in the required format.
    The BIG-IP system is configured to send an unformatted string of text to the log servers.
  5. From the Pool Name list, select the pool of remote log servers to which you want the BIG-IP system to send log messages.
  6. From the Protocol list, select the protocol used by the high-speed logging pool members.
  7. Click Finished.

Creating a formatted remote high-speed log destination

Ensure that at least one remote high-speed log destination exists on the BIG-IP® system.

Create a formatted logging destination to specify that log messages are sent to a pool of remote log servers, such as Remote Syslog, Splunk, or IPFIX servers.

  1. On the Main tab, click System > Logs > Configuration > Log Destinations .
    The Log Destinations screen opens.
  2. Click Create.
  3. In the Name field, type a unique, identifiable name for this destination.
  4. From the Type list, select a formatted logging destination, such as Remote Syslog, Splunk, or IPFIX.
    The Splunk format is a predefined format of key value pairs.
    The BIG-IP system is configured to send a formatted string of text to the log servers.
  5. If you selected Remote Syslog, then from the Syslog Format list select a format for the logs, and then from the High-Speed Log Destination list, select the destination that points to a pool of remote Syslog servers to which you want the BIG-IP system to send log messages.
    Important: For logs coming from Access Policy Manager® (APM®), only the BSD Syslog format is supported.
  6. If you selected Splunk or IPFIX, then from the Forward To list, select the destination that points to a pool of high-speed log servers to which you want the BIG-IP system to send log messages.
  7. Click Finished.

Creating a publisher

Ensure that at least one destination associated with a pool of remote log servers exists on the BIG-IP® system.
Create a publisher to specify where the BIG-IP system sends log messages for specific resources.
  1. On the Main tab, click System > Logs > Configuration > Log Publishers .
    The Log Publishers screen opens.
  2. Click Create.
  3. In the Name field, type a unique, identifiable name for this publisher.
  4. For the Destinations setting, select a destination from the Available list, and click << to move the destination to the Selected list.
    Note: If you are using a formatted destination, select the destination that matches your log servers, such as Remote Syslog, Splunk, or IPFIX.
    Important: If you configure a log publisher to use multiple logging destinations, then, by default, all logging destinations must be available in order to log to each destination. Unless all logging destinations are available, no logging can occur. If you want to log to the available logging destinations when one or more destinations become unavailable, you must set the logpublisher.atomic db variable to false.
  5. Click Finished.

Creating an LSN logging profile

You can create an LSN logging profile to allow you to configure logging options for various LSN events that apply to high-speed logging destinations.
Note: For configuring remote high-speed logging of CGNAT processes on the BIG-IP® system, these steps are optional.
  1. On the Main tab, click Carrier Grade NAT > Logging Profiles > LSN .
    The LSN logging profiles screen opens.
  2. Click Create.
    The New LSN Logging Profile screen opens.
  3. In the Name field, type a unique name for the logging profile.
  4. From the Parent Profile list, select a profile from which the new profile inherits properties.
  5. For the Log Settings area, select the Custom check box.
  6. For the Log Settings area, select Enabled for the following settings, as necessary.
    Setting Description
    CSV Format Generates log entries in comma-separated-values (csv) format.
    Start Outbound Session Generates event log entries at the start of a translation event for an LSN client.
    End Outbound Session Generates event log entries at the end of a translation event for an LSN client.
    Start Inbound Session Generates event log entries at the start of an incoming connection event for a translated endpoint.
    End Inbound Session Generates event log entries at the end of an incoming connection event for a translated endpoint.
    Quota Exceeded Generates event log entries when an LSN client exceeds allocated resources.
    Errors Generates event log entries when LSN translation errors occur.
  7. Click Finished.

Configuring an LSN pool

You can associate an LSN pool with a log publisher and logging profile that the BIG-IP® system uses to send log messages to a specified destination.
  1. On the Main tab, click Carrier Grade NAT > LSN Pools > LSN Pool List .
    The LSN Pool List screen opens.
  2. Select an LSN pool from the list.
    The configuration screen for the pool opens.
  3. From the Log Publisher list, select the log publisher the BIG-IP system uses to send log messages to a specified destination.
    Important: If you configure a log publisher to use multiple logging destinations, then, by default, all logging destinations must be available in order to log to each destination. Unless all logging destinations are available, no logging can occur. If you want to log to the available logging destinations when one or more destinations become unavailable, you must set the logpublisher.atomic db variable to false.
  4. Optional: From the Logging Profile list, select the logging profile the BIG-IP system uses to configure logging options for various LSN events.
  5. Click Finished.
You now have an LSN pool for which the BIG-IP system logs messages using the specified logging profile.