Applies To:
Show Versions
BIG-IP AAM
- 13.0.1, 13.0.0
BIG-IP APM
- 13.0.1, 13.0.0
BIG-IP Link Controller
- 13.0.1, 13.0.0
BIG-IP Analytics
- 13.0.1, 13.0.0
BIG-IP LTM
- 13.0.1, 13.0.0
BIG-IP AFM
- 13.0.1, 13.0.0
BIG-IP PEM
- 13.0.1, 13.0.0
BIG-IP DNS
- 13.0.1, 13.0.0
BIG-IP ASM
- 13.0.1, 13.0.0
Overview: Managing client-side HTTP traffic using a CA-signed RSA certificate
When you want to manage HTTP traffic over SSL, you can configure the BIG-IP® system to perform the SSL handshake that target web servers normally perform.
A common way to configure the BIG-IP system is to enable client-side SSL, which makes it possible for the system to decrypt client requests before sending them on to a server, and encrypt server responses before sending them back to the client. In this case, you need to install only one SSL key/certificate pair on the BIG-IP system.
This implementation uses a certificate signed by an RSA certificate authority (CA) to authenticate HTTP traffic.
Task summary
To implement client-side authentication using HTTP and SSL with a certificate signed by a certificate authority, you perform a few basic configuration tasks.
Task list
Requesting an RSA certificate from a certificate authority
Creating a custom HTTP profile
Creating a custom Client SSL profile
-
Click Add and repeat the process for all
certificate key chains that you want to specify. At a minimum, you must specify an RSA certificate key chain.
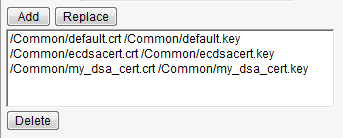
Sample configuration with three key types specified
The result is that all specified key chains appear in the text box. -
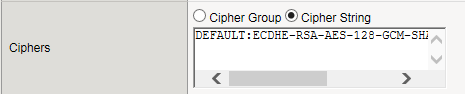
For the Ciphers setting, specify a cipher group or
cipher string by choosing one of these options.
Note: If you specified an ECDSA certificate key chain in the Certificate Key Chain setting, you must include the cipher string ECDHE_ECDSA in the cipher group or cipher string that you specify in the Ciphers setting. (At a minimum, you should specify a cipher group or string such as DEFAULT:ECDHE_ECDSA.) This is necessary to ensure successful cipher negotiation when the BIG-IP system is offered an ECDSA-based certificate only.
Option Description Cipher Group Select an existing cipher group from the list when you want to use a system-defined or custom cipher group to define the ciphers that the BIG-IP system uses for negotiating SSL connections. Here's an example of the Ciphers setting where we've selected a custom cipher group that we created earlier.

Cipher String Type a cipher string in the box if you want to manually specify a cipher string instead of selecting a cipher group. For security and performance reasons, consider following these recommendations:
- Always append ciphers to the DEFAULT cipher string.
- Type a cipher string that includes the ECC key type, because its shorter length speeds up encryption and decryption while still offering virtually the same level of security.
- Disable ADH ciphers but also include the keyword HIGH. To do this, just include both !ADH and :HIGH in your cipher string.
- For AES, DES, and RC4 encryption types, make sure you specify the DHE key exchange method. DHE uses Forward Privacy, which creates a key that it throws away after each session so that the same session key never gets used twice. When you use DHE, make sure that the SSL private key isn't being shared with a monitoring system or a security device like an intrusion detection or prevention system. Also, diagnostic tools like ssldump won't work when you're using Forward Secrecy.
- Disable EXPORT ciphers by including !EXPORT in the cipher string.
- If you can live with removing support for the SSLv3 protocol version, do it. This protocol version is not secure. Simply include :!SSLv3 in any cipher string you type.
Here's an example of the Ciphers setting where we have opted to manually type the cipher string DEFAULT:ECDHE-RSA-AES-128-GCM-SHA256:!ADH:!EXPORT:HIGH:
Creating a pool to process HTTP traffic
Creating a virtual server for client-side HTTP traffic
Implementation results
After you complete the tasks in this implementation, the BIG-IP® system can authenticate and decrypt HTTP traffic coming from a client system, using an RSA digital certificate. The BIG-IP system can also re-encrypt server responses before sending them back to the client.


