Manual Chapter : Configuring the BIG-IP System as an MS SQL Database Proxy

Applies To:

Show Versions Show Versions

BIG-IP AAM

  • 11.5.10, 11.5.9, 11.5.8, 11.5.7, 11.5.6, 11.5.5, 11.5.4, 11.5.3, 11.5.2, 11.5.1

BIG-IP APM

  • 11.5.10, 11.5.9, 11.5.8, 11.5.7, 11.5.6, 11.5.5, 11.5.4, 11.5.3, 11.5.2, 11.5.1

BIG-IP GTM

  • 11.5.10, 11.5.9, 11.5.8, 11.5.7, 11.5.6, 11.5.5, 11.5.4, 11.5.3, 11.5.2, 11.5.1

BIG-IP Link Controller

  • 11.5.10, 11.5.9, 11.5.8, 11.5.7, 11.5.6, 11.5.5, 11.5.4, 11.5.3, 11.5.2, 11.5.1

BIG-IP Analytics

  • 11.5.10, 11.5.9, 11.5.8, 11.5.7, 11.5.6, 11.5.5, 11.5.4, 11.5.3, 11.5.2, 11.5.1

BIG-IP LTM

  • 11.5.10, 11.5.9, 11.5.8, 11.5.7, 11.5.6, 11.5.5, 11.5.4, 11.5.3, 11.5.2, 11.5.1

BIG-IP AFM

  • 11.5.10, 11.5.9, 11.5.8, 11.5.7, 11.5.6, 11.5.5, 11.5.4, 11.5.3, 11.5.2, 11.5.1

BIG-IP PEM

  • 11.5.10, 11.5.9, 11.5.8, 11.5.7, 11.5.6, 11.5.5, 11.5.4, 11.5.3, 11.5.2, 11.5.1

BIG-IP ASM

  • 11.5.10, 11.5.9, 11.5.8, 11.5.7, 11.5.6, 11.5.5, 11.5.4, 11.5.3, 11.5.2, 11.5.1
Manual Chapter

Configuring the BIG-IP System as an MS SQL Database Proxy

Overview: Configuring LTM as a database proxy

You can configure BIG-IP® Local Traffic Manager™ systems to load balance database requests to pools of database servers. In this case, LTM acts as a proxy for databases that use the tabular data stream (TDS) protocol. LTM load balances client requests based on the user issuing the commands.

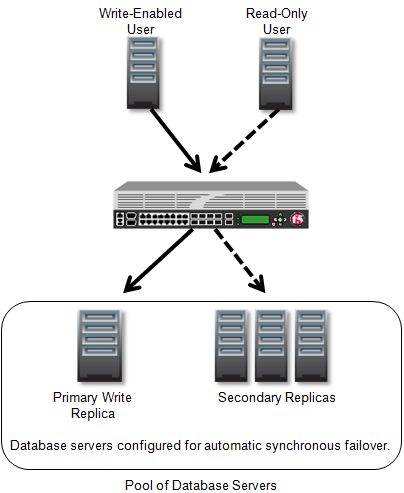
LTM configured as a database proxy

Task summary

About database authentication

BIG-IP®LTM® supports only basic authentication when acting as a proxy for an MS SQL database. You must configure user names and passwords on the database servers and the database servers must handle user authentication. Therefore, the user names and passwords must be synchronized across all database servers.

About database access configuration

You can configure BIG-IP® LTM® for user-based access to database servers. With user-based access, you configure a pool of database servers and indicate whether users write by default. Then, you configure either a read-only list of users or a write-enabled list of users.

Note: Write requests include at least one of these key words: create, update, insert, delete, into, alter, drop, rename, exec, and execute.

Creating a custom MS SQL monitor

Create a custom MS SQL monitor to send requests, generated using the settings you specify, to a pool of MS SQL database servers, and to validate the responses.
Important: When defining values for custom monitors, make sure you avoid using any values that are on the list of reserved keywords. For more information, see SOL number 3653 (for version 9.0 systems and later) on the AskF5™ technical support web site at www.askf5.com.
  1. On the Main tab, click Local Traffic > Monitors .
    The Monitor List screen opens.
  2. Click Create.
    The New Monitor screen opens.
  3. Type a name for the monitor in the Name field.
  4. From the Type list, select MSSQL.
  5. Type a SQL statement in the Send String field that the monitor sends to the database server to verify availability.
    This is an example of a basic Send String: SELECT Firstname, LastName FROM Person.Person WHERE LastName = 'name'. This is an example of a Send String that determines which database is primary: SELECT role_desc,is_local,synchronization_health_desc FROM sys.dm_hadr_availability_replica_states WHERE is_local = 1 AND synchronization_health_desc = 'HEALTHY';
    Note: Based on the string you enter, you may need to enter values in other fields for this monitor.
  6. In the User Name field, type the name the monitor uses to access the database server.
  7. In the Password field, type the password the monitor uses to access the database server.
  8. Click Finished.

Creating a pool of database servers

Gather the IP addresses of the database servers that you want to include in the pool. In an Always On architecture, normally the pool includes both primary and secondary database servers configured for synchronous automatic failover.

Ensure that a custom MS SQL monitor exists in the configuration.

Create a pool of database servers to process database requests. LTM® acts as a proxy for the database servers by load balancing requests to the members of the pool.
  1. On the Main tab, click Local Traffic > Pools .
    The Pool List screen opens.
  2. Click Create.
    The New Pool screen opens.
  3. In the Name field, type a unique name for the pool of database servers.
  4. For the Health Monitors setting, from the Available list, select the custom mssql monitor, and click << to move the monitor to the Active list.
  5. From the Load Balancing Method list, select how the system distributes traffic to members of this pool.
    For pool members that are MS SQL database servers, consider Least Connections, which selects the server that provides the best response time.
  6. Using the New Members setting, add the IP address for each database server that you want to include in the pool:
    1. Type an IP address in the Address field, or select a node address from the Node List.
    2. Type a service number in the Service Port field, or select a service name from the list.
      Note: Typical TDS database servers require port 1433.
    3. Click Add.
  7. Click Finished.
The pool of database servers appears in the Pools list.

Configuring database access by user

Create a custom Microsoft SQL Server (MS SQL) profile to configure BIG-IP® LTM® to grant user-based access to a pool of database servers.
  1. On the Main tab, click Local Traffic > Profiles > Databases > MS SQL .
    The MS SQL Profiles list screen opens.
  2. Click Create.
    The New MS SQL Profile screen opens.
  3. In the Profile Name field, type a unique name for the MS SQL profile, for example, mssql_user_access.
  4. Select the Custom check box.
  5. From the Read/Write Split list, select By User.
  6. From the Read Pool list, select the pool of MS SQL database servers to which the system sends read-only requests.
  7. From the Write Pool list, select the pool of MS SQL database servers to which the system sends write requests.
  8. From the Users Can Write By Default list, select Yes to give write access to all users, except those in the Read-Only Users list.
  9. In the Read-Only Users area, add users to whom you want to provide read-only access to the database.
  10. Click Finished.

Creating a custom OneConnect profile

Optionally, you can create a custom OneConnect profile. With this profile, the LTM® system minimizes the number of server-side TCP connections by sharing idle connections among TDS connections owned by the same user name.

  1. On the Main tab, click Local Traffic > Profiles > Other > OneConnect .
    The OneConnect profile list screen opens.
  2. Click Create.
    The New OneConnect Profile screen opens.
  3. In the Name field, type a unique name for the profile.
  4. In the Settings area, configure additional settings based on your network requirements.
  5. Click Finished.

Creating a database proxy virtual server

Ensure that a pool of database servers exist in the configuration before creating a database proxy virtual server.
You can create a virtual server to represent a destination IP address for database transaction traffic.
  1. On the Main tab, click Local Traffic > Virtual Servers .
    The Virtual Server List screen opens.
  2. Click the Create button.
    The New Virtual Server screen opens.
  3. In the Name field, type a unique name for the virtual server.
  4. For the Destination setting, in the Address field, type the IP address you want to use for the virtual server.
    The IP address you type must be available and not in the loopback network.
  5. In the Service Port field, type 1443.
  6. From the Configuration list, select Advanced.
  7. From the MS SQL Profile list, select either the default or a custom MS SQL profile.
  8. Optionally, from the OneConnect Profile list, select a custom OneConnect profile.
  9. From the Default Pool list, select the pool of database servers.
You now have a destination IP address on the BIG-IP® system for MS SQL database traffic.

Viewing MS SQL profile statistics

You can view statistics about database requests and responses, user access, and database messages for the traffic LTM® handles as a proxy for a database server.
  1. On the Main tab, click Statistics > Module Statistics > Local Traffic .
    The Local Traffic statistics screen opens.
  2. From the Statistics Type list, select Profiles Summary.
  3. In the Details column for the MS SQL profile, click View to display detailed statistics about database requests and responses, database access, and database messages.