Manual Chapter : Configuring the BIG-IP System as a Reverse Proxy Server

Applies To:

Show Versions Show Versions

BIG-IP AAM

  • 13.0.1, 13.0.0

BIG-IP APM

  • 13.0.1, 13.0.0

BIG-IP Link Controller

  • 13.0.1, 13.0.0

BIG-IP Analytics

  • 13.0.1, 13.0.0

BIG-IP LTM

  • 13.0.1, 13.0.0

BIG-IP AFM

  • 13.0.1, 13.0.0

BIG-IP PEM

  • 13.0.1, 13.0.0

BIG-IP DNS

  • 13.0.1, 13.0.0

BIG-IP ASM

  • 13.0.1, 13.0.0
Manual Chapter

Overview: URI translation and HTML content modification

For environments that use web servers, you might want your websites to appear differently on the external network than on the internal network. For example, you might want the BIG-IP® system to send traffic destined for http://www.siterequest.com/ to the internal server http://appserver1.siterequest.com/ instead. Normally, this translation could cause some issues, such as the web server expecting to see a certain host name (such as for name-based virtual hosting) or the web server using the internal host name and/or path when sending a redirect to client systems. Fortunately, you can configure the BIG-IP system to solve these problems.

You can also configure the BIG-IP system to modify HTML content as needed after the system has performed the URI translation.

This implementation describes an example of URI translation and HTML content modification and then provides the tasks to implement this example.

About URI translation

You can configure the BIG-IP® system to perform URI translation on HTTP requests. Suppose that a company named Siterequest has a website www.siterequest.com, which has a public IP address and a registered DNS entry, and therefore can be accessed from anywhere on the Internet.

Furthermore, suppose that Siterequest has two application servers with private IP addresses and unregistered DNS entries, inside the company's firewall. The application servers are visible within the internal network as appserver1.siterequest.com and appserver2.siterequest.com.

Because these servers have no public DNS entries, any client system that tries to access one of these servers from outside the company network receives a no such host error.

As the illustration shows, you can prevent this problem by configuring the BIG-IP system to act as a reverse proxy server:

The BIG-IP system as a reverse proxy server

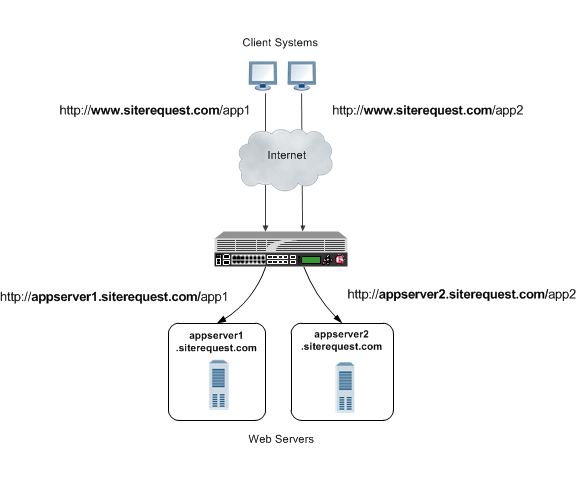
The BIG-IP system as a reverse proxy server for URI translation

In the example, the company Siterequest has decided to enable Web access to the internal application servers, without exposing them to the Internet directly. Instead, the company has integrated the servers with the web server siterequest.com so that http://www.siterequest.com/sales is mapped internally to http://appserver1.siterequest.com/sales, and http://siterequest.com/marketing is mapped internally to http://appserver2.example.com/marketing. This is a typical reverse-proxy configuration.

To configure the BIG-IP system to perform this translation, you create a Rewrite profile and configure one or more URI rules. A URI rule specifies the particular URI translation that you want the BIG-IP system to perform. Specifically, a URI rule translates the scheme, host, port, or path of any client URI, server URI, or both. A URI rule also translates any domain and path information in the Set-Cookie header of the response when that header information matches the information in the URI rule.

Note: The Rewrite profile supports HTML and CSS content types only. To specify MIME types for HTML content, you can either create an HTML profile or accept the default values that the Rewrite profile uses, text/html and text/xhtml. For CSS content, only the text/css MIME type is supported.

Rules for matching requests to URI rules

The BIG-IP® system follows these rules when attempting to match a request to a URI rule:

  • A request does not need to match any entry. That is, if no entries match and there is no catch-all entry, then the Rewrite profile has no effect.
  • Each request matches one entry only, which is the entry with the most specific host and path.
  • If multiple entries match, then the BIG-IP system uses the entry with the deepest path name on the left side of the specified mapping.
  • The BIG-IP system matches those requests that contain host names in URIs before matching requests that do not contain host names in URIs.
  • The BIG-IP system processes the specified entries in the mapping from most-specific to least-specific, regardless of the order specified in the actual Rewrite profile.

About URI Rules

When creating a URI rule, you must specify the client and server URIs in these ways:

  • When the URI is a path prefix only, the path must be preceded by and followed by a /, for example, /sales/.
  • When the URI contains more than the path prefix (such as, a host), the URI must also contain a scheme and must be followed by a /, for example, http://www.siterequest/sales/.

Introduction to HTML content modification

When you configure an HTML profile on the BIG-IP® system, the system can modify HTML content that passes through the system, according to your specifications. For example, if you want the BIG-IP system to detect all content of type text/html and then remove all instances of the HTML img tag with the src attribute, you can configure an HTML profile accordingly, and assign it to the virtual server. The HTML profile ensures that the BIG-IP system removes those instances of the tag from any HTML content that passes through the virtual server.

Or, you can configure an HTML profile to match on a certain tag and attribute in HTML content when a particular iRule event is triggered, and then create an iRule that includes a command to replace the value of the matched attribute with a different attribute. The BIG-IP system includes several iRule commands that you can use when the Raise Event on Comment or Raise Event on Tag events are triggered. For more information on iRule commands related to HTML content modification, see the F5 Networks web site http://devcentral.f5.com.

HTML tag removal and replacement are just two of several HTML rules that you can configure to manipulate HTML content. An HTML rule defines the specific actions that you want the BIG-IP system to perform on a specified type HTML content.

Task summary

The first step to configuring the BIG-IP® system to act as a reverse proxy server is to create a Rewrite type of profile on the BIG-IP system and associate it with a virtual server. Note that each virtual server must have an HTTP profile. The Rewrite profile is designed for HTTP sites, as well as HTTPS sites where SSL is terminated on the BIG-IP system (that is, the virtual server references a Client SSL profile).

Task List

Creating a Rewrite profile to specify URI rules

To configure the BIG-IP® system to perform URI translation, you create a Rewrite profile, specifying one or more URI rules that associate a client-side path with a server-side URI. You also specify whether you want the URI translation to pertain to HTTP requests, responses, or both.

Note: The Rewrite profile supports HTML and CSS content types only. To specify MIME types for HTML content, you can either create an HTML profile or accept the default values that the Rewrite profile uses, text/html and text/xhtml. For CSS content, only the text/css MIME type is supported.
  1. On the Main tab, click Local Traffic > Profiles > Services > Rewrite .
    The Rewrite profile list appears.
  2. Click Create New Profile.
    The Create New Profile Rewrite pop-up screen opens.
  3. In the Profile Name field, type a name, such as my_rewrite_profile.
  4. From the Parent Profile list, select rewrite.
  5. From the Rewrite Mode list, select URI Translation.
  6. On the left pane, click URI Rules.
    An empty text box appears for displaying client-server URI mappings that you specify.
  7. Click Add.
  8. From the Rule Type list, select Both.
  9. In the Client URI box, type a client path, such as /sales/.
  10. In the Server URI box, type a server URI, such as http://appserver1.siterequest.com/sales/.
    You must include a scheme in the server URI that you specify.
    An example of a scheme is http.
  11. Click OK.
    This displays a mapping of the specified client path to the associated server scheme, host, and path.
  12. Click Add again.
  13. From the Rule Type list, select Both.
  14. In the Client URI field, type a client path, such as /marketing/.
  15. In the Server URI field, type a server URI, such as http://appserver2.siterequest.com/marketing/.
    You must include a scheme in the server URI that you specify.
    An example of a scheme is http.
  16. Click OK.
    This displays a mapping of the specified client path to the associated server scheme, host, and path.
  17. Click OK.
The BIG-IP system now includes two URI rules for performing URI translation on both requests and responses. For example, the host name in a request destined for http://www.siterequest.com/sales/ will be translated to http://appserver1.siterequest.com/sales/, and the host name in a request destined for https://www.siterequest.com/marketing/ will be translated to http://appserver2.siterequest.com/marketing/. A reverse translation occurs on any response.

Creating an HTML profile for tag removal

You create an HTML profile when you want the BIG-IP® system to act on certain types of HTML content.

  1. On the Main tab, click Local Traffic > Profiles > Content > HTML .
  2. Click the Create New Profile button.
  3. In the Profile Name field, type a name, such as my_html_profile.
  4. From the Parent Profile list, select /Common/html.
  5. On the left pane, click HTML Rules.
  6. On the Create New button, click the right arrow.
  7. Select Remove Tag.
    The Create New Remove Tag Rule box appears.
  8. In the Rule Name field, type a name, such as my_remove_img_tag_rule.
  9. Optionally, in the Description field, type a description of the rule, such as Removes the img tag with the src attribute.
  10. On the left pane, click Match Settings.
  11. In the Match Tag Name field, type the name of the tag that you want to remove from the HTML content.
    An example of a tag to specify is the HTML img tag.
  12. In the Match Attribute Name field, type the name of the attribute associated with the tag that you specified for removal.
    An example of an attribute to specify is the src attribute for the img tag.
  13. Click OK.
  14. In the Available Rules list, locate the HTML rule that you want to enable, and select the adjacent check box.
  15. Using the Move button, move the selected HTML rule to the Selected Rules list.
  16. Click OK.
After creating this HTML profile, you can implement the HTML content modification by assigning the profile to the virtual server that is processing the associated HTTP traffic.

Creating pools for processing HTTP traffic

You can create two load balancing pools, and then create a policy that forwards certain HTTP traffic to one pool, and other HTTP traffic to another pool.
  1. On the Main tab, click Local Traffic > Pools .
    The Pool List screen opens.
  2. Click Create.
    The New Pool screen opens.
  3. In the Name field, type a unique name for the pool.
  4. Using the New Members setting, add each resource that you want to include in the pool:
    1. (Optional) In the Node Name field, type a name for the node portion of the pool member.
    2. In the Address field, type an IP address.
    3. In the Service Port field, type a port number, or select a service name from the list.
    4. (Optional) In the Priority field, type a priority number.
    5. Click Add.
  5. Click Finished.
  6. Repeat this task to create a second pool.
The new pools appear in the Pools list.

Creating a local traffic policy

You perform this task to create a local traffic policy that forwards traffic to one or more non-default pools, based on some condition. For example, for a condition such as an HTTP request whose host name equals siterequest.com and URI starts with /sales/, the BIG-IP® system can forward that request to pool_app1.
  1. On the Main tab, click Local Traffic > Policies > Policy List .
    The Policy List Page screen opens.
  2. Click Create.
    The New Policy screen opens.
  3. In the Name field, type a unique name for the policy.
  4. From the Strategy list, select a matching strategy.
  5. For the Requires setting, select http from the Available list, and move the entry to the Selected list using the Move button.
  6. For the Controls setting, select forwarding from the Available list, and move the entry to the Selected list using the Move button.
  7. Click Add.
    The New Rule screen opens.
  8. In the Rule field, type a unique name for the rule.
  9. From the Operand list, select http-host.
  10. Using the options for the Conditions setting, configure a rule where the condition equals the criteria specified:
    1. From the Condition list, select equals.
    2. Optional: Select the case sensitive check box to apply case sensitivity to the condition.
    3. In the Values field, type the text for the applicable value and click Add.
      An example of a value is siterequest.com.
      The specified condition appears in the Values list box.
    4. At the lower left, click Add.
      The configured condition appears in the Conditions list.
  11. From the Operand list, select http-uri.
  12. Using the options for the Conditions setting, configure a rule where the condition starts with the criteria specified:
    1. From the Condition list, select starts with.
    2. Optional: Select the case sensitive check box to apply case sensitivity to the condition.
    3. In the Values field, type the text for the applicable value and click Add.
      An example of a value is /app1/.
      The specified condition appears in the Values list box.
    4. At the lower left click Add.
      The configured condition appears in the Condition list.
  13. Using the Actions setting, configure the applicable options:
    1. From the Target list, select forward.
    2. From the Event list, select an event.
    3. From the Action list, select pool.
    4. From the Parameters list, select the pool name to which you want the BIG-IP system to forward the traffic.
    5. To the right of the input field, click Add.
      The configured parameter appears in the Parameters list box.
    6. At the lower left click Add.
      The configured settings for the action appear in the Actions list.
  14. Repeat steps 11 through 13, specifying a second http-uri condition value, such as /marketing, and specifying a different non-default pool name.
  15. Click Finished.
For each matching condition specified in the policy, the virtual server to which you assign the policy forwards the packet to the non-default pool that you specified in the policy. For example, you can create one policy that forwards traffic with a URI starting with /sales/ to pool_sales and another policy that forwards traffic with a URI starting with /marketing/ to pool_marketing.

Creating a virtual server

You can create a virtual server that translates a URI in a request or response and modifies HTML content. When you create the virtual server, you can also configure it to forward certain HTTP traffic to one pool, while forwarding other HTTP traffic to a different pool..
  1. On the Main tab, click Local Traffic > Virtual Servers .
    The Virtual Server List screen opens.
  2. Click the Create button.
    The New Virtual Server screen opens.
  3. In the Name field, type a unique name for the virtual server.
  4. In the Destination Address field, type the IP address in CIDR format.
    The supported format is address/prefix, where the prefix length is in bits. For example, an IPv4 address/prefix is 10.0.0.1 or 10.0.0.0/24, and an IPv6 address/prefix is ffe1::0020/64 or 2001:ed8:77b5:2:10:10:100:42/64. When you use an IPv4 address without specifying a prefix, the BIG-IP® system automatically uses a /32 prefix.
    Note: The IP address you type must be available and not in the loopback network.
  5. In the Service Port field, type 80, or select HTTP from the list.
  6. For the HTTP Profile setting, verify that the default HTTP profile, http, is selected.
  7. In the Content Rewrite area, from the Rewrite Profile list, select the relevant Rewrite profile that you created.
  8. From the HTML Profile list, select the relevant HTML profile that you created.
  9. For the Policies setting, select the local traffic policy you created from the Available list and move it to the Enabled list.
  10. Click Finished.
The HTTP virtual server appears in the list of existing virtual servers on the Virtual Server List screen. This virtual server can translate URIs in requests and responses, modify HTML content, and forward the traffic to two different non-default load balancing pools.

Implementation results

After you perform the tasks in this implementation, the BIG-IP® system can:

  • Translate URIs according to the URI rules specified in the Rewrite profile.
  • Modify specified HTML content according to the HTML rule specified in the HTML profile.
  • Forward HTTP traffic to two different non-default pools according to a local traffic policy.