Applies To:
Show Versions
BIG-IP AAM
- 12.1.0
BIG-IP APM
- 12.1.0
BIG-IP LTM
- 12.1.0
BIG-IP DNS
- 12.1.0
BIG-IP ASM
- 12.1.0
Managing vCMP Virtual Disks
Overview: Managing vCMP virtual disks
A virtual disk is the portion of disk space that the system has allocated to a guest. Each virtual disk is implemented as an image file with an .img extension, such as guest_A.img.
You do not explicitly create virtual disks. The vCMP® system automatically creates a virtual disk when you set a guest to the Provisioned or Deployed state.
Using the BIG-IP® Configuration utility or the Traffic Management Shell (tmsh), you can delete virtual disks on the system as a way to optimize disk space.
About virtual disk allocation
For each vCMP® guest, the host automatically creates a sparse file to be used as a virtual disk. This amount of disk space can grow to 100 GB, and is not dependent on the number of cores that you configure for that guest. For example, allocating two cores to guest_A provides the same amount of available disk space for the guest as allocating four cores to the guest.
Note that you cannot explicitly create virtual disks; instead, the BIG-IP® system automatically creates virtual disks when the guest changes to a Provisioned or Deployed date. You can create a guest that remains in the Configured state, but in this case, the guest has no virtual disk allocated to it.
About virtual disk images
A virtual disk is in the form of an image that resides in the /shared/vmdisks directory on each physical disk. The default file name that the BIG-IP® system initially assigns to a virtual disk is the guest name plus a .img extension (for example, guestA.img). Using the BIG-IP Configuration utility or the Traffic Management Shell (ttmsh), you identify and manage virtual disks on the system using these file names.
About virtual disk templates
If you need to create multiple guests, you most likely want to minimize the time that the vCMP® system needs to create all of the virtual disks. The vCMP system automatically accomplishes this through a feature known as virtual disk templates. A virtual disk template is a virtual disk image that contains a fresh installation of an initial ISO image. Its purpose is to minimize the time that the system uses to create virtual disks on the system.
When you provision a guest on the system, the system creates a template for that ISO image. Later, when you create other guests that use the same ISO image, the system instantiates a copy of the virtual disk template to more rapidly create the virtual disks for those guests. The vCMP system creates a separate virtual disk template for each initial image that you initially configure for a guest.
No user intervention is required to use this feature. On the vCMP system, you can view a list of the system-created templates, or you can delete a template, but you cannot explicitly create or modify a template.
Viewing the list of virtual disk templates
-
View all information displayed.
For example, the following shows a sample list of virtual disk templates on the vCMP host.
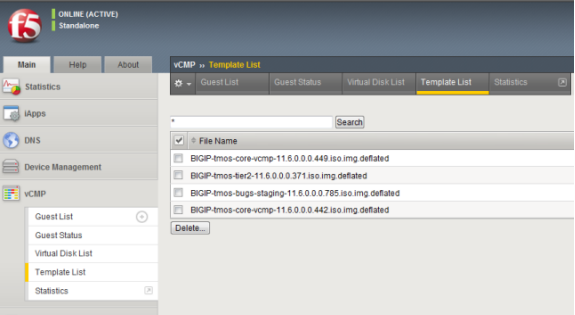
List of virtual disk templates
Deleting virtual disk templates
Enabling and disabling the virtual disk template feature
You can perform this task to enable or disable the virtual templates feature on any vCMP-enabled system. The virtual templates feature is useful for minimizing the time that the system uses to create virtual disks on the system. By default, the feature is enabled on platforms with solid-state drives. On platforms with spinning drives, the virtual disk templates feature is automatically disabled due to potential stress and latency on spinning drives during guest provisioning. For this reason, F5 Networks recommends that for platforms with spinning drives, you enable virtual disk templates in a test environment only, whenever you need to create multiple guests running the same BIG-IP software version.
- Log in to the BIG-IP system and access tmsh.
-
At the tmsh command prompt, type modify sys db vcmp.installer.use_vdisk_templates value default|enabled|disabled
Value Description default When set to default, the db variable vcmp.installer.use_vdisk_templates enables the virtual disk templates feature on any vCMP-enabled platforms with solid-state drives and disables virtual disk templates on any vCMP-enabled platforms with spinning drives. The default value is default. enabled When set to enabled, the db variable vcmp.installer.use_vdisk_templates enables the virtual disk templates feature on all vCMP-enabled hardware platforms, regardless of drive type. disabled When set to disabled, the db variable vcmp.installer.use_vdisk_templates disables the virtual disk templates feature on all vCMP-enabled hardware platforms, regardless of drive type.
Viewing the virtual disk templates db variable
You can perform this task to view the current value of the db variable vcmp.installer.use_vdisk_templates.
About virtual disk detachment and re-attachment
When a vCMP® guest has no virtual disk and moves from the Configured state to the Provisioned state, the system creates a virtual disk and attaches the disk to the guest. This attachment ensures that only that guest can use the virtual disk. A guest can have only one virtual disk attached to it at any one time.
A virtual disk can become unattached from a guest when you perform one of these actions:
- Delete a guest.
- Change the Virtual Disk property of the guest to None. Note that to perform this action, you must first change the guest state to Configured.
With either of these actions, the system retains the virtual disks on the system for future use.
You can attach an existing, unattached virtual disk to a new guest that you create. Attaching an existing virtual disk to a newly-created guest saves the BIG-IP® system from having to create a new virtual disk for the guest.
Detaching virtual disks from a vCMP guest
Viewing virtual disks not attached to a vCMP guest
- On the Main tab, click .
- Locate the Virtual Disk List area of the screen.
- To the right of the list of virtual disk names, note any disks that do not have any guest names associated with them. These disks are unattached.
Attaching a detached virtual disk to a vCMP guest
Before you begin this task, ensure that:
- You are logged into the vCMP® host.
- The guest to which you are attaching the virtual disk is in the Configured state.
- The virtual disk is not currently be attached to another guest.
It is possible for a virtual disk to become detached from a vCMP guest. A disk that is no longer attached to a guest is known as an unattached virtual disk.
You can attach an unattached virtual disk to another guest either when you create the guest or when you modify the Virtual Disk property of a guest.
Deleting a virtual disk from the BIG-IP system
Using the BIG-IP® Configuration utility, you can delete a virtual disk from the system.


