Applies To:
Show Versions
BIG-IQ Centralized Management
- 6.0.0
BIG-IQ Centralized Management: Access Overview
About Access
Access in BIG-IQ® Centralized Management offers you centralized management for BIG-IP ®Access Policy Manager® (APM) and F5 Secure Web Gateway (SWG) configurations. Centralized management gives you easy-to-deploy sets of access policies and access policy configuration objects. This means you don't need to repeat the configuration on each BIG-IP system individually. Access also offers you centralized reporting, which lets you to compare and monitor BIG-IP APM® usage across many device groups.
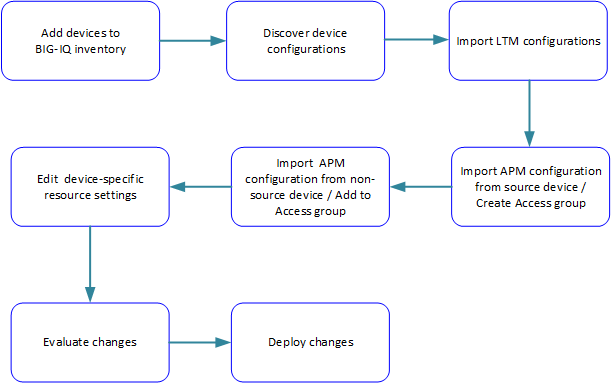
Access configuration workflow
What are Access groups?
Each Access group is a group of BIG-IP® devices across which you plan to share the same Access configuration. When you import an APM service configuration from a device, the device must join an Access group.
About the types of resources that Access imports
When you import an APM® service configuration from a device, the device must join an Access group.
- If the device joins a new Access group, Access imports both shared resources and device-specific resources from the device.
- If the device joins an existing Access group, Access imports only the device-specific resources from the device.
About shared resources
In an Access group on the BIG-IQ® system, shared resources are a set of configuration objects that are expected to be the same on every device in an Access group.
How do shared resources work in the configuration?
Initially, shared resources are imported with the APM® service configuration from the device. After import, they are read-only on the BIG-IQ® system. The deployment process configures the shared resources on all devices in the Access group. This can result in major configuration changes on the devices, with resources being overwritten, deleted, or added on them.
About device-specific resources
In an Access group on the BIG-IQ® system, device-specific resources are a set of configuration objects that are expected to exist on every device in the Access group. However, the properties of these resources can differ from device to device.
For example, an access policy could use an Active Directory server for user authentication. Device apm_north_america.xyz.com must use an Active Directory server configured in a North American domain or data center, while device apm_south_america.xyz.com must use an Active Directory server configured in a South American domain or data center.
How do device-specific resources work in the configuration?
When you add a device to an Access group, device-specific resources are created from the device's APM® service configuration. Or, if particular resources do not exist on a device, Access creates device-specific resources that match those in the device configuration. After import, you are instructed to review and change device-specific resources if needed; in addition, you can change them at your option. You can also make a device-specific resource shared, so that its properties can only be configured in the shared resources. At deployment, device-specific resources are configured on the specific devices.
Report configuration workflow
BIG-IQ logging nodes are required for Access and SWG reporting. To set up a discovered device so that it sends report data to a logging node, you must run the remote logging configuration. Then, you can run reports.

Upgrade Access for BIG-IQ Centralized Management version 5.1 to 5.2
After upgrading from BIG-IQ® Centralized Management version 5.1 to version 5.2, send out a POST request to a REST API in order to restore session data after an upgrade. Do this after restoring the elastic snapshot. If you do not perform this step, then after the upgrade, the sessions that you created before upgrading displays incorrectly in either the Sessions report or in the Active Sessions report.
The command to send the post request is restcurl -X POST -u admin:admin http://localhost:8100/mgmt/cm/access/reports/access-es-upgrade-task -d ‘{ }’ .


