Manual Chapter : Create an AWS Image of BIG-IQ Centralized Management VE

Applies To:

Show Versions Show Versions

BIG-IQ Centralized Management

  • 6.1.0
Manual Chapter

Create an AWS Image of BIG-IQ Centralized Management VE

How do I create an AWS image (AMI) of a BIG-IQ VE?

If you are in a region that doesn't have access to an AWS marketplace, you can download a BIG-IQ VE image and use it to create an AWS machine image (AMI). This AMI is a BIG-IQ VE image in a Linux instance in your AWS EC2 service. You can use the AMI you create exactly as you would an AMI downloaded from the AWS to create instances of BIG-IQ virtual edition.

To create an AMI, you complete these tasks:

  • Create a staging Linux instance in your AWS environment, and then copy the tar file to its default volume and unzip it on the secondary volume.

  • Create a secondary Linux instance, and attach the staging Linux's volume to the secondary Linux instance's boot volume.

  • Create the AMI on the secondary Linux instance. You'll use that AMI as the source for creating BIG-IQ VE instances.

To complete these tasks, you'll need access to the AWS Management Console using SSH.

Create a Linux instance and copy the BIG-IQ tar file to it

The first task to create an AMI as a source for BIG-IQ VE instances is to download the BIG-IQ tar file to a staging Linux instance. Some steps are done through SSH and can take quite some time to complete, so during this process you'll be increasing the SSH keepalives setting to avoid timeouts.
  1. Download the AWS BIG-IQ VE tar file from downloads.f5.com.
    The file content can be as much as 5 GB compressed and includes the version number as part of its name. For example: AWS-F5_Networks-BIG-IQ-VERSION-standard-xxx.tar.gz
  2. Log in to the AWS Management Console and launch a new Linux staging instance (for example, the Amazon Linux AMI https://aws.amazon.com/amazon-linux-ami) with the following attributes:
    • The instance's storage should have enough free space to contain the downloaded BIG-IQ image. We recommend using an i3.xlarge or larger instance.
    • During configuration, choose these settings:
      • Size: 32 GiB
      • Volume Type: Provisioned IOPS SSD (1)
      • IOPS: 1600.
  3. To prevent SSH timeouts, in SSH, from the SSH Connections menu, change the Seconds between keepalives setting to 90.
  4. Using SSH, connect to the Linux staging instance.
    For the Amazon Linux AMI, the user name is ec2-user.
  5. Type the following SSHSecure copy (SCP) command to copy the tar file to the staging instance's default volume.
    For example:scp -i <path_to_instance_ssh_key> <path_to_bigiq_tar_file> ec2-user@staging_instance_ip:/tmp
  6. When the command finishes, stop the instance from the AWS Console.
    Warning: Do not stop the instance from SSH.
Next, create a new volume and attach it to the Linux staging instance.

Create an empty volume and attach it to the staging Linux instance

Before you create an empty volume, you must create the Linux staging instance.
The next task in creating an AMI as a source for BIG-IQ VE instances is to create a new volume, attach the volume to a Linux staging instance, and then copy the BIG-IQ tar files to the new volume.
  1. From the AWS Management Console, create a 500GB volume.
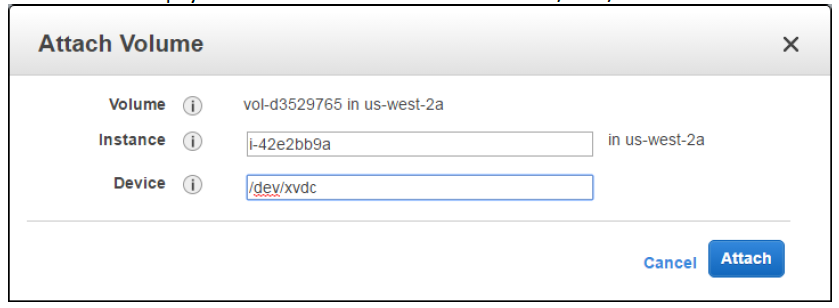
  2. Attach the volume to the staging Linux instance using the device name /dev/xvdc.
    When you're ready to attach the volume, your screen should look similar to this.
  3. Start the staging Linux instance.
  4. From SSH, connect and run the appropriate command to unzip and copy the files to the new volume.
    Note: This process can take quite some time.
    • If you have pv utility installed, type: tar -zxOf AWS-F5_Networks-BIG-IQ-VERSION-standard-xxx.tar.gz | pv =bt | sudo dd bs=1M of=/dev/xvdc
    • If you do not have the pv utility installed, type: AWS-F5_Networks-BIG-IQ-VERSION-standard-xxx.tar.gz | sudo dd bs=1M of=/dev/xvdc AWS-F5_Networks-BIG-IQ-VERSION-standard-xxx.tar.gz | sudo dd bs=1M of=/dev/xvdc
  5. When the command finishes, stop this instance from the AWS Console.
    Warning: Do not stop the instance from SSH.
  6. Detach the volume from the staging instance and then terminate the instance.
    Important: If you do not terminate the instance, you might incur unexpected costs associated with the instance.
    The unattached volume is now accessible under ELASTIC BLOCK STORE on the AWS EC2 Dashboard.
Next, you'll create a secondary Linux instance and attach the staging Linux's volume to the secondary Linux instance's boot volume. The files you unzipped and copied to this volume will be your source for creating an AMI.

Create a second Linux instance and attach the staging Linux's volume to its boot volume

Before you start this task, you must have created a new volume and attached it to the staging Linux instance.
The third task in creating an AMI as a source for BIG-IQ VE instances is to create a secondary Linux instance and then attach the volume that contains the source files to that secondary Linux instance's boot volume. This volume then houses the source files you need to create a new AMI.
  1. From the AWS Management Console, launch a new Linux instance (HVM with at least 4 vCPUs and 8 GiB of RAM).
  2. When the new instance is ready, stop the instance.
  3. Detach the root volume from this new instance.
    This removes the OS boot volume. After you do this, this instance will have no available volumes.
  4. Attach the staging Linux instance's volume to the new instance using the device name /dev/xvda.
    Warning: Do not start this instance.
    When you're ready to attach the volume, your screen should look similar to this.
    When the attach
Next, you'll create the Amazon Machine Image (AMI).

Create the Amazon Machine Image for the BIG-IQ VE source

Before you start this task, you must have created a secondary Linux instance and attached it to the secondary Linux instance's boot volume.
The last task in creating an AMI as a source for BIG-IQ VE instances is to create an Amazon Machine Image (AMI) to use to create BIG-IQ VEs.
Note: This process can take 2-3 hours to complete.
  1. From the AWS Management Console under Instances, right click Image > Create Image .
  2. Change all Volume Types to General Purpose SSD (GP2).
    This sets all of the default volume types to GP2 for future instances launched from this AMI.
After this process is complete, delete this instance and all previously-created volumes (including the volume you created for the staging Linux image) to avoid incurring unexpected costs.

You can now use this AMI to create instances of BIG-IQ virtual edition.