Applies To:
Show Versions
BIG-IQ Centralized Management
- 5.4.0
BIG-IQ® Centralized Management gives you the tools you need to customize user access to managed devices by letting you assign role-based access based on job responsibilities. When you associate a role with a user (or a group of users), they have access only to the areas within BIG-IQ that you explicitly grant.
Assigning more than one role to a user
The responsibilities and roles each of your users has probably depends on the number of people who have access to BIG-IQ.
For example, if you have only two people managing your devices from BIG-IQ, they both most likely need to have full access to all aspects of BIG-IQ at one time or another. For these users, you'd assign them both the Administrator role.
Assigning more granular/specialized privileges to a user
On the other hand, if you're working for a larger company that has specialized roles to manage different services, or different parts of services, you can provide more granular access.
For example, if you have two people who manage BIG-IP devices used only for network security purposes, you could assign them both the role of Network Security Manager. Or, if you have two people managing devices used for network security, but you want only one of them to write and edit policies, and the other to (only) deploy the policies, you could assign the first person the Network Security Editor role, and the other person the Network Security Deployer role. In this case, the person with the Network Security Editor role can only create, view, and edit policies, but not deploy them. The person assigned to the Network Security Deployer can view and deploy policies, but cannot create or edit them.
About built-in and custom roles
You can assign role-based user access one of two ways:
- Built-in user roles - BIG-IQ ships with several built-in user roles that correlate to common job responsibilities. This makes it easy for you to quickly assign users with permissions to access the BIG-IP objects they need to do their job.
- Custom user roles - allow you to grant access to users at a granular level in a way that fits your business needs. You can provide specific permissions to as many BIG-IP objects as needed, even across multiple services.
Built-in roles/role types shipped with BIG-IQ
As a system manager, you'll need a way to limit a user's access to certain areas of F5® BIG-IQ® Centralized Management and to its managed devices. The easiest way to do this is to base user access on the responsibilities, or role, the user has in your company. To help you do that, BIG-IQ ships with a set of built-in roles (associated with a role type) with certain privileges that you can assign to specific users. Since responsibilities and duties for certain roles are specialized, users assigned to some roles have access to only specific parts of BIG-IQ. These restrictions are outlined in the role description.
| Role | This role can: |
|---|---|
| Administrator | Perform all tasks for setting up and maintaining BIG-IQ and managing devices. This includes discovering devices, adding individual users, assigning roles, installing updates, activating licenses, and so forth. |
| Access Auditor | Only view Access configuration objects and managed Access devices. This role cannot edit, discover, or deploy devices or policies. |
| Access Deployer | Deploy Access configuration objects. This role cannot discover and edit devices or policies. |
| Access Editor | View and edit Access configuration objects, including the ability to add, update, and delete pools and pool members from the Access configuration object editor. This role cannot discover or deploy devices or policies. |
| Access Manager | Deploy and edit Access configuration objects, and view the Access Reporting and dashboard. This role cannot add or remove devices and device groups, and cannot discover, import, or delete services. |
| Access Viewer | Only view Access configuration objects and discovered Access devices. This role cannot edit, discover, or deploy devices or policies. |
| Application Editor | View Local Traffic & Network objects and create, view, and modify applications via Service Catalog templates. |
| Device Manager | Perform all tasks for device management, including device discovery, licensing, software image management, and UCS backups. |
| Device Viewer | Only view aspects of device management including device discovery, licensing, software image management, and UCS backups. |
| DNS Viewer | Only view aspects of device management associated with DNS. |
| Fraud Protection Manager | Perform all tasks for managing the Fraud Protection Service functionality. |
| Fraud Protection Viewer | Only view Fraud Protection Service objects. |
| License Manager | Perform all tasks related to BIG-IP licensing. |
| Local Traffic & Network Deployer | View and deploy Local Traffic & Network configuration objects for managed Local Traffic & Network devices. |
| Local Traffic & Network Editor | Create, view, modify, and delete Local Traffic & Network configuration objects. |
| Local Traffic & Network Manager | Perform all tasks for managing Local Traffic & Network, including creating, viewing, modifying, and deleting Local Traffic & Network objects. |
| Local Traffic & Network Viewer | Only view Local Traffic & Network objects. |
| Network Security Deployer | View and deploy Network Security objects. |
| Network Security Editor | Create, view, modify, and delete Network Security objects. |
| Network Security Manager | Perform all tasks associated with Network Security, including areas involved in creating, viewing, modifying, and deleting shared and firewall-specific security objects. |
| Network Security Viewer | Only view Network Security firewall objects. This role cannot edit, discover, or deploy devices or policies. |
| Pool Member Operator | Enable, disable, or force offline pool members for all pools. To limit access to select pools, create a custom resource group and role based on the Pool Member Operator type. |
| Security Manager | Perform all tasks associated with Network Security, Web Application Security, and Fraud Protection Service, including areas involved in device discovery, creating, viewing, modifying, and deleting Web Application Security, shared and firewall-specific security objects. |
| Service Catalog Editor | View Local Traffic & Network objects and create, view, modify, and delete Service Catalog templates. |
| Service Catalog Viewer | Only view Local Traffic & Network objects and Service Catalog templates. |
| Trust Discovery Import | Manage device trust establishment, service discovery, service import, removal of services and removal of trust. |
| Virtual Server Operator | Enable or disable all virtual servers. To limit access to select virtual servers, create a custom resource and role based on the Virtual Server Operator role type. |
| Web App Security Deployer | View and deploy Web Application Security and shared security configuration objects for Web Application Security devices. |
| Web App Security Editor | Create, view, modify, and delete Web Application Security and shared security configuration objects. |
| Web App Security Manager | Create, view, modify, delete and deploy Web Application Security and shared security configuration objects. |
| Web App Security Viewer | Only view Web Application Security and shared security configuration objects. |
Add a user and assign them a built-in role
Custom roles based on job responsibilities
BIG-IQ® Centralized Management makes it easy for you to give users specific permissions for access only to those BIG-IP® objects they need to do their job. Role-based access allows you to create a custom role with specific privileges to view or edit only those BIG-IP objects (resources) you explicitly assign to the role.
There are several built-in roles shipped with BIG-IQ, but there might be a reason you want to give a person permissions to interact only in a clearly defined way with specific resources. To do that, you need to add each of the following to BIG-IQ:
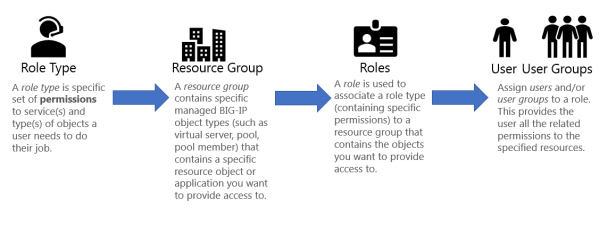
- Custom role type - Select a one or more services and define a set of permissions (read, add, edit, delete) for interacting with the objects associated with selected services.
- Custom resource group - Select the specific type of resources you want to provide a user access to—for example, BIG-IP virtual servers.
- Custom role - Associate this custom role with the custom role type and resource group you created, to combine the permissions you specified in the custom role type with the resources you defined for the custom resource group.
- Custom user - Associate this user with the custom role you created to provide that person access and permissions to the resources you specified.
Create a custom role type to give permissions to BIG-IP object types

Create a resource group and associate it with a role type

- At the top of the screen, click System.
- On the left, click .
- Near the top of the screen, click the Add button.
- In the Name field, type a name to identify this group of resources.
- From the Role Type list, select the role type you want to provide access to for this group of resources.
- From the Select Service list, select the service(s) you want to provide access to for this group of resources.
- From the Object Type list, select the type of object you want to add to this group of resources.
-
For the Source setting:
- Selected Instances - Select this option to put only the source objects you selected into this resource group. If you select this option, the associated role will not have access to any new objects of the same type added in the future unless you explicitly add it to this resource group.
- Any Instance - Select this option if you want the associated role to have any instance of the specified object type, including future instances (newly configured objects of this type).
- Select the check box next to the name of each object you want to add to this group of resources, and click the Add Selected button.
- Click the Save & Close button.
Add new custom role
In addition to the built-in roles that ship with BIG-IQ, you can create a custom role with specific privileges to particular areas of BIG-IQ and BIG-IP devices.

Add a user to a custom role


