Applies To:
Show Versions
BIG-IQ Centralized Management
- 5.4.0
BIG-IQ provides you with the tools you need to provide granular access to users. You decide what BIG-IP objects a user interacts with, and how. The BIG-IQ components you use for applying role-based user access are:

Pre-requisites
To complete this use case, you must have administrator access to BIG-IQ and have:
- Configured BIG-IQ.
- Discovered a BIG-IP device and imported the LTM service.
- Configured the SharePoint application on that BIG-IP device.
- Configured authentication for your users. In this use case scenario, we use BIG-IQ local authentication.
Overview: Providing a user access to a SharePoint application hosted on BIG-IP
This use case scenario walks you through the tasks you'll need to provide a user access to a single application, SharePoint, that is hosted on your managed BIG-IP device.
The required tasks are:
- Role Type
- Create a custom role type
associated with one or more services. Then select the type of resources (object types)
this role needs to do their job, and then specify how you want to allow this role type to
interact with those objects. For this example:
- Select the Local Traffic (LTM) service.
- Create a role type named SharePoint Management.
- Select the Virtual Server: Local Traffic and add it to the selected resources.
- Provide permissions for this role type to read, add, edit, and delete those objects.
- Resource Group
- Create a custom
resource group that contains the specific resources you want to provide access to. For
this example:
- Create a resource group, SharePoint Server.
- Select the SharePoint Management role type to narrow the service and object types displayed to only those this role type has permissions to.
- Select the Local Traffic (LTM) service.
- Select the Virtual Server: Local Traffic service
- Locate the virtual server that is hosting your SharePoint application, and add it to the selected resources.
- Role
- Create a custom role
associated with the custom role type, and assign the custom resource group to that role. For this example:
- Create a custom role called SharePoint Manager.
- Associate the SharePoint Management role type to it.
- Associate the SharePoint Server resource group to it.
- User
- Create a user and associate
it with the role you created. For this example:
- Create a user named Sam.
- Associate the user with the SharePoint Manager role.
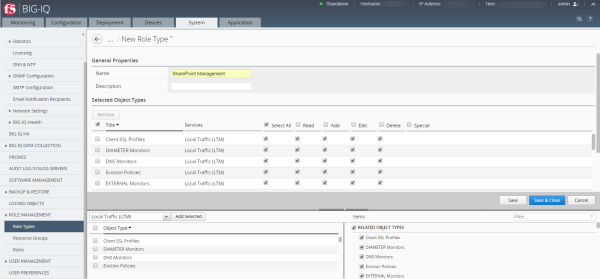
Create a custom role type with permissions to access LTM virtual servers

The first step to providing your user access to an application is to create a custom role type and define a set of permissions to specify how that role type interacts with objects that are associated with a service.
In this example, we'll be providing access to BIG-IP virtual servers (because your applications are hosted on BIG-IP virtual servers) with permissions to read, add, edit, and delete all associated objects.
-
Next to each object type, select check box beneath the permissions you want to
give to this role type.
You must select at least one permission for each Selected Object Type.Your screen should now look like this:
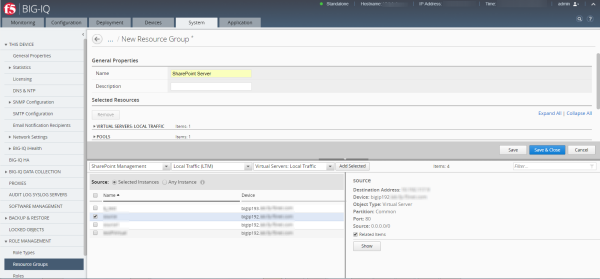
Create a resource group containing the virtual server hosting SharePoint

Create a resource group containing the BIG-IP virtual server (and associated objects) hosting your SharePoint application. This allows you to give the access and permissions you specified for the associated role type only to this virtual server.
-
Select the check box next to the virtual server hosting your
SharePoint and click the Add
Selected button.
Tip: For this scenario, we want to limit access to only the server hosting the SharePoint application, so leave the Source option set as Selected Instances. For other applications or scenarios, you might want to provide access to any existing virtual servers and any virtual servers created in the future. In that case, you would select the Any Instance setting.The virtual server you selected displays in the Selected Resources list. Your screen should look similar to the following.
Create a custom role for the SharePoint Manager

In this example, we'll be creating a role for SharePoint Manager.
-
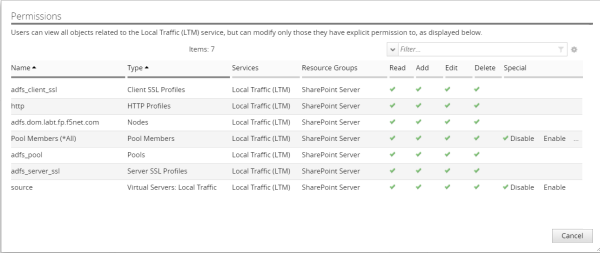
To view the user access permissions associated with this role, click the
View Permissions button towards the bottom of the
screen.
You'd see something similar to the following if you created the role in Relaxed Mode.
 In contrast, this is what you would see if you created the role in Strict Mode.
 Tip: It's a good idea to leave this in Relaxed Mode so you don't unintentionally limit a user's ability to see related objects.Your screen should look similar to the following:
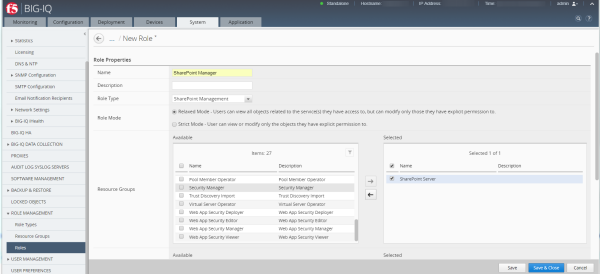
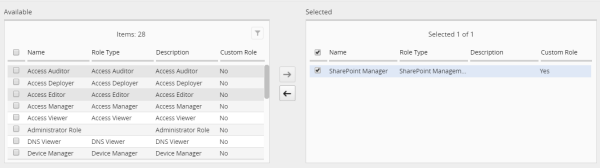
Add a SharePoint manager user

-
From the Roles Available list, select the check box next
to SharePoint Manager and move it to the
Selected list.
Your screen should look similar to the following:
Legal notices
Publication Date
This document was published on December 29, 2017.
Publication Number
MAN-0686-00
Copyright
Copyright © 2017, F5 Networks, Inc. All rights reserved.
F5 Networks, Inc. (F5) believes the information it furnishes to be accurate and reliable. However, F5 assumes no responsibility for the use of this information, nor any infringement of patents or other rights of third parties which may result from its use. No license is granted by implication or otherwise under any patent, copyright, or other intellectual property right of F5 except as specifically described by applicable user licenses. F5 reserves the right to change specifications at any time without notice.
Trademarks
For a current list of F5 trademarks and service marks, see http://www.f5.com/about/guidelines-policies/trademarks.
All other product and company names herein may be trademarks of their respective owners.
Patents
This product may be protected by one or more patents indicated at: https://f5.com/about-us/policies/patents.
Link Controller Availability
This product is not currently available in the U.S.
Export Regulation Notice
This product may include cryptographic software. Under the Export Administration Act, the United States government may consider it a criminal offense to export this product from the United States.
RF Interference Warning
This is a Class A product. In a domestic environment this product may cause radio interference, in which case the user may be required to take adequate measures.
FCC Compliance
This equipment has been tested and found to comply with the limits for a Class A digital device pursuant to Part 15 of FCC rules. These limits are designed to provide reasonable protection against harmful interference when the equipment is operated in a commercial environment. This unit generates, uses, and can radiate radio frequency energy and, if not installed and used in accordance with the instruction manual, may cause harmful interference to radio communications. Operation of this equipment in a residential area is likely to cause harmful interference, in which case the user, at his own expense, will be required to take whatever measures may be required to correct the interference.
Any modifications to this device, unless expressly approved by the manufacturer, can void the user's authority to operate this equipment under part 15 of the FCC rules.
Canadian Regulatory Compliance
This Class A digital apparatus complies with Canadian ICES-003.
Standards Compliance
This product conforms to the IEC, European Union, ANSI/UL and Canadian CSA standards applicable to Information Technology products at the time of manufacture.


