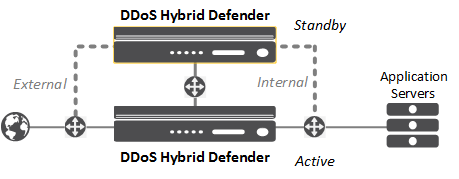
You can install DDoS Hybrid Defender™ onto a dedicated system (device 1)
and set up a failover system that automatically takes over in case of system failure (device 2).
The system processing traffic is called the active system. A second system is set up
as a standby system, and data is synchronized between the active and standby
systems. If the active system goes offline, the standby system become active, and begins
processing traffic and protecting against DDOS attacks.
Note: To set up two DDoS Hybrid
Defender devices for high availability, you need to follow the steps outlined in this section
exactly in the order shown.
You can assign the management IP addresses from the LCD panel of the devices, or with a
hypervisor if you are using the Virtual Edition.
DDoS Hybrid Defender High-Availability deployment
You must have two DDoS Hybrid Defender systems to set up high availability. Before you begin,
make sure you have this information for both devices:
- Base registration key
- Internal and external self-IP addresses
- Management IP address, network mask, and management route IP address
- Passwords for the root and admin accounts
- NTP server IP address (optional)
- Remote DNS lookup server IP address (required for F5 Silverline®
integration or if resolving host names)
Installing DDoS Hybrid Defender on device 1
Before you begin, you need to have
access to the DDoS Hybrid Defender™ software from F5 (either on the
system or downloaded from F5), and have completed the initial setup on device 1, the one
that will be the active device.
When installing two systems for high
availability, you first install DDoS Hybrid Defender onto device 1, the system you want
to set up as the active system. Device 1 must be the system with the highest management
IP address. If you are installing on systems with management IP addresses of
10.192.19.24 and 10.192.19.25,
consider 10.192.19.25 to be device 1.
-
Log in to DDoS Hybrid Defender device 1 using the administrator user name and
password.
The system displays the Welcome screen.
-
On the Main tab, click DoS Protection.
Because the software has not yet been installed, the Import Package
screen opens.
-
From the Install Method list, select Use
Onboard RPM.
If the software is not on the device, you need to download the RPM onto your
local system from F5 Downloads, then select Upload RPM to
locate and upload that file.
-
Click Install.
The software is installed quickly, and the Protected Objects screen
opens.
The DDoS Hybrid Defender software is
installed on device 1, and the DoS configuration screens are now available. Next you can
set up high availability on device 1.
Configuring high availability on device
1
Before you can set up a failover
device, you must have installed DDoS Hybrid Defender™ on one of the
two devices. That system must connect to a second system that uses the same hardware
platform.
To ensure high availability, you can
configure an HA VLAN that connects to and synchronizes data between the active and
standby systems. You perform this task by logging in to device 1.
-
On the Main tab, click .
-
On the menu bar, click High Availability.
On the High Availability screen, the HA Cluster Configuration is displayed, and shows
partial configuration of the device on which you are working (device
1).
-
Click the management IP address of device 1, and specify this
information:
-
Type the Username and
Password of the system administrator account
on device 1.
-
If your network requires a VLAN Tag, type the
number (1-4094). Otherwise, leave it blank.
-
Click Select Interface and select the interface
to connect to the standby system. If you specified a VLAN tag and want
to accept only frames that contain VLAN tags, select
Tagged; otherwise, leave it unselected.
You can associate multiple VLANs with tagged interfaces, but you can
associate only one VLAN with untagged interfaces.
-
In the IP Address/Mask field, type the IP
address and netmask that specifies the HA interface.
-
Click Remote Device Management IP, and specify this
information for the standby system:
-
In the Management IP Address field, type the
management IP address of the remote device (device 2) to use for high
availability.
-
Type the Username and
Password of the system administrator account
on device 2.
-
If your network requires a VLAN Tag, type the
number (1-4094). Otherwise, leave it blank.
-
Click Select Interface and select the interface
to connect to the active system. If you specified a VLAN tag and want to
accept only frames that contain VLAN tags, select
Tagged; otherwise, leave it unselected.
-
In the IP Address/Mask field, type the IP
address and netmask of the HA interface.
-
Click Submit.
Device 1 becomes the Active device and device 2 is the Standby device.
In the upper left corner of the screen it says ONLINE (ACTIVE) on device
1.
You have set up the two systems for
high availability. After you complete setting up the two systems and configuring DDoS,
the standby or failover system will be able to automatically take over and handle DDoS
protection if the active system goes offline.
Next, you need to install DDoS Hybrid Defender on the standby system.
Installing DDoS Hybrid Defender on device 2
Before you begin, you need to
have access to the DDoS Hybrid Defender™ software from F5 (either on
the system or downloaded from F5), and have completed the initial setup on device 2, the
standby device. The active device (device 1) must have been installed and set up for
high availability.
You can now install DDoS Hybrid
Defender onto device 2, the system that is set up as the standby system. Device 2 must
be the system with the lower management IP address. If you are installing on systems
with management IP addresses of 10.192.19.24 and
10.192.19.25, consider 10.192.19.24 to
be device 2.
-
Log in to DDoS Hybrid Defender device 2 using the administrator user name
and password.
The system displays the Welcome screen.
-
On the Main tab, click DoS Protection.
Because the software has not yet been installed, the Import Package
screen opens.
-
From the Install Method list, select Use
Onboard RPM.
If the software is not on the device, you need to download the RPM onto your
local system from F5 Downloads, then select Upload RPM to
locate and upload that file.
-
Click Install.
The software is installed quickly, and the Protected Objects screen
opens.
The DDoS Hybrid Defender software
is now installed on device 2. In the upper left corner, it says ONLINE
(STANDBY). You can proceed to configure the network on both systems.
However, note that you should configure DoS protection on the Active device.
Configuring the network on the high
availability systems
You must configure the network to
create the workflow on both the active and standby DDoS Hybrid
Defender™ systems. You do this by configuring VLANs (virtual local area
networks), and associating the physical interfaces on the system with them. The way you
set up the system depends on your network organization. Here are some of the
configurations to consider:
- Use the default VLAN setup (L2
bridge mode), for example, if you use switch topology
- Use Virtual Wire (L2Wire) to set
up the system as an inline L2 transparent mode device
- Define VLANs, if the system uses
routed technology
- Define routes as needed to direct
traffic.
Note: If you are using the BIG-IP® Virtual Edition, to set up the network as described
here, you must create a security policy on the vSwitch. Configure the security
policy to accept the Promiscuous Mode and Forged
Transmits policy exceptions. For details about these options, see
the VMware ESX or ESXi Configuration Guide.
-
Log in to DDoS Hybrid Defender device 1 using the administrator user name and
password.
-
On the Main tab, click .
-
On the menu bar, click Network Configuration.
-
If your network relies on switch topology and all traffic ingress to DDoS
Hybrid Defender is from one VLAN and traffic egress is through another VLAN, you
can use the defaultVLAN setup. Otherwise, skip this step
and go to the next one.
-
Click defaultVLAN.
This default VLAN group contains two VLANs, one for external traffic
and one for internal traffic.
-
For the Internal and
External fields, type a tag number (from 1 to
4094) for the VLAN.
The system automatically assigns a tag number if you do not specify a
value.
-
For each VLAN, select the interface to use for traffic management,
leave Untagged unselected, and click
Add.
Click Untagged to allow the interface to accept
traffic only from that VLAN, instead of from multiple VLANs.
-
In the IP Address/Mask (Port Lockdown) field,
type the IP address and mask.
-
After the IP address, select the Port Lockdown setting: Select
Allow None to accept no traffic;
Allow Default to accept default protocols and
services only; and Allow All to allow full access
to this IP address (all TCP and UDP services).
-
Because you are setting up two systems for high availability, in the
Floating IP field, type the IP address (it
must be in the same subnet as the IP address), and select the Port
Lockdown setting.
The floating IP address must be the same on both devices, and you must
configure it on both devices since it represents the active
device.
Tip: Using a
floating IP address makes it so the router always goes to the same
address regardless of which system is active.
-
Click Done Editing to save the default network
configuration.
The system configures the default network in the background creating 2
VLANs, a VLAN group, and assigns a self IP address.
-
To operate DDoS Hybrid Defender as an inline L2 transparent mode device, create
a Virtual Wire configuration. (The ingress and egress VLANs are the same.) Click
Create and configure it as follows:
-
Type a name for the Virtual Wire configuration, then select unique
interfaces (or trunks) for the ingress and egress ports on the system
(Member 1 and Member 2).
-
In the Configuration section, for Define VLANs
select Add.
-
Type a name for the VLAN group.
-
If using tagged VLANs, type a tag number for the VLANs (an integer from
1 to 4095), select the
Members Tagged check box,
-
Click Add.
-
If using other VLAN tags, create additional VLANs following the same
steps.
The system creates a Virtual Wire configuration.
-
If DDoS Hybrid Defender uses routed topology, instead of using the default
network, configure the network in the VLAN area. Click
Create and set up each VLAN as follows:
-
Type a name, VLAN tag, then select the interface for the VLAN, and
click Add.
-
In the IP Address/Mask (Port Lockdown) field,
type the IP address and mask that specifies a range of IP addresses
spanning the hosts in the VLAN.
-
After the IP address, select the Port Lockdown setting: Select
Allow None to accept no traffic;
Allow Default to accept default protocols and
services only; and Allow All to activate TCP and
UDP services.
-
Optional: To share an IP address between two high availability devices
(such as if data passes through a router on the way to DDoS Hybrid
Defender), in the Floating IP Address/Mask (Port
Lockdown) field, type the floating IP address (it must
be in the same subnet as the IP address), and select the Port Lockdown
setting.
The floating IP address must be the same on both devices, and you must
configure it on both devices since it represents the active
device.
Tip: Using a floating IP address makes it so the router
always goes to the same address regardless of which system is
active.
-
Click Done Editing to save the VLAN
configuration.
-
Create as many VLANs as you need to connect to DDoS Hybrid
Defender.
-
If your system is configured using routed mode and connects to other networks
through additional routers, add the required routes so the traffic can reach its
destination:
-
Next to Routes, click
Create.
-
Type a name, destination IP address, netmask, and gateway IP address
(this is the next hop router address).
-
Click Done Editing to save the route.
-
Click Update to save the network configuration.
-
Log in to DDoS Hybrid Defender device 2 using the administrator user name and
password.
-
Repeat the network configuration steps (2-8) on device 2, using a similar
configuration.
Tip: The names of the
VLANs (if you added new VLANs), VLAN tags, floating IP address, and routes
(if added) should be the same on both systems.
The active and standby DDoS Hybrid
Defender systems are set up to work within your network for most typical configurations.
The network configurations are not synchronized between the two devices because they
need to differ. However, other settings that you configure on the active device will be
synchronized with the standby device.
At this point, you can start
configuring DDoS Hybrid Defender on the active system. You can set up remote logging and
Silverline, if you are using those features. Then you can begin setting up DDoS
protection. All changes you make on the active system are synchronized automatically
with the standby system.


