Updated Date: 07/07/2026
Configuration Notes: F5 Access for Microsoft Windows 10 and Windows 10 Mobile
F5 Access is supported on Microsoft Windows 10 and Windows 10 Mobile clients. It supports F5 VPN connections with BIG-IP Access Policy Manager (APM).
After you configure a VPN profile on your device for F5 Access, select it from Network Connections.
Note: For information about how to configure remote access on a BIG-IP system with APM, refer to the BIG-IP APM Configuration Notes section.
You must first download the F5 Access application from the Microsoft Windows 10 Store before you can create a new VPN profile.
To use F5 Access for network access on Microsoft Windows 10, you must configure a VPN profile and specify F5 VPN as the VPN provider.
Note: A VPN connection that you configure this way uses default parameter values, such as port 443. To specify other values, you should configure a profile using the Add-VpnConnection PowerShell command and specify options using the CustomConfiguration property.
-
On your Windows system, select Settings > VPN. On Windows Mobile, select Settings > Network & Wireless > VPN
As you make selections, the display changes in response.
-
Click Add a VPN Connection.
-
From the VPN provider list, select F5 Access.
-
In the Connection name field, type a name for the connection.
-
In the Server name or address field, type the FQDN or IP address of the BIG-IP system with BIG-IP Access Policy Manager.
Do not type a URL.
-
Select the Remember my sign in info check box.
When you select this check box, the Windows client caches your credentials and you do not need to enter them again.
-
Click Save.
The new VPN profile appears on the list.
Connect to a profile to use the connections to your network supported by F5 Access.
-
On your Windows system, select Settings > VPN. On Windows Mobile, select Settings > Network & Wireless > VPN
As you make selections, the display changes in response.
-
Select the existing VPN profile.
Additional options display.
-
From the new options, select Connect.
The VPN profile displays as “Connected.”
You can terminate an existing VPN connection on the BIG-IP® Edge Client® for Windows Phone.
-
On the main screen of the Windows Phone, tap Settings > VPN.
The VPN screen displays.
-
Tap a VPN profile.
The VPN profile displays
connected, manualbefore you tap the profile.The VPN profile displays
not connected, manualafter you tap the profile.
You have now terminated an existing VPN connection.
This table specifies parameters that are specific to F5 Access; the client supports these parameters in addition to other parameters that are available for VPN profiles. When you configure a VPN profile from PC Settings on your client, it takes the default values displayed in the table. These parameters are available for configuring a VPN profile using an MDM solution orPowerShell commands.
| Parameter | Type | Default value | Description |
|---|---|---|---|
| port | number | 443 | Port to connect to VPN server (Access Policy Manager). |
| landing-uri | text | Landing URI to use for authentication (APM). | |
| ssl-encryption | boolean | true | If set to false, SSL encryption is not used. |
| authenticate-retries | number | 3 | Maximum number of attempts to prompt for credentials when authentication fails. |
| log-level | default, minimum, info, debug | default | Specifies maximum level for log entries. |
| client-certificate | string | Specifies issuer of client certificate being used for authentication. | |
| optimize-for-low-cost-network | boolean | false | If set to true, client tries to reconnect to cheapest available network connection. |
| single-sign-on-credential | boolean | true | If set to true, client tries to use VPN credentials to connect to Windows File Shares. |
| prompt-for-credentials | boolean | true | If set to false, user is not asked for credentials and server receives empty username and password fields. Can be used in certificate-only authentication. |
| tls1.2 | boolean | true | Use TLS1.2 protocol for TLS/SSL communication. |
These examples show how to specify F5 parameters for a VPN profile using PowerShell commands and the CustomConfiguration property.
This example shows how to create a VPN profile that uses a certificate issued by Site Request, Inc. for second-factor authentication. The certificate must already be installed on the client device. F5 Access can read the certificate from certificate storage on the device or from a smart card inserted into the device.
Note: The client supports smart cards that work with Microsoft Base Smart Card Cryptographic Service Provider.
$xml = "<f5-vpn-conf><client-certificate><issuer>Site Request Inc</issuer></client-certificate></f5-vpn-conf>"
$sourceXml=New-Object System.Xml.XmlDocument
$sourceXml.LoadXml($xml)

`Add-VpnConnection` **-Name** *F5\_vpn\_cert* **-ServerAddress** *apm\_server\_fqdn* **-SplitTunneling** *$True* **-PluginApplicationID** *F5Networks.vpn.client\_btcnfmkykcjs2* **-CustomConfiguration** *$sourceXml*This example shows how to create a VPN profile using port 444 to connect to the BIG-IP system.
$xml = "<f5-vpn-conf><port>444</port></f5-vpn-conf>"
$sourceXml=New-Object System.Xml.XmlDocument
$sourceXml.LoadXml(**$xml**)

`Add-VpnConnection` **-Name** `F5_vpn_port_444 `
**-ServerAddress** *apm\_server\_fqdn*
**-SplitTunneling** *$True*
**-PluginApplicationID** *F5Networks.vpn.client\_btcnfmkykcjs2*
**-CustomConfiguration** *$sourceXml*This example shows how to create a VPN profile using the landing URI to connect to the BIG-IP system.
$xml = "<f5-vpn-conf><landing-uri>test</landing-uri></f5-vpn-conf>"
$sourceXml=New-Object System.Xml.XmlDocument
$sourceXml.LoadXml(*$xml*)

`Add-VpnConnection` **-Name** `F5_vpn_landing_uri` **-ServerAddress** *apm\_server\_fqdn* **-SplitTunneling** *$True* **-PluginApplicationID** *F5Networks.vpn.client\_btcnfmkykcjs2* **-CustomConfiguration** *$sourceXml*This example shows how you can configure multiple servers for VPN connection. F5 Access attempts to reach each server in the list until it successfully authenticates the user.
$VPNConnectionName = "Global VPN"
$PluginApplicationID = "*F5Networks.vpn.client\_btcnfmkykcjs2*"

$VPNServerList = @()
$VPNServerList += New-VpnServerAddress my1.server.fqdn -FriendlyName Africa
$VPNServerList += New-VpnServerAddress my2.server.fqdn **-FriendlyName** Europe
$VPNServerList += New-VpnServerAddress my3.server.fqdn **-FriendlyName** Asia
$VPNServerList += New-VpnServerAddress my4.server.fqdn **-FriendlyName** "North America"
$VPNServerList += New-VpnServerAddress my5.server.fqdn **-FriendlyName**  "South America"
$VPNServerList += New-VpnServerAddress my6.server.fqdn **-FriendlyName**  Antarctica
$VPNServerList += New-VpnServerAddress my7.server.fqdn **-FriendlyName**  Australia

$xml = "<f5-vpn-conf><log-level>debug</log-level></f5-vpn-conf>"

# Validate XML configuration
$ErrorActionPreference = "Stop"
$sourceXml=New-Object System.Xml.XmlDocument
$sourceXml.LoadXml (*$xml*)

# Remove existing entry
$VPNConnections = `Get-VpnConnection`
foreach ($i in *$VPNConnections*) {
    if ($i.Name -eq *$VPNConnectionName*) {
        `Write-Host` "Remove VPN connection:" *$VPNConnectionName*
        `Remove-VpnConnection` **-Name** *$VPNConnectionName*
    }
}

# Add new entry
`Write-Host`> "Configure VPN connection:" *$VPNConnectionName* "with default server:" *$VPNServerList* [0].ServerAddress "VPNP ID:" *$PluginApplicationID*
`Add-VpnConnection` **-Name*** $VPNConnectionName ***-ServerAddress** *$VPNServerList*`[0].ServerAddress `**-SplitTunneling** *$True* **-PluginApplicationID** *$PluginApplicationID* **-CustomConfiguration** *$sourceXml* **-ServerList** *$VPNServerList*The AddVpnConnection PowerShell command supports a CustomConfiguration property that you can use to specify F5 parameters for a VPN profile. The input for the command is in XML format; the schema is available in the XML Schema: F5-specific configuration parameters section of this document. For help customizing a VPN profile, refer to the Examples: VPN profile configuration section.
| Command | Description |
|---|---|
Add-VpnConnection |
Add a VPN profile. |
Get-VpnConnection |
View configured VPN profiles. |
Remove-VpnConnection |
Delete a VPN profile. |
Use the Get-Help command in Powershell to view command syntax. For example, type Get-Help Add-VpnConnection.
When you select an app or resource that needs access through F5 Access, such as a company intranet site, Windows 10 can automatically prompt you to sign in with one click. For command syntax, open PowerShell and type Get-Help for this command:
Add-VpnConnectionTriggerApplication
Add-VpnConnectionTriggerApplication -ConnectionName SR_SanJose -ApplicationID "C:\Windows\System32\notepad.exe"This is the schema for the CustomConfiguration property of the VPN profile.
<?xml version="1.0" encoding="utf-8"?>
<xs:schema id="XMLSchema"
    targetNamespace="http://siterequest.com/XMLSchema.xsd"
    elementFormDefault="qualified"
    xmlns="http://tempuri.orgsiterequest.com/XMLSchema.xsd"
    xmlns:xs="http://www.w3.org/2001/XMLSchema">
  <xs:simpleType name="log-levelType">
    <xs:restriction base="xs:string">
      <xs:enumeration value="default"/>
      <xs:enumeration value="minimum"/>
      <xs:enumeration value="info"/>
      <xs:enumeration value="debug"/>
    </xs:restriction>
  </xs:simpleType>
  <xs:element name="f5-vpn-conf">
    <xs:complexType>
      <xs:all minOccurs="0">
        <xs:element name="port" type="xs:unsignedShort" default="443"/>
        <xs:element name="landing-uri" type="xs:anyURI"/>
        <xs:element name="ssl-encryption" type="xs:boolean" default="true"/>
        <xs:element name="tls1.2" type="xs:boolean" default="true"/>
        <xs:element name="authenticate-retries" type="xs:unsignedByte" default="3"/>
        <xs:element name="log-level" type="log-levelType" default="default"/>
        <xs:element name="optimize-for-low-cost-network" type="xs:boolean" default="false"/>
        <xs:element name="single-sign-on-credential" type="xs:boolean" default="true"/>
        <xs:element name="client-certificate">
          <xs:complexType>
            <xs:all minOccurs="0" maxOccurs="1">
              <xs:element name="issuer" type="xs:string" minOccurs="1"/>
            </xs:all>
          </xs:complexType>
        </xs:element>
      </xs:all>
    </xs:complexType>
  </xs:element>
</xs:schema>| Configuration example | Example XML syntax |
|---|---|
| Multifactor authentication with client certificate | <f5-vpn-conf><client-certificate> <issuer>Snake Oil</issuer> </client-certificate></f5-vpn-conf> |
| Client certificate authentication only | <f5-vpn-conf><prompt-for-credentials> false</prompt-for-credentials> <client-certificate><issuer> Snake Oil Ltd</issuer></client-certificate> </f5-vpn-conf> |
| Connecting to an APM server over port 80, no SSL encryption, for debugging purposes only | <f5-vpn-conf><port>80<ssl-encryption>false </ssl-encryption></f5-vpn-conf> |
You can deploy an F5 VPN profile for Windows 10 Mobile using the Airwatch MDM provider. This options provides more options than the standard VPN deployment, such as monitoring the client certificate usage and setting the landing URL.
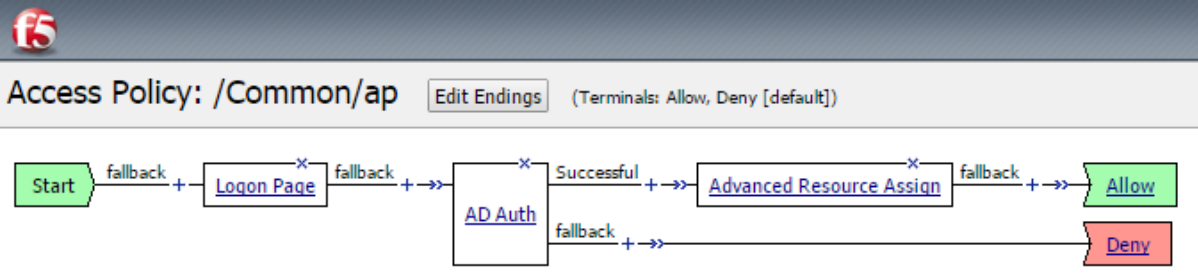
This example displays a username and password authentication access policy.
You can deploy a VPN connection on F5 Access for F5 Access using Airwatch.
-
On the Airwatch console, create a VPN configuration with the connection type F5 Edge VPN.
For more information on creating an Airwatch profile, refer to Airwatch documentation.
-
Create an access policy in BIG-IP® Access Policy Manager®.
-
Install F5 Access from the Windows Store.
-
Enroll the device with F5 Access.
F5 Access deploys the F5 VPN profile. The MDM profile is deployed to devices, regardless of whether the F5 Access app is installed.
-
Check that the VPN profile is created on the device or devices.
You have now deployed an F5 VPN connection profile.
On Access Policy Manager (APM), you need to configure an access policy for F5 Access.
Additionally, you need a standard network access configuration. For more information, refer to BIG-IP Access Policy Manager Network Access Configuration on the AskF5 website at http://support.f5.com.
Your access policy can collect this type of information for authentication purposes:
- User name and password
- Client certificate as second-factor authentication
In the access policy, you can use the Client Cert access policy item or the On-Demand Cert Auth access policy item.
In the client SSL profile for the virtual server, select request for the Client Certificate property.
An access policy to support F5 Access might include a Client Type item, a Client OS item, appropriate authentication items, and some resource assignment access policy items.
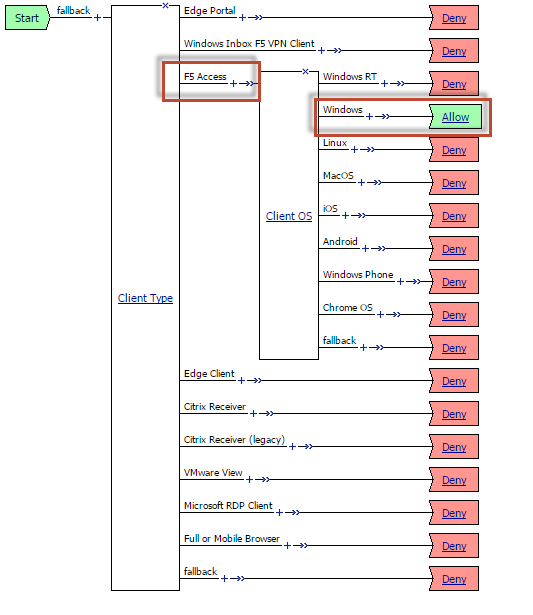
To configure F5 Access for Windows 10 to be detected, use the F5 Access branch of the Client Type access policy item. F5 Access is detected as “F5 Access” on this branch. The Client Type for F5 Access differs from F5 Inbox VPN Client for Windows 8.1 (detected as “Windows Inbox F5 VPN Client”) and BIG-IP Edge Client for Windows Phone 8.1 (detected as “Edge Client”).
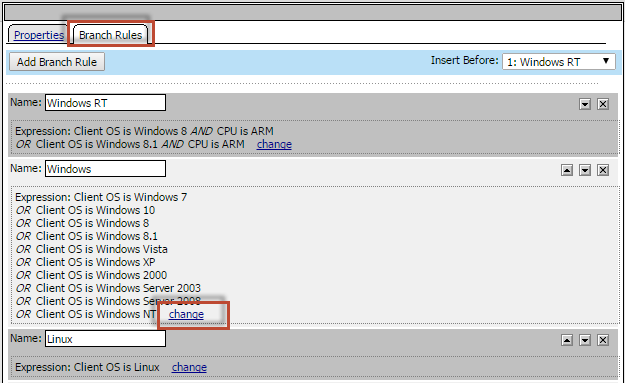
To detect F5 Access for Windows 10 with the Client OS access policy item, you must modify the Client OS branch rule for Windows as follows.
Click the Client OS item, click the Branch Rules tab, and click change at the bottom of the Windows branch rule.
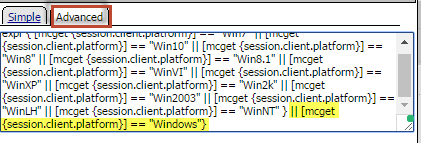
Click the Advanced tab, and add the following to the Windows expression.
|| [mcget {session.client.platform}] == "Windows"}
Click Finished, then Save, and change the ending to Allow on the Windows branch. The access policy appears as follows.
Note: You can also configure the access policy item to further detect the Windows version for Windows 10. To do this, you can add a custom access policy item or a branch rule with the custom expression [mcget {session.client.platform_version}] == "10".
Typically, in a network access configuration after authentication, you assign resources to the client. Resource assignment access policy items are omitted from this example for the sake of readability.
For additional information, refer to the AskF5 web site (http://support.f5.com) for documentation specific to the version of Access Policy Manager that you are using.
| Document | Description |
|---|---|
| Release Note for BIG-IP APM | New features and known issues. |
| BIG-IP Access Policy Manager Network Access Configuration | How to configure network access. |
| Configuration Guide for BIG-IP Access Policy Manager | Access profiles, access policies, visual policy editor. |