Updated Date: 07/07/2026
Configuring Remote High-Speed DNS Logging
You can configure the BIG-IP® system to log information about DNS traffic and send the log messages to remote high-speed log servers. You can choose to log either DNS queries or DNS responses, or both. In addition, you can configure the system to perform logging on DNS traffic differently for specific resources. For example, you can configure logging for a specific resource, and then disable and re-enable logging for the resource based on your network administration needs.
This illustration shows the association of the configuration objects for remote high-speed logging.
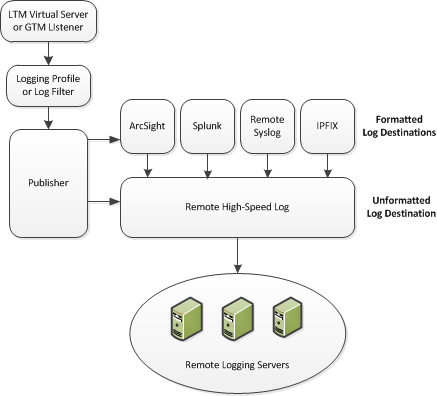
When configuring remote high-speed DNS logging, it is helpful to understand the objects you need to create and why, as described here:
| Object | Reason | Applies to |
|---|---|---|
| Pool of remote log servers | Create a pool of remote log servers to which the BIG-IP® system can send log messages. | Creating a pool of remote logging servers. |
| Destination (unformatted) | Create a log destination of Remote High-Speed Log type that specifies a pool of remote log servers. | Creating a remote high-speed log destination. |
| Destination (formatted) | If your remote log servers are the ArcSight, Splunk, IPFIX, or Remote Syslog type, create an additional log destination to format the logs in the required format and forward the logs to a remote high-speed log destination. | Creating a formatted remote high-speed log destination. |
| Publisher | Create a log publisher to send logs to a set of specified log destinations. | Creating a publisher. |
| DNS Logging profile | Create a custom DNS Logging profile to define the data you want the BIG-IP system to include in the DNS logs and associate a log publisher with the profile. | Creating a custom DNS logging profile for logging DNS queries. Creating a custom DNS logging profile for logging DNS responses. Creating a custom DNS logging profile for logging DNS queries and responses. |
| DNS profile | Create a custom DNS profile to enable DNS logging, and associate a DNS Logging profile with the DNS profile. | Creating a custom DNS profile to enable DNS logging. |
| LTM virtual server | Associate a custom DNS profile with a virtual server to define how the BIG-IP system logs the DNS traffic that the virtual server processes. | Configuring an LTM virtual server for DNS logging. |
Before creating a pool of log servers, gather the IP addresses of the servers that you want to include in the pool. Ensure that the remote log servers are configured to listen to and receive log messages from the BIG-IP system.
Create a pool of remote log servers to which the BIG-IP system can send log messages.
-
On the Main tab, click Local Traffic > Pools.
The Pool List screen opens.
-
Click Create.
The New Pool screen opens.
-
In the Name field, type a unique name for the pool.
-
Using the New Members setting, add the IP address for each remote logging server that you want to include in the pool:
-
Type an IP address in the Address field, or select a node address from the Node List.
-
Type a service number in the Service Port field, or select a service name from the list.
Note: Typical remote logging servers require port
514. -
Click Add.
-
-
Click Finished.
Before creating a remote high-speed log destination, ensure that at least one pool of remote log servers exists on the BIG-IP system.
Create a log destination of the Remote High-Speed Log type to specify that log messages are sent to a pool of remote log servers.
-
On the Main tab, click System > Logs > Configuration > Log Destinations.
The Log Destinations screen opens.
-
Click Create.
-
In the Name field, type a unique, identifiable name for this destination.
-
From the Type list, select Remote High-Speed Log.
Important: If you use log servers such as Remote Syslog, Splunk, or ArcSight, which require data be sent to the servers in a specific format, you must create an additional log destination of the required type, and associate it with a log destination of the Remote High-Speed Log type. With this configuration, the BIG-IP system can send data to the servers in the required format.
The BIG-IP system is configured to send an unformatted string of text to the log servers.
-
From the Pool Name list, select the pool of remote log servers to which you want the BIG-IP system to send log messages.
-
From the Protocol list, select the protocol used by the high-speed logging pool members.
-
Click Finished.
Ensure that at least one remote high-speed log destination exists on the BIG-IP system.
Create a formatted logging destination to specify that log messages are sent to a pool of remote log servers, such as Remote Syslog, Splunk, or IPFIX servers.
-
On the Main tab, click System > Logs > Configuration > Log Destinations.
The Log Destinations screen opens.
-
Click Create.
-
In the Name field, type a unique, identifiable name for this destination.
-
From the Type list, select a formatted logging destination, such as Remote Syslog, Splunk, or IPFIX.
The Splunk format is a predefined format of key value pairs.
The BIG-IP system is configured to send a formatted string of text to the log servers.
-
If you selected Remote Syslog, then from the Syslog Format list select a format for the logs, and then from the High-Speed Log Destination list, select the destination that points to a pool of remote Syslog servers to which you want the BIG-IP system to send log messages.
Important: For logs coming from Access Policy Manager (APM), only the BSD Syslog format is supported.
-
If you selected Splunk or IPFIX, then from the Forward To list, select the destination that points to a pool of high-speed log servers to which you want the BIG-IP system to send log messages.
-
Click Finished.
Ensure that at least one destination associated with a pool of remote log servers exists on the BIG-IP system.
Create a publisher to specify where the BIG-IP system sends log messages for specific resources.
-
On the Main tab, click System > Logs > Configuration > Log Publishers.
The Log Publishers screen opens.
-
Click Create.
-
In the Name field, type a unique, identifiable name for this publisher.
-
For the Destinations setting, select a destination from the Available list, and click << to move the destination to the Selected list.
Note: If you are using a formatted destination, select the destination that matches your log servers, such as Remote Syslog, Splunk, or ArcSight.
-
Click Finished.
Create a custom DNS logging profile to log DNS queries, when you want to log only DNS queries.
-
On the Main tab, click DNS > Delivery > Profiles > Other > DNS Logging or Local Traffic > Profiles > Other > DNS Logging.
The DNS Logging profile list screen opens.
-
Click Create.
The New DNS Logging profile screen opens.
-
In the Name field, type a unique name for the profile.
-
In the DNS Security area, from the Publisher list, select a destination to which the BIG-IP system sends DNS log entries.
-
If you want the BIG-IP system to log all DNS queries, for the Log Queries setting, ensure that the Enabled check box is selected.
-
If you want the BIG-IP system to include the query ID sent by the client in the log messages, for the Include Query ID setting, select the Enabled check box.
-
Click Finished.
Assign this custom DNS logging profile to a custom DNS profile.
Create a custom DNS logging profile to log DNS responses when you want to determine how the BIG-IP system is responding to a given query.
-
On the Main tab, click DNS > Delivery > Profiles > Other > DNS Logging or Local Traffic > Profiles > Other > DNS Logging.
The DNS Logging profile list screen opens.
-
Click Create.
The New DNS Logging profile screen opens.
-
In the Name field, type a unique name for the profile.
-
In the DNS Security area, from the Publisher list, select a destination to which the BIG-IP system sends DNS log entries.
-
If you want the BIG-IP system to log all DNS responses, for the Log Responses setting, select the Enabled check box.
-
If you want the BIG-IP system to include the query ID sent by the client in the log messages, for the Include Query ID setting, select the Enabled check box.
-
Click Finished.
Assign this custom DNS logging profile to a custom DNS profile.
Create a custom DNS logging profile to log both DNS queries and responses when troubleshooting a DDoS attack.
Note: Logging both DNS queries and responses has an impact on the BIG-IP system performance.
-
On the Main tab, click DNS > Delivery > Profiles > Other > DNS Logging or Local Traffic > Profiles > Other > DNS Logging.
The DNS Logging profile list screen opens.
-
Click Create.
The New DNS Logging profile screen opens.
-
In the Name field, type a unique name for the profile.
-
In the DNS Security area, from the Publisher list, select a destination to which the BIG-IP system sends DNS log entries.
-
If you want the BIG-IP system to log all DNS queries, for the Log Queries setting, ensure that the Enabled check box is selected.
-
If you want the BIG-IP system to log all DNS responses, for the Log Responses setting, select the Enabled check box.
-
If you want the BIG-IP system to include the query ID sent by the client in the log messages, for the Include Query ID setting, select the Enabled check box.
-
Click Finished.
Assign this custom DNS logging profile to a custom DNS profile.
Ensure that at least one custom DNS Logging profile exists on the BIG-IP system.
Create a custom DNS profile to log specific information about DNS traffic processed by the resources to which the DNS profile is assigned. Depending upon what information you want the BIG-IP system to log, attach a custom DNS Logging profile configured to log DNS queries, to log DNS responses, or to log both.
-
On the Main tab, click DNS > Delivery > Profiles > DNS.
The DNS list screen opens.
-
Click Create.
The New DNS Profile screen opens.
-
In the Name field, type a unique name for the profile.
-
Select the Custom check box.
-
In the Logging and Reporting area, from the Logging list, select Enabled.
-
In the Logging and Reporting area, from the Profile list, select a custom DNS Logging profile.
-
Click Finished.
You must assign this custom DNS profile to a resource before the BIG-IP system can log information about the DNS traffic handled by the resource.
Ensure that at least one custom DNS profile with logging configured exists on the BIG-IP system.
Assign a custom DNS profile to a listener when you want the BIG-IP system to log the DNS traffic the listener handles.
Note: This task applies only to BIG-IPDNS-provisioned systems.
-
On the Main tab, click DNS > Delivery > Listeners.
The Listeners List screen opens.
-
Click the name of the listener you want to modify.
-
In the Service area, from the DNS Profile list, select a custom DNS profile that is associated with a DNS Logging profile.
-
Click Update.
Ensure that at least one wide IP exists in the BIG-IP DNS configuration, and that high-speed remote logging is configured on the device.
When you want to view the global server load-balancing decisions made by BIG-IP DNS in the high-speed remote logs, configure the verbosity of the information that displays in the logs.
-
On the Main tab, click DNS > GSLB > Wide IPs.
The Wide IP List screen opens.
-
Click the name of the wide IP you want to modify.
-
From the General Properties list, select Advanced.
-
For the Load-Balancing Decision Log setting, select the check boxes of the options that you want to include in the high-speed remote logs.
Check-box option Log information Pool Selection The pool selected to answer a DNS request, and why the pool was selected. Pool Traversal The pools in the wide IP considered during the load-balancing decision, and why the pool was selected. Pool Member Selection The pool member selected to answer a DNS request, and why the member was selected. Pool Member Traversal The members of the pool considered during the load-balancing decision, and why the member was selected. Example log for a wide IP configured for Ratio load balancing when Load-Balancing Decision Log is set to only Pool Selection:
2013-03-14 15:40:05 bigip1.com to 10.10.10.9#34824: [wip.test.net A] [ratio selected pool (pool_b) with the first highest ratio counter (1)]Example log for a wide IP configured for Ratio load balancing when Load-Balancing Decision Log is set to both Pool Selection and Pool Traversal:
2013-03-14 16:18:41 bigip1.com from 10.10.10.9#35902 [wip.test.net A] [ratio selected pool (pool_a) - ratio counter (0) is higher] [ratio skipped pool (pool_b) - ratio counter (0) is not higher] [ratio reset IPv4 ratio counter to original ratios - the best had zero ratio count] [ratio selected pool (pool_a) - ratio counter (1) is not higher] [ratio selected pool (pool_b) - ratio counter (1) is not higher] [ratio selected pool (pool_a) with the first highest ratio counter (1)]
Disable DNS logging on a custom DNS profile when you no longer want the BIG-IP system to log information about the DNS traffic handled by the resources to which the profile is assigned.
Note: You can disable and re-enable DNS logging for a specific resource based on your network administration needs.
-
On the Main tab, click DNS > Delivery > Profiles > DNS.
The DNS profile list screen opens.
-
Click the name of a profile.
-
Select the Custom check box.
-
In the Logging and Reporting area, from the Logging list, select Disabled.
-
Click Update.
The system does not perform DNS logging on the DNS traffic handled by the resources to which this profile is assigned.