


Updated Date: 07/07/2026
Securing Client-Side and Server-Side LDAP Traffic
You can configure STARTTLS encryption for Lightweight Directory Access Protocol (LDAP) traffic passing through the BIG-IP® system. LDAP is an industry standard application protocol for accessing and maintaining distributed directory information services over an Internet Protocol (IP) network.
You configure the BIG-IP system for STARTTLS encryption by configuring Client LDAP and Server LDAP profiles to activate the STARTTLS communication protocol for any client or server traffic that allows or requires STARTTLS encryption.
Normally, LDAP traffic between LDAP servers and clients is unencrypted. This creates a privacy issue because LDAP traffic often passes through routers that the servers and clients do not trust, resulting in a third party potentially changing the communications between the server and client. Also, two LDAP systems do not normally authenticate each other. A more secure LDAP server might only allow communications from other known LDAP systems, or the server might act differently with unknown systems.
To mitigate these problems, the BIG-IP system includes two LDAP profiles that you can configure. When you configure a Client LDAP or Server LDAP profile, you can instruct the BIG-IP system to activate the STARTTLS communication protocol for any client or server traffic that allows or requires STARTTLS encryption. The STARTTLS protocol effectively upgrades a plain-text connection to an encrypted connection on the same port (port 389), instead of using a separate port for encrypted communication.
This illustration shows a basic configuration of a BIG-IP system that activates STARTTLS to secure LDAP traffic between a client system and the BIG-IP system, and between the BIG-IP system and an LDAP authentication server.
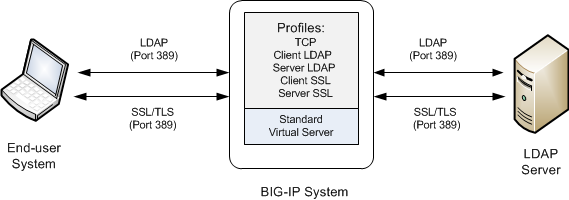
To configure the BIG-IP ®system to process Lightweight Directory Access Protocol (LDAP) traffic with TLS encryption, you perform a few basic tasks.
You perform this task to specify the condition under which the BIG-IP system should activate STARTTLS encryption for client-side traffic destined for a specific virtual server.
-
On the Main tab, click Local Traffic > Profiles > Services > Client LDAP.
The Client LDAP list screen opens.
-
Click Create.
The New Client LDAP Profile screen opens.
-
In the Name field, type a unique name for the profile.
-
From the Parent Profile list, retain the default value, clientldap.
-
Select the Custom check box.
-
From the STARTTLS Activation Mode list, select a value:
Value Description Allow This value activates STARTTLS encryption for any client-side traffic that allows, but does not require, STARTTLS encryption. Require This value activates STARTTLS encryption for any client-side traffic that requires STARTTLS encryption. All messages sent to the BIG-IP system prior to STARTTLS activation are rejected with a message stating that a stronger authentication mechanism is required. None This value refrains from activating STARTTLS encryption for client-side traffic. Note if you select this value, that you optionally can create an iRule that identifies client-side traffic that requires STARTTLS encryption and then dynamically activates STARTTLS for that particular traffic. -
Click Finished.
After you perform this task, the Client LDAP profile appears on the Client LDAP list screen.
You perform this task to specify the condition under which the BIG-IP system should activate STARTTLS encryption for server-side traffic destined for a specific virtual server.
-
On the Main tab, click Local Traffic > Profiles > Services > Server LDAP.
The Server LDAP list screen opens.
-
Click Create.
The New Server LDAP Profile screen opens.
-
In the Name field, type a unique name for the profile.
-
From the Parent Profile list, retain the default value, serverldap.
-
Select the Custom check box.
-
From the STARTTLS Activation Mode list, select a value:
Value Description Allow This value activates STARTTLS encryption for server-side traffic that allows, but does not require, STARTTLS encryption. In this case, the BIG-IP system only activates STARTTLS for server-side traffic when the BIG-IP system has activated STARTTLS on the client side and the client has acknowledged the activation. Require This value activates STARTTLS encryption for any server-side traffic that requires STARTTLS encryption. In this case, the BIG-IP system activates STARTTLS when a successful connection is made. None This value refrains from activating STARTTLS encryption for server-side traffic. Note that if you select this value, you can optionally create an iRule that identifies server-side traffic that requires STARTTLS encryption and then dynamically activates STARTTLS for that particular traffic. -
Click Finished.
After you perform this task, the Server LDAP profile appears on the Server LDAP list screen.
You create a custom Client SSL profile when you want the BIG-IP system to terminate client-side SSL traffic for the purpose of:
- Authenticating and decrypting ingress client-side SSL traffic
- Re-encrypting egress client-side traffic
By terminating client-side SSL traffic, the BIG-IP system offloads these authentication and decryption/encryption functions from the destination server.
-
On the Main tab, click Local Traffic > Profiles > SSL > Client.
The Client SSL profile list screen opens.
-
Click Create.
The New Client SSL Profile screen opens.
-
In the Name field, type a unique name for the profile.
-
Select clientssl in the Parent Profile list.
-
Select the Proxy SSL check box (the rest of the UI will collapse following this setting).
-
Optionally, select the Proxy SSL Passthrough check box.
Note: This option is often not needed. Review the Knowledge Center article K13385: Overview of the Proxy SSL feature for guidelines on when to enable this setting and its implications.
-
Configure the Certificate Key Chain.
Note: The Certificate and Key under ClientSSL profile are not used in Proxy SSL (since the client and the server will eventually verify each other). F5 recommends leaving the default F5 cert/key pair.
-
Click Finished.
Create a custom server SSL profile to support SSL forward proxy.
-
On the Main tab, click Local Traffic > Profiles > SSL > Server.
The Server SSL profile list screen opens.
-
Click Create.
The New Server SSL Profile screen opens.
-
In the Name field, type a unique name for the profile.
-
For Parent Profile, retain the default selection, serverssl.
-
Select the Proxy SSL check box (the rest of the UI will collapse following this setting).
-
Optionally, select the Proxy SSL Passthrough check box.
Note: This option is often not needed. Review the Knowledge Center article K13385: Overview of the Proxy SSL feature for guidelines on when to enable this setting and its implications.
-
Configure the Certificate and Key using the identical Certificate and Key details configured on the server.
Note: Import the details to the BIG-IP system prior to configuring Proxy SSL.
-
Click Finished.
The custom Server SSL profile is now listed in the SSL Server profile list.
You use this task to create a virtual server, as well as a default pool of LDAP servers. The virtual server then listens for and applies the configured STARTTLS activation to client-side or server-side LDAP traffic, or both. Part of creating this virtual server is specifying the names of any client-side and server-side LDAP and SSL profiles that you previously created.
-
You use this task to create a virtual server, as well as a default pool of LDAP servers. The virtual server then listens for and applies the configured STARTTLS activation to client-side or server-side LDAP traffic, or both. Part of creating this virtual server is specifying the names of any client-side and server-side LDAP and SSL profiles that you previously created.
The Virtual Server List screen opens.
-
Click the Create button.
The New Virtual Server screen opens.
-
In the Name field, type a unique name for the virtual server.
-
In the Destination Address/Mask field, type an address, as appropriate for your network.
The supported format is address/prefix, where the prefix length is in bits. For example, an IPv4 address/prefix is
10.0.0.1or10.0.0.0/24, and an IPv6 address/prefix isffe1::0020/64or2001:ed8:77b5:2:10:10:100:42/64. When you use an IPv4 address without specifying a prefix, the BIG-IP system automatically uses a/32prefix. -
In the Service Port field, type
389or select LDAP from the list. -
From the Configuration list, select Basic.
-
For the SSL Profile (Client) setting, in the Available box, select a profile name, and using the Move button, move the name to the Selected box.
-
From the Client LDAP Profile list, select the Client LDAP profile that you previously created.
-
From the Server LDAP Profile list, select the Server LDAP profile that you previously created.
-
In the Resources area of the screen, for the Default Pool setting, click the Create (+) button.
The New Pool screen opens.
-
In the Name field, type a unique name for the pool.
-
In the Resources area, for the New Members setting, select the type of new member you are adding, then type the information in the appropriate fields, and click Add to add as many pool members as you need.
-
Click Finished to create the pool.
The screen refreshes, and reopens the New Virtual Server screen. The new pool name appears in the Default Pool list.
-
Click Finished.
After you have created the required LDAP and SSL profiles and assigned them to a virtual server, the BIG-IP system listens for client- and server-side LDAP traffic on port 389. The BIG-IP system then activates the STARTTLS method for that traffic to provide SSL security on that same port, before forwarding the traffic on to the specified LDAP server pool.
After you have created the required LDAP and SSL profiles and assigned them to a virtual server, the BIG-IP® system listens for client- and server-side LDAP traffic on port 389. The BIG-IP system then activates the STARTTLS method for that traffic to provide SSL security on that same port, before forwarding the traffic on to the specified LDAP server pool.