Updated Date: 07/07/2026
One-Time Password Authentication
Access Policy Manager supplies an OTP Generate access policy item that generates a one-time time-sensitive password and an OTP Verify item that verifies that a user entered the correct password before that password expired. In between the two actions, you must configure an action that delivers the one-time password to the user. To send the password in an email message, use the Email access policy item. You must have an external SMTP server and you must create an SMTP server configuration for it on the BIG-IP® system.
A macro template to configure OTP over email is available for use in an access policy. Look at the macro, AD auth query OTP by email and resources, from the visual policy editor to determine whether to use it to help you configure the access policy more quickly.
You specify the SMTP server configuration so that you can send emails through an SMTP server.
-
On the Main tab, click System > Configuration > Device > SMTP.
-
Click the Create button.
The New SMTP Configuration screen opens.
-
In the Name field, type a name for the SMTP server that you are creating.
-
In the SMTP Server Host Name field, type the fully qualified domain name for the SMTP server host.
-
In the SMTP Server Port Number field, type a port number.
-
In the Local Host Name field, type the host name used in the SMTP headers in the form of a fully qualified domain name.
This host name is not the same as the BIG-IP system’s host name.
-
In the From Address field, type the email address that you want displayed as the reply-to address for the email.
-
From the Encrypted Connection list, select the encryption level required for the SMTP server.
-
To require that the SMTP server validates users before allowing them to send email, select the Use Authentication check box, and type the user name and password required to validate the user.
-
Click the Finish button.
You can now configure the system to use this SMTP server to send emails. For the SMTP mailer to work, you must make sure the SMTP server is on the DNS lookup server list, and configure the DNS server on the BIG-IP system.
Before you start this task, configure an access profile.
Create an access policy like this when you need to generate and send a one-time password over email.
Note: Look at the macro, AD query auth OTP by email and resources, to determine whether to use it to configure an access policy similar to this one.
-
On the Main tab, click Access > Profiles / Policies.
The Access Profiles (Per-Session Policies) screen opens.
-
In the Per-Session Policy column, click the Edit link for the access profile you want to configure.
The visual policy editor opens the access policy in a separate screen.
-
Add actions to authenticate the user and find an email address and a mobile phone number.
-
Click the (+) icon anywhere in your access profile to add a new action item.
A popup screen opens, listing predefined actions on tabs such as General Purpose, Authentication, and so on.
-
On the Authentication tab, select AD Auth and click Add Item.
A popup properties screen displays.
-
From the Server list, select a server and click Save.
The properties screen closes.
-
On the Successful branch after the previous action, click the (+) icon.
An Add Item screen opens, listing predefined actions that are grouped on tabs such as General Purpose, Authentication, and so on.
-
On the Authentication tab, select AD Query and click Add Item.
An AD Query is only one way to find the email address for a user. If users normally log on to your system with an email address as their username, you can get the email address using a Logon Page action.
A popup properties screen displays.
-
From the Server list, select a server.
-
Click Add new entry.
An empty entry displays under Required Attributes (optional).
-
Type mobile into the Required Attributes (optional) field
After the query, the session.ad.last.attr.mobile variable holds the value.
-
Click Add new entry.
An empty entry displays under Required Attributes (optional).
-
Type mail into the Required Attributes (optional) field
After the query, the session.ad.last.attr.mail variable holds the value.
-
Click Save.
The properties screen closes.
-
-
Generate a one-time password.
-
On the Successful branch after the previous action, click the (+) icon.
An Add Item screen opens, listing predefined actions that are grouped on tabs such as General Purpose, Authentication, and so on.
-
On the Authentication tab, select OTP Generate and click Add Item.
-
Click Save.
The properties screen closes and the policy displays.
-
-
Send the OTP to the user through the Email agent.
-
On the Successful branch after the previous action, click the (+) icon.
An Add Item screen opens, listing predefined actions that are grouped on tabs such as General Purpose, Authentication, and so on.
-
On the General Purpose tab, select Email and click Add Item.
-
From the SMTP Configuration list, select a configuration.
The configuration specifies an external SMTP server to send the email.
-
In the From field, type an email address on the system.
-
In the To field, type an email address, a session variable, or a session variable and a string.
For example, type
%{session.ad.last.attr.mobile}*@providerservice.com*where providerservice.com is supplied by a mobile phone provider. -
Type a subject in the Subject field.
-
In the Message field, type the one-time password and anything else the user should know.
One Time Passcode: %{session.otp.assigned.val} Expires after use or in %{session.otp.assigned.ttl} seconds
-
Click Save.
The properties screen closes and the policy displays.
-
-
Add a Logon Page action that requests the one-time password only.
-
On the Successful branch after the previous action, click the (+) icon.
An Add Item screen opens, listing predefined actions that are grouped on tabs such as General Purpose, Authentication, and so on.
-
On the Logon tab, select Logon Page and click the Add Item button.
The Logon Page Agent properties screen opens.
-
From the Logon Page Agent area, on line 1 select none from the Type column to remove the user name input field from the logon page; do not change line 2 (password).
-
From the Customization area in Logon Page Input Field # 2, type a prompt for the field.
For example, type One-Time Passcode.
-
Click Save.
The properties screen closes and the policy displays.
-
-
Verify the one-time password.
-
On the Successful branch after the previous action, click the (+) icon.
An Add Item screen opens, listing predefined actions that are grouped on tabs such as General Purpose, Authentication, and so on.
-
On the Authentication tab, select OTP Verify and click Add Item.
-
Click Save.
The properties screen closes and the policy displays.
-
-
Add any other branches and actions that you need to complete the policy.
-
Change the Successful rule branch from Deny to Allow, and then click the Save button.
-
At the top of the window, click the Apply Access Policy link to apply and activate your changes to this access policy.
-
Click the Close button to close the visual policy editor.
You have an access policy that provides a user with a one-time time-based password over SMTP.
To apply this access policy to network traffic, add the access profile to a virtual server.
Note: To ensure that logging is configured to meet your requirements, verify the log settings for the access profile.
Confirm that the correct log settings are selected for the access profile to ensure that events are logged as you intend.
Note: Log settings are configured in the Access > Overview > Event Log > Settings area of the product. They enable and disable logging for access system and URL request filtering events. Log settings also specify log publishers that send log messages to specified destinations.
-
On the Main tab, click Access > Profiles / Policies.
The Access Profiles (Per-Session Policies) screen opens.
-
Click the name of the access profile that you want to edit.
The properties screen opens.
-
On the menu bar, click Logs.
The access profile log settings display.
-
Move log settings between the Available and Selected lists.
You can assign up to three log settings that enable access system logging to an access profile. You can assign additional log settings to an access profile provided that they enable logging for URl request logging only.
Note: Logging is disabled when the Selected list is empty.
-
Click Update.
An access profile is in effect when it is assigned to a virtual server.
Access Policy Manager supplies an OTP Generate action that generates a one-time time-sensitive password and an OTP Verify action that verifies that a user entered the correct password before it expired. In between the two actions, you must configure an action that delivers the one-time password to the user. To send the password in a text message, you can use a form-based HTTP authentication agent (if you do not want to use an Email agent). You pass the one-time password in hidden parameters to a form action. You must create a form action that sends the OTP using an external SMS.
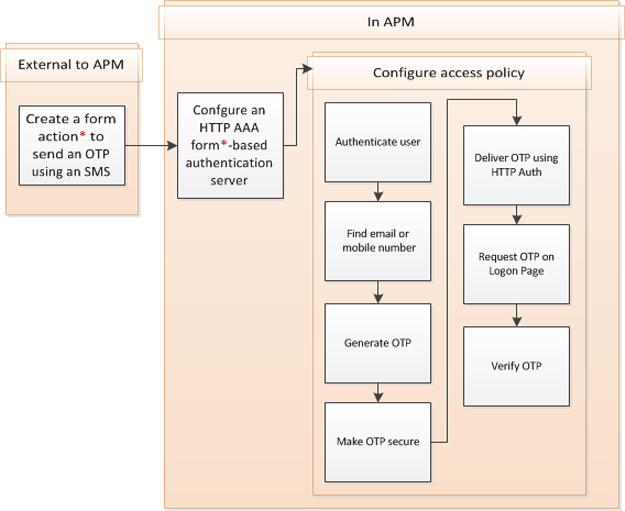
A macro template to configure an OTP and use the HTTP Auth agent to deliver it is available for use in an access policy. Look at the macro, AD query auth OTP by HTTP and resources, from the visual policy editor to determine whether to use it to help you configure the access policy more quickly.
Configure an AAA HTTP server to use a form action that you configured previously to send a one-time password through an external SMS.
-
On the Main tab, click Access > Authentication > HTTP.
The HTTP servers screen opens.
-
Click Create.
The New Server properties screen opens.
-
In the Name field, type a unique name for the authentication server.
-
From the Configuration area, select Form Based for the Authentication Type.
-
Let the Form Method remain at the default setting, POST.
-
In the Form Action field, type the complete destination URL to process the form.
Specify a URL for a form action that you created to send a user a one-time password using an SMS.
-
In the Hidden Form Parameters/Values field, type parameters and values for the one-time password, the phone number, and any other values that the form action requires.
Here is an example.
otp_http_mobile "%{session.ad.last.attr.mobile}" otp_http_email "%{session.ad.last.attr.mail}" otp_http_body "One Time Passcode: %{session.otp.assigned.val} Expires after use or in %{session.otp.assigned.ttl} seconds" -
From the Successful Logon Detection Match Type list, select the method that the authenticating server uses.
-
In the Successful Logon Detection Match Value field, type the value that denotes successful logon.
Type a cookie name, a URL, or a string, depending on the successful logon detection match type you selected.
-
Click Finished.
The new server displays on the list.
An HTTP server for form-based authentication with a one-time password is ready for use.
Before you start this task, configure an access profile and configure a form action that uses an external SMS to send the one-time password.
Create an access policy like this when you need to generate and send a one-time password as a text message and you do not want to send it using email.
Note: The macro, AD auth query OTP by HTTP and resources, is available from the visual policy editor and might be useful to configure an access policy similar to this one.
-
On the Main tab, click Access > Profiles / Policies.
The Access Profiles (Per-Session Policies) screen opens.
-
In the Per-Session Policy column, click the Edit link for the access profile you want to configure.
The visual policy editor opens the access policy in a separate screen.
-
Add actions to authenticate the user and find a mobile phone number.
-
Click the (+) icon anywhere in your access profile to add a new action item.
A popup screen opens, listing predefined actions on tabs such as General Purpose, Authentication, and so on.
-
From the Authentication tab, select AD Auth and click Add Item.
A pop-up properties screen displays.
-
From the Server list, select a server and click Save.
The properties screen closes.
-
On the Successful branch after the previous action, click the (+) icon.
An Add Item screen opens, listing predefined actions that are grouped on tabs such as General Purpose, Authentication, and so on.
-
On the Authentication tab, select AD Query and click Add Item.
A pop-up properties screen displays.
-
From the Server list, select a server.
-
Click Add new entry.
An empty entry displays under Required Attributes (optional).
-
Type mobile into the Required Attributes (optional) field
-
Click Save.
The properties screen closes.
-
-
Generate a one-time password.
-
On the Successful branch after the previous action, click the (+) icon.
An Add Item screen opens, listing predefined actions that are grouped on tabs such as General Purpose, Authentication, and so on.
-
From the Authentication tab, select OTP Generate and click Add Item.
-
Click Save.
The properties screen closes and the policy displays.
-
-
Make the OTP secure.
-
On the Successful branch after the previous action, click the (+) icon.
An Add Item screen opens, listing predefined actions that are grouped on tabs such as General Purpose, Authentication, and so on.
-
From the Assignment tab, select Variable Assign and click Add Item.
A properties screen opens.
-
Click Add new entry.
An Empty entry displays.
-
Click the change link in the new entry.
A popup screen opens.
-
From the Unsecure list, select Secure.
-
In the Custom Variable text box, type
session.user.otp.pwd. -
In the Custom Expression text box, type
expr { [mcget {session.user.otp.pw}]}. -
Click Finished.
The popup screen closes.
-
-
Send the OTP through the HTTP Auth agent.
-
On the Successful branch after the previous action, click the (+) icon.
An Add Item screen opens, listing predefined actions that are grouped on tabs such as General Purpose, Authentication, and so on.
-
From the Authentication tab, select HTTP Auth and click Add Item.
-
From the AAA server list, select the HTTP form-based server that you configured previously.
-
Click Save.
The properties screen closes and the policy displays.
-
-
Add a Logon Page action that requests only the one-time password.
-
On the Successful branch after the previous action, click the (+) icon.
An Add Item screen opens, listing predefined actions that are grouped on tabs such as General Purpose, Authentication, and so on.
-
From the Logon Page tab, select Logon Page and click Add Item.
A pop-up properties screen displays.
-
From the Logon Page Agent area, on line 1 select password from the Type column and change the post and session variable names.
The variable name password is acceptable.
-
From the Customization area in Logon Page Input Field # 1, type a prompt for the field.
For example, type One-Time Passcode.
-
Click Save.
The properties screen closes and the policy displays.
-
-
Verify the one-time password.
-
On the Successful branch after the previous action, click the (+) icon.
An Add Item screen opens, listing predefined actions that are grouped on tabs such as General Purpose, Authentication, and so on.
-
From the Authentication tab, select OTP Verify and click Add Item.
-
Click Save.
The properties screen closes and the policy displays.
-
-
Add any other branches and actions that you need to complete the policy.
-
Change the Successful rule branch from Deny to Allow, and then click the Save button.
-
At the top of the window, click the Apply Access Policy link to apply and activate your changes to this access policy.
-
Click the Close button to close the visual policy editor.
You have an access policy that uses HTTP authentication to provide a user with a one-time time-based password over SMS.
To apply this access policy to network traffic, add the access profile to a virtual server.
Note: To ensure that logging is configured to meet your requirements, verify the log settings for the access profile.
Confirm that the correct log settings are selected for the access profile to ensure that events are logged as you intend.
Note: Log settings are configured in the Access > Overview > Event Log > Settings area of the product. They enable and disable logging for access system and URL request filtering events. Log settings also specify log publishers that send log messages to specified destinations.
-
On the Main tab, click Access > Profiles / Policies.
The Access Profiles (Per-Session Policies) screen opens.
-
Click the name of the access profile that you want to edit.
The properties screen opens.
-
On the menu bar, click Logs.
The access profile log settings display.
-
Move log settings between the Available and Selected lists.
You can assign up to three log settings that enable access system logging to an access profile. You can assign additional log settings to an access profile provided that they enable logging for URl request logging only.
Note: Logging is disabled when the Selected list is empty.
-
Click Update.
An access profile is in effect when it is assigned to a virtual server.