Updated Date: 07/07/2026
Explicit Forward Proxy Configuration
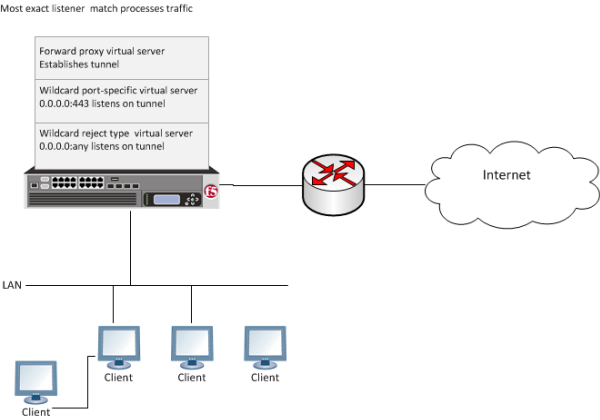
For explicit forward proxy, you configure client browsers to point to a forward proxy server. A forward proxy server establishes a tunnel for SSL traffic. Other virtual servers (wildcard SSL and wildcard forwarding IP virtual servers) listen on the tunnel. The listener that best matches the web traffic directed to the forward proxy server handles the traffic.
Use these procedures to configure the virtual servers, SSL profiles, access profile, and tunnel, that you need to support explicit forward proxy. When you are done, you must add an access policy and a per-request policy to this configuration to process traffic as you want.
-
Browser and firewall configuration best practices for explicit forward proxy
-
Creating a virtual server to use as the forward proxy server
When deployed as an application service, the Secure Web Gateway (SWG) iApps® template can set up either an explicit or a transparent forward proxy configuration. The template is designed for use on a system provisioned and licensed with SWG. To download a zipped file of iApp templates from the F5 Downloads site at (downloads.f5.com), you must register for an F5 support account. In the zipped file, a README and template for F5 Secure Web Gateway are located in the RELEASE_CANDIDATE folder.
In any deployment of explicit forward proxy, you must consider how best to configure browsers on client systems to point to the proxy server and how to configure your firewall to prevent users from bypassing the proxy. Here are some best practices to consider.
| Configuration | Recommendation |
|---|---|
| Client browser | Consider using a group policy that points to a Proxy Auto-Configuration (PAC) file to distribute the configuration to clients and periodically update it. |
| Firewall | A best practice might be to configure the firewall to trust outbound connections from Access Policy Manager (APM) only. Note that possibly not all applications will work with a firewall configured this way. (APM uses ports 80 and 443.) |
You configure a DNS resolver to resolve DNS queries and cache the responses. The next time the system receives a query for a response that exists in the cache, the system returns the response from the cache.
-
On the Main tab, click Network > DNS Resolvers > DNS Resolver List.
The DNS Resolver List screen opens.
-
Click Create.
The New DNS Resolver screen opens.
-
In the Name field, type a name for the resolver.
-
Click Finished.
Note: When you create an OAuth Server, creating a DNS Resolver with a forward zone named . (period) is mandatory to forward all requests.
Before you begin, gather the IP addresses of the nameservers that you want to associate with a forward zone.
Add a forward zone to a DNS resolver when you want the BIG-IP system to forward queries for particular zones to specific nameservers for resolution in case the resolver does not contain a response to the query.
Note: Creating a forward zone is optional. Without one, a DNS resolver can still make recursive name queries to the root DNS servers; the virtual servers using the cache must have a route to the Internet.
When you create an OAuth Server, creating a DNS Resolver with a forward zone named . (period) is mandatory.
-
On the Main tab, click Network > DNS Resolvers > DNS Resolver List.
The DNS Resolver List screen opens.
-
Click the name of the resolver you want to modify.
The properties screen opens.
-
On the menu bar, click Forward Zones.
The Forward Zones screen displays.
-
Click the Add button.
Note: You add more than one zone to forward based on the needs of your organization.
-
In the Name field, type the name of a subdomain or type the fully qualified domain name (FQDN) of a forward zone.
Note: To forward all requests (such as when creating an OAuth server), specify . (period) as the name.
For example, either
exampleorsite.example.comwould be valid zone names. -
Add one or more nameservers:
-
In the Address field, type the IP address of a DNS nameserver that is considered authoritative for this zone.
Based on your network configuration, add IPv4 or IPv6 addresses, or both.
-
Click Add.
The address is added to the list.
Note: The order of nameservers in the configuration does not impact which nameserver the system selects to forward a query to.
-
-
Click Finished.
You create a tunnel to support SSL traffic in a configuration where Access Policy Manager (APM) acts as an explicit forward proxy.
Note: Alternatively, you can use a preconfigured tunnel, http-tunnel.
-
On the Main tab, click Network > Tunnels > Tunnel List.
The Tunnel List screen opens.
-
Click Create.
-
In the Name field, type a name.
-
From the Encapsulation Type menu, select tcp-forward.
-
Click Finished.
The Tunnel List screen displays the tunnel with tcp-forward in the Profile column.
An HTTP profile defines the way that you want the BIG-IPsystem to manage HTTP traffic.
Note: To act an explicit forward proxy, Access Policy Manager (APM) requires a DNS resolver that you select in the HTTP profile.
-
On the Main tab, click Local Traffic > Profiles > Services > HTTP.
The HTTP profile list screen opens.
-
Click Create.
The New HTTP Profile screen opens.
-
In the Name field, type a unique name for the profile.
-
From the Proxy Mode list, select Explicit.
-
For Parent Profile, retain the http-explicit setting.
-
Select the Custom check box.
-
Scroll down to the Explicit Proxy area.
-
From the DNS Resolver list, select the DNS resolver you configured previously.
-
In the Tunnel Name field, you can retain the default value, http-tunnel, or type the name of a tunnel if you created one.
APM requires a tunnel with tcp-forward encapsulation to support SSL traffic for explicit forward proxy.
-
From the Default Connect Handling list, retain the default setting Deny.
Any CONNECT traffic goes through the tunnel to the virtual server that most closely matches the traffic; if there is no match, the traffic is blocked.
-
Click Finished.
The custom HTTP profile now appears in the HTTP profile list screen.
Create an access profile to provide the access policy configuration for a virtual server that establishes a secured session.
-
On the Main tab, click Access > Profiles / Policies.
The Access Profiles (Per-Session Policies) screen opens.
-
Click Create.
The New Profile screen opens.
-
In the Name field, type a name for the access profile.
Note: An access profile name must be unique among all per-session profile and per-request policy names.
-
From the Profile Type list, select SWG-Explicit.
Selecting this type ensures that only access policy items that are valid for explicit forward proxy are available in the visual policy editor when you configure an access policy.
-
In the Configurations area for the User Identification Method list, select one of these methods:
- IP Address: Select this method only in an environment where a client IP address is unique and can be trusted.
- Credentials: Select this method to identify users using NTLM authentication.
-
If you selected Credentials for the User Identification Method, you must select an entry from the NTLM Auth Configuration list.
-
If you selected IP Address for the User Identification Method, you can also select an entry from the NTLM Auth Configuration list to use NTLM authentication before a session starts.
In the case of a shared machine, an IP address might already be associated with a user or a session. Using NTLM authentication ensures that the system can associate the IP address with the correct session (new or existing) or with a new user each time a user logs on to a shared machine.
-
In the Language Settings area, add and remove accepted languages, and set the default language.
A browser uses the highest priority accepted language. If no browser language matches the accepted languages list, the browser uses the default language.
-
Click Finished.
The Access Profiles list screen displays.
The access profile displays in the Access Profiles List. Default-log-setting is assigned to the access profile.
You specify a virtual server to handle forward proxy traffic. In an explicit proxy configuration, client browser configurations specify this virtual server as the proxy server.
Note: Use this virtual server for forward proxy traffic only. You should not try to use it for reverse proxy too; do not add a pool to it. This virtual server is, in effect, a bastion host.
-
On the Main tab, click Local Traffic > Virtual Servers.
The Virtual Server List screen opens.
-
Click Create.
The New Virtual Server screen opens.
-
In the Name field, type a unique name for the virtual server.
-
In the Destination Address/Mask field, type the IP address for a host virtual server.
This field accepts an address in CIDR format (IP address/prefix). However, when you type the complete IP address for a host, you do not need to type a prefix after the address.
Type a destination address in this format:
162.160.15.20. -
From the Configuration list, select Advanced.
-
In the Service Port field, type the port number to use for forward proxy traffic.
Typically, the port number is
3128or8080. -
From the HTTP Profile list, select the HTTP profile you configured earlier.
-
For the HTTP Connect Profile setting, be sure to retain the default value None.
-
From the VLAN and Tunnel Traffic list, select Enabled on.
-
For the VLANs and Tunnels setting, move the VLAN on the BIG-IP system that connects to the internal networks to the Selected list.
-
From the Source Address Translation list, select Auto Map.
-
Click Finished.
After you configure an access policy and a per-request policy, update this virtual server to specify them.
You perform this task to create a Client SSL forward proxy profile that makes it possible for client and server authentication while still allowing the BIG-IP system to perform data optimization, such as decryption and encryption. This profile applies to client-side SSL forward proxy traffic only.
-
On the Main tab, click Local Traffic > Profiles > SSL > Client.
The Client SSL profile list screen opens.
-
Click Create.
The New Client SSL Profile screen opens.
-
In the Name field, type a unique name for the profile.
-
From the Parent Profile list, select clientssl.
-
From the SSL Forward Proxy list, select Advanced.
-
Select the Custom check box for the SSL Forward Proxy area.
-
Modify the SSL Forward Proxy settings.
-
From the SSL Forward Proxy list, select Enabled.
-
From the CA Certificate list, select a certificate.
Important: If the BIG-IP system is part of a DSC Sync-Failover group, always select a non-default certificate name, and ensure that this same certificate name is specified in every instance of this SSL profile in the device group. Taking these actions helps to ensure that SSL handshakes are successful after a failover event.
-
From the CA Key list, select a key.
Important: If the BIG-IP system is part of a DSC Sync-Failover group, always select a non-default key name, and ensure that this same key name is specified in every instance of this SSL profile in the device group. Taking these actions helps to ensure that SSL handshakes are successful after a failover event.
-
In the CA Passphrase field, type a passphrase.
-
In the Confirm CA Passphrase field, type the passphrase again.
-
In the Certificate Lifespan field, type a lifespan for the SSL forward proxy certificate in days.
-
From the Certificate Extensions list, select Extensions List.
-
For the Certificate Extensions List setting, select the extensions that you want in the Available extensions field, and move them to the Enabled Extensions field using the Enable button.
-
Select the Cache Certificate by Addr-Port check box if you want to cache certificates by IP address and port number.
-
From the SSL Forward Proxy Bypass list, select Enabled.
Additional settings display.
-
From the Bypass Default Action list, select Intercept or Bypass.
The default action applies to addresses and hostnames that do not match any entry specified in the lists that you specify. The system matches traffic first against destination IP address lists, then source IP address lists, and lastly, hostname lists. Within these, the default action also specifies whether to search the intercept list or the bypass list first.
Note: If you select Bypass and do not specify any additional settings, you introduce a security risk to your system.
-
-
Click Finished.
The custom Client SSL forward proxy profile now appears in the Client SSL profile list screen.
Create a custom server SSL profile to support SSL forward proxy.
-
On the Main tab, click Local Traffic > Profiles > SSL > Server.
The Server SSL profile list screen opens.
-
Click Create.
The New Server SSL Profile screen opens.
-
In the Name field, type a unique name for the profile.
-
For Parent Profile, retain the default selection, serverssl.
-
Select the Proxy SSL check box (the rest of the UI will collapse following this setting).
-
Optionally, select the Proxy SSL Passthrough check box.
Note: This option is often not needed. Review the Knowledge Center article K13385: Overview of the Proxy SSL feature for guidelines on when to enable this setting and its implications.
-
Configure the Certificate and Key using the identical Certificate and Key details configured on the server.
Note: Import the details to the BIG-IP system prior to configuring Proxy SSL.
-
Click Finished.
The custom Server SSL profile is now listed in the SSL Server profile list.
You specify a port-specific wildcard virtual server to handle SSL traffic. This virtual server listens on the tunnel that the forward proxy server establishes.
-
On the Main tab, click Local Traffic > Virtual Servers.
The Virtual Server List screen opens.
-
Click Create.
The New Virtual Server screen opens.
-
In the Name field, type a unique name for the virtual server.
-
In the Destination Address/Mask field, type
0.0.0.0to accept any IPv4 traffic. -
In the Service Port field, type
443or select HTTPS from the list. -
From the Configuration list, select Advanced.
-
From the HTTP Profile (Client) list, select a previously-created HTTP/2 profile for client-side traffic.
-
For the SSL Profile (Client) setting, from the Available list, select the name of the custom Client SSL proxy profile you previously created, and using the Move button, move the name to the Selected list.
Important:
To enable proxy SSL functionality, you can either:
- Disassociate existing Client SSL and Server SSL profiles from a virtual server and configure the Proxy SSL settings.
- Create new Client SSL and Server SSL profiles and configure the Proxy SSL settings. Then with either option, select the Client SSL and Server SSL profiles on a virtual server. You cannot modify existing Client SSL and Server SSL profiles while they are selected on a virtual server to enable proxy SSL functionality.
-
For the SSL Profile (Server) setting, from the Available list, select the name of the custom Server SSL proxy profile you previously created and move the name to the Selected list.
Important:
To enable SSL proxy functionality, you can either:
- Disassociate existing Client SSL and Server SSL profiles from a virtual server and configure the Proxy SSL settings.
- Create new Client SSL and Server SSL profiles and configure the Proxy SSL settings. Then with either option, select the Client SSL and Server SSL profiles on a virtual server. You cannot modify existing Client SSL and Server SSL profiles while they are selected on a virtual server to enable SSL proxy functionality.
-
From the VLAN and Tunnel Traffic list, select Enabled on.
-
For the VLANs and Tunnels setting, move either the tunnel you configured earlier or the default tunnel, http-tunnel, to the Selected list.
This must be the same tunnel that you specified in the HTTP profile for the virtual server for forward proxy.
-
From the Source Address Translation list, select Auto Map.
-
For the Address Translation setting, clear the Enabled check box.
-
Click Finished.
The virtual server now appears in the Virtual Server List screen.
After you configure an access policy and a per-request policy, update this virtual server to specify them.
You create a reject type virtual server to reject any IP traffic with URLs that are incomplete, or otherwise misconfigured for use with forward proxy. This virtual server listens on the tunnel that the forward proxy server establishes.
Note: Secure Web Gateway does not support application access and network access tunnels.
-
On the Main tab, click Local Traffic > Virtual Servers.
The Virtual Server List screen opens.
-
Click Create.
The New Virtual Server screen opens.
-
In the Name field, type a unique name for the virtual server.
-
From the Type list, select Reject.
-
In the Source Address field, type
0.0.0.0/0. -
In the Destination Address/Mask field, type
0.0.0.0to accept any IPv4 traffic. -
From the Service Port list, select *All Ports.
-
From the Protocol list, select TCP.
-
From the VLAN and Tunnel Traffic list, select Enabled on.
-
For the VLANs and Tunnels setting, select the tunnel you configured earlier, or select the default tunnel, http-tunnel, and move it to the Selected list.
This must be the same tunnel that is specified in the virtual server for the forward proxy server.
-
Click Finished.
You now have the profiles and virtual servers that you need for explicit forward proxy.
Important: Before you configure browsers to send traffic to this configuration, you need to configure an access policy and a per-request policy and specify them in the virtual servers.
Access policy and per-request policy configuration depends on what you are trying to do. Look for configuration examples that categorize and filter traffic, intercept or bypass SSL traffic, forward traffic to a third-party proxy server, and so on.
Only L7 ACLs work with Access Policy Manager (APM) explicit forward proxy.
If you configure Access Policy Manager APM as a gateway for RDP clients and configure APM to act as an explicit forward proxy on the same BIG-IP® system, you need to complete an additional configuration step to ensure that APM can process the RDP client traffic. The configuration F5 recommends for explicit forward proxy includes a catch-all virtual server, which listens on all IP addresses and all ports, on an HTTP tunnel interface.
When a programmatic API queries listeners for a specific IP and port, the query covers all interfaces and tunnels. As a result, the catch-all virtual server will always match. Sending traffic using this tunnel results in all packets being dropped because this virtual server is configured as a reject type of virtual server.
To prevent RDP client traffic from being dropped, add an additional wildcard port-specific virtual server on the HTTP tunnel interface.
Note: Removing the catch-all virtual server from the HTTP tunnel interface is not recommended because doing so is counterproductive for security.
You specify a port-specific wildcard virtual server to match RDP client traffic on the HTTP tunnel interface for the Secure Web Gateway (SWG) explicit forward proxy configuration.
-
On the Main tab, click Local Traffic > Virtual Servers.
The Virtual Server List screen opens.
-
Click Create.
The New Virtual Server screen opens.
-
In the Name field, type a unique name for the virtual server.
-
In the Destination Address/Mask field, type
0.0.0.0to accept any IPv4 traffic. -
In the Service Port field, type
3389. -
From the Configuration list, select Advanced.
-
From the VLAN and Tunnel Traffic list, select Enabled on.
-
For the VLANs and Tunnels setting, move the HTTP tunnel interface used in the SWG explicit forward proxy configuration to the Selected list.
The default tunnel is http-tunnel.
This must be the same tunnel specified in the HTTP profile for the virtual server for forward proxy.
-
For the Address Translation setting, clear the Enabled check box.
-
Click Finished.
The virtual server now appears in the Virtual Server List screen.
In the recommended Secure Web Gateway explicit forward proxy configuration, client browsers point to a forward proxy server that establishes a tunnel for SSL traffic. Additional wildcard virtual servers listen on the HTTP tunnel interface. The listener that best matches the web traffic directed to the forward proxy server handles the traffic.