Updated Date: 07/07/2026
Policies for APM \(with SWG\) as a Secure Web Gateway
With an SWG subscription, when you configure a per-request policy to control forward proxy access using URL categories, the Category Lookup agent can use standard categories (from the URL database) or any custom URL categories that you might have created or both. For non-encrypted traffic, Category Lookup can also be configured to return safe search results to your users. Additional analytics agents are available to scan URL responses for malware and scan URL requests for further filtering.
In this example per-request policy, a Category Lookup item obtains a list of categories and a response web page. If Category Lookup returns a value that specifies the response needs to be scanned to determine the appropriate category, Response Analytics runs.
Note: Response Analytics is available only with an SWG subscription.
Response Analytics scans the response for malicious embedded content and passes an analysis to the URL Filter Assign item. URL Filter Assign uses the analysis, if provided, and the specified filter to determine whether to allow the request.

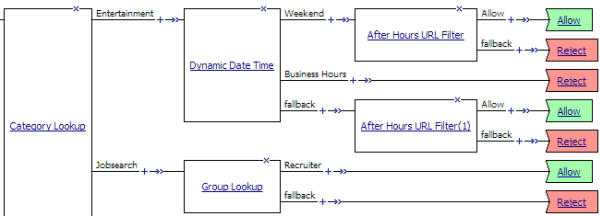
This example uses two standard URL categories, Entertainment and Jobsearch, that are available on a BIG-IP system with an SWG subscription. In this per-request policy example, only recruiters are allowed to access URLs in the job search category. The policy also restricts access to entertainment sites during business hours.
You configure an access policy to support explicit forward proxy or transparent forward proxy. If you plan to use branching by group or class attribute in your per-request policy, you add items to the access policy to populate that information. You can also add access policy items to collect credentials and to authenticate a user or add access policy items to identify the user transparently.
Note: If you include authentication in your access policy and the first site that a user accesses uses HTTP instead of secure HTTP, passwords are passed as clear text. To prevent this from happening, F5 recommends using Kerberos or NTLM authentication.
-
On the Main tab, click Access > Profiles / Policies.
The Access Profiles (Per-Session Policies) screen opens.
-
In the Per-Session Policy column, click the Edit link for the access profile you want to configure.
The visual policy editor opens the access policy in a separate screen.
-
Click the (+) icon anywhere in the access policy to add a new item.
Note: Only an applicable subset of access policy items is available for selection in the visual policy editor for any access profile type.
A popup screen opens, listing predefined actions on tabs such as General Purpose, Authentication, and so on.
-
If you specified an NTLM Auth configuration in the access profile, verify that authentication succeeded.
-
On the Authentication tab, select NTLM Auth Result.
-
Click Add Item.
A properties popup screen opens.
-
Click Save.
The properties screen closes. The policy displays.
-
-
To add Kerberos authentication to an access policy for forward proxy, add HTTP 407 Response (for explicit forward proxy) or HTTP 401 Response (for transparent forward proxy); then follow it with these actions in order: Variable Assign, and Kerberos Auth.
Note: This example uses HTTP 407 Response. You can replace it with HTTP 401 Response.
In a transparent forward proxy configuration, APM does not support Kerberos request-based authentication
-
On a policy branch, click the plus symbol (+) to add an item to the policy.
-
On the Logon tab, select HTTP 407 Response and click Add Item.
A properties screen opens.
-
From the HTTP Auth Level list, select negotiate and click Save.
The properties screen closes.
-
Click the (+) icon on the negotiate branch.
A popup screen opens.
-
On the Assignment tab, select Variable Assign and click Add Item.
For Kerberos authentication to work correctly with forward proxy, you must assign the domain name for the proxy virtual server to a session variable.
-
Click Add new entry.
An empty entry appears in the Assignment table.
-
Click the change link in the new entry.
A popup screen opens.
-
In the left pane, retain the selection of Custom Variable and type this variable name:
session.server.network.name. -
In the right pane, in place of Custom Variable, select Text and type the domain name for the proxy virtual server.
-
Click Finished.
The popup screen closes.
-
Click Save.
The properties screen closes. The policy displays.
-
On a policy branch, click the plus symbol (+) to add an item to the policy.
-
On the Authentication tab, select Kerberos Auth and click Add Item.
A properties screen opens.
-
From the AAA Server list, select an existing server.
-
From the Request Based Auth list, select Disabled.
-
Click Save.
The properties screen closes and the policy displays.
Note: The Max Logon Attempts Allowed setting specifies attempts by an external client without a Kerberos ticket to authenticate on forward proxy.
-
-
To identify a user transparently using information provided by a Secure Web Gateway (SWG) user identification agent, perform these steps:
For this step of the access policy to succeed, you must have installed and configured either the F5 DC Agent or the F5 Logon Agent. Either agent is supported on a BIG-IP system with an SWG subscription only.
-
On a policy branch, click the plus symbol (+) to add an item to the policy.
-
From the Authentication tab, select Transparent Identity Import and click Add Item.
The transparent identity import access policy item searches the database in the IF-MAP server for the client source IP address. By default, this access policy item has two branches: associated and fallback.
A properties screen opens.
-
Click Save.
The visual policy editor opens.
-
Add any additional access policy items to the fallback or associated branches.
For example, you might add Kerberos authentication on the fallback branch.
-
-
To supply LDAP group information for use in the per-request policy, add an LDAP Query item anywhere in the policy and configure its properties:
-
From the Server list, select an AAA LDAP server.
An LDAP Query uses SSL connections when you select an LDAP AAA server that is configured for LDAPS.
-
Specify the SearchDN, and SearchFilter settings.
SearchDN is the base DN from which the search is done.
-
Click Save.
This item populates the session.ldap.last.attr.memberOf session variable.
-
-
To supply Active Directory groups for use in the per-request policy, add an AD Query item anywhere in the policy and configure its properties:
-
From the Server list, select an AAA AD server.
-
Select the Fetch Primary Group check box.
The value of the primary user group populates the session.ad.last.attr.primaryGroupID session variable.
-
Click Save.
-
-
To supply RADIUS class attributes for use in the per-request policy, add a RADIUS Auth item anywhere in the policy and configure its properties:
-
From the Server list, select an AAA RADIUS server.
-
Click Save.
This item populates the session.radius.last.attr.class session variable.
-
-
Click the Apply Access Policy link to apply and activate the changes to the policy.
You must create a per-request policy before you can configure it in the visual policy editor.
-
On the Main tab, click Access > Profiles / Policies > Per-Request Policies.
The Per-Request Policies screen opens.
-
Click Create.
The General Properties screen opens.
-
In the Name field, type a name for the policy and click Finished.
A per-request policy name must be unique among all per-request policy and access profile names.
The policy name appears on the Per-Request Policies screen.
Important: This task specifies elements and options that are supported only on a BIG-IP system with an SWG subscription.
You configure per-request policy to control access to forward proxy with these agents: Category Lookup to categorize requests and to provide safe search results to your users; Response Analytics (after Category Lookup) to scan the output response web page for malware, if indicated, and to provide a result to the next agent; and, URL Filter Assign to determine whether to allow or block a request.
Note: This task does not specify a complete per-request policy.
-
On the Main tab, click Access > Profiles / Policies > Per-Request Policies.
The Per-Request Policies screen opens.
-
In the Name field, locate the policy that you want to update, then in the Per-Request Policy field, click the Edit link.
The visual policy editor opens in another tab.
-
On a policy branch, click the (+) icon to add an item to the policy.
The actions you can use for building a per-request policy are displayed on a popup screen with actions on tabs, such as Authentication, Classification, and General Purpose, and a search field.
-
On the Classification tab, select Category Lookup, and then click Add Item.
A popup Properties screen opens.
-
For Categorization Input, select an option based on the type of traffic to process:
- For HTTP traffic, select Use HTTP URI (cannot be used for SSL Bypass decisions). If selected, the SafeSearch Mode field displays set to Enabled.
- For SSL-encrypted traffic, select Use SNI in Client Hello (if SNI is not available, use Subject.CN) or Use Subject.CN in Server Cert. Tip: Early in the per-request policy, you can insert a Protocol Lookup agent to provide separate branches for HTTPS and HTTP traffic.
-
For Category Lookup Type, select the types of categories to look through for the URL.
- Custom categories first, then standard categories if not found - Select to look through custom categories; then, if the URL is not found, look through the standard categories that the URL database maintains.
- Always process full list of both custom and standard categories - Select to look through custom categories and standard categories.
- Process standard categories only - Select to look through standard categories only. Category Lookup compiles a list of one or more categories for the URL.
-
Click Save.
The properties screen closes. The visual policy editor displays.
-
On a branch after a Category Lookup item, add a URL Filter Assign agent and, in its properties, select a URL filter.
-
To trigger inspection of response web page contents, on a branch after a Category Lookup item and before a URL Filter Assign item, insert a Response Analytics agent and specify its properties:
-
In the Max Buffer Size field, type the number of bytes to buffer.
-
In the Max Buffer time field, type the number of seconds to retain response data in the buffer.
-
For the Reset on Failure field, retain the default value Enabled to send a TCP reset if the server fails.
Important: If Reset on Failure is enabled, the TCP reset occurs whenever the category lookup fails, for example, if the SWG URLF license expires. Clients receive no response from the server in this case and requests fail. You can configure the policy to branch on failure and specify what you want to happen (such as Allow, Reject, or specify another path).
-
For each type of content that you want to exclude from analysis, click Add new entry and then select a type from the list.
The All-Images type is on the list by default because images are not scanned.
-
Click Finished.
The popup screen closes.
-
Click Save.
The popup screen closes. The visual policy editor displays.
-
A per-request policy goes into effect when you add it to a virtual server. Depending on the forward proxy configuration, you might need to add the per-request policy to more than one virtual server.
This configuration is specific to a BIG-IP system with an SWG subscription. To use this procedure, you must already have a per-request policy configured that contains Category Lookup.
You might want to block outgoing requests to social media, particularly chat requests. To do this, you must insert two items after Category Lookup in the per-request policy: Request Analytics followed by URL Filter Assign. 
-
Open a per-request policy for editing.
-
Click the (+) icon after the Category Lookup item to add a new item.
A popup screen opens, displaying tabs such as General Purpose and Logon.
-
On the General Purpose tab, select Request Analytics and click Add Item.
The popup screen closes. A new popup screen displays the properties for the newly added item.
-
Click Save.
The popup screen closes. The newly added item displays in the per-request policy.
-
After the newly added Request Analytics item, click the (+) icon.
-
On the General Purpose tab, select URL Filter Assign and click Add Item.
-
From the URL Filter list, select a URL filter and click Save.
Note: A URL Filter Assign must follow the Request Analytics agent in addition to following the Response Analytics agent.
The resulting per-request policy might include these items on a branch: Category Lookup, Request Analytics, URL Filter Assign, Response Analytics, and URL Filter Assign.
To add per-request processing to a configuration, associate the per-request policy with the virtual server.
-
On the Main tab, click Local Traffic > Virtual Servers.
The Virtual Server List screen opens.
-
Click the name of the virtual server.
-
In the Access Policy area, from the Per-Request Policy list, select the policy that you configured earlier.
-
Click Update.
The per-request policy is now associated with the virtual server.
F5 recommends multiple virtual servers for configurations where Access Policy Manager (APM) acts as an explicit or transparent forward proxy. This table lists forward proxy configurations, the virtual servers recommended for each, and whether an access profile and per-request policy should be specified on the virtual server.
| Forward proxy | Recommended virtual servers (by purpose) | Specify access profile? | Specify per-request policy? |
|---|---|---|---|
| Explicit | Process HTTP traffic | Yes | Yes |
| Process HTTPS traffic | Yes | Yes | |
| Reject traffic other than HTTP and HTTPS | N/A | N/A | |
| Transparent Inline | Process HTTP traffic | Yes | Yes |
| Process HTTPS traffic | Only when a captive portal is also included in the configuration | Only when a captive portal is also included in the configuration | |
| Forward traffic other than HTTP and HTTPS | N/A | N/A | |
| Captive portal | Yes | No | |
| Transparent | Process HTTP traffic | Yes | Yes |
| Process HTTPS traffic | Only when a captive portal is also included in the configuration | Only when a captive portal is also included in the configuration | |
| Captive portal | Yes | No |
Note: The Response Analytics per-request policy item is for use only on a BIG-IP® system with an SWG subscription.
The Response Analytics per-request policy item makes an HTTP request and waits for the HTTP response before it completes. As a result to function properly, any policy items that rely on the information in the HTTP request or that attempt to modify the HTTP request must always precede the Response Analytics item. Specifically, the Category Lookup and HTTP Headers items must not follow a Response Analytics item.
Important: You must enforce this ordering to ensure that your per-request policy functions as you intend.
Note: Safe Search is supported only on a BIG-IP® system with an SWG subscription.
Safe Search is a search engine feature that can prevent offensive content and images from showing up in search results. Safe Search can also protect video searches on Google, Bing, and Yahoo search engines.
Safe Search can be enabled in a per-request policy using the Category Lookup item. Secure Web Gateway (SWG) with Safe Search enabled supports these search engines: Ask, Bing, DuckDuckGo, Google, Lycos, and Yahoo. Some search engines, such as Google and Yahoo, use SSL by default; in this case, Safe Search works only when SWG is configured with SSL forward proxy.
Note: For Safe Search filtering to work correctly, URLs for the supported search engine sites must not be added to a custom category. The search engine’s domain must remain categorized in the Search Engines and Portals URL category.