
Applies To:
-
BIG-IP APM
15.1.10, 15.1.9, 15.1.8, 15.1.7, 15.1.6, 15.1.5, 15.1.4, 15.1.3, 15.1.2, 15.1.1, 15.1.0


Seamless SSO: Azure with SAML and MFA
-
Creating an external IdP connector for standard authentication with Azure AD
-
Creating a local Service Provider for primary authentication with Azure AD
-
Creating the per-request policy for Azure AD with SAML and MFA
In this scenario:
-
The Microsoft identity platform is used for main authentication and for multi-factor authentication as the Identity Provider (IdP).
-
The BIG-IP that outsources authentication to the Microsoft identity platform is registered in Azure Active Directory (Azure AD) as an application with the SAML (Security Assertion Markup Language) SSO method.
-
The app (named App) is behind a BIG-IP and all the requests to the application come through a BIG-IP LTM virtual server.
-
When a user attempts to access the administrative console of App, multi-factor authentication is required.
-
All access policy actions occur in a per-request Policy, using subroutines. The main access policy exists only to create a container for the per-request policy.
-
Because the configuration occurs in a per-request Policy and subroutines, continuous client checks are possible, and occur on a periodic basis. The per-request policy also allows revalidation of the access policy items based on changing information, or, in this case, a request for a new URL.
Note: Because the configuration for items on non-F5 products can change, we provide only the details of what needs to be configured, and not the procedures for configuring those items.
In the Microsoft Azure portal, configure the items listed.
- Create a basic SAML configuration for the first application, which requires only normal authentication:
- Entity ID: this is the unique identifier of the entity. The entity is an immutable name for the entity, which is also the unique identifier of the service provider. This value must match the Entity ID of the SAML Service Provider configured on the BIG-IP. For example,
https://app.example.com/. - Reply URL (Assertion Consumer Service URL): The address (based on the app address) <app-address>/saml/sp/profile/post/acs. For example,
https://app.example.com/saml/sp/profile/post/acs.
- Entity ID: this is the unique identifier of the entity. The entity is an immutable name for the entity, which is also the unique identifier of the service provider. This value must match the Entity ID of the SAML Service Provider configured on the BIG-IP. For example,
- Download the Azure STS Metadata for the application after you have created it. In the SAML Signing Certificate area, next to Federation Metadata XML, click Download.
- Assign users and groups to the application, using the Users and Groups panel in Azure.
- Create a basic SAML configuration for the second application, which requires MFA:
- Entity ID: this is a URI, and matches the BIG-IP virtual server address for the application. For example,
https://app.example.com/admin/. - Reply URL (Assertion Consumer Service URL): The address (based on the app address) <app-address>/saml/sp/profile/post/acs. Note that this address should be the same as the address for the previous application. For example,
https://app.example.com/saml/sp/profile/post/acs.
- Entity ID: this is a URI, and matches the BIG-IP virtual server address for the application. For example,
- Download the Azure STS Metadata for the application after you have created it. In the SAML Signing Certificate area, next to Federation Metadata XML, click Download.
- Assign users and groups to the application, using the Users and Groups panel in Azure. The users and groups you configure for this application should be the same as the users and groups you configure for the first application. Only the Conditional Access policy should change.
- Create a Conditional Access policy for the app that configures multifactor authentication. This policy should include:
- The policy must specify the cloud app to which the policy applies (for example, the
https://app.example.com/admin/policy specified above). - The policy must specify the users and groups to which the policy applies.
- The policy must require multifactor authentication.
- The policy must specify the cloud app to which the policy applies (for example, the
Locate the metadata you exported from Azure AD for the non-gallery application you created for standard authentication. You will use this metadata to create the external IdP on the BIG-IP.
You create an external IdP to allow BIG-IP to work as a Service Provider with Azure AD as the Identity Provider.
-
On the Main tab, click Access > Federation > SAML Service Provider > External IdP Connectors.
-
Click the arrow next to Create, then select From Metadata.
-
Click Browse and select the metadata file you exported from Azure AD for the application with main authentication.
-
Type a Name for the Identity Provider.
-
Click OK.
Next, create the external IdP connector for multifactor authentication.
Locate the metadata you exported from Azure AD for the non-gallery application you created for multifactor authentication. You will use this metadata to create the external IdP on the BIG-IP.
You create an external IdP to allow BIG-IP to work as a Service Provider with Azure AD as the Identity Provider.
-
On the Main tab, click Access > Federation > SAML Service Provider > External IdP Connectors.
-
Click the arrow next to Create, then select From Metadata.
-
Click Browse and select the metadata file you exported from Azure AD for the application with MFA.
-
Type a Name for the Identity Provider.
-
Click OK.
Next, create local SAML Service Providers (SPs) for the main authentication and multifactor authentication.
Create the local service provider to provide the authentication object that you can reference in the SAML Auth item in the per-request policy.
-
On the Main tab, click Access > Federation > SAML Service Provider > Local SP Services.
-
Click Create.
-
Specify the app URI for the Entity ID.
For example,
https://app.example.com/. -
Select the Scheme, and specify the Host URL.
For example,
app.example.com. -
Click Security Settings.
-
Select Sign Authentication Request and select the Message Signing Private Key and Message Signing Certificate.
-
Click Advanced.
-
Select Allow Name-Identifier Creation.
-
From the list, select
urn:oasis:names:tc:SAML:1.1:nameid-format:unspecified. -
Click OK.
-
Click Bind/Unbind IdP Connectors.
-
Click Add New Row.
-
Select the IdP connector you created for the non-MFA application.
-
Click Update, then click OK.
Create the local service provider to provide the authentication object that you can reference for MFA in the SAML Auth item in the per-request policy.
-
On the Main tab, click Access > Federation > SAML Service Provider > Local SP Services.
-
Click Create.
-
Specify the app URI for the Entity ID for which you specified MFA on Azure.
For example,
https://app.example.com/admin/. -
Select the Scheme, and specify the Host URL.
For example,
app.example.com.Note: The Host field should contain the same URL as the non-MFA Service Provider.
-
Click Security Settings.
-
Select Sign Authentication Request and select the Message Signing Private Key and Message Signing Certificate.
-
Click Advanced.
-
Select Allow Name-Identifier Creation.
-
From the list, select
urn:oasis:names:tc:SAML:1.1:nameid-format:unspecified. -
Click OK.
-
Click Bind/Unbind IdP Connectors.
-
Click Add New Row.
-
Select the IdP connector you created for the MFA application.
-
Click Update, then click OK.
You create an allow-all per-session policy to provide an in and out point for your per-request policies on a virtual server.
Note: It is not required that the per-session policy that provides the in and out point for your per-request policy be empty. You can use an existing policy, or create one with per-session access policy items specifically for this purpose. However, an allow-all policy is the simplest per-session policy that will work.
-
On the Main tab, click Access > Profiles / Policies > Access Profiles (Per-Session Policies).
-
Click Create.
-
Name the access policy (for example, allow-all).
-
For the Profile Type, select All.
-
In the Language Settings section, move one or more languages to the Accepted Languages list.
-
Click Finished.
The Access Profiles (Per-Session Policies) screen is displayed.
-
In the Per-Session Policies column, click the Edit… link.
-
Change the Deny ending to Allow.
-
Save and Apply the access policy.
You now have a per-session access policy that allows all traffic, which can then be processed by the per-request access policy.
Create a virtual server for the HTTP Connector policy.
You should have created applications on your Azure AD system for main authentication and MFA. On the BIG-IP, you should have configured External Identity Providers and local Service Providers for both main authentication and MFA.
In this task, you configure the access policy that creates the traffic and event flow for the BIG-IP as a Service Provider and Azure AD as the Identitity Provider, using SAML Authentication and MFA for separate per-request policy branches.
-
On the Main tab, click Access > Profiles / Policies > Per-Request Policies.
-
Click Create.
-
Specify a Name and add one or more Accepted Languages.
-
Click Finished.
You must have a per-request policy.
Add a URL branching rule to provide branching for different URLs to allow different authentication methods.
-
From the Main tab, click Access > Profiles / Policies > Per-Request Policies.
-
Find the policy you want to edit, and in the Per-Request Policy column, click Edit.
-
Add a URL branching rule by clicking the plus symbol, then the Classification tab, then selecting URL Branching. Click Add Item.
-
Click the Branch Rules tab.
-
In the Name field, type the name of the branch for MFA. For example,
admin. -
Next to Expression: URL contains: domain.com, click Change.
-
In the URL contains field, type the URL for users who are required to use MFA. For example,
https://app.example.com/admin/*.Important: Rules are evaluated in order, so specify the most specific rule first. In this example, we specify the
<url>/admin/*rule first, because this URL requires MFA, and it is more specific than the next rule,<url>/*. If we specified the less specific rule first, all traffic would be sent to primary authentication, and MFA would not be used. -
Click Finished.
-
From Insert Before, select fallback, then click Add Branch Rule.
-
In the Name field, type the name of the branch that does not use MFA. For example,
non-admin. -
Next to Expression: Empty click change.
-
Click Add Expression.
-
From Condition, select Substring.
-
In the URL contains field, type the URL to match for all other non-MFA traffic. For example,
https://app.example.com/*.Tip: You are not required to use substring as the condition when specifying a URL. You can use equals for an exact match, prefix or suffix for prefix or suffix matching, or glob for glob matching.
-
Click Finished.
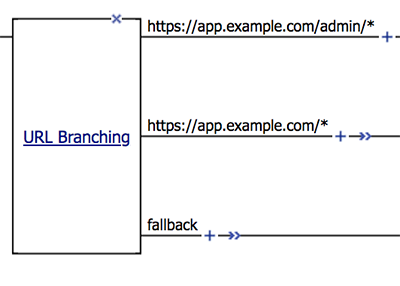
This is an example of the URL Branching access policy item configured to branch for MFA and non-MFA authentication.
You should have a per-request policy, and SAML authentication servers for authentication with and without MFA.
Create the subroutines to allow continuous checks and reauthenticate with SAML and MFA when the user goes to a specific URL.
-
From the Main tab, click Access > Profiles / Policies > Per-Request Policies.
-
Find the policy you want to edit, and in the Per-Request Policy column, click Edit.
-
In the per-request policy, click Add New Subroutine.
-
Name the subroutine for use with SAML Auth and MFA. For example,
APP Azure SAML Auth + MFA. -
Click Save.
-
Expand the subroutine, and click the plus to add a new item.
-
Click the Authentication tab, select SAML Auth, and click Add Item.
-
Select the AAA Server for SAML Authentication with MFA. For example,
/Common/app.example.com-azure-mfa. -
Click Save.
-
In the subroutine, click Edit Terminals.
-
Click Add Terminal.
-
Select the red color for the new terminal, and name the unsuccessful terminal, for example,
fail.Restriction: You cannot name the failure terminal
fallback. -
Create another subroutine for SAML Auth without MFA, name it accordingly, and for the AAA Server, select the non-MFA AAA server.
Configure the terminals in the same way.
-
On the MFA branch of the per-request policy, click the plus symbol.
-
Click the Subroutines tab, select the SAML Auth with MFA subroutine you created, and click Add Item.
-
On the non-MFA branch of the per-request policy, click the plus symbol.
-
Click the Subroutines tab, select the SAML Auth without MFA subroutine you created, and click Add Item.
-
Add any other items your per-request policy requires.
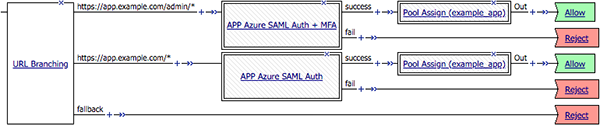
This example shows a completed per-request policy with MFA and non-MFA subroutines, assigned by URL branching. A Pool Assign macro has also been added, which assigns a static pool after authentication succeeds. The Start of the policy has been removed for image clarity.
The per-request policy is now configured.
Configure a virtual server for the application, and attach the allow-all access policy and the authentication per-request policy.
Determine the IP address you want to use to create the virtual server. This should be the same address as your application. For example, app.example.com.
Create a virtual server and attach the allow-all access policy and the per-request policy that confgures SAML Auth with Azure and MFA.
-
On the Main tab, click Local Traffic > Virtual Servers.
The Virtual Server List screen opens.
-
Click Create.
The New Virtual Server screen opens.
-
In the Name field, type a unique name for the virtual server.
-
In the Destination Address field, type the IP address you want to use for the virtual server.
This address should correspond to the address specified for your application in Microsoft Azure.
-
In the service port field, type the service port, or select the service from the list.
For example,
HTTPS. -
From HTTP Profile (Client) select an HTTP profile (typically, http).
-
In the Access Policy area, from Access Profile, select the allow-all access policy you created.
-
From Per-Request Policy, select the per-request policy you created for SAML Auth with Azure and MFA.
-
Click Finished.
You have completed configuration for SAML Auth with Azure and MFA.