
Applies To:
-
BIG-IP APM
15.1.10, 15.1.9, 15.1.8, 15.1.7, 15.1.6, 15.1.5, 15.1.4, 15.1.3, 15.1.2, 15.1.1, 15.1.0


Seamless OAuth with Okta and MFA
-
Overview of Okta with OAuth, step-up authentication, and RADIUS MFA
-
Configuring an OAuth server for APM as client and resource server
-
Creating the per-request policy for Okta with OAuth and RADIUS MFA
-
Adding a Variable Assign agent to collect the username in an OAuth MFA subroutine
-
Completing the per-request policy for Okta OAuth with RADIUS MFA
You can create a Zero Trust Identity Aware Proxy configuration using Okta and OAuth, with RADIUS MFA. For this scenario, the Zero Trust proxies are Access Policy Managers configured in Client + Resource Server configurations. APM is configured as the Authentication Server . RADIUS is used for multifactor authentication for a branch that requires more authentication (for example, and /admin URL). In this scenario the authentication server uses the Zero Trust Step-Up Authentication feature to provide seamless access across different apps.
To create a configuration for Seamless Auth with Okta, OAuth, and RADIUS MFA, you must complete the following steps.
- Create the Okta configuration
- Create an Okta OAuth provider
- Configure an OAuth client and resource server on APM
- Create an allow-all access policy and a per-request policy
- Create configuration objects in the per-request policy
- Assign the access policy and per-request policy to a virtual server
This task is completed in the Okta application. Okta configuration information may differ or change; please refer to your Okta version’s documentation for the most up-to-date information.
Create an Okta configuration to enable the BIG-IP to interact with Okta for seamless access use cases.
-
On the Okta server, click Directory > Groups > **** > ****, create a group, and add users to it.
-
Click Security > Multifactor > Okta Verify to enable Okta Verify.
-
In the Security > Multifactor area, enable the multifactor One Time Passcode (OTP) method (for example, Google Authenticator).
-
Create and add a multifactor policy for the group you have created. Click Security > Multifactor > Factor Enrollment > Add Multifactor policy, then enable Okta Verify and the other OTP method.
-
Add the rule Enroll in multi-factor - the first time a user signs in to the policy.
-
Create the RADIUS application on the Okta server with the command Applications > Create Application > RADIUS Application.
-
Configure the Port and Secret.
-
Disable the option Okta performs primary authentication.
-
Assign the group you created as the Application.
-
Configure the Okta RADIUS Agent.
-
Install the RADIUS agent on the Windows Server.
-
Specify the Okta domain during the installation, and authorize the agent in the Okta configuration.
For more information see Okta RADIUS Server Agent Deployment Best Practices.
-
-
Create an OAuth application and assign it to the group you created.
-
Set up the Okta RADIUS agent, using the instructions here: https://help.okta.com/en/prod/Content/Topics/DeploymentGuides/Radius_Server_Agent/radius-server-agent-dg.htm
-
Install the agent on a Windows server.
-
Specify the Okta doman during the installation.
-
Authorize the agent in the Okta configuration.
-
-
Add the scope
preferred_usernameto the Okta authentication server, for use later.
The Okta configuration is now configured to work with a seamless access configuration on the BIG-IP.
Assign the Okta application to users.
You must first create an Okta application.
Assign the Okta application to a user (typically yourself) to allow your user account to access the application.
-
On the Assignments tab, click Assign > Assign to People.
-
Assign the application to yourself, or another user.
For example, assign the group
test_groupto the application. The application is assigned to you, or another user you select.
Configure the Okta OAuth server and make a note of the OpenID URI to use for discovery.
OAuth Discover uses the global system DNS (not DNS resolvers) so you need to have configured a DNS remote lookup server using System > Configuration > Device > DNS to use discovery.
You can configure an Okta OAuth provider to obtain opaque tokens or JSON web tokens (JWTs) from an OAuth authorization server that supports them. When an OAuth provider supports discovery from a well-known endpoint, APM can discover JWTs and JSON web key (JWK) configurations from the provider.
Without discovery, you can still create token and key configurations in Access > Federation > JSON Web Token.
Note: APM includes preconfigured providers named AzureAD (Azure Active Directory from Microsoft), F5 (APM), Facebook, Google, Okta, and Ping (PingFederate from Ping Identity).
-
On the Main tab, click Access > Federation > OAuth Client / Resource Server > Provider.
The Provider screen opens.
-
Click Create.
-
Type the Name for the provider.
-
From the Type field, select Okta.
-
Select the Trusted Certificate Authorities.
-
Select Use Auto JWT.
-
In the OpenID URI field, specify the OpenID URI of the server.
-
Click Discover to fill in the remaining fields.
Note: This only works if you have configured a system DNS server in System > Configuration > Device > DNS.
-
Click Save.
The new Okta OAuth provider displays on the Provider screen.
You configure the OAuth servers that process requests from Access Policy Manager (APM).
Note: For APM to play the role of an OAuth client and an OAuth resource server, configure OAuth servers with Mode set to Client + Resource Server.
-
On the Main tab, click Access > Federation > OAuth Client / Resource Server > OAuth Server.
The OAuth Server screen opens.
-
Click Create.
-
In the Name field, type a name for the object.
-
From the Mode list, select Client + Resource Server.
APM can use this OAuth server to request access tokens and scope details, such as an email address for the user.
The Client Settings and Resource Server Settings areas display.
-
From the Type list, select Okta.
-
From the OAuth Provider list, select the Okta OAuth provider you defined.
-
From the DNS Resolver list, select a DNS resolver (or click the plus (+) icon, create a DNS resolver, and then select it).
-
In the Token Validation Interval field, type a number.
If you configure a per-request policy subroutine to validate the token, the subroutine repeats at this interval, or the expiry time of the access token, whichever is shorter.
-
In the Client Settings area, fill in these fields:
You should have gotten a client ID and client secret when you registered APM as a client of the OAuth authorization server.
-
In the Client ID field, type or paste the client ID.
-
In the Client Secret field, type or paste the secret.
-
From the Client’s ServerSSL Profile Name, select a server SSL profile.
-
-
In the Resource Server Settings area, fill in these fields.
You should have gotten an ID and secret from the OAuth authorization server when you registered APM with it.
Note: Social account providers supply only client ID and client secret. For social account providers, use the client ID and client secret for the client and the resource server IDs and secrets.
-
In the Resource Server ID field, type or paste the resource server ID (for an enterprise provider).
For a social provider, type or paste the client ID instead.
-
In the Resource Server Secret field, type or paste the resource server secret (for an enterprise provider).
For a social provider, type or paste the client secret instead.
-
From the Resource Server’s ServerSSL Profile Name, select a server SSL profile.
-
-
Click Finished.
The server displays on the OAuth Servers screen.
You can now select the OAuth server that you configured from the OAuth Client and OAuth Scope agents when you configure an access policy or a per-request policy.
You create an allow-all per-session policy to provide an in and out point for your per-request policies on a virtual server.
Note: It is not required that the per-session policy that provides the in and out point for your per-request policy be empty. You can use an existing policy, or create one with per-session access policy items specifically for this purpose. However, an allow-all policy is the simplest per-session policy that will work.
-
On the Main tab, click Access > Profiles / Policies > Access Profiles (Per-Session Policies).
-
Click Create.
-
Name the access policy (for example, allow-all).
-
For the Profile Type, select All.
-
In the Language Settings section, move one or more languages to the Accepted Languages list.
-
Click Finished.
The Access Profiles (Per-Session Policies) screen is displayed.
-
In the Per-Session Policies column, click the Edit… link.
-
Change the Deny ending to Allow.
-
Save and Apply the access policy.
You now have a per-session access policy that allows all traffic, which can then be processed by the per-request access policy.
Create a virtual server for the HTTP Connector policy.
You should have created applications on your Okta AD system for main authentication and MFA. On the BIG-IP, you should have configured External Identity Providers and local Service Providers for both main authentication and MFA.
In this task, you configure the access policy that creates the traffic and event flow for the BIG-IP as a Service Provider and Azure AD as the Identitity Provider, using SAML Authentication and MFA for separate per-request policy branches.
-
On the Main tab, click Access > Profiles / Policies > Per-Request Policies.
-
Click Create.
-
Specify a Name and add one or more Accepted Languages.
-
Click Finished.
You must have a per-request policy.
Add a URL branching rule to provide branching for different URLs to allow different authentication methods.
-
From the Main tab, click Access > Profiles / Policies > Per-Request Policies.
-
Find the policy you want to edit, and in the Per-Request Policy column, click Edit.
-
Add a URL branching rule by clicking the plus symbol, then the Classification tab, then selecting URL Branching. Click Add Item.
-
Click the Branch Rules tab.
-
In the Name field, type the name of the branch for MFA. For example,
admin. -
Next to Expression: URL contains: domain.com, click Change.
-
In the URL contains field, type the URL for users who are required to use MFA. For example,
https://app.example.com/admin/*.Important: Rules are evaluated in order, so specify the most specific rule first. In this example, we specify the
<url>/admin/*rule first, because this URL requires MFA, and it is more specific than the next rule,<url>/*. If we specified the less specific rule first, all traffic would be sent to primary authentication, and MFA would not be used. -
Click Finished.
-
From Insert Before, select fallback, then click Add Branch Rule.
-
In the Name field, type the name of the branch that does not use MFA. For example,
non-admin. -
Next to Expression: Empty click change.
-
Click Add Expression.
-
From Condition, select Substring.
-
In the URL contains field, type the URL to match for all other non-MFA traffic. For example,
https://app.example.com/*.Tip: You are not required to use substring as the condition when specifying a URL. You can use equals for an exact match, prefix or suffix for prefix or suffix matching, or glob for glob matching.
-
Click Finished.
This is an example of the URL Branching access policy item configured to branch for MFA and non-MFA authentication.
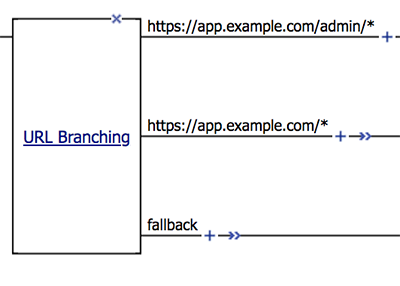
You should have a per-request policy, an OAuth authentication server for authentication with Okta, and RADIUS server for authentication with MFA.
Create the subroutines to allow continuous checks and authentication with OAuth and MFA when the user goes to a specific URL.
-
From the Main tab, click Access > Profiles / Policies > Per-Request Policies.
-
Find the policy you want to edit, and in the Per-Request Policy column, click Edit.
-
In the per-request policy, click Add New Subroutine.
-
Name the subroutine for use with OAuth and MFA. For example,
OAuth Login. -
Click Save.
-
Expand the subroutine, and click the plus to add a new item.
-
Click the Authentication tab, select OAuth Client, and click Add Item.
-
Configure the OAuth client settings for your environment.
-
Click Save.
-
On the Successful branch, click the plus to add a new item.
-
Click the Authentication tab, select OAuth Scope, and click Add Item.
-
Configure the OAuth scope settings for your environment.
-
Click Save.
-
On the Succesful branch, click the plus to add a new item.
-
Click the Assignment tab, select Variable Assign, and click Add Item.
-
Click Add new entry.
-
On the left, select Custom Variable and type
subsession.logon.last.username. -
On the right, select Session Variable and type
subsession.oauth.client.last.id_token.preferred_username. -
Specify terminals for success and fail branches.
This example shows a completed subroutine for OAuth auth.

The OAuth auth subroutine is now configured.
Configure the MFA subroutine, and add the subroutines to a per-request policy.
You should have a per-request policy, and SAML authentication servers for authentication with and without MFA.
Create the subroutines to allow continuous checks and reauthenticate with RADIUS and MFA when the user goes to a specific URL.
-
From the Main tab, click Access > Profiles / Policies > Per-Request Policies.
-
Find the policy you want to edit, and in the Per-Request Policy column, click Edit.
-
In the per-request policy, click Add New Subroutine.
-
Name the subroutine for use with OAuth and MFA. For example,
radius_mfa_okta. -
Click Save.
-
Expand the subroutine, and click the plus to add a new item.
-
Click the Assignment tab, select Variable Assign, and click Add Item.
-
Click Add new entry.
-
On the left, select Custom Variable and type
subsession.logon.last.username. -
On the right, select Session Variable and type
last.subsession.logon.last.logonname. -
Click Finished.
Configure the remaining items for the subroutine.
You should have created a subroutine with the variable assign agent to collect subsession.logon.last.username and assign it to the session variable last.subsession.logon.last.logonname. Start this task in this subroutine.
The logon page presents the user with a choice to type a onetime passcode or to get a push notification.
-
In the subroutine, after the Variable Assign agent, click the plus to add a new item.
-
On the Logon tab, click Logon Page and click Add Item.
-
Specify the following settings for the Logon Page item.
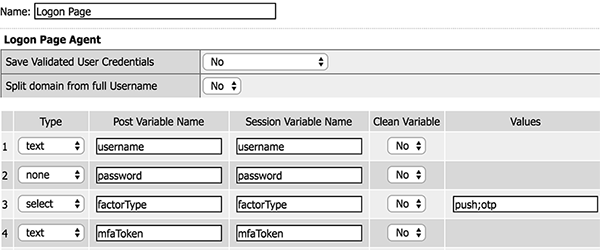
Item Type Post variable Session variable Other configuration 1 text username username 2 none password password 3 select factorType factorType Click Values and specify two options: pushandotp. Specify names for identification.4 text mfaToken mfaToken This example shows the logon page item configuration.
-
Click the Branch Rules tab and click Add Branch Rule.
-
Name the branch rule for the push notification, for example
Push Selected. -
Next to Expression: empty click change.
-
Click Advanced.
-
Type the expression for push notifications:
expr { [mcget {subsession.logon.last.factorType}] == "push" }. -
Click Finished.
-
Click Add Branch Rule.
-
Name the branch rule for the one time passcode, for example
OTP Selected. -
Next to Expression: empty click change.
-
Click Advanced.
-
Type the expression for push notifications:
expr { [mcget {subsession.logon.last.factorType}] == "otp" }. -
Click Finished.
-
Click Save.
-
- Assign success and failure terminals to the branches.
Continue with the configuration of the subroutine.
You should have created the subroutine for MFA with a variable assign agent and logon page item as previously described. This task begins in the subroutine.
Assign the variables for the push and one time passcode to provide succesful MFA in the per-request policy.
-
On the Push branch follwing the logon page items, click plus.
-
Click the Assignment tab, select Variable Assign, and click Add Item.
-
Click Add new entry.
-
On the left, select Custom Variable and type
subsession.logon.last.password. -
On the right, select Text and type
push. -
Click Finished.
-
On the OTP branch following the logon page items, click plus.
-
Click the Assignment tab, select Variable Assign, and click Add Item.
-
Click Add new entry.
-
On the left, select Custom Variable and type
subsession.logon.last.password. -
On the right, select Session Variable and type
subsession.logon.last.mfaToken. -
Click Finished.
-
Click Save.
-
On both branches, add a RADIUS Auth item, and specify the RADIUS server.
-
Add terminals for thje branches.
This example shows a completed subroutine for MFA with a one time passcode and push options.
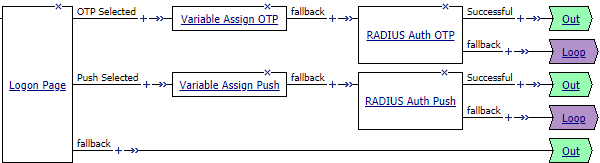
The subroutine for MFA is created.
Add the subroutine to the per-request policy.
Complete the previous tasks, including creating a per-request policy, adding a URL Branching item, and creating subroutines for Oauth authentication and MFA.
This step completes the per-request policy to provide Okta OAuth athentication with RADIUS MFA. Add OAuth subroutines to both admin and non-admin branches, and the MFA subroutine to the successful admin branch. Then add a pool to each successful branch.
-
In the main per-request policy, on the admin branch, click the plus symbol.
-
Click the Subroutines tab, select the OAuth auth subroutine you created, and click Add Item.
-
On the successful branch after the OAuth subroutine, click the plus symbol.
-
Click the Subroutines tab, select the RADIUS MFA subroutine you created, and click Add Item.
-
In the main per-request policy, on the non-admin branch, click the plus symbol.
-
Click the Subroutines tab, select the OAuth auth subroutine you created, and click Add Item.
-
Add a pool to each success branch.
-
Configure an Allow ending for each success branch.
The per-request policy is now complete.
Assign an allow-all access policy and this per-request policy to a virtual server.