
Applies To:
-
BIG-IP APM
15.1.10, 15.1.9, 15.1.8, 15.1.7, 15.1.6, 15.1.5, 15.1.4, 15.1.3, 15.1.2, 15.1.1, 15.1.0


Using HTTP Connector to Access External Servers
-
Creating an HTTP Connector Request for an external IP blocklist
-
Adding an HTTP Connector to a subroutine to check an external blocklist
-
Adding the HTTP Connector subroutine to the per-request policy
Use the HTTP Connector to post an HTTP request to an external HTTP server. This enables APM to make HTTP calls from a per-request policy without the need for an iRule, for example. The typical use for an HTTP Connector is to provide access to an external API or service. For example, you can use HTTP Connector to check a server against an external blocklist, or an external reputation engine, and then use the results in an Access Policy Manager per-request policy.
The HTTP Connector request allows for configuration flexibility with the following options.
- Security / SSL options for the request
- Choice of DNS Resolver objects
- Choice of serverSSL profile
- Transformation of HTTP response body into subsession variables in JSON format, or in plain text format
- Encoding options for input and output data (see the online help for examples)
- HTTP Basic, Token, or custom authentication types
- Encryption of secret tokens and passwords used for HTTP calls
HTTP Connector is implemented in a per-request policy.
Configure the following elements to define an HTTP Connector workflow.
-
An HTTP Transport item, to provide the connection details, including the DNS server and connection limits.
-
An HTTP Connector Request item, to define the items and queries that will be sent to the HTTP server, and how to handle the response.
-
An HTTP Connector per-request policy agent, defined in a per-request policy subroutine. The HTTP Connector per-request policy item provides access to the HTTP Connector from a specific point in the per-request policy, and provides branching logic based on the results. Multiple HTTP Connector per-request policy items can be specified, even to the same HTTP Connector Request item, for handling multiple results within the per-request policy flow.
In this example, an external API is used to validate an IP address against a blocklist. The external API is Neutrino API, and a free account can be used to test this functionality.
In the example, a request is POSTed to the API. This request includes the following information.
- The user ID (user-id) of the Neutrino API user.
- The API Key (api-key) of the Neutrino API user. Because the Neutrino API requires the administrator’s API key, we will specify this as a Custom authentication token, and reference this API key in the Request Body using a variable.
- The IP address (ip) to check against the blocklist. In this case, use the perflow variable perflow.client.ip.address to check the client’s IP against the blocklist.
As a response, the blocklist check returns a list of information about the IP address specified, as in the following example:
{
    "is-hijacked": false,
    "is-spider": false,
    "is-tor": false,
    "is-dshield": false,
    "is-vpn": false,
    "ip": "*an.ip.address*",
    "is-spyware": false,
    "is-spam-bot": false,
    "blocklists": [],
    "last-seen": 0,
    "is-bot": false,
    "sensors": [],
    "list-count": 0,
    "is-proxy": false,
    "is-malware": false,
    "is-listed": false,
    "is-exploit-bot": false
}
In the example presented, we extract the is-listed response, and if the result is true, the connection is rejected by the per-request policy.
A DNS Resolver object is required for an HTTP Connector Transport. You can select an existing resolver, or define one when you create the Connector Transport.
Create an HTTP Connector Transport to provide the DNS resolver info and connection settings for an HTTP Connector Request.
-
On the Main tab, click Access > Authentication > HTTP Connector > HTTP Connector Transport.
-
Click Create.
-
Specify a Name for the connector transport.
-
Select a DNS Resolver, or create one by clicking the plus symbol (+).
The transport uses this DNS resolver to resolve the server name specified in the HTTP Connector URL.
-
If you require encrypted communication for the connection, select a Server SSL Profile. You can create one by clicking the plus symbol (+).
If the HTTP server requires SNI (Server Name Indication), make sure that corresponding fields in the Server SSL profile referenced in the HTTP Connector Request are set correctly. The Server Name field should match the server name specified the URLfield of the HTTP Connector Request. In the Server Authentication section, Server Certificate should be set to require… and Authenticate Nameshould also match with the server name in the URL.
-
Specify the Maximum Response Size in bytes that the HTTP Connector Transport can receive.
The Maximum Response Size limit is ignored if the Response Action in the associated HTTP Connector Request is set to Ignore.
-
Specify the Timeout in seconds for the HTTP Connector Transport.
-
Click Save.
The HTTP Connector Transport is defined, and appears in the HTTP Connector Transport list.
Configure an HTTP Connector Request, and specify the transport in the configuration.
You can configure an account with Neutrino API for this example. A free account is sufficient to test the blocklist function.
Use an HTTP Connector Request to check an IP address against the Neutrino API blocked IP list.
-
On the Main tab, click Access > Authentication > HTTP Connector > HTTP Connector Request.
-
In the Name field, type a name for the HTTP Connector Request.
-
Select an HTTP Connector Transport, or click the plus symbol (+) to create one.
-
Type the URL on which the HTTP Connector Request action will occur.
For the Neutrino API blocklist, the URL is
https://neutrinoapi.com/ip-blocklist. -
In the Method field, type
POST.Neutrino API uses POST; however your external connector may require a different method.
-
Specify and configure your Authentication type and parameters. For this example, because Neutrino API uses an API key, select Custom authentication.
-
In the Token field, type or paste the API key (api-key) value for the Neutrino API account.
For example,
JsV1X4RbfCVmYPerI6324p8Cc9iKD4vbUPwLQHpsd3cO6lup3. -
In the Request Headers field, type
Content-Type: application/x-www-form-urlencoded.This entry is specific to Neutrino API; other applications may require a different header.
-
In the Request Body field, type the request body to send.
For the Neutrino API blocklist, this should be formatted as
user-id=*your-user-id*&api-key=*your-api-key\(or api-key reference\)*&ip=*the-IP-to-check-against-the-blocklist*.For example,
user-id=johndoe&api-key=%{token}&ip=%{perflow.client.ip.address}.Note: In this example, the variable token is substituted with the API key from the Token field, and the variable perflow.client.ip.address is substituted with the client’s IP address.
-
Set the Response Action to Parse.
-
Click Save.
The HTTP Connector Request for the Neutrino API blocklist is now configured.
Reference this HTTP Connector Request using the HTTP Connector access policy item in a Per-Request Policy subroutine.
You must have an HTTP Connector Request configured to add the HTTP Connector in a per-request policy.
Add and configure the HTTP Connector to a per-request policy to run a check against an external server. In this example, you check whether an IP address is listed on a blocklist (in this scenario, the Neutrino API blocklist).
-
On the Main tab, click Access > Profiles / Policies > Per-Request Policies.
The Per-Request Policies screen opens.
-
To create a new per-request policy, click Create, type a name that is unique among all access profiles and per-request policies, select the accepted languages, and click Finished.
The Per-Request Policies screen displays the new per-request policy.
-
In the Name field, locate the policy that you want to update, then in the Per-Request Policy field, click the Edit link.
The visual policy editor opens in another tab.
-
Click the Add New Subroutine button.
A popup screen opens.
-
Type a Name for the new subroutine.
For example, because this subroutine checks the IP address against a blocklist, you can specify the name
Check Blocklist. -
On the Select Subroutine template list, retain the selection Empty, and click Save.
The popup screen closes. The subroutine, with the heading [+] Subroutine: Name, displays below the main editor.
You should have created a per-request policy before you complete this task.
Add the HTTP Connector item to the Check Blocklist subroutine you created to check data against an external HTTP server. In this example, you verify that an IP address is not included on an external IP blocklist.
-
Expand the subroutine by clicking the [+] icon.
The subroutine displays.
-
Click the (+) icon anywhere in the subroutine to add a new item.
-
Click the General Purpose tab.
-
Select the HTTP Connector item, and click Add Item.
-
From HTTP Connector Request, select the HTTP connector request you configured previously.
-
Click the Branch Rules tab.
The Branch Rules screen opens.
-
Change the name of the default Successful rule.
In this case, the expression will detect that the IP addrress is not on a blocklist, so you could name this rule
IP Not Blocked, for example. -
Click the change link in the Expression area.
A popup screen opens.
-
Click the Advanced tab.
Use this tab to enter Tcl expressions.
A text input field displays.
-
In the field, type
expr {[mcget {subsession.http_connector.body.is-listed == false}, and click Finished. -
Click Edit Terminals.
A popup screen opens.
-
Click Add Terminal.
A new terminal line appears.
-
Type the name for the new terminal, for example,
Fail, and select the red color, then click Save. -
On the IP Not Blocked branch you created earlier in the subroutine, click the Out terminal.
-
Select the success terminal, for example, Success, and click Save.
-
Click Save.
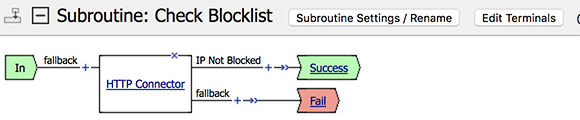
You should have created a per-request policy and the HTTP connector subroutine, configured for your application.
For this example, the application checks an IP address against an external blocklist. You add the subroutine to the per-request policy to check IP addresses.
-
Add the subroutine to the per-request policy:
-
On a per-request policy branch, click the (+) icon.
-
Select the Subroutines tab.
-
Select the subroutine and click Add Item.
The popup screen closes and the policy displays.
-
-
Click the endings to edit them for the per-request policy.
For this example, the Out (fallback) branch is actually the Success branch, and should be configured with the Allow ending. The Fail branch should be configured with a Reject ending.
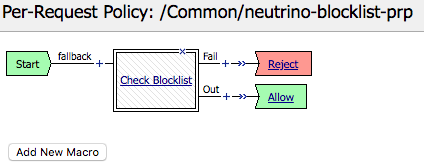
You create an allow-all per-session policy to provide an in and out point for your per-request policies on a virtual server.
Note: It is not required that the per-session policy that provides the in and out point for your per-request policy be empty. You can use an existing policy, or create one with per-session access policy items specifically for this purpose. However, an allow-all policy is the simplest per-session policy that will work.
-
On the Main tab, click Access > Profiles / Policies > Access Profiles (Per-Session Policies).
-
Click Create.
-
Name the access policy (for example, allow-all).
-
For the Profile Type, select All.
-
In the Language Settings section, move one or more languages to the Accepted Languages list.
-
Click Finished.
The Access Profiles (Per-Session Policies) screen is displayed.
-
In the Per-Session Policies column, click the Edit… link.
-
Change the Deny ending to Allow.
-
Save and Apply the access policy.
You now have a per-session access policy that allows all traffic, which can then be processed by the per-request access policy.
Create a virtual server for the HTTP Connector policy.
Determine the IP address you want to use to create the virtual server. This should be the same address as your application..
Create a virtual server and attach the allow-all access policy and the per-request policy that includes the HTTP Connector item.
-
On the Main tab, click Local Traffic > Virtual Servers.
The Virtual Server List screen opens.
-
Click Create.
The New Virtual Server screen opens.
-
In the Name field, type a unique name for the virtual server.
-
In the Destination Address field, type the IP address you want to use for the virtual server.
-
In the service port field, type the service port, or select the service from the list.
For example,
HTTPS. -
From HTTP Profile (Client) select an HTTP profile (typically, http).
-
In the Access Policy area, from Access Profile, select the allow-all access policy you created, or another policy.
-
From Per-Request Policy, select the per-request policy you created for HTTP Connector.
-
Click Finished.
You have completed the configuration for the HTTP Connector.