Updated Date: 07/07/2026
Migration of Devices Running the Same Software Version
Device migration enables you to replace the devices in a BIG-IP device group running software version 12.1.3, or later, with newer devices running the same software version. It enables you to take an existing configuration on a device group’s source device and easily replicate it on a target device.
Supported source and target platforms include appliances, VIPRION® platforms, virtual edition (VE) devices, and vCMP® guests.
Migration to newer devices running software version 12.1.3, or later, ignores the following configuration objects. If your configuration includes dependencies on any of these objects, you must reconfigure them on the new device before you load the UCS file onto that device.
Important: You must reconfigure the following objects on the new target device to use the same names as the objects on the source device, before you load the UCS file onto that device
- Interfaces
- Interface bundles
- Management IP address
- Management route
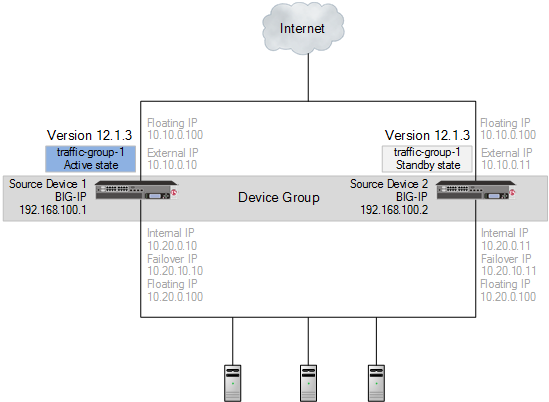
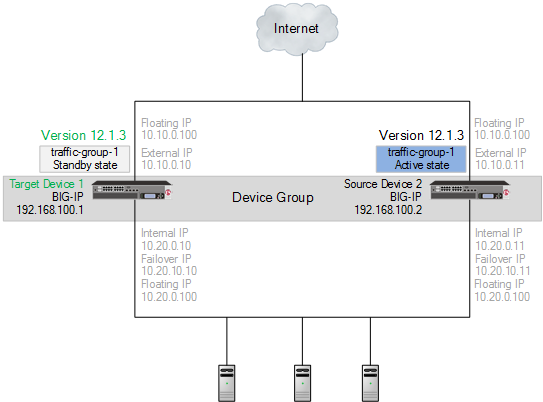
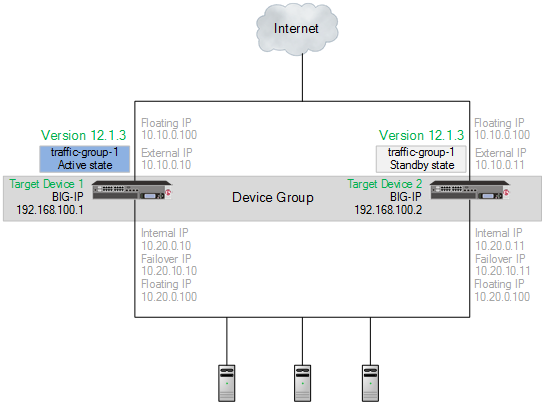
When you migrate the source devices in a device group running BIG-IP software version 12.1.3, or later, to new target devices running the same BIG-IP software version, the following sequence of steps applies. This sequence migrates a device group composed of source devices 1 and 2 to a device group composed of new target devices 1 and 2.
Important:
- For a device group, migration functionality reestablishes the device group with the target devices when you load an archive onto the second target device.
- During migration, do not make any additional configuration changes. Reconfiguration during migration can cause unexpected behavior.
- Devices run different software versions during migration, preventing normal config sync functionality until migration completes.
- Prepare each source device in the device group.
- Create and save an archive for each device.
- Download an archive file for each device.
- Force source device 1 offline, and observe that source device 2 becomes active.
- Shut down source device 1.
- Install target device 1.
- Prepare target device 1.
- Upload the source device 1 archive, and load the archive onto the target device 1.
- Force source device 2 offline, and observe that target device 1 becomes active.
- Shut down source device 2.
- Install target device 2.
- Prepare target device 2.
- Upload the source device 2 archive, and load the archive onto the target device 2, reestablishing the device group.
You can easily take an existing configuration on a source device (appliance, VIPRION®, VE, or vCMP® guest) and replicate it on a target device (appliance, VIPRION, VE, or vCMP guest). The migration process includes the following steps:
- Prepare the source device
- Archive and download the UCS file
- Shut down the source device
- Set up the target device
- Upload the archived UCS file
- Load the archived UCS file onto the target device
For a device group, the migration functionality reestablishes the device group with the target devices when you load an archive onto the second target device.
You can use these steps to prepare a source device for migration to a target device.
-
Open the Traffic Management Shell (
tmsh).tmshThis starts
tmshin interactive shell mode, and displays thetmshprompt:(tmos)#. -
Set the device master key to prompt for a password.
(tmos)# modify sys crypto master-key prompt-for-passwordTip: This master key password is used when configuring the source and target devices. You will want to remember or safely record it for configuration of source and target devices.
-
On the Main tab, click Device Management > Overview.
In the Devices area of the screen, in the Sync Status column, view the sync status of each device:
- If all devices show a sync status of green, the configurations of all device members are synchronized, and you do not need to perform a config sync operation.
- If any device shows a sync status of Changes Pending, you must synchronize the configuration on that device to the other members of the device group.
A status of
Changes Pendingfor a device indicates that the device contains recent configuration changes that have not yet been synchronized to the other members of the device group.
-
For each device, sync the configuration:
-
On the Main tab, click Device Management > Overview.
-
In the Device Groups area of the screen, in the Name column, select the name of the relevant device group.
The screen expands to show a summary and details of the sync status of the selected device group, as well as a list of the individual devices within the device group.
-
In the Devices area of the screen, in the Sync Status column, select a device.
-
From the Sync options list, select a sync option.
Option Description Sync Device to Group Select this option to synchronize the configuration of the selected device to the device group. Sync Group to Device Select this option to synchronize the configuration of the device group to the selected device. -
Click Sync.
-
The source device is prepared for migration to a target device
You can use the BIG-IP Configuration utility to create and save archives on the BIG-IP system.
Important: Any UCS file that you create includes the host name of the BIG-IP system as part of the data stored in that file. Later, when you specify this UCS file while restoring configuration data to a BIG-IP system, the host name stored in this UCS file must match the host name of the system to which you are restoring the configuration data. Otherwise, the system does not fully restore the data. Also, if your configuration data includes SSL keys and certificates, make sure to store the archive file in a secure environment.
-
Force the source device to the offline state.
-
On the Main menu, click Device Management > Devices.
-
Click the name of the source.
The device properties screen opens.
-
Click Force Offline.
The source device changes to the offline state.
Important: Once the source device changes to the offline state, ensure that traffic passes normally for all active traffic groups on the other devices.
Note: When Force Offline is enabled, make sure to manage the system using the management port or console. Connections to self IP addresses are terminated when Force Offline is enabled.
-
-
On the Main tab, click System > Archives.
The Archives screen displays a list of existing UCS files.
-
Click Create.
Note: If the Create button is unavailable, you do not have permission to create an archive. You must have the Administrator role assigned to your user account.
-
In the File Name field, type a unique file name for the archive.
F5 recommends that the file name match the name of the BIG-IP system. For example, if the name of the BIG-IP system is
bigip2, then the name of the archive file should bebigip2.ucs. -
To encrypt the archive, for the Encryption setting, select Enabled.
Note: If the Encryption setting is unavailable, you must configure the Archive Encryption setting located on the Preferences screen.
-
To include private keys, for the Private Keys setting, select Include.
Make sure to store the archive file in a secure environment.
-
Click Finished.
You can use the Configuration utility to download a copy of an archive to a management workstation. This provides an extra level of protection by preserving the configuration data on a remote system. In the unlikely event that you need to restore the data, and a BIG-IP® system event prevents you from accessing the archive in the BIG-IP system directory, you still have a backup copy of the configuration data.
-
On the Main tab, click System > Archives.
The Archives screen displays a list of existing UCS files.
-
In the File Name column, click the name of the archive that you want to view.
This displays the properties of that archive.
-
For the Archive File setting, click the Download: <filename>.ucs button.
A confirmation screen appears.
-
Click Save.
The BIG-IP system downloads a copy of the UCS file to the system from which you initiated the download.
Before you shut down a source device during the migration process, download a copy of the archive file to a management workstation.
You can shut down a BIG-IP source device, as needed, when migrating a configuration to a new target device.
-
Complete one of these steps.
- For BIG-IP software version 11.x.x, type
halt. When a message appears indicating that the device is halted, turn off the power. - For BIG-IP software version 12.0.0, and later, type
shutdown.
- For BIG-IP software version 11.x.x, type
The BIG-IP source device is shut down.
You can install a target device when migrating from an older source device to a new target device.
-
Install and license the new target device in accordance with the platform guide installation instructions for the device.
Note: When installing the new target device, use the Configuration utility to specify the same IP address, Netmask, and Management Route as the source device.
-
Provision the target device according to the provisioning of the source device.
The target device is installed, licensed, and provisioned.
You can prepare a target device for migration.
-
Open the Traffic Management Shell (
tmsh).tmshThis starts
tmshin interactive shell mode, and displays thetmshprompt:(tmos)#. -
Set the device master key to prompt for a password.
(tmos)# modify sys crypto master-key prompt-for-passwordTip: This master key password is used when configuring the source and target devices. You will want to remember or safely record it for configuration of source and target devices.
-
Save the configuration.
(tmos)# save sys config
The target device is prepared for migration.
If you previously downloaded a copy of an archive to a management workstation, you can upload that archive to the BIG-IP® system at any time. This is useful when a BIG-IP system event has occurred that has caused the archive stored on the BIG-IP system to either become unavailable or corrupted.
You can use the Configuration utility to upload a copy of an archive stored on a management workstation.
Note: When you upload a copy of an archive, you must specify the exact path name for the directory in which the downloaded archive copy is stored.
-
On the Main tab, click System > Archives.
The Archives screen displays a list of existing UCS files.
-
Click Upload.
The Upload screen opens.
-
For the File Name setting, click Browse.
-
For the Options setting, select the Overwrite existing archive file check box if you want the BIG-IP system to overwrite any existing archive file.
Note: The BIG-IP system overwrites an existing file with the uploaded file only when the name of the archive you are uploading matches the name of an archive on the BIG-IP system.
-
Click Upload.
The specified archive is now uploaded to the
/var/local/ucsdirectory on the BIG-IP system.
Migration to newer devices running software version 12.1.3, or later, ignores the following configuration objects. If your configuration includes dependencies on any of these objects, you must reconfigure them on the new device before you load the UCS file onto that device.
Important: You must reconfigure the following objects on the new target device to use the same names as the objects on the source device, before you load the UCS file onto that device
- Interfaces
- Interface bundles
- Management IP address
- Management route
You can use tmsh to load and migrate data from an archive file. The /var/local/ucs directory is the only location on the BIG-IP system from which you can migrate an archive. If no archive exists in that directory, then you cannot migrate configuration data.
Important: The host name stored in the archive file must match the host name of the target BIG-IP device; otherwise, the system does not fully migrate the data.
-
Connect to the system using the serial console.
-
Open the Traffic Management Shell (
tmsh).tmshThis starts
tmshin interactive shell mode, and displays thetmshprompt:(tmos)#. -
Load the configuration contained in a specified UCS file.
(tmos)# load sys ucs my_file.ucs platform-migrateNote: When you load the configuration for a second device in a device group, the migration functionality reestablishes the device group.
The UCS is loaded into the running configuration of the device.