Updated Date: 07/07/2026
Synchronizing Access Policies
Syncing access policies from one BIG-IP Access Policy Manager® (APM®) device to another Access Policy Manager device, or to multiple devices in a device group, allows you to maintain up-to-date access policies on multiple APM devices, while adjusting appropriate settings for objects that are specific to device locations.
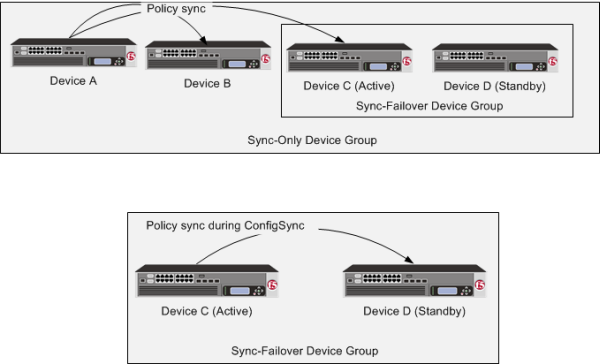
To synchronize access policies between multiple devices, you configure a Sync-Only device group that includes the devices between which you want to synchronize access policies.
Note: To add devices to a device group, the devices must all belong to the same trust domain.
For policy sync to work seamlessly, the Sync-Only device group configuration must specify an automatic type of sync. However, the process to perform a policy sync remains manual. The process involves selecting an access policy, running a sync, and resolving conflicts as needed.
To add devices to a device group, all devices must belong to the same local trust domain. If you want to sync access policies with a device that does not belong to the local trust domain, but also belongs to a Sync-Failover group, you must reset the trust between the devices and remove them from the Sync-Failover device group. (For more information, see BIG-IP Device Service Clustering: Administration on the AskF5™ web site located at http://support.f5.com/.)
After you establish device trust between your BIG-IP system and the devices, you can add them to a Sync-Failover group again.
Before you configure device trust, you should consider the following:
- Only version 11.x or later systems can join the local trust domain.
- You can manage device trust when logged in to a certificate signing authority only. You cannot manage device trust when logged in to a subordinate non-authority device.
- If you reset trust authority on a certificate signing authority by retaining the authority of the device, you must subsequently recreate the local trust domain and the device group.
- As a best practice, you should configure the ConfigSync and mirroring addresses on a device before you add that device to the trust domain.
Before you begin this task, verify that:
- Each BIG-IP device that is to be part of the local trust domain has a device certificate installed on it.
- The local device is designated as a certificate signing authority.
You perform this task to establish trust among devices on one or more network segments. Devices that trust each other constitute the local trust domain. A device must be a member of the local trust domain prior to joining a device group.
By default, the BIG-IP software includes a local trust domain with one member, which is the local device. You can choose any one of the BIG-IP devices slated for a device group and log into that device to add other devices to the local trust domain. For example, devices Bigip_1, Bigip_2, and Bigip_3 each initially shows only itself as a member of the local trust domain. To configure the local trust domain to include all three devices, you can simply log into device Bigip_1 and add devices Bigip_2 and Bigip_3 to the local trust domain; there is no need to repeat this process on devices Bigip_2 and Bigip_3.
-
On the Main tab, click Device Management > Device Trust > Device Trust Members.
-
Click Add.
-
From the Device Type list, select Peer or Subordinate.
-
Type a device IP address, administrator user name, and administrator password for the remote BIG-IP device with which you want to establish trust. The IP address you specify depends on the type of BIG-IP device:
- If the BIG-IP device is an appliance, type a management IP address (IPv4 or IPv6) for the device.
- If the BIG-IP device is a VIPRION device that is not licensed and provisioned for vCMP, type a primary cluster management IP address (IPv4 or IPv6) for the cluster.
- If the BIG-IP device is a VIPRION device that is licensed and provisioned for vCMP, then type a cluster management IP address (IPv4 or IPv6) for the guest.
- If the BIG-IP device is an Amazon Web Services EC2 device, type one of the Private IP addresses created for this EC2 instance.
-
Click Retrieve Device Information.
-
Verify that the certificate of the remote device is correct, and then click Device Certificate Matches.
-
In the Name field, verify that the name of the remote device is correct.
-
Click Add Device.
After you perform this task, the local device is now a member of the local trust domain. Also, the BIG-IP system automatically creates a special Sync-Only device group for the purpose of synchronizing trust information among the devices in the local trust domain, on an ongoing basis.
Repeat this task to specify each device that you want to add to the local trust domain.
You configure a device group with specific settings for use in synchronizing access policies across devices. You can perform this task on any BIG-IP device within the local trust domain.
Important: When you initiate the sync of an access policy to a device group, the only device groups that you can select are those configured with the settings specified in this task.
-
On the Main tab, click Device Management > Device Groups.
-
On the Device Groups list screen, click Create.
The New Device Group screen opens.
-
In the Name field, type a name for the device group.
-
From the Group Type list, select Sync-Only.
-
For the Members setting, select a host name from the Available list for each BIG-IP device that you want to include in the device group. Use the Move button to move the host name to the Includes list.
The list shows any devices that are members of the device’s local trust domain.
-
From the Sync Type list, select one of these options:
- Automatic with Incremental Sync - F5 Networks recommends that you select this option for optimal performance.
- Automatic with Full Sync
-
Click Finished.
You now have a device group that you can select when you initiate policy sync for an access policy.
After you set up a sync-only device group for your Access Policy Manager devices, you can sync a policy from one device to other devices in the group. You can perform a policy sync from any device in the group.
-
On the Main tab, click Access > Profiles / Policies > Policy Sync.
A list of policies and related sync status information opens. The sync status is either:
- Policies with no sync pending
- No synchronization is currently in progress for policies on this list.
- Policies with sync pending
- A synchronization is in progress for these policies. Select a policy from this list to view the Sync Details or Resolve Conflicts panel for it.
-
Select a policy and click the Sync Policy button.
The Policy Sync screen opens.
-
From the Device Group list, select the device group to which to sync the policy.
This list displays only Sync-Only device groups with automatic sync and full sync enabled.
-
In the Description field, type a description of the reason for the policy sync operation.
-
From the Ignore errors due to Variable Assign Agent during sync list, select whether to ignore errors caused by syncing the variable assign agent.
Note: If the policy includes a Variable Assign action, errors occur when resources are missing from the target device. If you select Yes, you might need to manually configure the resources on the target device.
-
Click Sync.
The sync process begins.
The policy is synced between devices in the device group.
Important: A policy sync operation takes 25-30 seconds, depending on the number of devices.
A BIG-IP Access Policy Manager might exist in a different physical location from another BIG-IP in the same device group, and might use different resources that are specific to that location or local network. For example, different authentication servers might exist in each location. Configure static resources to set these static resources for devices in different locations.
-
On the Main tab, click Access > Profiles / Policies > Policy Sync.
If policies are present and configured for sync, a list of policies and related sync status information opens.
-
Select a policy and click the Sync Policy button.
The Policy Sync screen opens.
-
Click the Advanced Settings button, then click Static Resources.
The list displays a name, type, and Location Specific check box for each resource. You might need to configure a location-specific resource differently on a remote system. With the Location Specific check box selected, the first time a resource is synced as part of a policy, you must resolve its configuration on the remote system. Subsequent policy sync operations do not modify a previously synced location-specific resource.
Important: Many resource types are marked as location-specific by default. If a resource is not location-specific in this configuration, clear the Location Specificcheck box.
-
Click the OK button.
The APM Policy Sync screen is displayed.
-
Click the Sync button.
The policy is synced between devices in the device group.
If this is the first time you sync a policy with location-specific resources, or you have added location-specific resources to the policy sync operation, you must resolve the location-specific issues on each affected target system.
When policies are configured with the Variable Assign action, some dynamically assigned resources might not be available on sync target machines. You can specify that such resources are included in a policy sync operation and will be created on the target devices.
-
On the Main tab, click Access > Profiles / Policies > Policy Sync.
A list of policies and related sync status information opens.
-
Select a policy and click the Sync Policy button.
The Policy Sync screen opens.
-
Click the Advanced Settings button, then click Dynamic Resources.
The list displays a name, type, Dynamic Resource, and Location Specific check box for each resource.
-
Select the dynamic resources by clicking the check boxes.
-
Click the OK button.
The APM Policy Sync screen is displayed.
-
Click the Sync button.
The policy is synced between devices in the device group.
Resolve the location-specific issues on each affected target system.
After you sync a policy, you might need to resolve conflicts on the target devices. Conflicts occur when a policy contains new location-specific resources.
-
On a target system that requires conflicts to be resolved, on the Main tab, click Access > Profiles / Policies > Policy Sync.
A list of policies and related sync status information opens.
-
From the Policies with Sync Pending list, select a policy for which you want to resolve conflicts.
If conflicts exist, the Resolve Conflicts panel displays one entry and an Unresolved link for each location-specific or dynamic resource that is in conflict.
-
Click an Unresolved link.
A popup window opens displaying two panes.
- A navigation pane with one or more groups of settings. In the navigation pane, an icon indicates that data is required.
- A data entry pane in which you can type or select values. The data entry pane displays the values from the source device, with labels for required fields asterisked (*) and filled with yellow.
-
Select a group of settings from the left pane, and type or select the required information in the right pane until you have added the required information.
You can fill in the required information only, or any other information and settings you wish to configure.
In the navigation pane, an icon indicates that required information for a group of settings is complete.
-
Click the OK button.
The popup window closes. If no more Unresolved links remain, the Finish button is active.
-
After you resolve all conflicts, click the Finish button.
Access Policy Manager creates the resolved policy on the device. After sync is completed on all target devices, sync status on the source device will be updated to Sync completed.
The Ignore errors due to Variable Assign Agent during sync setting affects system behavior only when a Variable Assign agent is included in an access policy, and the Variable Assign agent uses resources.
Important: The user name and password fields are not considered to be resources.
If you set Ignore errors due to Variable Assign Agent during sync to Yes:
- If you do not select any dynamic resources, after the policy sync completes you must create all needed resources on each target system.
- If you select the appropriate dynamic resources, after the policy sync completes, you must resolve any conflicts that exist on the target systems. If you do not select all the dynamic resources that are required, you must create them on each target system.
If you set Ignore errors due to Variable Assign Agent during sync to No:
- If you do not select any dynamic resources, an error is displayed and the policy sync does not start.
- If you select the appropriate dynamic resources, after the policy sync completes, you must resolve any conflicts that exist on the target systems.
To summarize, you now have synchronized access policies between devices in a sync-only device group.
On the Sync Details tab, you can see sync status for an access policy.
|
Column |
Description |
|---|---|
|
Device |
The specific device to which the access policy was synced. |
|
Sync Status |
One of the following: -
|
|
Status End Time |
The time at which the last status entry completed on the specific device. |
|
Sync Status Details |
More information about the Sync Status for a specific device. |
On the Sync History tab, you can see the sync history for an access policy.
| Column | Description |
|---|---|
| Last sync | The last time a sync was initiated for this access policy. |
| Last Sync Status | The outcome of the last sync for this access policy. |
| Device Group | The device group to which the access policy was synced. |
| Description | A clickable icon that presents information about the sync operation for the device group. |
| Non Location Specific Objects | An access policy was created with certain resources which the sync process indicates are not location-specific, but that might in fact be location-specific on the target device. This column lists such objects, which you can then verify by checking the objects on the remote systems, and modifying if necessary. |