Manual Chapter :
Using Edge Client for macOS
Applies To:
Show Versions
BIG-IP APM
- 21.1.0 , 17.5.0, 17.1.2, 17.1.1, 16.1.6, 16.1.5, 16.1.2, 16.1.1, 16.1.0, 16.0.1, 16.0.0, 15.1.10, 15.1.5, 15.1.4, 15.1.3, 15.1.2, 15.1.1, 15.1.0, 15.0.1, 15.0.0, 14.1.4, 14.1.3, 14.1.2, 14.1.0, 14.0.1, 14.0.0, 13.1.4, 13.1.3, 13.1.1, 13.1.0
Using Edge Client for macOS
About BIG-IP Edge Client
BIG-IP Edge Client establishes secure communications to applications and networks.
It provides users with full access to IP-based applications, resources, and intranet files as if
they were physically working on the office network.
The Edge Client for macOS quick start guide is intended for VPN client end users.
What's new in 7.2.1
Edge Client 7.2.1 supports OAuth 2.0 authentication flow for native
applications. When this feature is configured by the administrators of the BIG-IP system,
authentication is entirely performed in the browser. The user does not have to sign-in again when
accessing a web application on a browser that uses the same authentication method.
This feature also allows the use of any second factor or passwordless
authentication that is supported by the browser.
What's New in 7.1.9
The Edge Client 7.1.9 includes enhanced user experience, seamless secure
connectivity, status notifications, and much more. Some of the new changes are:
- New and improved UI
- Temporarily disconnect from the VPN without logging out
- Improved status notifications
- Auto-Connect moved to Preferences
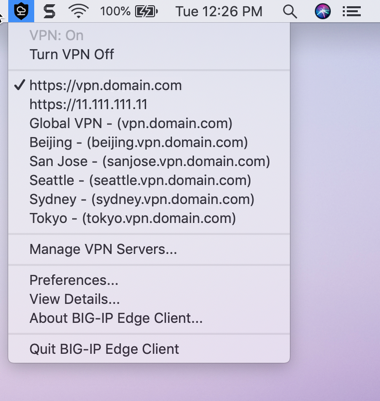
New and improved UI
The first thing that you will notice in the updated version of Edge Client is its new status
icons and the absence of the main window. After launch, the Edge Client for macOS displays a
welcome screen. Subsequent launches display a splash screen, which minimizes to the status menu
on the right end of the menu bar. You can quickly access connection options by clicking on the
Edge Client icon.
Use the
Manage VPN Servers
popup screen to add, edit, and delete
servers. The graph displaying traffic throughput is no longer available and has been
removed.Edge Client icon menu
Temporarily disconnect from the VPN without logging out
BIG-IP Edge Client's
Turn VPN Off
option now temporarily disconnects
from the VPN without logging you out. The login session remains active and allows you to
establish a VPN without the need for re-authentication when you choose to Turn VPN
On
. This feature may be used to: - Temporarily disconnect from the VPN to either print something on a printer or perform other tasks on a remote network without logging out.
- Establish a VPN quickly in high latency networks such as airplanes without going through the authentication flow.
- Switch between the corporate wifi network and public wifi network easily without re-authentication.
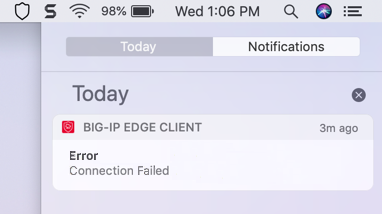
Improved status notifications
Edge Client now displays alerts instead of growl notifications to provide timely information
about an error or an auto-update. Alert appears in the top-right corner of the screen and the
Notifications pane, accessed by clicking the Notification Center icon.
Edge Client error notification
Notifications are enabled by default. Use the Preferences popup screen to disable
notifications.
Auto-Connect moved to Preferences
Edge Client's Auto-Connect lets you start a secure access connection as
needed. You can enable Auto-Connect when your administrator configures the Network Location
Awareness. Auto-Connect is disabled by default.
Edge Client preferences
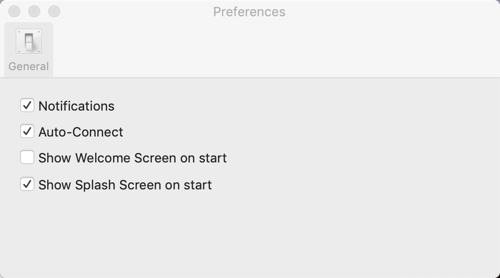
To enable auto-connect:
- From the status menu, click the Edge Client icon and then clickPreferences.
- Select theAuto-Connectcheck box.
When the computer is on an enterprise network, the client disconnects and remains active in
the status menu. In this case, the Edge Client icon menu displays the message
In
Enterprise Network
, and the Turn VPN On
option is not
available.When the computer moves outside the enterprise network, the login session remains active, and
the VPN connection establishes automatically without the need for re-authentication.
Authentication is required only when a new session is created.
Connecting to the VPN
When you connect to the VPN, you also
establish a login session. To connect to the VPN:
- From the status menu, click the Edge Client icon and then clickTurn VPN On. You can also establish VPN by clicking on the Edge Client dock icon if it is pinned to the dock. When there is no existing active session, a login screen is displayed.Edge Client for macOS login screen
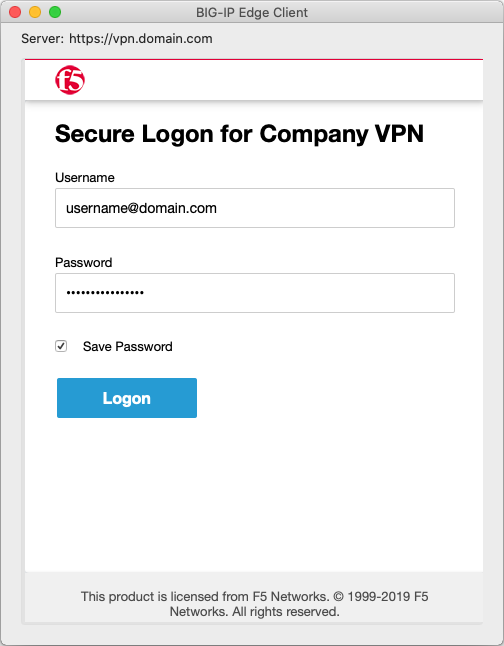
- Log in to establish a login session.
You are now logged in and connected to the
VPN.
Disconnecting from the VPN
You can disconnect from the VPN in the
following two ways:
- From the status menu, click the Edge Client icon and then clickTurn VPN Off. When you disconnect from the VPN, your session remains active. You can reconnect by clickingTurn VPN On.
- From the status menu, click the Edge Client icon and then clickQuit BIG-IP Edge Client. When you quit the application, your session ends, you are logged out, and disconnected from the VPN.
Configuring a server
BIG-IP Edge Client populates a list of all the servers available for users’ connections.
From the status menu, click the Edge Client icon and select the server to connect. Once
connected, the Edge Client connects to this server by default.
Adding and editing a server
To connect to a server that is not on the
list, add a new server using the
Manage VPN Servers
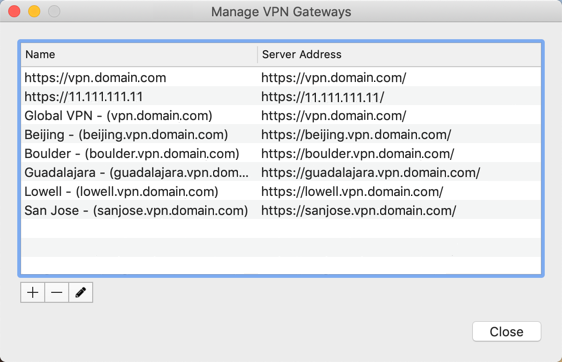
option.- From the status menu, click the Edge Client icon and then clickManage VPN Servers. The Manage VPN Gateways screen opens.Edge Client Manage VPN Gateways
- Click+. A popup screen opens where you define the server.Edge Client adding a new server
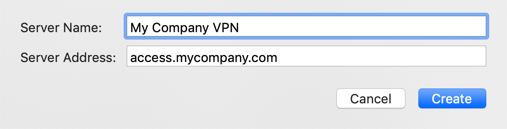
- ForServer Name, type a name for the VPN server.
- ForServer Address, type the IP address or hostname of the server. For example, https://110.11.111.11 or https://vpn.domain.com..
- ClickCreate. The server is added to the list.
- ClickClose.
To connect to the new server, from the status
menu, click the Edge Client icon and then select the server. You can edit the server
configuration later if needed by clicking
Edit
or double-clicking
the name, then making the changes, and clicking Modify
.Deleting a server
To delete a server configuration from the
list:
- From the status menu, click the Edge Client icon and then clickManage VPN Servers. The Manage VPN Gateways screen opens.
- Select the server and click-.
- In theRemove Serverpopup screen, clickContinueto confirm.
- ClickClose.
Edge Client Status Messages
This section describes the different messages displayed on
the BIG-IP Edge Client icon menu.
VPN Status Message |
Description |
|---|---|
On |
You are connected to the VPN and have an active login
session. |
Off |
You are logged out and disconnected from the VPN. To
connect, click Turn VPN On . |
Connecting |
The Edge Client is actively working to establish a
connection to the VPN servers. Make sure your network connection is working. |
Reconnecting |
The Edge Client is reconnecting to the VPN
servers. |
Off, User: Logged In |
You are disconnected from the VPN but have an active login
session. To connect, click Turn VPN On . |
In Enterprise Network |
You are connected to the LAN and have an active login
session. |
Server Not Configured |
The Edge Client is unable to establish a connection to the
VPN Servers. Contact your network administrator. |
Upgrading... |
The Edge Client is updating to the latest version. |
No Connectivity |
There is no network connectivity between the client and
the server. Verify the network connection. |
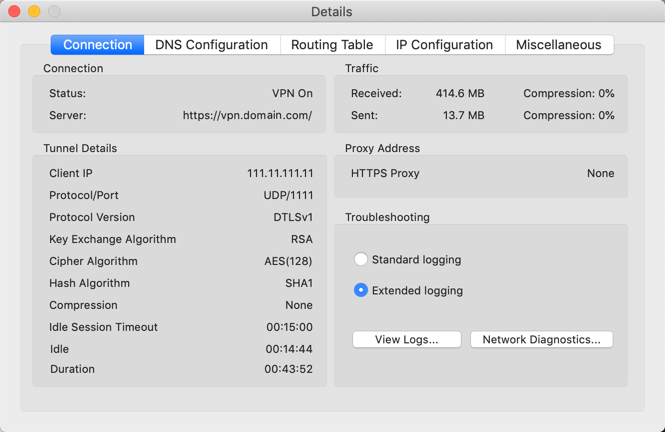
Viewing connection details
You can view the details of the VPN connection, DNS Configuration, Routing Table, IP Configuration, and other settings.
From the status menu, click the Edge Client icon and then click
View
Details
. The Details popup screen opens and displays the connection details.Edge Client details